Lerobot框架使用(含本地数据训练)
本文包含从安装环境到完整使用Lerobot框架进行算法复现全流程。lerobot框架版本5.28日之前
A Install LeRobot
安装miniconda管理python环境
Linux
mkdir -p ~/miniconda3
wget https://repo.anaconda.com/miniconda/Miniconda3-latest-Linux-x86_64.sh -O ~/miniconda3/miniconda.sh
bash ~/miniconda3/miniconda.sh -b -u -p ~/miniconda3
rm ~/miniconda3/miniconda.sh
macOS
mkdir -p ~/miniconda3
curl https://repo.anaconda.com/miniconda/Miniconda3-latest-MacOSX-arm64.sh -o ~/miniconda3/miniconda.sh
bash ~/miniconda3/miniconda.sh -b -u -p ~/miniconda3
rm ~/miniconda3/miniconda.sh
Windows command Prompt
curl https://repo.anaconda.com/miniconda/Miniconda3-latest-Windows-x86_64.exe -o .\miniconda.exe
start /wait "" .\miniconda.exe /S
del .\miniconda.exe
创建并激活conda环境
conda create -y -n lerobot python=3.10 && conda activate lerobot克隆Lerobot仓库
git clone https://github.com/huggingface/lerobot.git ~/lerobot安装飞特舵机的驱动
cd ~/lerobot && pip install -e ".[feetech]"NOTE: If you encounter build errors, you may need to install additional dependencies (cmake, build-essential, and ffmpeg libs). On Linux, run: sudo apt-get install cmake build-essential python3-dev pkg-config libavformat-dev libavcodec-dev libavdevice-dev libavutil-dev libswscale-dev libswresample-dev libavfilter-dev pkg-config.
如果你是Linux用户,还需要安装一些额外的依赖:
conda install -y -c conda-forge ffmpeg
pip uninstall -y opencv-python
conda install -y -c conda-forge "opencv>=4.10.0"
To use Weights and Biases for experiment tracking, log in with
wandb loginB 配置舵机驱动
结合UP主视频操作:B站视频
C 组装机械臂
我买的是组装好的,自己组装可参考视频4-lerobot aloha从臂机械臂的组装步骤_哔哩哔哩_bilibili
D 查找配置端口号
我们通过typeC端口链接机械臂,然后通过hub或者直接连接在电脑主机上
1.首先运行脚本
python lerobot/scripts/find_motors_bus_port.py2.在不同系统上输出不同
windows上多是COM几
linux上是/dev/ttyACM0
mac为/dev/tty.usbmodem575E0031751
3.之后按照提示指令拔出其中主臂的数据线,按enter键会输出主臂的端口号,从臂的方式同理
在linux上需要给USB端口权限
sudo chmod 666 /dev/ttyACM0
sudo chmod 666 /dev/ttyACM1
4.去文件lerobot-main\lerobot\common\robot_devices\robots\configs.py下,在大致440行处修改
@RobotConfig.register_subclass("so100")
@dataclass
class So100RobotConfig(ManipulatorRobotConfig):
    calibration_dir: str = ".cache/calibration/so100"
    # `max_relative_target` limits the magnitude of the relative positional target vector for safety purposes.
    # Set this to a positive scalar to have the same value for all motors, or a list that is the same length as
    # the number of motors in your follower arms.
    max_relative_target: int | None = None

    leader_arms: dict[str, MotorsBusConfig] = field(
        default_factory=lambda: {
            "main": FeetechMotorsBusConfig(
-                port="/dev/tty.usbmodem58760431091",
+                port="{ADD YOUR LEADER PORT}",
                motors={
                    # name: (index, model)
                    "shoulder_pan": [1, "sts3215"],
                    "shoulder_lift": [2, "sts3215"],
                    "elbow_flex": [3, "sts3215"],
                    "wrist_flex": [4, "sts3215"],
                    "wrist_roll": [5, "sts3215"],
                    "gripper": [6, "sts3215"],
                },
            ),
        }
    )

    follower_arms: dict[str, MotorsBusConfig] = field(
        default_factory=lambda: {
            "main": FeetechMotorsBusConfig(
-                port="/dev/tty.usbmodem585A0076891",
+                port="{ADD YOUR FOLLOWER PORT}",
                motors={
                    # name: (index, model)
                    "shoulder_pan": [1, "sts3215"],
                    "shoulder_lift": [2, "sts3215"],
                    "elbow_flex": [3, "sts3215"],
                    "wrist_flex": [4, "sts3215"],
                    "wrist_roll": [5, "sts3215"],
                    "gripper": [6, "sts3215"],
                },
            ),
        }
    )
E 校准机械臂
首先运行脚本
python lerobot/scripts/control_robot.py \
  --robot.type=so100 \
  --robot.cameras='{}' \
  --control.type=calibrate \
--control.arms='["main_follower"]'按照提示去进行校准,严格按照校准提示去校准,如果校准位置不对,会出现舵机发烫的现象
You will need to move the follower arm to these positions sequentially, note that the rotated position is on the right side of the robot and you have to open the gripper fully.
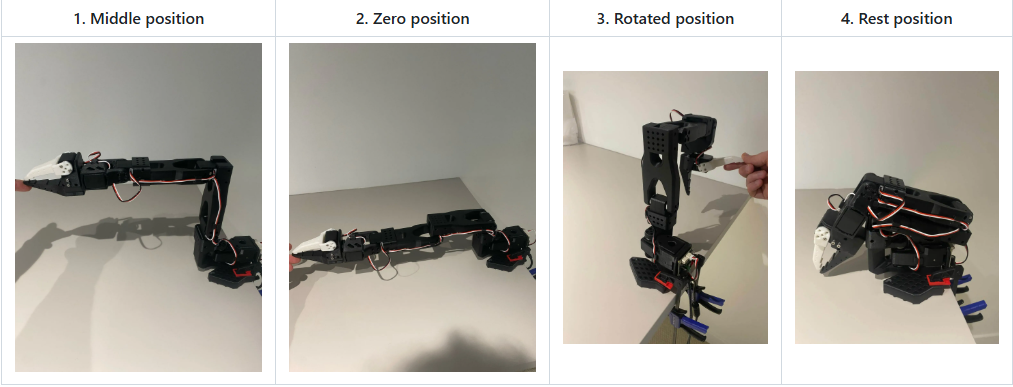
同样运行校准主臂指令
python lerobot/scripts/control_robot.py \
  --robot.type=so100 \
  --robot.cameras='{}' \
  --control.type=calibrate \
  --control.arms='["main_leader"]'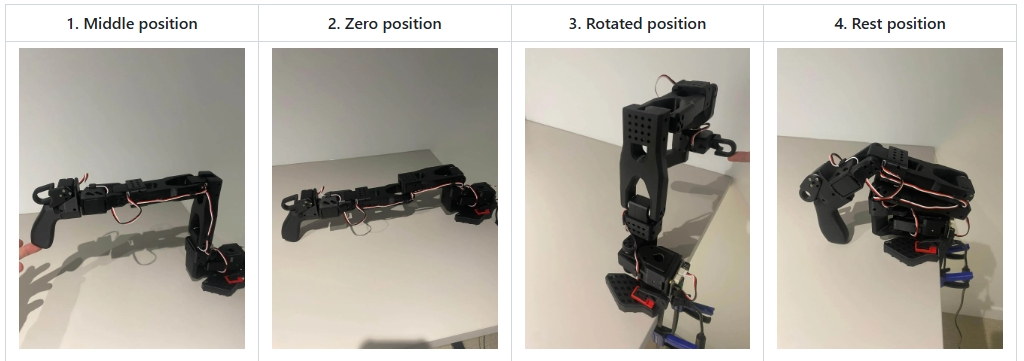
校准好的json文件会保存在根目录的.cache文件夹下,需要重新标定的话,只需要删除了重新执行脚本。
F 遥操作
先运行不带摄像头的进行简单的遥操作示例
python lerobot/scripts/control_robot.py \
  --robot.type=so100 \
  --robot.cameras='{}' \
  --control.type=teleoperate
完成基本的操作是没什么问题的,但是在进行精细操作的时候还是些许抖动,在此调整了PID参数使更加顺滑一些,在文件lerobot-main/lerobot/common/robot_devices/robots/manipulator.py下修改
# Set P_Coefficient to lower value to avoid shakiness (Default is 32)
self.follower_arms[name].write("P_Coefficient", 12)
# Set I_Coefficient and D_Coefficient to default value 0 and 32
self.follower_arms[name].write("I_Coefficient", 0)
self.follower_arms[name].write("D_Coefficient", 0)
G 配置相机并使用rerun监控相机与机械臂数据
The OpenCVCamera class allows you to efficiently record frames from most cameras using the opencv2 library. For more details on compatibility, see Video I/O with OpenCV Overview.
To instantiate an OpenCVCamera, you need a camera index (e.g. OpenCVCamera(camera_index=0)). When you only have one camera like a webcam of a laptop, the camera index is usually 0 but it might differ, and the camera index might change if you reboot your computer or re-plug your camera. This behavior depends on your operating system.
To find the camera indices, run the following utility script, which will save a few frames from each detected camera:
python lerobot/common/robot_devices/cameras/opencv.py \
    --images-dir outputs/images_from_opencv_cameras
这个脚本会在目录output下生成随机个数张图片,在此你可以寻找你的相机index一般是0或1或2等
输出类似这种
Mac or Windows detected. Finding available camera indices through scanning all indices from 0 to 60
[...]
Camera found at index 0
Camera found at index 1
[...]
Connecting cameras
OpenCVCamera(0, fps=30.0, width=1920.0, height=1080.0, color_mode=rgb)
OpenCVCamera(1, fps=24.0, width=1920.0, height=1080.0, color_mode=rgb)
Saving images to outputs/images_from_opencv_cameras
Frame: 0000        Latency (ms): 39.52
[...]
Frame: 0046        Latency (ms): 40.07
Images have been saved to outputs/images_from_opencv_cameras
再去lerobot-main\lerobot\common\robot_devices\robots\configs.py下修改相机配置,通常是配置index,还可以配置个数等等
    cameras: dict[str, CameraConfig] = field(
        default_factory=lambda: {
            "above": OpenCVCameraConfig(
                camera_index=0,
                fps=30,
                width=640,
                height=480,
            ),
            "wrist": OpenCVCameraConfig(
                camera_index=1,
                fps=30,
                width=640,
                height=480,
            ),
        }
    )
之后便可以运行
python lerobot/scripts/control_robot.py \
  --robot.type=so100 \
  --control.type=teleoperate
NOTE: To visualize the data, enable --control.display_data=true. This streams the data using rerun.
我在windows上是没有出现问题的,在linux上可能会出现ffmpeg冲突等问题,具体解决办法在github上issue上有人提出可以参考https://github.com/huggingface/lerobot/pull/883,不知道现在修复了没有。
H 记录数据集
数据传输到huggingface
这可能涉及到网络连接的问题具体配置方法如下
If you want to use the Hugging Face hub features for uploading your dataset and you haven't previously done it, make sure you've logged in using a write-access token, which can be generated from the Hugging Face settings:
huggingface-cli login --token ${HUGGINGFACE_TOKEN} --add-to-git-credentialStore your Hugging Face repository name in a variable to run these commands:
HF_USER=$(huggingface-cli whoami | head -n 1)
echo $HF_USER
记录两组数据集
python lerobot/scripts/control_robot.py \
  --robot.type=so100 \表示机械臂类型
  --control.type=record \
  --control.fps=30 \
  --control.single_task="Grasp a lego block and put it in the bin." \
  --control.repo_id=${HF_USER}/so100_test \
  --control.tags='["so100","tutorial"]' \
  --control.warmup_time_s=5 \
  --control.episode_time_s=30 \一组的时间
  --control.reset_time_s=30 \环境重置的时间
  --control.num_episodes=2 \录制两组数据
  --control.push_to_hub=true  传到huggingface hub上
记录在本地
我是把每次的数据放在了根目录的data文件夹下
其中你需要改的事repo id 还要定义root根目录不然,系统会自动把你的文件存在系统的.cache文件夹下,windows下存在c盘,linux系统,需要点击ctrl+h找到隐藏文件
之后我们为了方便录制多组数据可以将数据存在目录data/repoid下面需要修改源码
obj.root.mkdir(parents=True, exist_ok=False)改为
obj.root.mkdir(parents=True, exist_ok=True)
self.root = Path(root) if root else HF_LEROBOT_HOME / repo_id改为
self.root = Path(root/repo_id) if root else HF_LEROBOT_HOME / repo_id
运行脚本为
python lerobot/scripts/control_robot.py \
  --robot.type=so100 \
  --control.type=record \
  --control.fps=30 \
  --control.single_task="Grasp a pen." \
  --control.repo_id=robotxxx/so100_first \
  --control.root=./data \
  --control.tags='["so100","pencil"]' \
  --control.warmup_time_s=5 \
  --control.episode_time_s=12 \
  --control.reset_time_s=10 \
  --control.num_episodes=5 \
  --control.push_to_hub=false
播放可视化数据集
If you uploaded your dataset to the hub with --control.push_to_hub=true, you can visualize your dataset online by copy pasting your repo id given by:
echo ${HF_USER}/so100_test
If you didn't upload with --control.push_to_hub=false, you can also visualize it locally with (a window can be opened in the browser http://127.0.0.1:9090 with the visualization tool):
python lerobot/scripts/visualize_dataset_html.py \
  --repo-id ${HF_USER}/so100_test \
  --local-files-only 1
Now try to replay the first episode on your robot:
python lerobot/scripts/control_robot.py \
  --robot.type=so100 \
  --control.type=replay \
  --control.fps=30 \
  --control.repo_id=${HF_USER}/so100_test \
  --control.episode=0
记录期间的键盘控制
| 按键 Key | 操作 Action |
| Right Arrow | Skip to next step (exit current episode or reset phase) |
| Left Arrow | Re-record current episode |
| Escape | Stop recording entirely |
I 选择合适策略训练
  python lerobot/scripts/train.py \
  --dataset.root=./data \
  --dataset.repo_id=robotxxx/so100_act
  --policy.type=act \
  --output_dir=outputs/train/act_so100_test \
  --job_name=act_so100_test \
  --policy.device=cuda \
  --wandb.enable=true \
其中repoid对应你收集数据时候写的,如果是上传了huggingface使用
python lerobot/scripts/train.py \
  --dataset.repo_id=${HF_USER}/so100_test \
  --policy.type=act \
  --output_dir=outputs/train/act_so100_test \
  --job_name=act_so100_test \
  --policy.device=cuda \
  --wandb.enable=true
其中我们可以分析train.py文件和不同policy的config文件去改训练参数或模型参数以适配好的训练效果
-
策略配置包括:
-
模型架构参数(维度、层数等)
-
训练专用参数
-
设备规格(CPU/GPU/MPS)
-
预训练模型路径(如果从检查点加载)等
J 评估你的策略
You can use the record function from lerobot/scripts/control_robot.py but with a policy checkpoint as input. For instance, run this command to record 10 evaluation episodes:
python lerobot/scripts/control_robot.py \
  --robot.type=so100 \
  --control.type=record \
  --control.fps=30 \
  --control.single_task="Grasp a lego block and put it in the bin." \
  --control.repo_id=${HF_USER}/eval_act_so100_test \
  --control.tags='["tutorial"]' \
  --control.warmup_time_s=5 \
  --control.episode_time_s=30 \
  --control.reset_time_s=30 \
  --control.num_episodes=10 \
  --control.push_to_hub=true \
  --control.policy.path=outputs/train/act_so100_test/checkpoints/last/pretrained_model
路径记得改一下,如果没问题的话,你的机械臂应该能自己动起来执行推理任务了。

DAMO开发者矩阵,由阿里巴巴达摩院和中国互联网协会联合发起,致力于探讨最前沿的技术趋势与应用成果,搭建高质量的交流与分享平台,推动技术创新与产业应用链接,围绕“人工智能与新型计算”构建开放共享的开发者生态。
更多推荐


 36
36 0
0- 0


 已为社区贡献4条内容

所有评论(0)