C++GDI库实现高性能WPF捕获屏幕(开源 )
如题,使用C++做GDI类库来让WPF程序调用,然后捕获屏幕,至于为什么不用现成的nuget包,大多数开源的nuget包(捕获屏幕的)要么缺少维护,要么过于复杂,有没有什么简单的呢?这不就来了,ScreenCaptureWpfEasy,一个开源项目,当然除了WPF其它Windows程序也是可以调用的
先说环境,VS2022,C++20,NET8,示例程序使用了IUWM项目美化
一,C++部分
1,函数名
extern "C" [[nodiscard]] bool __cdecl CaptureFrame(
    int x, int y,
    const int width, const int height,
    uint8_t** outBuffer,
    int* outWidth, int* outHeight) noexcept
-
extern "C"保证函数名不被 C++ 修饰,便于动态调用 -
[[nodiscard]]提示“调用方应检查返回值” -
noexcept表明不会抛异常
2,统一变量
void*      pBits    = nullptr;
HBITMAP    hBitmap  = nullptr;
constexpr int bytesPerPixel = 2;
size_t     rowBytes = 0;
int        stride   = 0;
size_t     bufSize  = 0;
uint8_t*   buffer   = nullptr;
uint8_t*   srcBase  = nullptr;
struct BI16 { BITMAPINFOHEADER hdr; DWORD masks[3]; } bmi16 = {};
-
bytesPerPixel、rowBytes、stride、bufSize用于后续快速计算
3,捕获屏幕,检查DC
HDC hScreenDC = GetDC(nullptr);
if (!hScreenDC) return false;

HDC hMemDC = CreateCompatibleDC(hScreenDC);
if (!hMemDC) goto cleanup_dc;
-
GetDC(nullptr)拿到整个屏幕的设备上下文 -
CreateCompatibleDC创建与屏幕 DC 格式匹配的内存 DC,用于后续
4,准备 转入
bmi16.hdr.biSize        = sizeof(BITMAPINFOHEADER);
bmi16.hdr.biWidth       = width;
bmi16.hdr.biHeight      = -height;      // 负值:自顶向下
bmi16.hdr.biPlanes      = 1;
bmi16.hdr.biBitCount    = 16;           // 16 位 RGB565
bmi16.hdr.biCompression = BI_BITFIELDS;
bmi16.masks[0] = 0xF800;
bmi16.masks[1] = 0x07E0;
bmi16.masks[2] = 0x001F;
-
构造
BITMAPINFOHEADER并通过三个掩码指定 RGB565 的 R/G/B 分量位置 -
自顶向下 的
biHeight使像素行从上至下存储,避免出现捕获奇葩画面
5,创建 DIBSection 并执行 BitBlt
hBitmap = CreateDIBSection(
    hMemDC,
    reinterpret_cast<BITMAPINFO*>(&bmi16),
    DIB_RGB_COLORS,
    &pBits, nullptr, 0);
if (!hBitmap) goto cleanup_dc;

SelectObject(hMemDC, hBitmap);
if (!BitBlt(hMemDC, 0, 0, width, height, hScreenDC, x, y, SRCCOPY))
goto cleanup_bitmap;-
CreateDIBSection在内存中做连续像素缓冲,格式为 RGB565 -
SelectObject把该位图挂到hMemDC,再用BitBlt从屏幕 DC 拷贝指定区域到内存 DC
6,内存管理
rowBytes = size_t(width) * bytesPerPixel;
stride   = ((width * 16 + 31) / 32) * 4;
bufSize  = rowBytes * size_t(height);
srcBase  = static_cast<uint8_t*>(pBits);

buffer = static_cast<uint8_t*>(CoTaskMemAlloc(bufSize));
if (!buffer) goto cleanup_bitmap;
-
每行实际像素字节数 =
width * 2 -
DIBSection 每行实际占用字节数(含对齐填充),按 4 字节对齐
-
分配大小是
rowBytes × height
7,像素筛选
for (int row = 0; row < height; ++row) {
    std::memcpy(
        buffer + size_t(row) * rowBytes,
        srcBase + size_t(row) * stride,
        rowBytes);
}
-
遍历每行,将有意义的像素数据从
srcBase拷贝到buffer -
跳过每行末尾的填充字节,确保输出紧凑连续
8,结果输出和资源释放
*outBuffer = buffer;
*outWidth  = width;
*outHeight = height;

DeleteObject(hBitmap);
DeleteDC(hMemDC);
ReleaseDC(nullptr, hScreenDC);
return true;
-
将缓冲指针和宽高回传给调用方
-
释放 GDI 和 DC
9,错误清理
cleanup_bitmap:
    DeleteObject(hBitmap);
cleanup_dc:
    if (hMemDC)    DeleteDC(hMemDC);
    if (hScreenDC) ReleaseDC(nullptr, hScreenDC);
    return false;
-
在 DIB 创建后或 DC 创建后触发集中执行清理
二,WPF部分
1,先做个布局
<ui:Page x:Class="NavigationViewExample.Pages.HomePage"
      xmlns="http://schemas.microsoft.com/winfx/2006/xaml/presentation"
      xmlns:x="http://schemas.microsoft.com/winfx/2006/xaml"
      xmlns:mc="http://schemas.openxmlformats.org/markup-compatibility/2006"
      xmlns:d="http://schemas.microsoft.com/expression/blend/2008"
      xmlns:local="clr-namespace:NavigationViewExample.Pages"
      xmlns:ui="http://schemas.inkore.net/lib/ui/wpf/modern"
      mc:Ignorable="d"
      d:DesignHeight="450" d:DesignWidth="800"
      Title="Home" Loaded="Page_Loaded_1">
    <ui:ScrollViewerEx VerticalScrollBarVisibility="Visible">
        <Grid >
            <Image x:Name="imageAA" Margin="0,0,372,238"  />
            <Button Content="Left+" Height="36" Width="93" VerticalAlignment="Top" Click="Button_Click" />
            <Button Content="Top+" Height="36" Width="92" Margin="98,0,0,0" VerticalAlignment="Top" Click="Button_Click_1" />
            <Button Content="Width+" Height="36" Width="93" Margin="0,41,0,0" VerticalAlignment="Top" Click="Button_Click_2" />
            <Button Content="Height+" Height="36" Width="93" Margin="97,41,0,0" VerticalAlignment="Top" Click="Button_Click_3" />
            <Button Content="Left-" Height="36" Width="93" Margin="0,88,0,0" VerticalAlignment="Top" Click="Button_Click_4" />
            <Button Content="Top-" Height="36" Width="93" Margin="97,88,0,0" VerticalAlignment="Top" Click="Button_Click_5" />
            <Button Content="Width-" Height="36" Width="93" Margin="0,129,0,0" VerticalAlignment="Top" Click="Button_Click_6" />
            <Button Content="Height-" Height="36" Width="93" Margin="97,129,0,0" VerticalAlignment="Top" Click="Button_Click_7" />
        </Grid>
    </ui:ScrollViewerEx>
</ui:Page>
这样你将看到以下界面(记得安装iNKORE.UI.WPF.Modern) 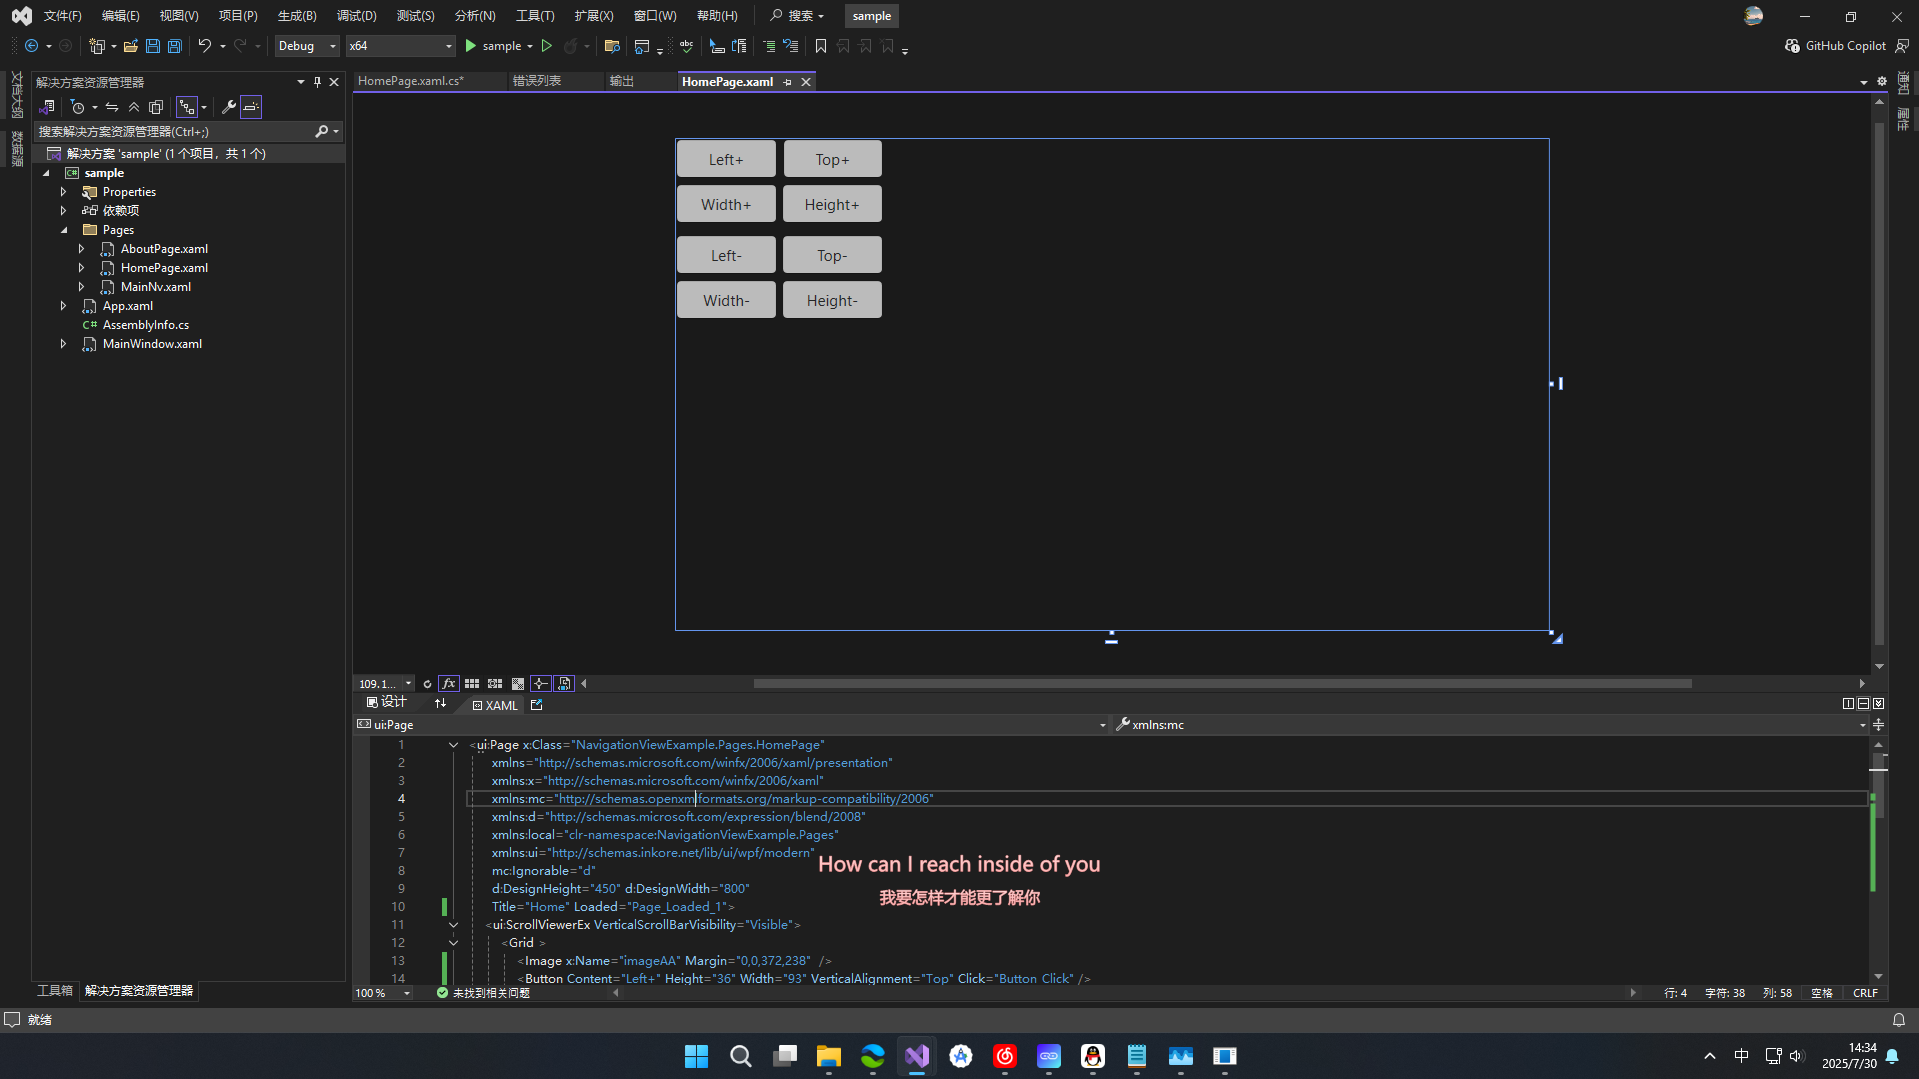
2,界面后台代码
namespace NavigationViewExample.Pages
{
    /// <summary>
    /// Interaction logic for HomePage.xaml
    /// </summary>
    public partial class HomePage : Page
    {
        public HomePage()
        {
            InitializeComponent();
        }
        private double left = 100;
        private double top  = 100;
        private double right= 100;
        private double bottom= 100;
        private string filePath="";
        private void Page_Loaded_1(object sender, RoutedEventArgs e)
        {
            string baseDir = AppDomain.CurrentDomain.BaseDirectory;
            filePath = Path.Combine(baseDir, "Appdata", "data2.txt");
            if (File.Exists(filePath))
            {
                string content = File.ReadAllText(filePath).Trim();
                var tokens = content.TrimEnd('_').Split(new[] { '_' }, StringSplitOptions.RemoveEmptyEntries);
                left = double.Parse(tokens[0], CultureInfo.InvariantCulture);
                top = double.Parse(tokens[1], CultureInfo.InvariantCulture);
                right = double.Parse(tokens[2], CultureInfo.InvariantCulture);
                bottom = double.Parse(tokens[3], CultureInfo.InvariantCulture);
                imageAA.Margin = new Thickness(left, top, right, bottom);
            }
            else
            {
                File.WriteAllText(filePath, "100_100_100_100");
                imageAA.Margin = new Thickness(left, top, right, bottom);
            }
        }

        private void Button_Click(object sender, RoutedEventArgs e)
        {
            imageAA.Margin = new Thickness(left=left+1, top, right,bottom);
            File.WriteAllText(filePath, $"{left}_{top}_{right}_{bottom}");
        }

        private void Button_Click_1(object sender, RoutedEventArgs e)
        {
            imageAA.Margin = new Thickness(left , top=top+1, right , bottom );
            File.WriteAllText(filePath, $"{left}_{top}_{right}_{bottom}");
        }

        private void Button_Click_2(object sender, RoutedEventArgs e)
        {
            imageAA.Margin = new Thickness(left , top , right = right + 1, bottom );
            File.WriteAllText(filePath, $"{left}_{top}_{right}_{bottom}");
        }

        private void Button_Click_3(object sender, RoutedEventArgs e)
        {
            imageAA.Margin = new Thickness(left, top, right , bottom = bottom + 1);
            File.WriteAllText(filePath, $"{left}_{top}_{right}_{bottom}");
        }

        private void Button_Click_4(object sender, RoutedEventArgs e)
        {
            imageAA.Margin = new Thickness(left = left - 1, top, right, bottom);
            File.WriteAllText(filePath, $"{left}_{top}_{right}_{bottom}");
        }

        private void Button_Click_5(object sender, RoutedEventArgs e)
        {
            imageAA.Margin = new Thickness(left, top = top - 1, right, bottom);
            File.WriteAllText(filePath, $"{left}_{top}_{right}_{bottom}");
        }

        private void Button_Click_6(object sender, RoutedEventArgs e)
        {
            imageAA.Margin = new Thickness(left, top, right = right - 1, bottom);
            File.WriteAllText(filePath, $"{left}_{top}_{right}_{bottom}");
        }

        private void Button_Click_7(object sender, RoutedEventArgs e)
        {
            imageAA.Margin = new Thickness(left, top, right, bottom = bottom - 1);
            File.WriteAllText(filePath, $"{left}_{top}_{right}_{bottom}");
        }
    }
}
3,做个窗口,方便选择捕获选区
<ui:Page x:Class="NavigationViewExample.Pages.HomePage"
      xmlns="http://schemas.microsoft.com/winfx/2006/xaml/presentation"
      xmlns:x="http://schemas.microsoft.com/winfx/2006/xaml"
      xmlns:mc="http://schemas.openxmlformats.org/markup-compatibility/2006"
      xmlns:d="http://schemas.microsoft.com/expression/blend/2008"
      xmlns:local="clr-namespace:NavigationViewExample.Pages"
      xmlns:ui="http://schemas.inkore.net/lib/ui/wpf/modern"
      mc:Ignorable="d"
      d:DesignHeight="450" d:DesignWidth="800"
      Title="Home" Loaded="Page_Loaded_1">
    <ui:ScrollViewerEx VerticalScrollBarVisibility="Visible">
        <Grid >
            <Image x:Name="Screenimage" Margin="0,0,372,238"  />
            <Button Content="Left+" Height="36" Width="93" VerticalAlignment="Top" Click="Button_Click" />
            <Button Content="Top+" Height="36" Width="92" Margin="98,0,0,0" VerticalAlignment="Top" Click="Button_Click_1" />
            <Button Content="Width+" Height="36" Width="93" Margin="0,41,0,0" VerticalAlignment="Top" Click="Button_Click_2" />
            <Button Content="Height+" Height="36" Width="93" Margin="97,41,0,0" VerticalAlignment="Top" Click="Button_Click_3" />
            <Button Content="Left-" Height="36" Width="93" Margin="0,88,0,0" VerticalAlignment="Top" Click="Button_Click_4" />
            <Button Content="Top-" Height="36" Width="93" Margin="97,88,0,0" VerticalAlignment="Top" Click="Button_Click_5" />
            <Button Content="Width-" Height="36" Width="93" Margin="0,129,0,0" VerticalAlignment="Top" Click="Button_Click_6" />
            <Button Content="Height-" Height="36" Width="93" Margin="97,129,0,0" VerticalAlignment="Top" Click="Button_Click_7" />
            <Button Content="选择捕获区域" Margin="46,170,0,0" VerticalAlignment="Top" Width="128" Click="Button_Click_8"/>
            <Button Content="Start" Margin="46,206,0,0" Height="34" Width="90" Click="Button_Click_9" VerticalAlignment="Top"/>
        </Grid>
    </ui:ScrollViewerEx>
</ui:Page>
后台代码太多了,这里就不放了
4,调用
        [DllImport("kernel32.dll", SetLastError = true)]// 在应用启动时设置 DLL 搜索路径
        private static extern bool SetDllDirectory(string lpPathName);
        [DllImport("ScreenCaptureWpfEasy.dll", CallingConvention = CallingConvention.Cdecl)]// 原有 P/Invoke 声明
        private static extern bool CaptureFrame(int x, int y, int width, int height, out IntPtr buffer, out int outWidth, out int outHeight);
        [DllImport("ScreenCaptureWpfEasy.dll", CallingConvention = CallingConvention.Cdecl)]
引用dll
        private static extern void FreeBuffer(IntPtr buffer);
        private int CatchLeft = 100;
        private int CatchTop = 300;
        private int CatchWidth = 900;
        private int CatchHeight = 600;
        private async Task CaptureLoopAsync()
        {
            while (_running == true)
            {
                if (!CaptureFrame(CatchLeft, CatchTop, CatchWidth, CatchHeight, out IntPtr bufPtr, out int width, out int height))
                {
                    MessageBox.Show("Capture failed");
                    return;
                }
                int stride = width * 2;
                int bufSize = height * stride;
                var bmp = BitmapSource.Create(width, height, 96, 96, PixelFormats.Bgr565, null, bufPtr, bufSize, stride);
                bmp.Freeze();
                Application.Current.Dispatcher.Invoke(() =>
                {
                    Screenimage.Source = bmp;
                });
                FreeBuffer(bufPtr);
                await Task.Delay(100);//循环间隔
            }
        }
缓存大小以及刷新频率
        private volatile bool _running = false;
        private void Button_Click_9(object sender, RoutedEventArgs e)
        {
            if (_running == false)
            {
                _running = true;
                Task.Run(CaptureLoopAsync);
                St.Content= "stop";
            }
            else
            {
                _running = false;
                St.Content = "start";
            }
        }
防止重开等
三,演示
sbcsdn,传了视频毛都没有

DAMO开发者矩阵,由阿里巴巴达摩院和中国互联网协会联合发起,致力于探讨最前沿的技术趋势与应用成果,搭建高质量的交流与分享平台,推动技术创新与产业应用链接,围绕“人工智能与新型计算”构建开放共享的开发者生态。
更多推荐


 24
 0
- 0


 已为社区贡献1条内容

所有评论(0)