【RTDETR-MM 多模态目标检测】环境搭建与基础模型训练全流程实战
一、环境准备(RTDETR-MM 多模态目标检测)
本文以 Windows + Conda + CUDA 11.8 + PyTorch 2.0.1 为例,给出一套在本地 GPU 上跑通 RTDETR-MM 多模态目标检测(RGB + IR) 的环境配置方案。
✅ 说明
-
Python 必须 ≥ 3.10(项目中大量使用了
str | None等新类型注解语法,在 3.8 下会直接报错)。 -
PyTorch 与 CUDA 版本需匹配,本文使用官方 cu118 轮子。
-
建议使用独立虚拟环境,不要在 base 环境里直接安装。
1. 创建 Conda 虚拟环境(Python 3.10)
conda create -n mm python==3.10为什么不用 3.8?
RTDETR-MM 依赖的 ultralytics、timm 等库内部使用了 Python 3.10 才支持的类型注解语法(| 联合类型),在 3.8 / 3.9 下会报类似:TypeError: unsupported operand type(s) for |: 'type' and 'NoneType'
所以建议直接按官方推荐使用 3.10。
2. 激活虚拟环境
conda activate mm3. 安装 PyTorch 2.0.1(CUDA 11.8)
如果你的显卡驱动支持 CUDA 11.8,可以直接使用 PyTorch 官方 cu118 源:
pip install torch==2.0.1 torchvision==0.15.2 torchaudio==2.0.2 --index-url https://download.pytorch.org/whl/cu1183.1 环境检查
安装完成后,建议在 Python 里做一次自检:
python - << "EOF"
import torch
print("Torch version:", torch.__version__)
print("CUDA available:", torch.cuda.is_available())
if torch.cuda.is_available():
    print("CUDA device:", torch.cuda.get_device_name(0))
EOF
若输出中:
-
Torch version: 2.0.1 -
CUDA available: True
则说明 GPU 环境已经就绪。
💡 如果你是 CPU 环境 或没有 CUDA 11.8,对应地改成安装 CPU 版或与你机器匹配的 CUDA 版本即可,这一节主要展示和 RTDETR-MM 实验一致的配置。
4. 安装项目依赖(requirements)
将 RTDETR-MM 仓库拉到本地后,在项目根目录下执行:
pip install -r requirements.txt环境安装完事后的所有库如下:
albucore               0.0.24
albumentations         2.0.8
annotated-types        0.7.0
anyio                  4.12.0
certifi                2022.12.7
charset-normalizer     2.1.1
click                  8.3.1
colorama               0.4.6
contourpy              1.3.2
cycler                 0.12.1
einops                 0.8.1
exceptiongroup         1.3.1
filelock               3.19.1
fonttools              4.61.0
fsspec                 2025.12.0
gitdb                  4.0.12
GitPython              3.1.45
grad-cam               1.5.5
h11                    0.16.0
hf-xet                 1.2.0
httpcore               1.0.9
httpx                  0.28.1
huggingface_hub        1.2.1
idna                   3.4
Jinja2                 3.1.6
joblib                 1.5.2
kiwisolver             1.4.9
MarkupSafe             2.1.5
matplotlib             3.10.7
mpmath                 1.3.0
networkx               3.3
numpy                  1.26.4
opencv-python          4.11.0.86
opencv-python-headless 4.11.0.86
packaging              25.0
pandas                 2.3.3
pillow                 11.3.0
pip                    25.3
psutil                 7.1.3
pydantic               2.12.5
pydantic_core          2.41.5
pyparsing              3.2.5
python-dateutil        2.9.0.post0
pytz                   2025.2
PyYAML                 6.0.3
requests               2.32.5
safetensors            0.7.0
scikit-learn           1.7.2
scipy                  1.15.3
seaborn                0.13.2
setuptools             80.9.0
shellingham            1.5.4
simsimd                6.5.3
six                    1.17.0
smmap                  5.0.2
stringzilla            4.4.0
sympy                  1.14.0
thop                   0.1.1.post2209072238
threadpoolctl          3.6.0
timm                   0.9.16
torch                  2.0.1+cu118
torchaudio             2.0.2+cu118
torchvision            0.15.2+cu118
tqdm                   4.67.1
ttach                  0.0.3
typer-slim             0.20.0
typing_extensions      4.15.0
typing-inspection      0.4.2
tzdata                 2025.2
urllib3                1.26.13
wheel                  0.45.1
二、基础模型训练
一、数据集目录结构
假设数据集根目录命名为 FLIR3C,目录结构如下:
FLIR3C
├── images          # RGB 图像
│   ├── train
│   └── val
├── images_ir       # 红外图像(IR)
│   ├── train
│   └── val
├── labels          # YOLO 格式标注
│   ├── train
│   └── val
│   └── train.cache (训练时自动生成,可忽略)
└── data.yaml       # 数据集配置文件
1. images/ – 可见光(RGB)图像
-
images/train/:训练集 RGB 图像 -
images/val/:验证 / 测试集 RGB 图像
文件名与标注文件、红外图像要一一对应,例如:
images/train/000123.jpg
images_ir/train/000123.jpg
labels/train/000123.txt
2. images_ir/ – 红外(IR)图像
-
images_ir/train/:训练集红外图像 -
images_ir/val/:验证 / 测试集红外图像
一般情况下,红外和 RGB 图像已经对齐,只要保证文件名完全相同即可。
3. labels/ – YOLO 格式标注
标注采用标准 YOLO txt 格式,每张图片对应一个同名 .txt 文件,例如:
labels/train/000123.txt
labels/val/000456.txt
二、data.yaml 配置文件示例
根目录下的 data.yaml 内容示例:
path: FLIR3C          # 数据集根目录(相对或绝对路径)

train: ./images/train # RGB 训练集
val: ./images/val     # RGB 验证集
test: ./images/val    # 没有独立测试集时先复用 val

modality:
  rgb: images         # RGB 图像子目录
  ir: images_ir       # 红外图像子目录

modality_used: ['rgb', 'ir']   # 启用 RGB + IR

names:
  0: person
  1: car
三、如何在训练脚本中使用
RTDETR-MM ,假设你已经安装好环境,常见的训练命令形如:
import warnings
from ultralytics import RTDETRMM

# 1. 可选:屏蔽 timm 的未来弃用警告(不影响训练,仅减少控制台噪音)
warnings.filterwarnings(
    "ignore",
    category=FutureWarning,
    message="Importing from timm.models.layers is deprecated, please import via timm.layers"
)

if __name__ == "__main__":
    # 2. 加载多模态模型配置(RGB + IR)
    #    这里使用官方提供的 yolo11n-mm-mid 配置,你也可以换成自己的 yaml
    model = RTDETRMM("ultralytics/cfg/models/rt-detr/rtdetr-r18-mm-mid.yaml")

    # 3. 启动训练
    model.train(
        data="FLIR3C/data.yaml",   # 多模态数据集配置(上一节已经编写)
        epochs=10,                 # 训练轮数,实际实验中建议 100+ 起步
        batch=4,                   # batch size,可根据显存大小调整
        imgsz=640,                 # 输入分辨率(默认 640),可与数据集分辨率统一
        device=0,                  # 指定 GPU id,CPU 训练可写 "cpu"
        workers=4,                 # dataloader 线程数(Windows 一般 0~4 比较稳)
        project="runs/mm_exp",     # 训练结果保存根目录
        name="rtdetrmm_flir3c",    # 当前实验名,对应子目录名
        # resume=True,             # 如需从中断的训练继续,可打开此项
        # patience=30,             # 早停策略,连降若干轮 mAP 不提升则停止
        # modality="X",            # 模态消融参数(默认由 data.yaml 中的 modality_used 决定)
        # cache=True,              # 启用图片缓存,加快 IO(内存足够时可打开)
    )
训练完成的结果:
  0%|          | 0/65 [00:00<?, ?it/s]
      Epoch    GPU_mem   box_loss   cls_loss   dfl_loss  Instances       Size
       1/10       1.3G      4.535      4.734      4.227          7        640: 100%|██████████| 65/65 [00:09<00:00,  7.03it/s]
                 Class     Images  Instances      Box(P          R      mAP50  mAP50-95): 100%|██████████| 7/7 [00:00<00:00,  7.50it/s]
                   all         51        484   0.000166    0.00621   0.000109   3.01e-05

      Epoch    GPU_mem   box_loss   cls_loss   dfl_loss  Instances       Size
       2/10       1.3G      4.259       4.28      3.908          2        640: 100%|██████████| 65/65 [00:07<00:00,  9.20it/s]
                 Class     Images  Instances      Box(P          R      mAP50  mAP50-95): 100%|██████████| 7/7 [00:00<00:00, 11.86it/s]
                   all         51        484   0.000204    0.00776   0.000117   2.82e-05

      Epoch    GPU_mem   box_loss   cls_loss   dfl_loss  Instances       Size
       3/10       1.3G      3.969      3.797      3.445          8        640: 100%|██████████| 65/65 [00:06<00:00,  9.33it/s]
                 Class     Images  Instances      Box(P          R      mAP50  mAP50-95): 100%|██████████| 7/7 [00:00<00:00,  9.79it/s]
                   all         51        484     0.0054     0.0109    0.00269   0.000565

      Epoch    GPU_mem   box_loss   cls_loss   dfl_loss  Instances       Size
       4/10       1.3G      3.674      3.484      3.145         11        640: 100%|██████████| 65/65 [00:06<00:00,  9.33it/s]
                 Class     Images  Instances      Box(P          R      mAP50  mAP50-95): 100%|██████████| 7/7 [00:00<00:00,  7.17it/s]
                   all         51        484      0.507     0.0171    0.00298   0.000793

      Epoch    GPU_mem   box_loss   cls_loss   dfl_loss  Instances       Size
       5/10       1.3G      3.551      3.282      3.007          8        640: 100%|██████████| 65/65 [00:06<00:00,  9.31it/s]
                 Class     Images  Instances      Box(P          R      mAP50  mAP50-95): 100%|██████████| 7/7 [00:00<00:00,  8.14it/s]
                   all         51        484      0.537     0.0559     0.0228    0.00555

      Epoch    GPU_mem   box_loss   cls_loss   dfl_loss  Instances       Size
       6/10       1.3G      3.379       3.12        2.9         11        640: 100%|██████████| 65/65 [00:06<00:00,  9.30it/s]
                 Class     Images  Instances      Box(P          R      mAP50  mAP50-95): 100%|██████████| 7/7 [00:00<00:00,  9.81it/s]
                   all         51        484      0.215      0.259     0.0475     0.0138
  0%|          | 0/65 [00:00<?, ?it/s]
      Epoch    GPU_mem   box_loss   cls_loss   dfl_loss  Instances       Size
       7/10       1.3G      3.225      2.927      2.753         11        640: 100%|██████████| 65/65 [00:07<00:00,  9.24it/s]
                 Class     Images  Instances      Box(P          R      mAP50  mAP50-95): 100%|██████████| 7/7 [00:00<00:00, 10.93it/s]
                   all         51        484       0.16      0.291     0.0881     0.0284
  0%|          | 0/65 [00:00<?, ?it/s]
      Epoch    GPU_mem   box_loss   cls_loss   dfl_loss  Instances       Size
       8/10       1.3G      3.082      2.762      2.659          8        640: 100%|██████████| 65/65 [00:06<00:00,  9.32it/s]
                 Class     Images  Instances      Box(P          R      mAP50  mAP50-95): 100%|██████████| 7/7 [00:00<00:00, 11.25it/s]
                   all         51        484      0.204      0.209      0.132     0.0388

      Epoch    GPU_mem   box_loss   cls_loss   dfl_loss  Instances       Size
       9/10       1.3G      2.978      2.687      2.603          6        640: 100%|██████████| 65/65 [00:07<00:00,  9.12it/s]
                 Class     Images  Instances      Box(P          R      mAP50  mAP50-95): 100%|██████████| 7/7 [00:00<00:00, 11.51it/s]
                   all         51        484      0.314      0.273      0.211     0.0664
  0%|          | 0/65 [00:00<?, ?it/s]
      Epoch    GPU_mem   box_loss   cls_loss   dfl_loss  Instances       Size
      10/10       1.3G      2.966      2.581      2.575         16        640: 100%|██████████| 65/65 [00:07<00:00,  9.18it/s]
                 Class     Images  Instances      Box(P          R      mAP50  mAP50-95): 100%|██████████| 7/7 [00:00<00:00, 11.02it/s]
                   all         51        484      0.364      0.242      0.218     0.0724

10 epochs completed in 0.036 hours.
Optimizer stripped from runs\mm_exp\rtdetrmm_flir3c\weights\last.pt, 23.6MB
Optimizer stripped from runs\mm_exp\rtdetrmm_flir3c\weights\best.pt, 23.6MB

Validating runs\mm_exp\rtdetrmm_flir3c\weights\best.pt...
Ultralytics 8.3.163  Python-3.10.0 torch-2.0.1+cu118 |  v1 CUDA:0 (NVIDIA GeForce RTX 3060 Laptop GPU, 6144MiB)
YOLO11n-mm-mid summary (fused): 176 layers, 4,964,246 parameters, 0 gradients, 11.0 GFLOPs
6YOLOwarmup (RGB:3 + X:3)
                 Class     Images  Instances      Box(P          R      mAP50  mAP50-95): 100%|██████████| 7/7 [00:02<00:00,  2.50it/s]
                   all         51        484      0.369      0.241      0.218     0.0725
                person         51        322      0.418      0.254      0.234     0.0663
                   car         51        162      0.319      0.228      0.202     0.0786
Speed: 9.5ms preprocess, 14.1ms inference, 0.0ms loss, 6.8ms postprocess per image
Results saved to runs\mm_exp\rtdetrmm_flir3c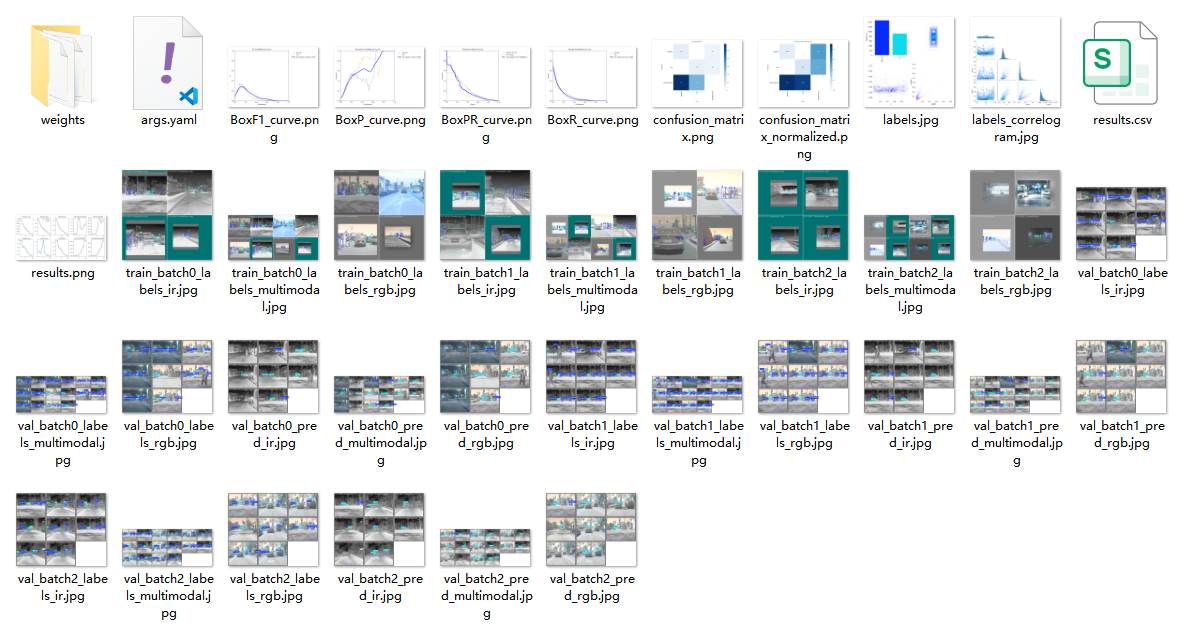
四、如何在测试脚本中使用
import warnings
from ultralytics import RTDETRMM

# 1. 可选:屏蔽 timm 的 FutureWarning,避免控制台刷屏
warnings.filterwarnings(
    "ignore",
    category=FutureWarning,
    message="Importing from timm.models.layers is deprecated, please import via timm.layers"
)

if __name__ == "__main__":
    # 2. 加载训练好的多模态权重
    #    这里使用上一节训练生成的 best.pt
    model = RTDETRMM("runs/mm_exp/rtdetrmm_flir3c/weights/best.pt")

    # 3. 准备一组多模态输入(RGB + IR)
    #    ⚠ 路径示例请根据自己的数据集调整
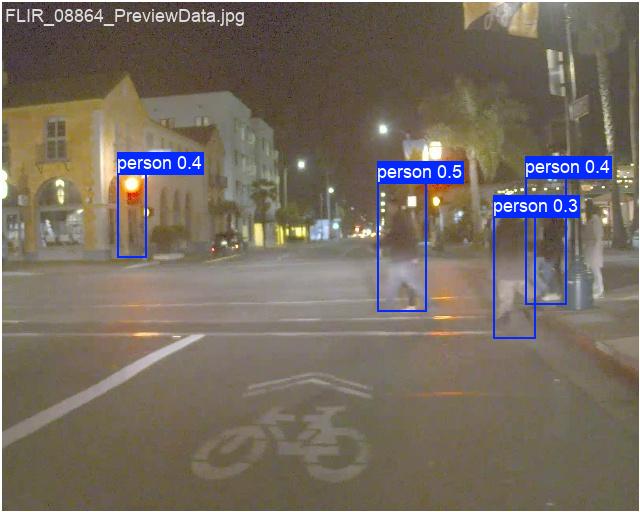
    rgb_path = "FLIR3C/images/train/FLIR_08864_PreviewData.jpg"
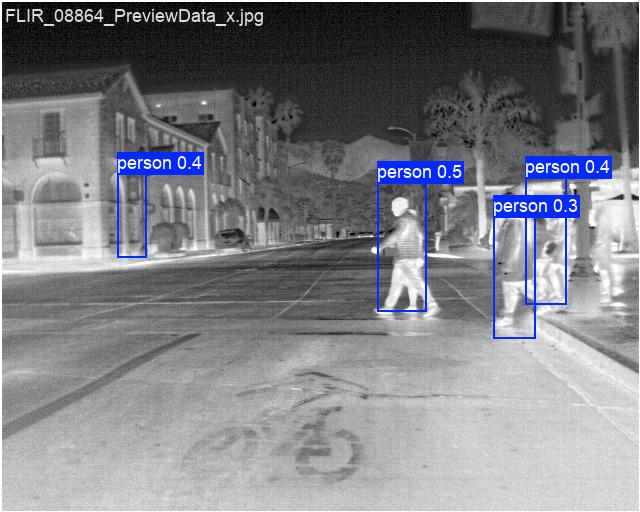
    ir_path  = "FLIR3C/images_ir/train/FLIR_08864_PreviewData.jpg"

    print("=== 多模态(RGB + IR)推理示例 ===")
    results = model.predict(
        [rgb_path, ir_path],  # 注意:列表顺序需与 data.yaml 中 modality_used 对应
        imgsz=640,            # 推理分辨率,需与训练设置大致一致
        conf=0.25,            # 置信度阈值
        iou=0.45,             # NMS IoU 阈值
        device=0,             # 指定 GPU,CPU 推理时可改为 "cpu"
        save=True,            # 保存带框可视化结果
        save_txt=False,       # 如需导出 txt 结果,可设为 True
        save_conf=True,       # 在 txt 中同时保存置信度
        max_det=300,          # 单张图最大检测目标数
    )
三、总结
本文基于 RTDETR-MM 给出了一个完整的多模态目标检测实战流程,主要包括:
1. **环境搭建**:在 Python 3.10 + PyTorch 2.0.1 + CUDA 11.8 的前提下,构建独立的 `mm` 虚拟环境,避免了低版本 Python 导致的类型注解报错问题。
2. **多模态数据集准备**:以 FLIR3C 为例,统一组织 `images / images_ir / labels` 目录,并通过 `data.yaml` 中的 `modality` 与 `modality_used` 完成 RGB + IR 的多模态配置。
3. **模型训练**:使用 `YOLOMM` 接口加载多模态模型配置,完成 RTDETR-MM 的端到端训练,并保存最优权重 `best.pt`。
4. **推理与可视化**:基于训练得到的权重,对 RGB + IR 图像进行多模态联合推理,并保存检测可视化结果,用于分析多模态在低光/夜间场景下的优势。
后续可以进一步开展的工作包括但不限于:
- 单模态(仅 RGB 或仅 IR)与多模态的对比实验(mAP、FPS 等维度);
- 引入更大规模的骨干网络或更高输入分辨率,探索精度上限;
- 在自定义工业场景数据集上迁移 RTDETR-MM,多模态提升检测鲁棒性。
如果这篇文章对你有帮助,欢迎点赞、收藏,也可以在评论区交流你在多模态检测实战中的坑和经验。

DAMO开发者矩阵,由阿里巴巴达摩院和中国互联网协会联合发起,致力于探讨最前沿的技术趋势与应用成果,搭建高质量的交流与分享平台,推动技术创新与产业应用链接,围绕“人工智能与新型计算”构建开放共享的开发者生态。
更多推荐



 31
31 0
0- 0


 已为社区贡献23条内容

所有评论(0)