(目标检测+颜色识别)VS2026+QT6.9+opencv+yolov11+onnxruntime1.16(详细解释)
目录
1.前提环境
本次项目使用YOLO11对目标进行检测,颜色识别,具体实现了基于 YOLOv11 分割模型 的 Qt 可视化应用,核心功能是加载图像并自动完成目标检测、实例分割,同时提取分割区域的次要颜色并可视化展示。
需要的前提环境是可以正常在VS里跑QT程序,如果没有配好可以参考(最新)VS2026+QT3.9安装教程,这篇教程教的很详细。
2.介绍
YOLOv11 是 Ultralytics 团队在 YOLO 系列基础上推出的最新目标检测模型。支持目标检测、实例分割、姿态估计等多种任务,统一的模型架构降低了多任务部署的复杂度,适合复杂场景下的综合感知需求,YOLOv11只在训练模型时需要使用到,而本次的项目是使用模型,不需要安装YOLOv11。
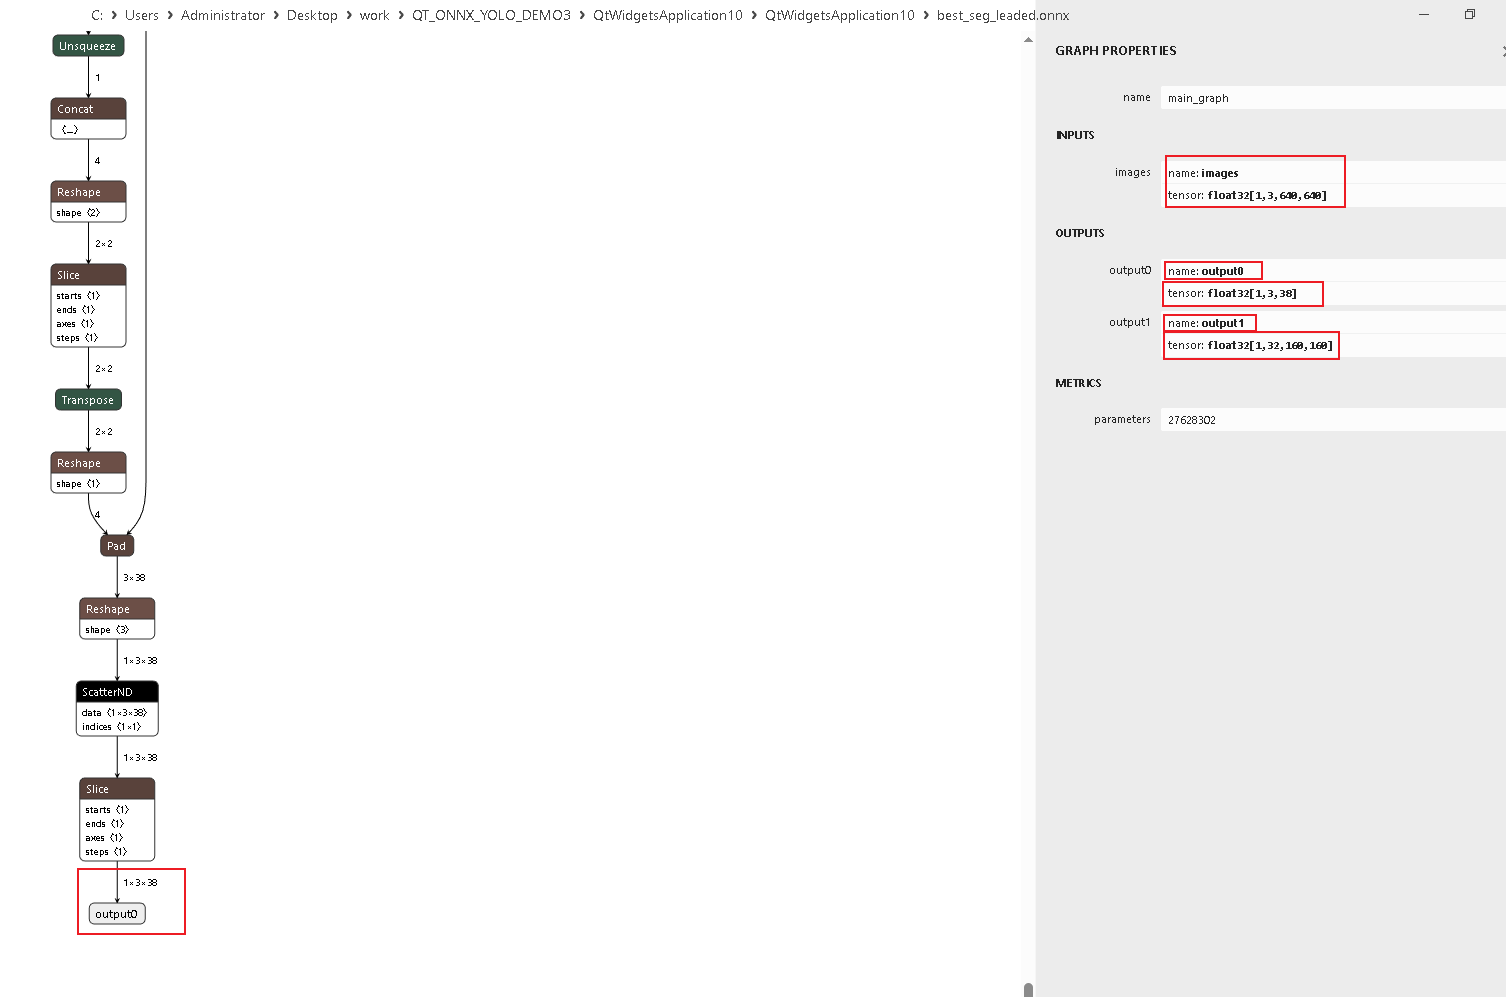
ONNX Runtime 是一款跨平台、高性能的推理引擎,专为运行 ONNX 格式的模型设计。本次项目的模型在python训练得出.pt模型,后转为.onnx模型。而onnx模型文件可通过netron.app查看。
代码运行模型能否运行模型重点需要注意的参数是模型的输入与输出。输入可以在模型训练时调整,它决定了需要传入的图像大小等信息,而输出决定了要使用什么样的格式才能去使用这个模型,如果有自己训练的模型请注意下面这些参数。

二. 库下载
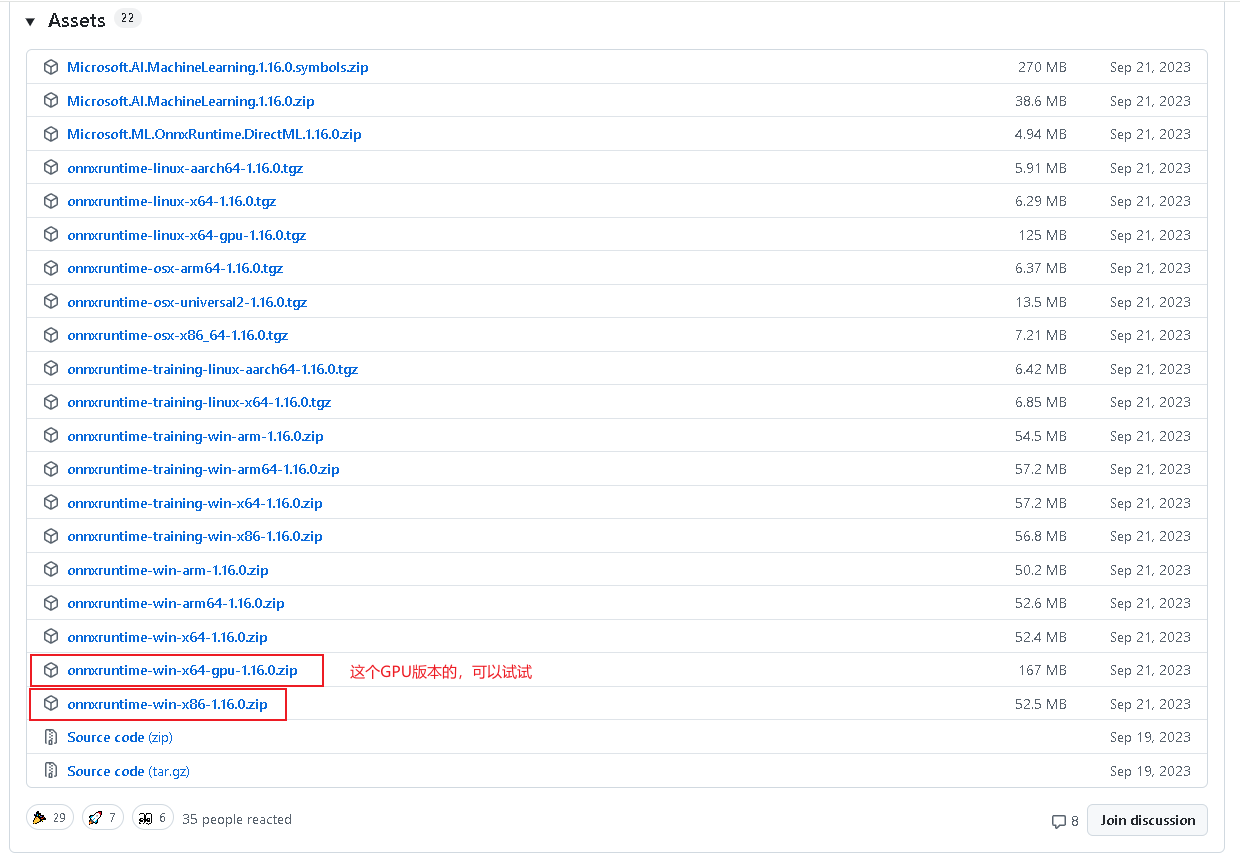
下载链接:opencv官网,直接选择最新版就好。

下载链接:onnxruntime1.16.0(CPU版本兼容性挺好,最新的1.23.1应该也是可以用的,如果有库了可以先试试不同版本的)。
三.库环境配置
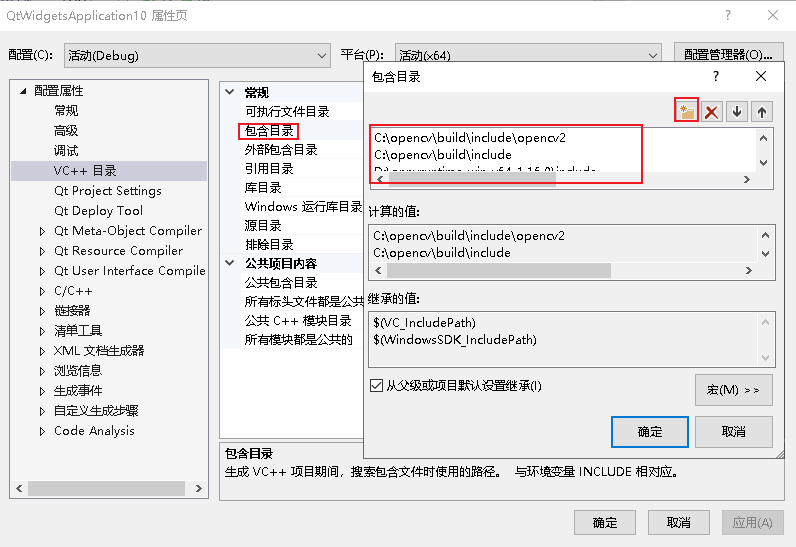
VS2026新建一个项目,打开属性--->VC++目录添加
包含目录中添加:
C:\opencv\build\include\opencv2
C:\opencv\build\include
C:\Users\Administrator\Desktop\onnxruntime-win-x64-1.16.0\include
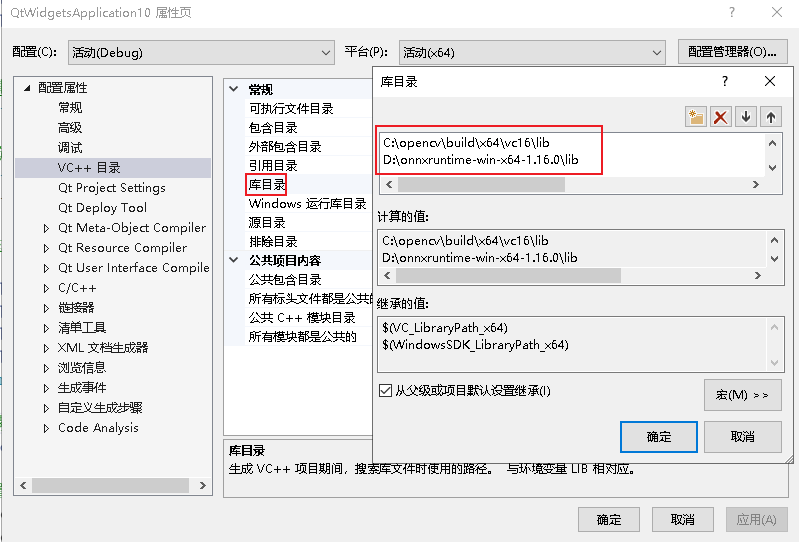
库目录中添加:
C:\opencv\build\x64\vc16\lib
C:\Users\Administrator\Desktop\onnxruntime-win-x64-1.16.0\lib
链接器中输入:
onnxruntime.lib
onnxruntime_providers_shared.lib
opencv_world4120d.lib
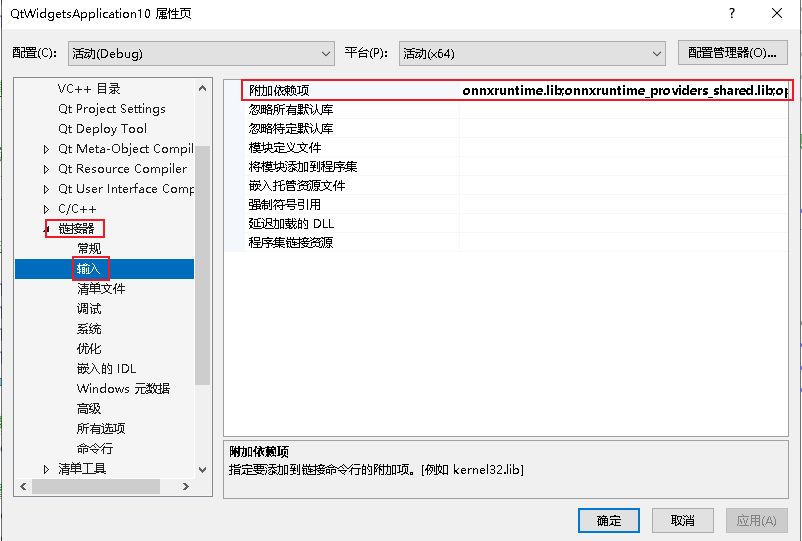
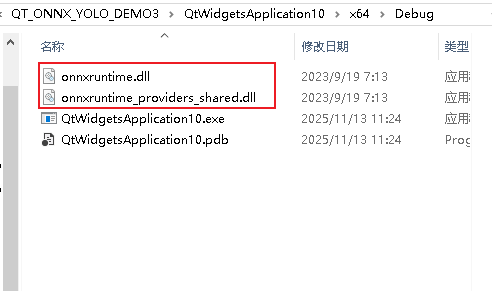
需要从onnxruntime-win-x64-1.16.0-->lib包内将这两个dll动态库放入x64-->debug目录下,不然会报错。
四.项目代码
.cpp代码
#include "QtWidgetsApplication10.h"
#include <QMessageBox>
#include <QDebug>
#include <QFile>
#include <chrono>
#include <algorithm>

QtWidgetsApplication10::QtWidgetsApplication10(QWidget* parent)
	: QMainWindow(parent)
	, inpHeight(640)
	, inpWidth(640)
	, useGPU(false)  // 默认使用CPU
{
	ui.setupUi(this);

	// 设置模型路径和图像路径(使用绝对路径)
	modelPath = "best_seg_leaded.onnx"; // 修改为你的模型绝对路径

	// 初始化ONNX Runtime并加载模型
	try {
		if (loadYOLOv11Model(modelPath, useGPU)) {
			qDebug() << "YOLOv11模型加载成功!";

			// 自动加载图像并检测
			std::string imagePath = "./images/20251113111421_208_272.png"; // 修改为你的测试图像绝对路径
			if (loadImage(imagePath)) {
				autoDetect();
			}
		}
		else {
			QMessageBox::critical(this, "错误", "YOLOv11模型加载失败!");
		}
	}
	catch (const std::exception& e) {
		QMessageBox::critical(this, "异常", QString("模型加载异常: %1").arg(e.what()));
	}
}

QtWidgetsApplication10::~QtWidgetsApplication10()
{
	// 清理资源
	session.reset();
	env.reset();
}

// 自动检测函数
// 在autoDetect中调用时指定枚举值
void QtWidgetsApplication10::autoDetect() {
	if (currentImage.empty() || !session) {
		return;
	}

	// 执行目标检测
	auto start = std::chrono::high_resolution_clock::now();
	currentDetections = detectObjects(currentImage);
	auto end = std::chrono::high_resolution_clock::now();

	// 提取次要颜色(使用类内枚举OTSU)
	for (auto& det : currentDetections) {
		extractMinorColor(det, OTSU);  // 此处枚举值已在类内声明,可直接使用
	}

	// 后续绘制和打印逻辑...
	auto duration = std::chrono::duration_cast<std::chrono::milliseconds>(end - start);
	displayImage = currentImage.clone();
	drawDetections(displayImage, currentDetections);
	updateDisplay();
	printMinorColorResults();  // 打印结果
	updateColorLabels();       // 更新颜色标签
	qDebug() << "检测完成,发现" << currentDetections.size() << "个目标,耗时:" << duration.count() << "ms";
}

// 加载图像
bool QtWidgetsApplication10::loadImage(const std::string& imagePath)
{
	currentImage = cv::imread(imagePath);
	if (currentImage.empty()) {
		qDebug() << "无法加载图像文件:" << imagePath.c_str();
		return false;
	}

	currentDetections.clear();

	// 创建显示副本
	displayImage = currentImage.clone();
	updateDisplay();

	qDebug() << "图像加载成功,尺寸:" << currentImage.cols << "x" << currentImage.rows;
	return true;
}

// 图像预处理
cv::Mat QtWidgetsApplication10::preprocessImage(const cv::Mat& image)
{
	cv::Mat resized, floatImage;

	// 调整图像尺寸
	cv::resize(image, resized, cv::Size(inpWidth, inpHeight));

	// 转换颜色空间 BGR -> RGB
	cv::cvtColor(resized, resized, cv::COLOR_BGR2RGB);

	// 归一化到 [0,1] 并转换为float
	resized.convertTo(floatImage, CV_32FC3, 1.0 / 255.0);

	return floatImage;
}

// 目标检测
std::vector<Detection> QtWidgetsApplication10::detectObjects(const cv::Mat& image)
{
	if (!session) {
		qDebug() << "模型未加载!";
		return {};
	}

	try {
		// 保存原始图像尺寸
		cv::Size originalSize = image.size();

		// 预处理图像
		cv::Mat processedImage = preprocessImage(image);

		// 创建输入Tensor
		size_t inputTensorSize = processedImage.total() * processedImage.channels();
		std::vector<float> inputTensorValues(inputTensorSize);

		// 将图像数据复制到inputTensorValues中(HWC -> CHW)
		std::vector<cv::Mat> channels(3);
		cv::split(processedImage, channels);

		size_t channelSize = processedImage.rows * processedImage.cols;
		for (int i = 0; i < 3; ++i) {
			std::memcpy(inputTensorValues.data() + i * channelSize,
				channels[i].data, channelSize * sizeof(float));
		}

		Ort::MemoryInfo memoryInfo = Ort::MemoryInfo::CreateCpu(
			OrtAllocatorType::OrtArenaAllocator, OrtMemType::OrtMemTypeDefault);

		std::vector<Ort::Value> inputTensors;
		inputTensors.push_back(Ort::Value::CreateTensor<float>(
			memoryInfo,
			inputTensorValues.data(),
			inputTensorValues.size(),
			inputNodeDims[0].data(),
			inputNodeDims[0].size()
		));

		// 执行推理
		auto start = std::chrono::high_resolution_clock::now();
		std::vector<Ort::Value> outputTensors = session->Run(
			runOptions,
			inputNames.data(),
			inputTensors.data(),
			inputTensors.size(),
			outputNames.data(),
			outputNames.size()
		);
		auto end = std::chrono::high_resolution_clock::now();

		auto duration = std::chrono::duration_cast<std::chrono::milliseconds>(end - start);
		qDebug() << "推理时间:" << duration.count() << "ms";

		// 后处理结果
		return postprocessResults(outputTensors, originalSize,image);

	}
	catch (const std::exception& e) {
		qDebug() << "推理错误:" << e.what();
		return {};
	}
}

// 后处理
std::vector<Detection> QtWidgetsApplication10::postprocessResults(
	const std::vector<Ort::Value>& outputTensors, const cv::Size& originalSize,
	const cv::Mat& originalImage,
	float confThreshold, float iouThreshold)
{
	std::vector<Detection> detections;
	if (outputTensors.size() != 2) {
		qDebug() << "分割模型需2个输出张量,当前数量:" << outputTensors.size();
		return detections;
	}

	//解析双输出张量
	// output0: [1,3,38] → (batch, num_detections, 38):38=4(坐标)+1(置信度)+1(类别)+32(掩码系数)
	const float* output0 = outputTensors[0].GetTensorData<float>();
	auto output0Shape = outputTensors[0].GetTensorTypeAndShapeInfo().GetShape();
	int numDetections = static_cast<int>(output0Shape[1]); // 3个检测目标
	int output0Dim = static_cast<int>(output0Shape[2]); // 38维

	// output1: [1,32,160,160] → (batch, mask_channels, H, W):32通道掩码特征图
	const float* output1 = outputTensors[1].GetTensorData<float>();
	auto output1Shape = outputTensors[1].GetTensorTypeAndShapeInfo().GetShape();
	int maskChannels = static_cast<int>(output1Shape[1]); // 32
	int maskHeight = static_cast<int>(output1Shape[2]); // 160
	int maskWidth = static_cast<int>(output1Shape[3]); // 160

	// 转换output1为矩阵(32, 160*160)
	cv::Mat output1Mat(maskChannels, maskHeight * maskWidth, CV_32FC1, const_cast<float*>(output1));

	// 遍历每个检测目标,进行矩阵计算生成掩码
	for (int i = 0; i < numDetections; ++i) {
		const float* detData = output0 + i * output0Dim;
		float conf = detData[4];
		if (conf < confThreshold) continue;

		// 3.1 解析检测框坐标(x1,y1,x2,y2)
		float x1 = detData[0], y1 = detData[1], x2 = detData[2], y2 = detData[3];
		int classId = static_cast<int>(detData[5]);

		// 3.2 提取掩码系数(32维)
		cv::Mat coeffs(1, maskChannels, CV_32FC1, const_cast<float*>(detData + 6));

		// 3.3 矩阵乘法:coeffs(1,32) × output1Mat(32,25600) → 掩码分数图(1,25600)
		cv::Mat maskScoreMat;
		cv::gemm(coeffs, output1Mat, 1.0, cv::Mat(), 0.0, maskScoreMat);
		//3.4 Sigmoid激活
		cv::Mat negMaskScore;
		cv::multiply(maskScoreMat, -1.0, negMaskScore); // 计算 -maskScoreMat
		cv::exp(negMaskScore, negMaskScore); // 矩阵指数运算:exp(-x)
		maskScoreMat = 1.0 / (1.0 + negMaskScore); // 完成Sigmoid计算

		// 3.5 重塑为掩码图(160x160)并上采样到原始图像尺寸
		maskScoreMat = maskScoreMat.reshape(1, maskHeight);
		cv::Mat mask;
		cv::resize(maskScoreMat, mask, originalSize, 0, 0, cv::INTER_LINEAR);

		// 3.6 阈值过滤生成二值掩码(置信度>0.5)
		cv::threshold(mask, mask, 0.5, 255, cv::THRESH_BINARY);
		mask.convertTo(mask, CV_8UC1);

		// 3.7 坐标映射和边界框调整
		float scaleX = static_cast<float>(originalSize.width) / inpWidth;
		float scaleY = static_cast<float>(originalSize.height) / inpHeight;
		int origX1 = std::max(0, (int)(x1 * scaleX));
		int origY1 = std::max(0, (int)(y1 * scaleY));
		int origX2 = std::min(originalSize.width, (int)(x2 * scaleX));
		int origY2 = std::min(originalSize.height, (int)(y2 * scaleY));

		// 3.8 存储检测结果
		Detection det;
		det.box = cv::Rect(origX1, origY1, origX2 - origX1, origY2 - origY1);
		det.conf = conf;
		det.classId = classId;
		det.mask = mask(det.box); // 裁剪掩码到检测框区域

		det.roi = originalImage(det.box).clone();

		detections.push_back(det);
	}

	return detections;
}

// 绘制检测结果
void QtWidgetsApplication10::drawDetections(cv::Mat& image, const std::vector<Detection>& detections)
{
	std::vector<cv::Scalar> colors = { cv::Scalar(0,255,0), cv::Scalar(0,0,255) };
	cv::Mat maskOverlay = image.clone(); // 用于绘制掩码叠加层

	for (const auto& detection : detections) {
		cv::Scalar color = colors[detection.classId % colors.size()];

		// 绘制分割掩码(半透明叠加)
		if (!detection.mask.empty()) {
			cv::Mat maskRGB;
			cv::cvtColor(detection.mask, maskRGB, cv::COLOR_GRAY2BGR);
			maskRGB.setTo(color, detection.mask); // 掩码区域填充对应颜色
			cv::addWeighted(maskOverlay(detection.box), 0.5, maskRGB, 0.5, 0, maskOverlay(detection.box));
		}

		// 绘制边界框和标签(保持原有逻辑)
		cv::rectangle(image, detection.box, color, 2);
		std::string label = "Class " + std::to_string(detection.classId) + " " + std::to_string(detection.conf).substr(0, 4);
		int baseLine;
		cv::Size labelSize = cv::getTextSize(label, cv::FONT_HERSHEY_SIMPLEX, 0.5, 1, &baseLine);
		cv::rectangle(image, cv::Point(detection.box.x, detection.box.y - labelSize.height - baseLine),
			cv::Point(detection.box.x + labelSize.width, detection.box.y), color, cv::FILLED);
		cv::putText(image, label, cv::Point(detection.box.x, detection.box.y - baseLine),
			cv::FONT_HERSHEY_SIMPLEX, 0.5, cv::Scalar(255, 255, 255), 1);
	}

	// 合并原始图像和掩码叠加层
	cv::addWeighted(image, 0.7, maskOverlay, 0.3, 0, image);
}

// 更新显示
void QtWidgetsApplication10::updateDisplay()
{
	if (displayImage.empty()) return;

	// 将OpenCV图像转换为Qt图像
	cv::Mat rgbImage;
	cv::cvtColor(displayImage, rgbImage, cv::COLOR_BGR2RGB);

	QImage qimg(rgbImage.data, rgbImage.cols, rgbImage.rows,
		rgbImage.step, QImage::Format_RGB888);

	QPixmap pixmap = QPixmap::fromImage(qimg);

	// 在QLabel中显示图像
	ui.label->setPixmap(pixmap.scaled(ui.label->width(),
		ui.label->height(),
		Qt::KeepAspectRatio, Qt::SmoothTransformation));
}

// 以下为原有的模型加载函数
bool QtWidgetsApplication10::loadYOLOv11Model(const std::string& model_path, bool useGPU)
{
	//  初始化ONNX Runtime环境
	initializeONNXRuntime();

	//  配置会话选项
	setupSessionOptions(useGPU);

	//  使用QString进行路径转换(解决宽字符问题)
	QString qModelPath = QString::fromStdString(model_path);
	std::wstring wideModelPath = qModelPath.toStdWString();

	// 创建会话(使用宽字符路径)
	session = std::make_unique<Ort::Session>(*env, wideModelPath.c_str(), sessionOptions);

	//  获取模型输入输出信息
	Ort::AllocatorWithDefaultOptions allocator;

	inputNodeDims.clear();  // 清空原有数据
	inputNodeDims.push_back({ 1, 3, 640, 640 });  // 填充输入维度
	inputNamesStr.clear();
	inputNames.clear();
	inputNamesStr.push_back("images"); // 匹配模型输入名称
	inputNames.push_back(inputNamesStr.back().c_str());

	outputNamesStr.clear();
	outputNames.clear();
	outputNamesStr.push_back("output0"); // 匹配模型输出名称
	outputNamesStr.push_back("output1");
	outputNames.push_back(outputNamesStr[0].c_str());
	outputNames.push_back(outputNamesStr[1].c_str());
	return true;
}
// 初始化ONNX运行环境
void QtWidgetsApplication10::initializeONNXRuntime()
{
	env = std::make_unique<Ort::Env>(ORT_LOGGING_LEVEL_WARNING, "YOLOv11");
	runOptions = Ort::RunOptions();
}

void QtWidgetsApplication10::setupSessionOptions(bool useGPU)
{
	sessionOptions.SetIntraOpNumThreads(1);
	sessionOptions.SetInterOpNumThreads(1);
	sessionOptions.SetExecutionMode(ExecutionMode::ORT_SEQUENTIAL);
	sessionOptions.SetGraphOptimizationLevel(GraphOptimizationLevel::ORT_ENABLE_ALL);

	if (useGPU) {
		bool cudaAvailable = false;
		try {
			auto availableProviders = Ort::GetAvailableProviders();
			for (const auto& provider : availableProviders) {
				qDebug() << "可用执行提供器:" << provider;
				if (provider.find("CUDA") != std::string::npos) {
					cudaAvailable = true;
					break;
				}
			}
			if (cudaAvailable) {
				OrtCUDAProviderOptions cuda_options;
				cuda_options.device_id = 0;
				sessionOptions.AppendExecutionProvider_CUDA(cuda_options);
				qDebug() << "CUDA执行提供器已启用";
			}
			else {
				qDebug() << "CUDA执行提供器不可用,使用CPU";
			}
		}
		catch (const Ort::Exception& e) {
			qDebug() << "CUDA初始化失败,使用CPU执行:" << e.what();
		}
	}
}
// 打印模型信息
void QtWidgetsApplication10::printModelInfo()
{
	qDebug() << "=== YOLOv11模型信息 ===";
	qDebug() << "模型路径:" << QString::fromStdString(modelPath);
	qDebug() << "输入尺寸:" << inpHeight << "x" << inpWidth;
	qDebug() << "使用GPU:" << (useGPU ? "是" : "否");
	qDebug() << "输入节点数量:" << session->GetInputCount();
	qDebug() << "输出节点数量:" << session->GetOutputCount();

	for (size_t i = 0; i < inputNamesStr.size(); i++) {
		qDebug() << "输入" << i << ":" << inputNamesStr[i].c_str();
	}

	for (size_t i = 0; i < outputNamesStr.size(); i++) {
		qDebug() << "输出" << i << ":" << outputNamesStr[i].c_str();
	}

	qDebug() << "=========================";
}
// 打印结果
void QtWidgetsApplication10::printMinorColorResults() {
	qDebug() << "\n🎯 次要颜色提取最终结果(RGB格式):";
	for (size_t i = 0; i < currentDetections.size(); i++) {
		const auto& det = currentDetections[i];
		qDebug() << QString("区域 %1:").arg(i + 1);
		qDebug() << QString("  推荐颜色 (中位数): RGB(%1, %2, %3)")
			.arg(cvRound(det.medianColorRGB[0]))
			.arg(cvRound(det.medianColorRGB[1]))
			.arg(cvRound(det.medianColorRGB[2]));
		qDebug() << QString("  替代颜色 (平均值): RGB(%1, %2, %3)")
			.arg(cvRound(det.avgColorRGB[0]))
			.arg(cvRound(det.avgColorRGB[1]))
			.arg(cvRound(det.avgColorRGB[2]));
		qDebug() << "";
	}
}
// 二值化
cv::Mat QtWidgetsApplication10::binarizeRegion(const cv::Mat& grayRegion, BinarizeMethod method) {
	cv::Mat binary;
	switch (method) {
	case OTSU:  // 直接使用枚举值(类内已声明)
		cv::threshold(grayRegion, binary, 0, 255, cv::THRESH_BINARY + cv::THRESH_OTSU);
		break;
	case ADAPTIVE:
		cv::adaptiveThreshold(grayRegion, binary, 255,
			cv::ADAPTIVE_THRESH_GAUSSIAN_C,
			cv::THRESH_BINARY, 11, 2);
		break;
	case ORIGINAL:
		cv::threshold(grayRegion, binary, 127, 255, cv::THRESH_BINARY);
		break;
	}
	return binary;
}

//计算矩阵中位数
cv::Scalar calculateMedian(const std::vector<cv::Vec3b>& pixels) {
	std::vector<int> b_vals, g_vals, r_vals;
	for (const auto& pix : pixels) {
		b_vals.push_back(pix[0]);
		g_vals.push_back(pix[1]);
		r_vals.push_back(pix[2]);
	}

	// 排序取中位数
	std::sort(b_vals.begin(), b_vals.end());
	std::sort(g_vals.begin(), g_vals.end());
	std::sort(r_vals.begin(), r_vals.end());

	int n = pixels.size();
	int b_med = (n % 2 == 1) ? b_vals[n / 2] : (b_vals[n / 2 - 1] + b_vals[n / 2]) / 2;
	int g_med = (n % 2 == 1) ? g_vals[n / 2] : (g_vals[n / 2 - 1] + g_vals[n / 2]) / 2;
	int r_med = (n % 2 == 1) ? r_vals[n / 2] : (r_vals[n / 2 - 1] + r_vals[n / 2]) / 2;

	return cv::Scalar(b_med, g_med, r_med);
}

// 次要颜色提取核心函数
void QtWidgetsApplication10::extractMinorColor(Detection& det, BinarizeMethod method) {
	if (det.roi.empty() || det.mask.empty()) return;

	// 转换为灰度图
	cv::Mat grayRegion;
	cv::cvtColor(det.roi, grayRegion, cv::COLOR_BGR2GRAY);

	// 二值化处理(使用类内枚举)
	cv::Mat binary = binarizeRegion(grayRegion, method);

	// 统计黑白像素
	int whitePixels = 0, blackPixels = 0;
	std::vector<cv::Vec3b> allPixels, minorPixels;
	for (int y = 0; y < det.mask.rows; y++) {
		for (int x = 0; x < det.mask.cols; x++) {
			if (det.mask.at<uchar>(y, x) == 255) { // 仅统计分割区域内像素
				cv::Vec3b pix = det.roi.at<cv::Vec3b>(y, x);
				allPixels.push_back(pix);
				if (binary.at<uchar>(y, x) == 255) {
					whitePixels++;
				}
				else {
					blackPixels++;
				}
			}
		}
	}
	// 计算占比和颜色
	int totalPixels = whitePixels + blackPixels;
	det.whiteRatio = static_cast<float>(whitePixels) / totalPixels;
	det.blackRatio = static_cast<float>(blackPixels) / totalPixels;

	bool isBlackMinor = (det.blackRatio < det.whiteRatio);
	det.minorPart = isBlackMinor ? "black" : "white";
	det.minorRatio = isBlackMinor ? det.blackRatio : det.whiteRatio;

	// 提取次要部分像素并计算颜色
	for (int y = 0; y < det.mask.rows; y++) {
		for (int x = 0; x < det.mask.cols; x++) {
			if (det.mask.at<uchar>(y, x) == 255) {
				bool isMinor = (isBlackMinor && binary.at<uchar>(y, x) == 0) ||
					(!isBlackMinor && binary.at<uchar>(y, x) == 255);
				if (isMinor) {
					minorPixels.push_back(det.roi.at<cv::Vec3b>(y, x));
				}
			}
		}
	}
	det.avgColorBGR = cv::mean(det.roi, det.mask);       // 带掩码的平均值(BGR)
	det.medianColorBGR = calculateMedian(minorPixels);    // 中位数(BGR)

	det.avgColorRGB = bgrToRgb(det.avgColorBGR);
	det.medianColorRGB = bgrToRgb(det.medianColorBGR);
}
// BGR转RGB
cv::Scalar QtWidgetsApplication10::bgrToRgb(const cv::Scalar& bgr) {
	return cv::Scalar(bgr[2], bgr[1], bgr[0]);  // 交换B和R通道
}
// 更新 label_2(颜色块)和 label_3(RGB文本)
void QtWidgetsApplication10::updateColorLabels() {
	if (currentDetections.empty()) {
		ui.label_2->clear();
		ui.label_3->setText("无检测目标");
		ui.label_2->setStyleSheet("background-color: transparent;");
		return;
	}

	// 获取第一个目标的中位数RGB颜色
	const auto& targetDet = currentDetections[0];
	int r = cvRound(targetDet.medianColorRGB[0]);  // R通道
	int g = cvRound(targetDet.medianColorRGB[1]);  // G通道
	int b = cvRound(targetDet.medianColorRGB[2]);  // B通道

	// 更新label_2:显示颜色块
	int labelW = ui.label_2->width();
	int labelH = ui.label_2->height();

	// 确保label尺寸有效
	if (labelW <= 0 || labelH <= 0) {
		labelW = 100;  // 默认宽度
		labelH = 100;  // 默认高度
	}

	// 创建OpenCV图像(BGR格式,因为OpenCV默认BGR)
	cv::Mat colorBlock(labelH, labelW, CV_8UC3, cv::Scalar(b, g, r));  // 注意:Scalar是(B,G,R)

	// 转换为RGB格式
	cv::Mat rgbBlock;
	cv::cvtColor(colorBlock, rgbBlock, cv::COLOR_BGR2RGB);

	// 通过QImage的构造函数深拷贝数据,避免cv::Mat释放后内存失效
	QImage qimgBlock(
		rgbBlock.data,
		rgbBlock.cols,
		rgbBlock.rows,
		rgbBlock.step,
		QImage::Format_RGB888
	);
	// 深拷贝数据到QImage管理的内存中
	qimgBlock = qimgBlock.copy();

	// 设置到label_2
	ui.label_2->setPixmap(QPixmap::fromImage(qimgBlock));
	ui.label_2->setScaledContents(true);  // 自适应label大小
	ui.label_2->setStyleSheet("border: 1px solid #999;");  // 加边框更清晰

	// 更新label_3:显示RGB值
	ui.label_3->setText(QString("RGB(%1, %2, %3)").arg(r).arg(g).arg(b));
	ui.label_3->setAlignment(Qt::AlignCenter);
	ui.label_3->setStyleSheet("font-size: 12px;");
}
.h文件代码
#pragma once

#include <QtWidgets/QMainWindow>
#include "ui_QtWidgetsApplication10.h"
#include <opencv2/opencv.hpp>
#include <onnxruntime_cxx_api.h>
#include <vector>
#include <string>
#include <memory>

// 检测结果结构体
struct Detection {
    cv::Rect box;
    float conf;
    int classId;
    cv::Mat mask; // 存储分割掩码
    cv::Mat roi;  // 目标区域原图
    // 次要颜色提取结果
    std::string minorPart;       // 次要部分("black"/"white")
    float minorRatio;            // 次要部分占比
    float whiteRatio;            // 白色占比
    float blackRatio;            // 黑色占比
    cv::Scalar avgColorBGR;         // 平均颜色(BGR)
    cv::Scalar medianColorBGR;      // 中位数颜色(BGR)
    cv::Scalar avgColorRGB;      // 平均颜色(RGB)
    cv::Scalar medianColorRGB;   // 中位数颜色(RGB)
};

class QtWidgetsApplication10 : public QMainWindow
{
    Q_OBJECT

public:
    QtWidgetsApplication10(QWidget* parent = nullptr);
    ~QtWidgetsApplication10();

    // 声明二值化方法枚举
    enum BinarizeMethod {
        OTSU,       // Otsu二值化
        ADAPTIVE,   // 自适应二值化
        ORIGINAL    // 普通二值化
    };

private:
    // ONNX Runtime 相关成员变量
    std::unique_ptr<Ort::Env> env;
    std::unique_ptr<Ort::Session> session;
    Ort::SessionOptions sessionOptions;
    Ort::RunOptions runOptions;

    // 模型输入输出信息(使用更安全的内存管理)
    std::vector<std::string> inputNamesStr;
    std::vector<std::string> outputNamesStr;
    std::vector<const char*> inputNames;
    std::vector<const char*> outputNames;
    std::vector<std::vector<int64_t>> inputNodeDims;
    std::vector<std::vector<int64_t>> outputNodeDims;

    // 模型配置
    std::string modelPath;
    int inpHeight;
    int inpWidth;
    bool useGPU;

    // 图像和检测结果
    cv::Mat currentImage;
    cv::Mat displayImage;
    std::vector<Detection> currentDetections;

    // 类别名称
    std::vector<std::string> classNames;

    // 模型加载和初始化方法
    bool loadYOLOv11Model(const std::string& model_path, bool useGPU = false);
    void initializeONNXRuntime();
    void setupSessionOptions(bool useGPU);
    void printModelInfo();

    // 图像处理和检测方法
    bool loadImage(const std::string& imagePath);
    cv::Mat preprocessImage(const cv::Mat& image);
    std::vector<Detection> postprocessResults(const std::vector<Ort::Value>& outputTensors,
        const cv::Size& originalSize,
        const cv::Mat& originalImage,
        float confThreshold = 0.5f,
        float iouThreshold = 0.45f);
    std::vector<Detection> detectObjects(const cv::Mat& image);
    void drawDetections(cv::Mat& image, const std::vector<Detection>& detections);
    void updateDisplay();
    void autoDetect(); // 自动检测函数

    cv::Mat binarizeRegion(const cv::Mat& grayRegion, BinarizeMethod method);
    void extractMinorColor(Detection& det, BinarizeMethod method = OTSU);
    void printMinorColorResults();
    cv::Scalar bgrToRgb(const cv::Scalar& bgr);
    void updateColorLabels();

private:
    Ui::QtWidgetsApplication10Class ui;
};
五.运行结果

原理:电容的黑色长条内的次主体的颜色是电容整体的颜色,而代码通过onnx模型实现目标检测,识别出黑色区域内的淡紫色区域的颜色,从而确定电容整体的颜色。
六.项目下载

DAMO开发者矩阵,由阿里巴巴达摩院和中国互联网协会联合发起,致力于探讨最前沿的技术趋势与应用成果,搭建高质量的交流与分享平台,推动技术创新与产业应用链接,围绕“人工智能与新型计算”构建开放共享的开发者生态。
更多推荐


 30
 0
- 0


 已为社区贡献2条内容

所有评论(0)