Unet3+训练自己的数据集保姆级教程
1.利用labelme进行数据标注
1.1Labelme 安装方法
首先安装 Anaconda,然后运行下列命令:
##################
## for Python 2 ##
##################
conda create --name=labelme python=2.7
source activate labelme
# conda install -c conda-forge pyside2
conda install pyqt
pip install labelme
# 如果想安装最新版本,请使用下列命令安装:
# pip install git+https://github.com/wkentaro/labelme.git

##################
## for Python 3 ##
##################
conda create --name=labelme python=3.6
source activate labelme
# conda install -c conda-forge pyside2
# conda install pyqt
pip install pyqt5  # pyqt5 can be installed via pip on python3
pip install labelme
输入以下指令打开
labelme
1.2Labelme 使用教程
使用 labelme 进行场景分割标注的教程详见:labelme
2.将JSON格式标注文件转换为png格式
新建文件夹如图所示:JPEGImages存放图片,SegmentationClass_Origin存放json标签

运行如下代码进行格式转换,注意填对文件地址和种类数量
import base64
import json
import os
import os.path as osp

import numpy as np
import PIL.Image
from labelme import utils

'''
制作自己的语义分割数据集需要注意以下几点:
1、我使用的labelme版本是3.16.7,建议使用该版本的labelme,有些版本的labelme会发生错误,
   具体错误为:Too many dimensions: 3 > 2
   安装方式为命令行pip install labelme==3.16.7
2、此处生成的标签图是8位图,此时每个像素点的值就是这个像素点所属的种类。
'''
if __name__ == '__main__':
    jpgs_path   = "datasets/JPEGImages"
    pngs_path   = "datasets/SegmentationClass"
    classes     = ["_background_","1"]  ##种类填什么名称都可以
    # classes     = ["_background_","cat","dog"]

    count = os.listdir("./datasets/SegmentationClass_Origin/")
    for i in range(0, len(count)):
        path = os.path.join("./datasets/SegmentationClass_Origin", count[i])

        if os.path.isfile(path) and path.endswith('json'):
            data = json.load(open(path))

            if data['imageData']:
                imageData = data['imageData']
            else:
                imagePath = os.path.join(os.path.dirname(path), data['imagePath'])
                with open(imagePath, 'rb') as f:
                    imageData = f.read()
                    imageData = base64.b64encode(imageData).decode('utf-8')

            img = utils.img_b64_to_arr(imageData)
            label_name_to_value = {'_background_': 0}
            for shape in data['shapes']:
                label_name = shape['label']
                if label_name in label_name_to_value:
                    label_value = label_name_to_value[label_name]
                else:
                    label_value = len(label_name_to_value)
                    label_name_to_value[label_name] = label_value

            # label_values must be dense
            label_values, label_names = [], []
            for ln, lv in sorted(label_name_to_value.items(), key=lambda x: x[1]):
                label_values.append(lv)
                label_names.append(ln)
            assert label_values == list(range(len(label_values)))

            lbl = utils.shapes_to_label(img.shape, data['shapes'], label_name_to_value)


           # 保存处理后的原始图像为 .jpg 文件
            PIL.Image.fromarray(img).save(osp.join(jpgs_path, count[i].split(".")[0]+'.jpg'))

             # 创建标签图像,并将每个类别映射为对应的整数值
            new = np.zeros([np.shape(img)[0], np.shape(img)[1]], dtype=np.uint8)
            for name in label_names:
                index_json = label_names.index(name)
                index_all = classes.index(name)
                new = new + (index_all * (lbl == index_json)).astype(np.uint8)

           # 保存标签图像为灰度图的 .png 文件
            #utils.lblsave(osp.join(pngs_path, count[i].split(".")[0]+'.png'), new)
            PIL.Image.fromarray(new, mode='L').save(osp.join(pngs_path, count[i].split(".")[0] + '.png'))
            print('Saved ' + count[i].split(".")[0] + '.jpg and ' + count[i].split(".")[0] + '.png')
转换完成后可以通过data_process/check_label.py文件查看标签的值,比如有两个种类,那么png标签的值就只能是0和1。
3.将标签和图片转化为统一大小
import os
import cv2

def resize_images(input_folder1, input_folder2, output_folder1, output_folder2, size=(640, 640)):
    # 确保输出文件夹存在
    os.makedirs(output_folder1, exist_ok=True)
    os.makedirs(output_folder2, exist_ok=True)

    # 获取文件夹1中所有.jpg图片
    jpg_files = [f for f in os.listdir(input_folder1) if f.endswith('.jpg')]

    # 获取文件夹2中所有.png图片
    png_files = [f for f in os.listdir(input_folder2) if f.endswith('.png')]

    # 遍历.jpg文件并处理
    for jpg_file in jpg_files:
        # 构造完整的文件路径
        jpg_path = os.path.join(input_folder1, jpg_file)
        # 读取.jpg图片为灰度图
        img_jpg = cv2.imread(jpg_path)
        # 调整大小
        img_jpg_resized = cv2.resize(img_jpg, size)
        # 保存到新的文件夹
        cv2.imwrite(os.path.join(output_folder1, jpg_file), img_jpg_resized)

        # 处理对应的.png图片
        png_file = jpg_file.replace('.jpg', '.png')
        if png_file in png_files:
            png_path = os.path.join(input_folder2, png_file)
            # 读取.png图片为灰度图
            img_png = cv2.imread(png_path, cv2.IMREAD_GRAYSCALE)
            # 调整大小
            img_png_resized = cv2.resize(img_png, size)
            # 保存到新的文件夹
            cv2.imwrite(os.path.join(output_folder2, png_file), img_png_resized)

# 定义输入输出文件夹路径
input_folder1 = 'F:/Improve/unet_improve/unet/datasets/JPEGImages'
input_folder2 = 'F:/Improve/unet_improve/unet/datasets/SegmentationClass'
output_folder1 = 'F:/Improve/unet_improve/unet/datasets/JPEGImages2'
output_folder2 = 'F:/Improve/unet_improve/unet/datasets/SegmentationClass2'

# 调用函数进行图片处理
resize_images(input_folder1, input_folder2, output_folder1, output_folder2, size=(640, 640))
4.划分数据集
按照不同的比例将数据集划分为训练验证集和测试集
import os
import shutil
import random


def split_dataset(image_folder, label_folder, train_ratio, train_image_folder, train_label_folder, test_image_folder,
                  test_label_folder):
    # 获取所有图片文件名
    image_files = [f for f in os.listdir(image_folder) if f.endswith('.jpg')]

    # 将文件顺序打乱
    random.shuffle(image_files)

    # 计算训练集的数量
    train_size = int(len(image_files) * train_ratio)

    # 创建输出目录
    os.makedirs(train_image_folder, exist_ok=True)
    os.makedirs(train_label_folder, exist_ok=True)
    os.makedirs(test_image_folder, exist_ok=True)
    os.makedirs(test_label_folder, exist_ok=True)

    # 划分训练集和测试集
    train_files = image_files[:train_size]
    test_files = image_files[train_size:]

    # 复制文件到训练集文件夹
    for file in train_files:
        label_file = file.replace('.jpg', '.png')
        shutil.copy(os.path.join(image_folder, file), os.path.join(train_image_folder, file))
        shutil.copy(os.path.join(label_folder, label_file), os.path.join(train_label_folder, label_file))

    # 复制文件到测试集文件夹
    for file in test_files:
        label_file = file.replace('.jpg', '.png')
        shutil.copy(os.path.join(image_folder, file), os.path.join(test_image_folder, file))
        shutil.copy(os.path.join(label_folder, label_file), os.path.join(test_label_folder, label_file))


# 示例使用
image_folder = 'F:/Improve/unet_improve/unet/640voc/images'
label_folder = 'F:/Improve/unet_improve/unet/640voc/i-masks'
train_image_folder = 'F:/Improve/unet_improve/unet/640voc/train_images'
train_label_folder = 'F:/Improve/unet_improve/unet/640voc/train_masks'
test_image_folder = 'F:/Improve/unet_improve/unet/640voc/test_images'
test_label_folder = 'F:/Improve/unet_improve/unet/640voc/test_masks'

split_dataset(image_folder, label_folder, train_ratio=0.8,
              train_image_folder=train_image_folder,
              train_label_folder=train_label_folder,
              test_image_folder=test_image_folder,
              test_label_folder=test_label_folder)
5.训练
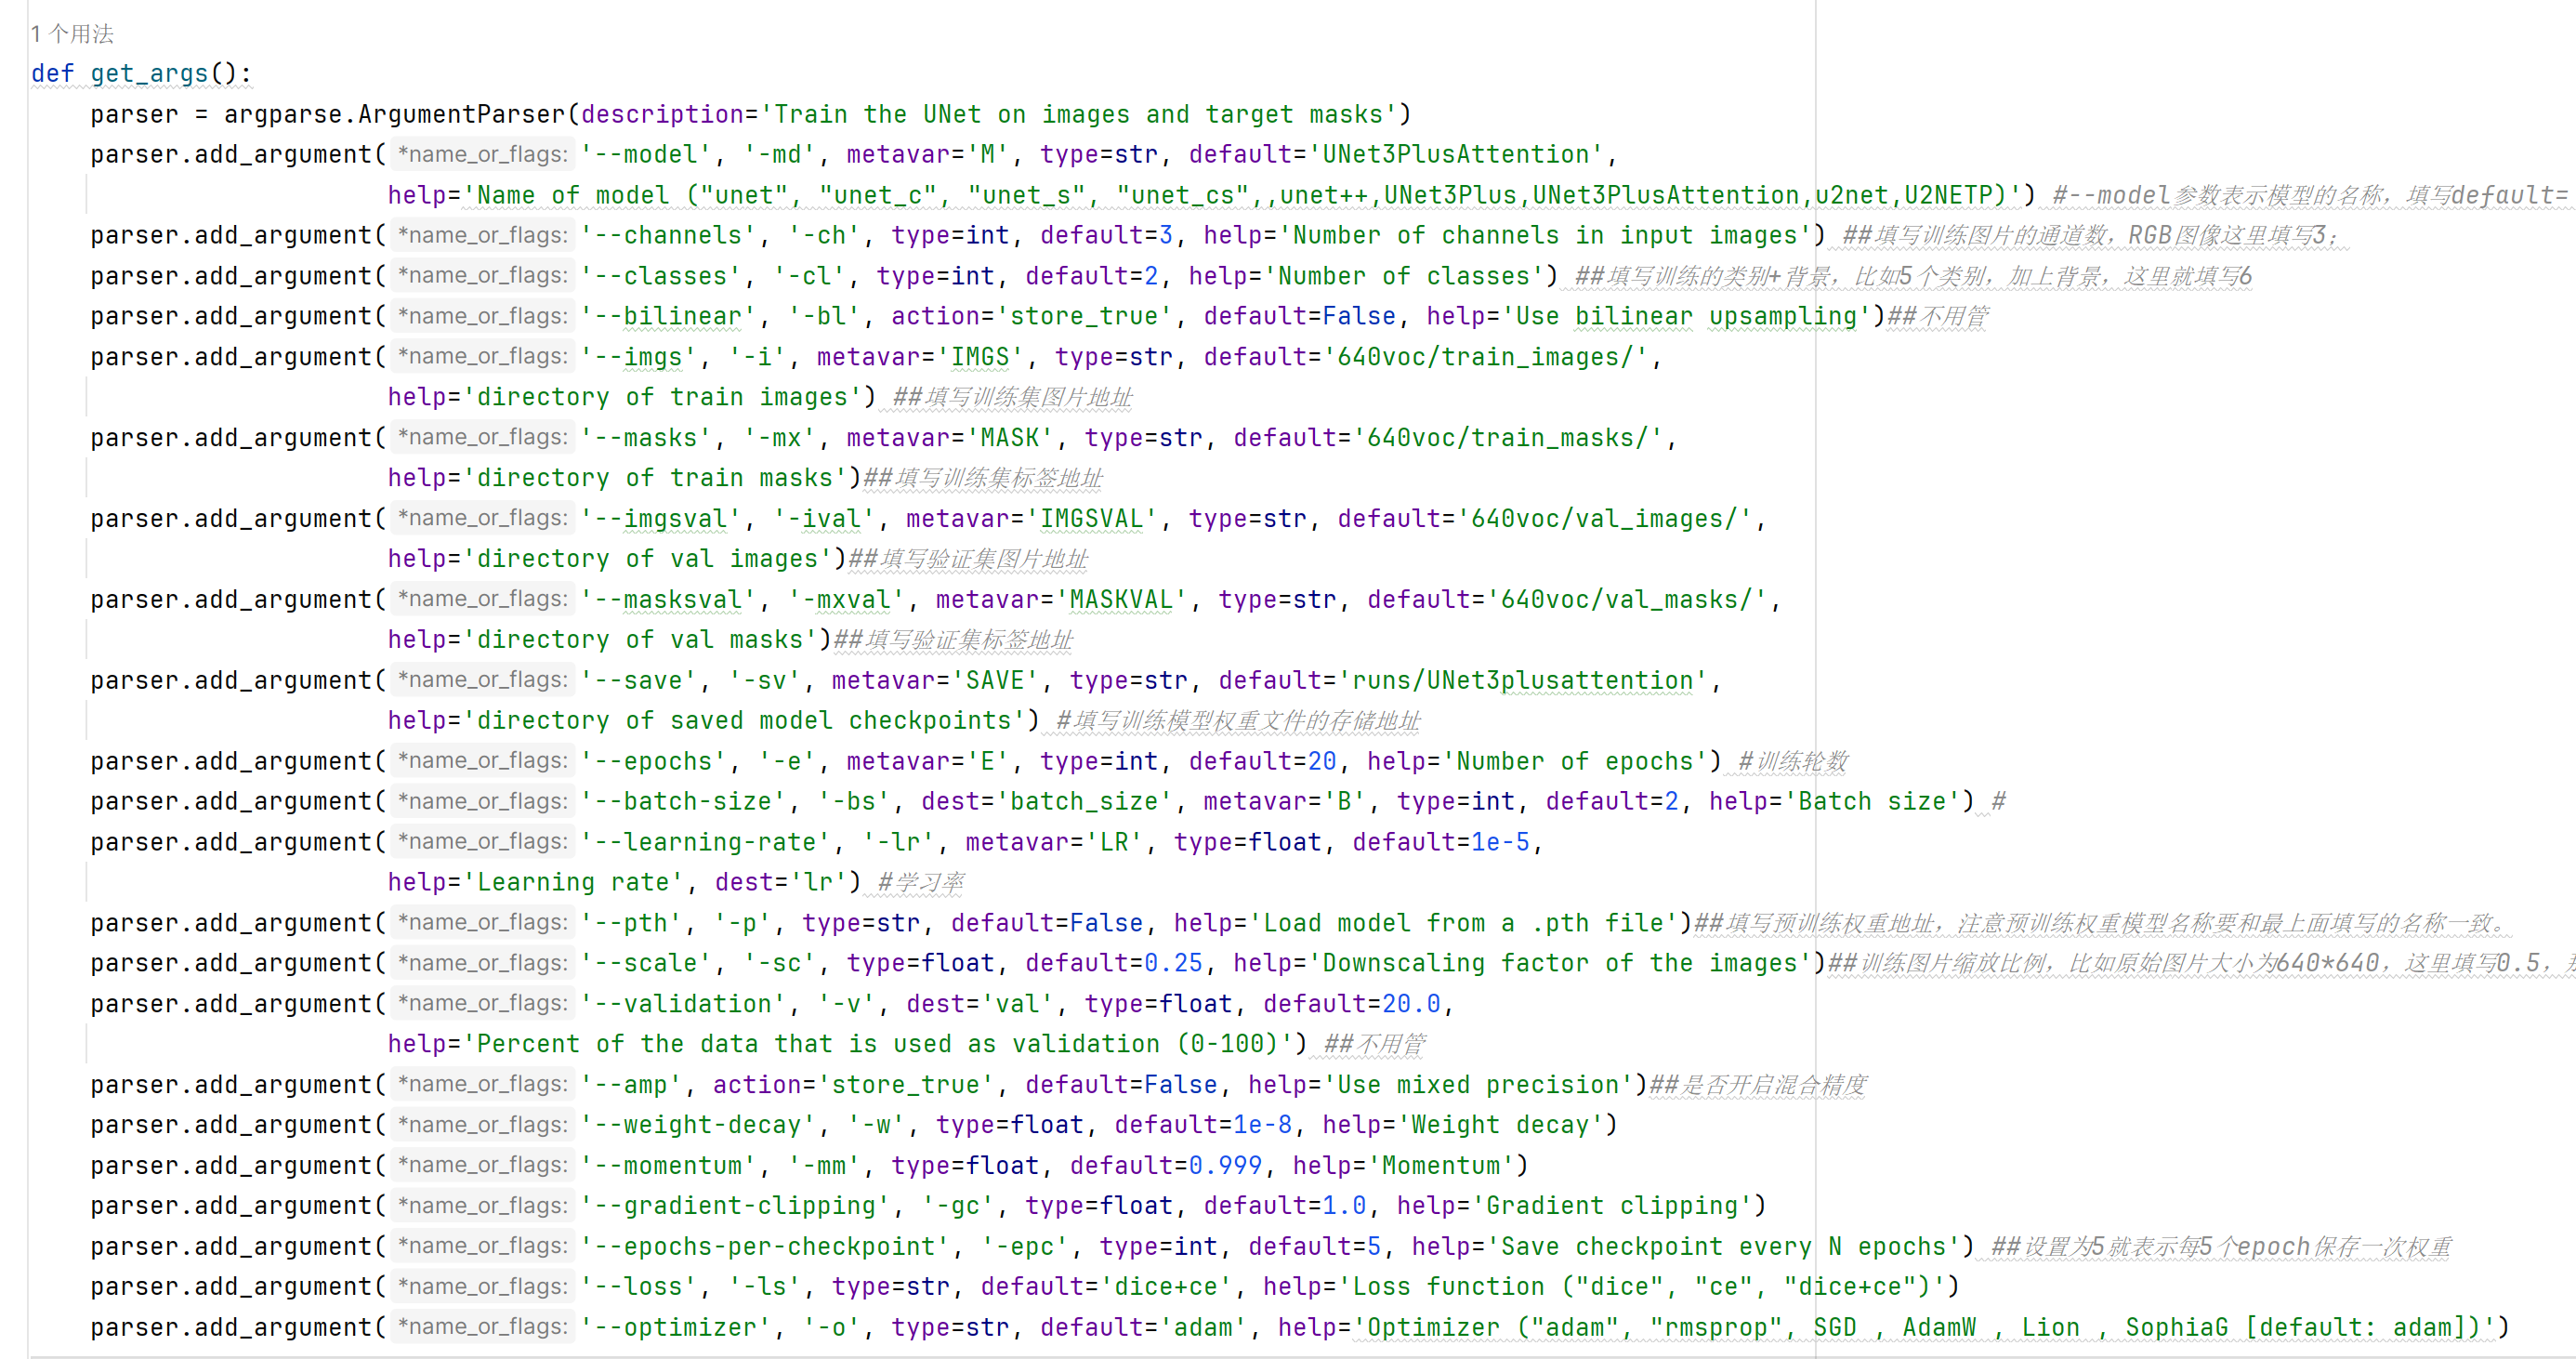
使用命令训练:
python train.py
--model unet
--imgs ../train_data_aug/imgs/
--masks ../train_data_aug/i-masks/
--save ../i-checkpoints/
--epochs 50
--batch-size 64
--scale 0.5
-w 1e-4
-epc 5
-ls dice+ce
-o adam
--amp
或者在train.py中直接修改相应的参数,然后右键运行即可
参数说明:
--scale 0.5 表示将原始图片缩放到0.5倍大小进行训练,比如原始图片大小为640X640,这里填0.5,就表示训练图像大小为320X320
6.评估
在eval_test.py中添加pth权重路径并修改种类数classes,然后运行以下命令即可得到评估参数
其中input为图片地址 output为标签地址
python eval_test.py --input 640voc/images/ --output 640voc/i-masks

7.预测
同样修改权重路径和种类即可,然后运行下面的命令
python predict.py --input /home/cdg/test/unet-pytorch-main/VOCdevkit2/VOC2007/JPEGImages2/00000.jpg --viz --no-save

效果图:

整理不易,完整代码收取少许费用
代码地址:unet3+

DAMO开发者矩阵,由阿里巴巴达摩院和中国互联网协会联合发起,致力于探讨最前沿的技术趋势与应用成果,搭建高质量的交流与分享平台,推动技术创新与产业应用链接,围绕“人工智能与新型计算”构建开放共享的开发者生态。
更多推荐
 5
5 0
0- 0


 已为社区贡献6条内容

所有评论(0)