嵌入式单片机一套通关学习笔记
一、电压、电流和电阻
1.电流
世间万物都是由原子构成,一个最简单的原子模型可以简化成,带正电荷的原子核在中央,周围环绕有若干个带负电的电子。同性相斥,异性相吸。这是最朴素的法则。
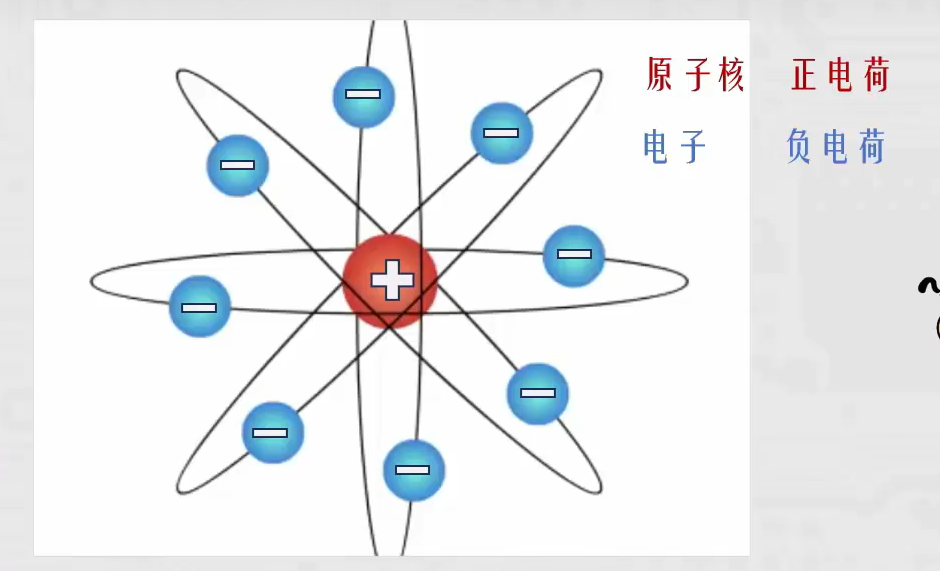
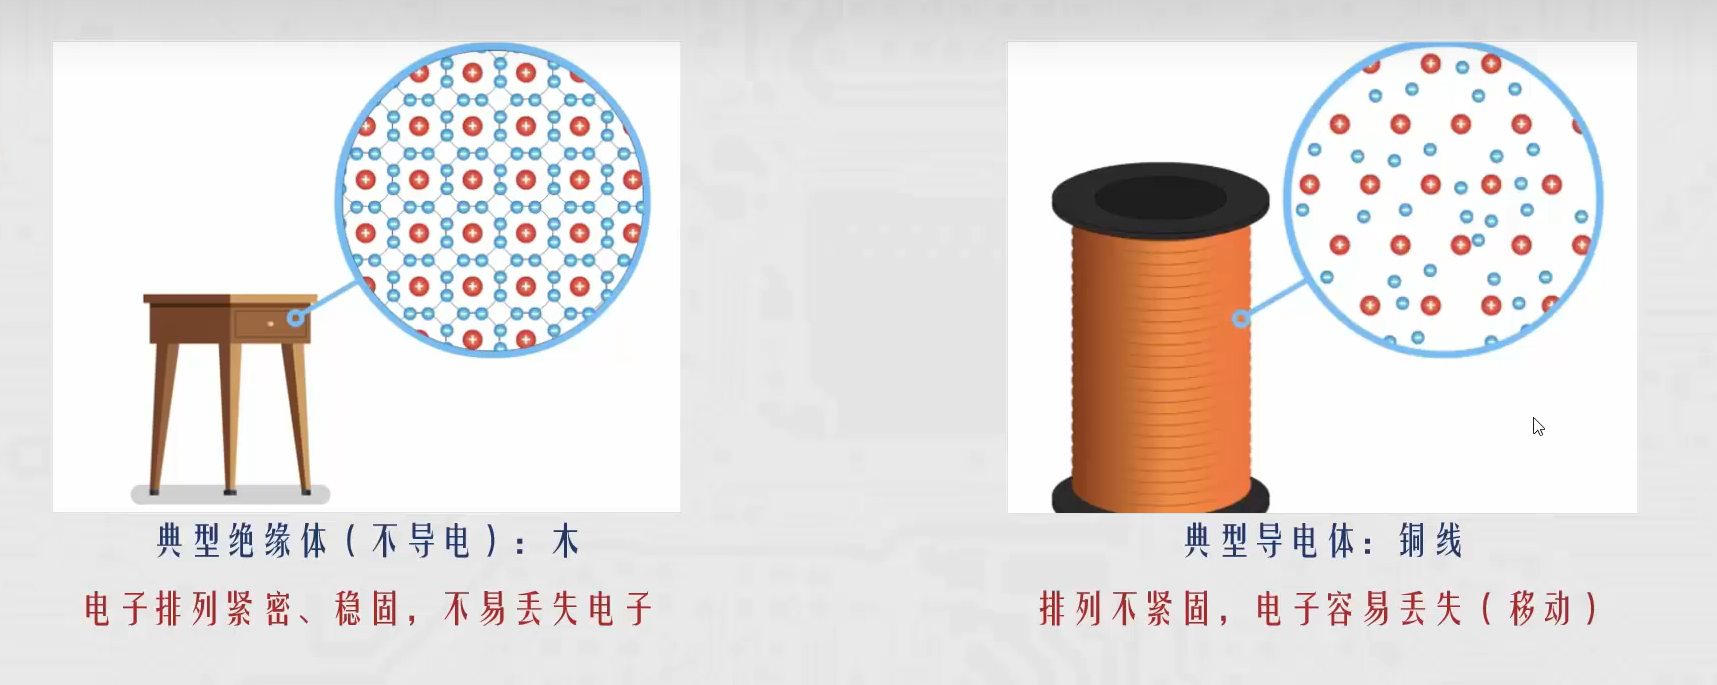
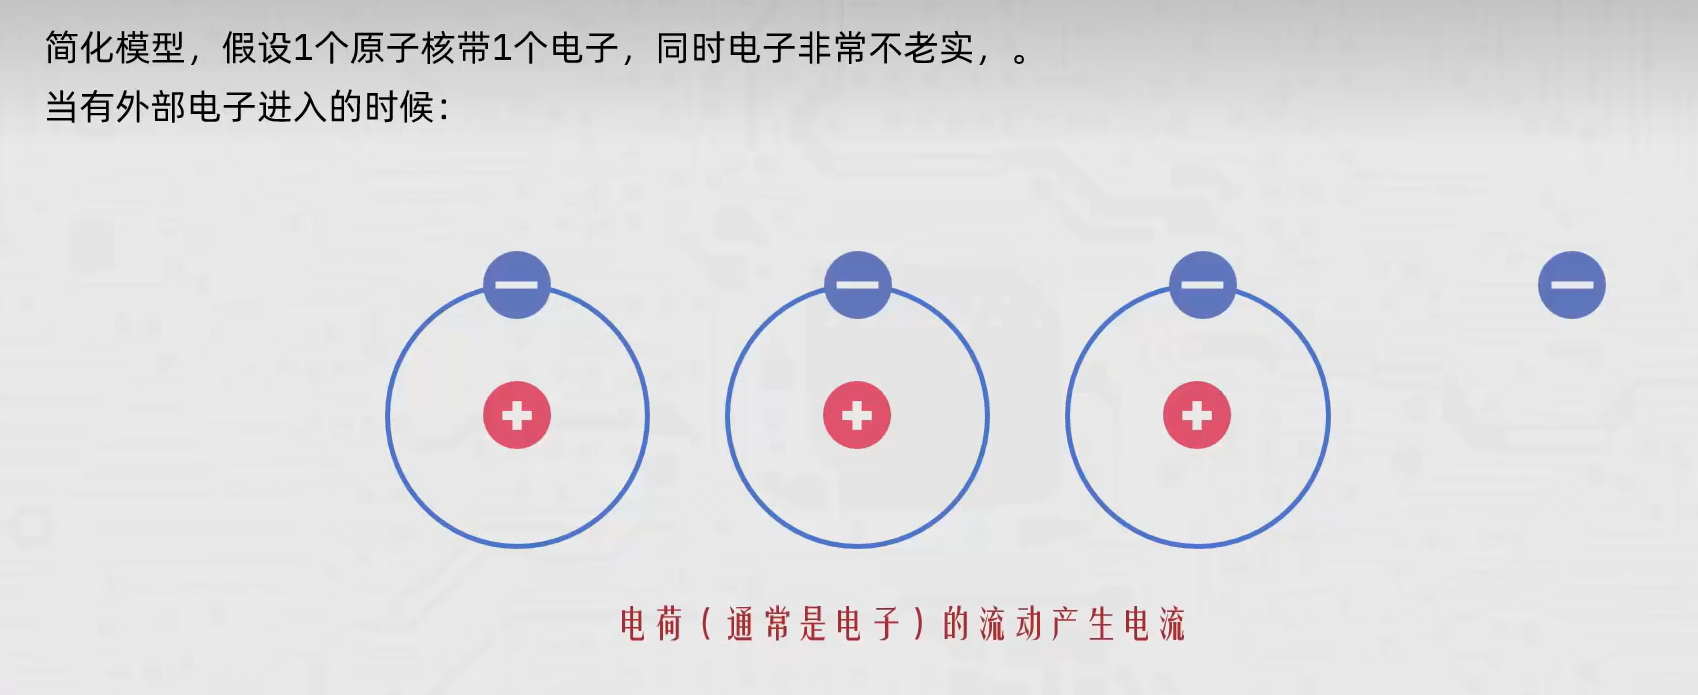
电流的产生和原子核及其电子的排列紧密相关。
供能:为电路提供能量(电子),即发送电子
回路:在电路另一端,吸收多余电子
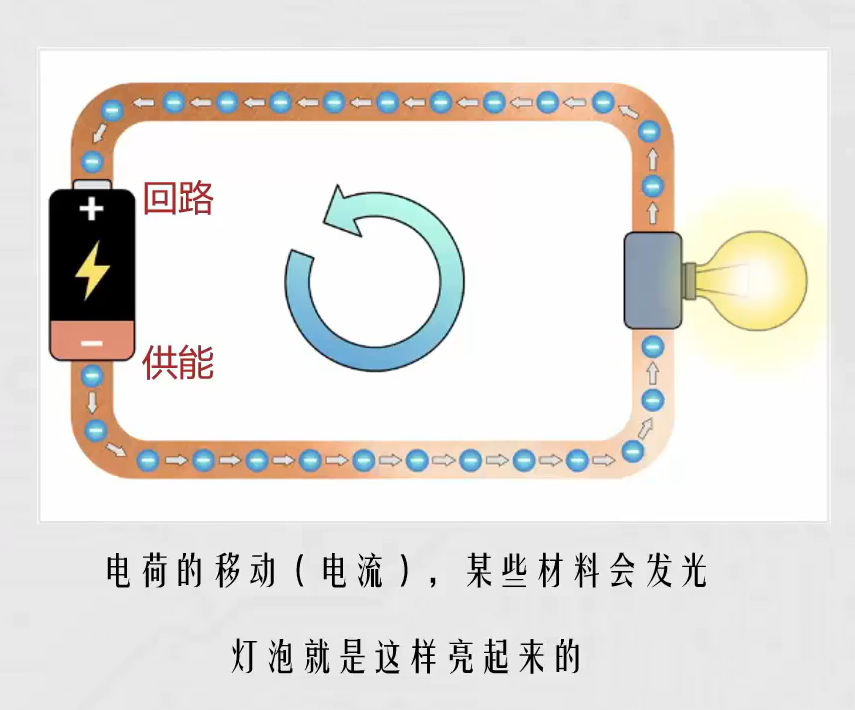
两百年前的科学家无法观测到电子,猜测电流是:正极->负极。但真实情况是,电子是:负极->正极不过这些不影响,因为电流的定义是:正电荷的流动方向, 和负电荷相反)
2.电压
如果电路是个挤满电子的公交车,上车1个电子,就要挤下去一个电子
电子够不够劲?
挤不上去怎么办。
电子移动的动力称之为:电压(电势能)

3.电阻
就像如下公交车一样,受限于材料,电子的移动是有阻力的(不同材料阻值不同)
电子移动的阻力,称之为:电阻
电子、电压、电阻之间的关系如下图
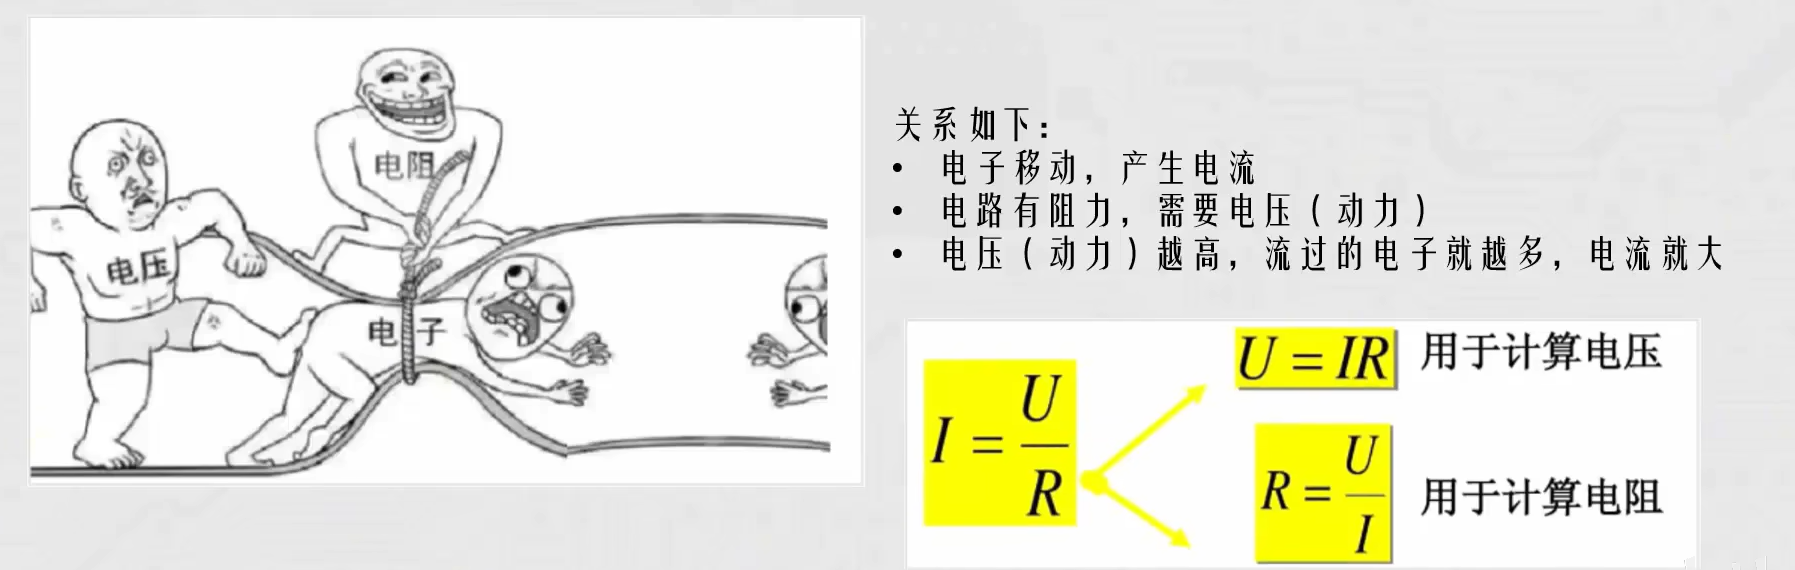
欧姆定律的重要参数
- I 电流
1A(安培): 1秒内有6.2415093x10^18个电荷通过单位安A1A=1000mA(毫安)
·U 电压
单位伏V 1V(伏特):在1R电阻下能通过1A电流,视为1V
·R 电阻
单位欧姆R 1R(欧姆):在1V电压下能通过1A电流,视为1R
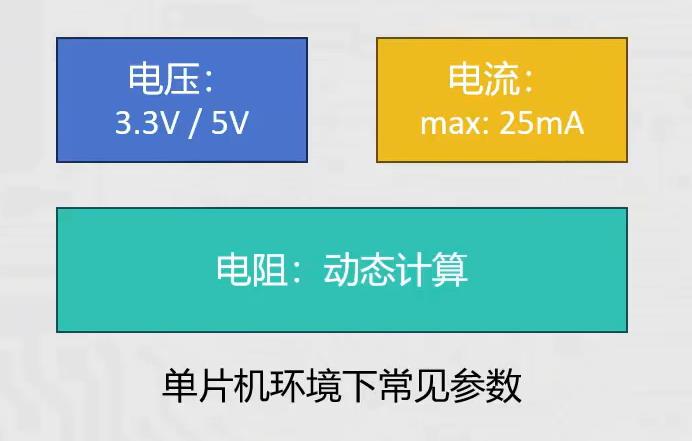
单片机环境下的常见参数
4.电压电流大小的直观感受
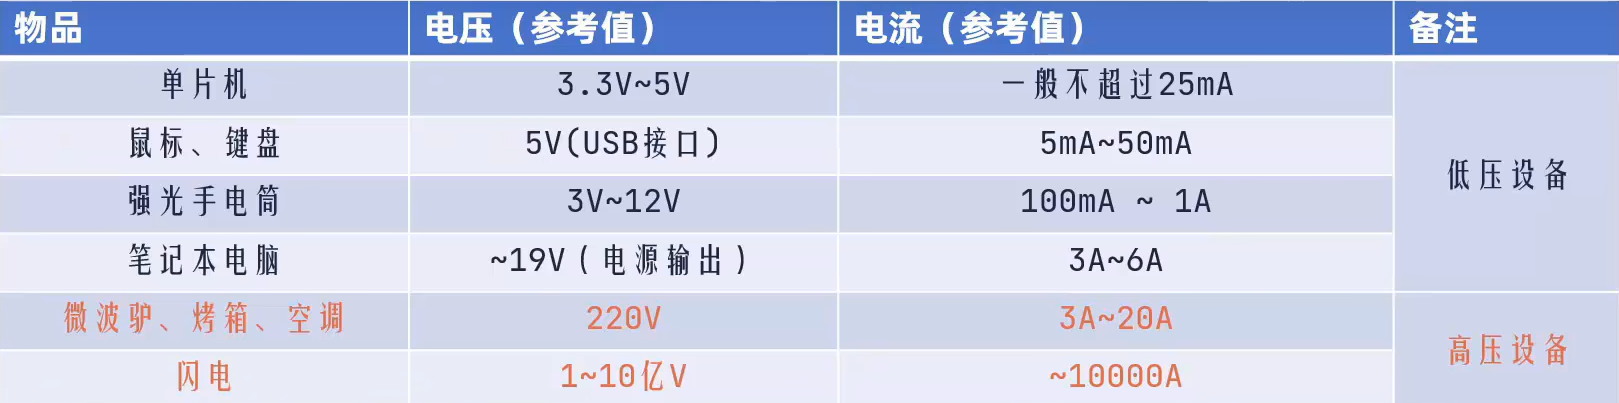
人体的安全电压是36V,注意用电安全
补充:瞬时电压是36V
持续接触的安全电压24V(潮湿环境12V)
安全电流10 mA
二、单片机概述
1.概述
单片机(Micro Controller Unit:MCU)是一种集成电路芯片,它集成了处理器、存储器、输入/输出接口及各种功能模块于一身。
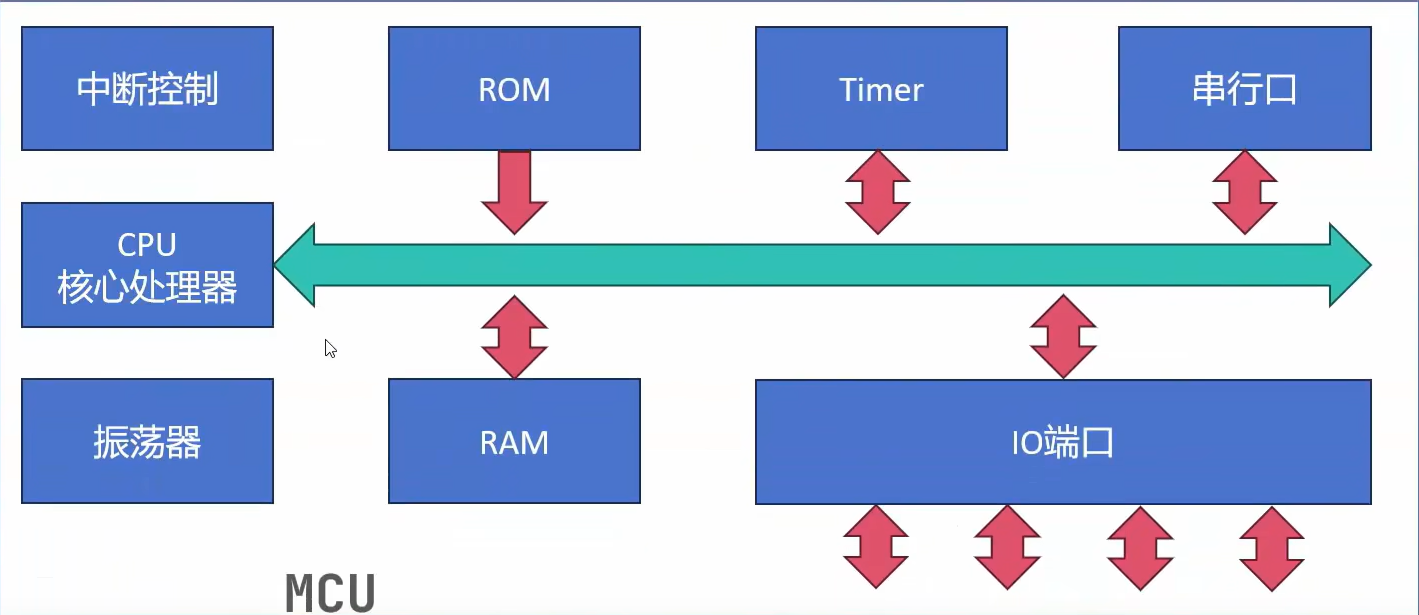
2.常见的MCU
单片机的分类主要基于其内核架构,如常见的:51内核、ARM内核、RISC-V内核
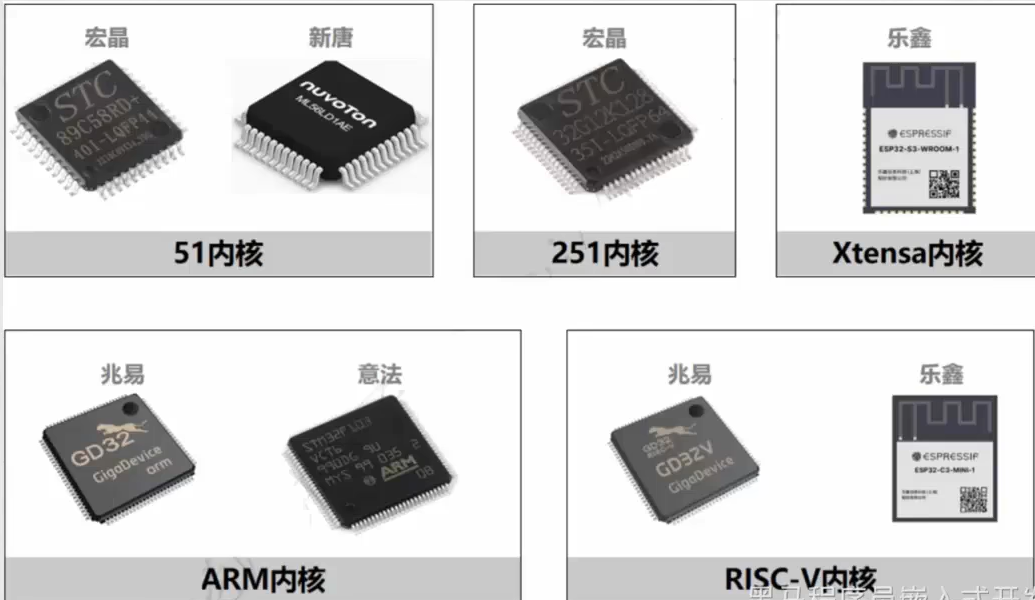
单片机主要用作于:微控制器。即基于逻辑程序(代码)控制(集成)电路的各类外设和资源
3.单片机控制原理
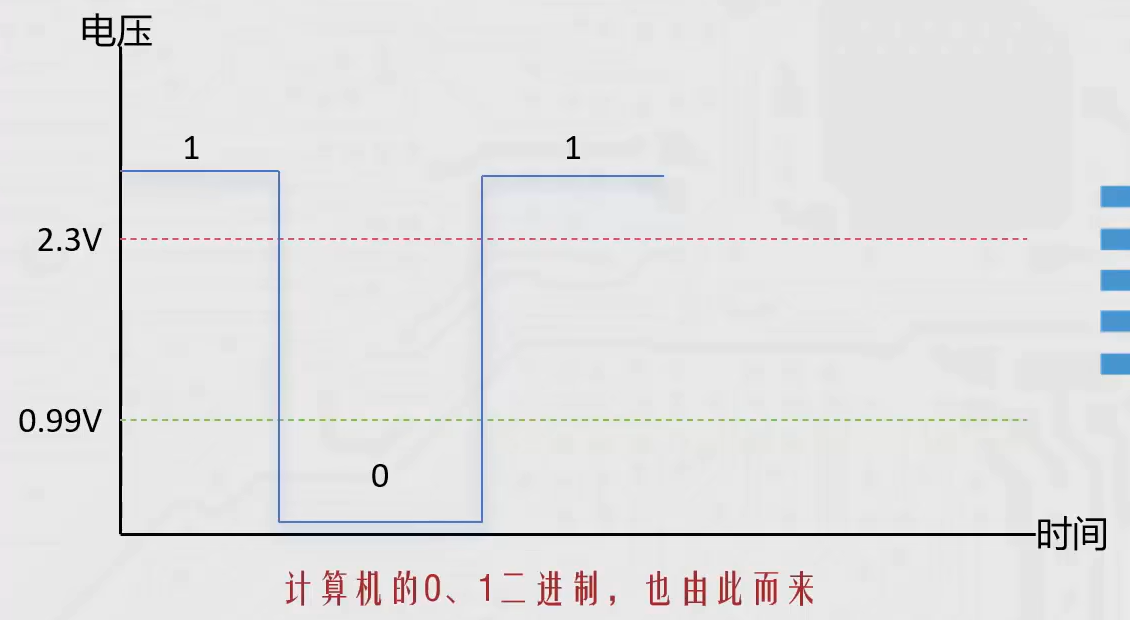
单片机通过 数字信号(高低电平) 控制外围设备。
-高电平,逻辑表示为1。通常认为大于供电电压(3.3V)的70%,即2.3V
-低电平,逻辑表示为0。通常认为小于供电电压(3.3V)的30%,即0.99V即,通过电压的高低(大于某个阈值、小于某个值)来决定0、1
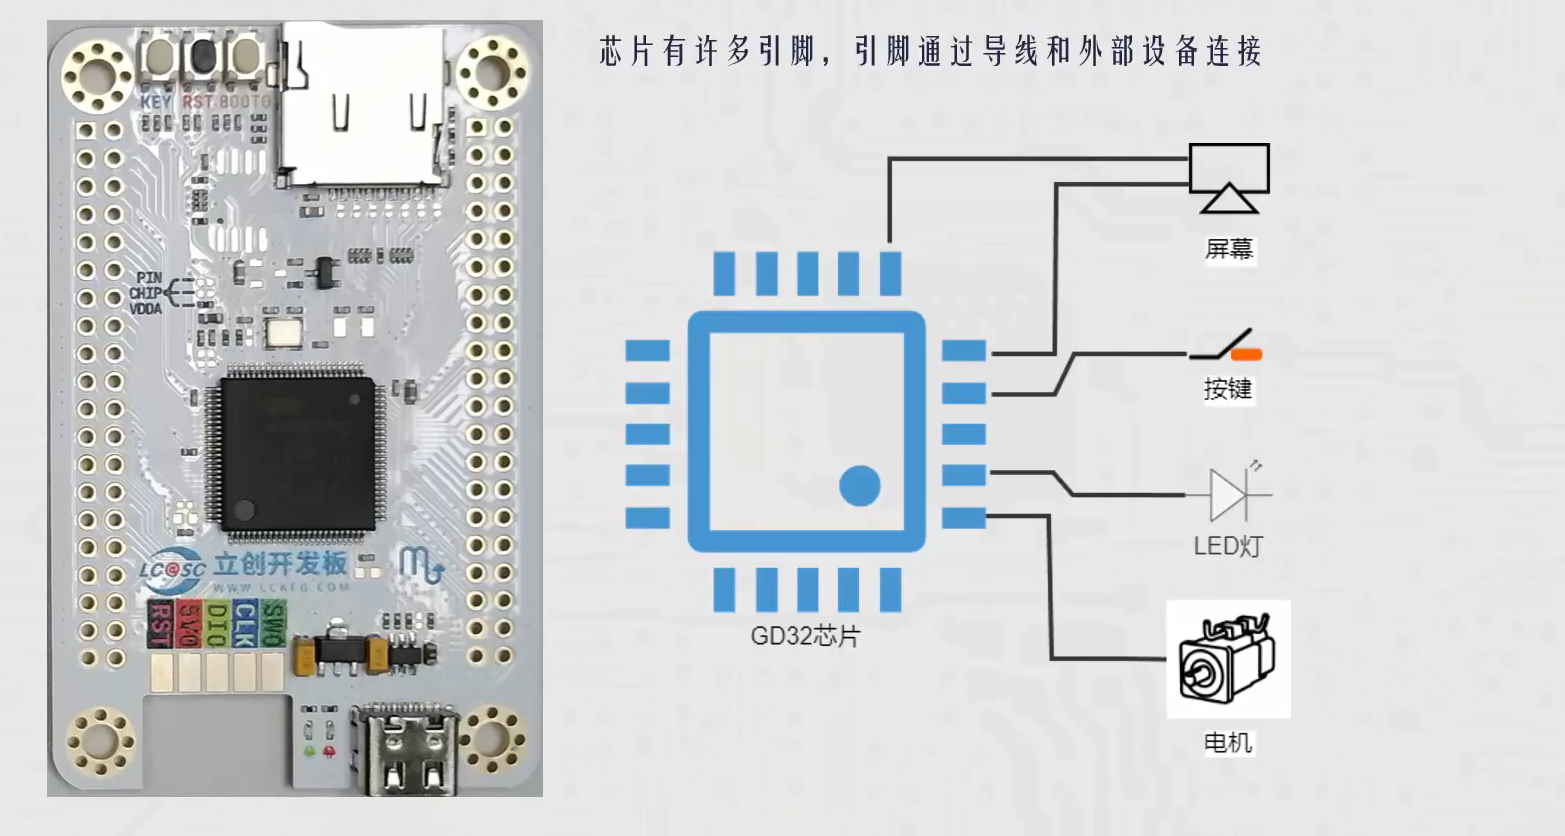
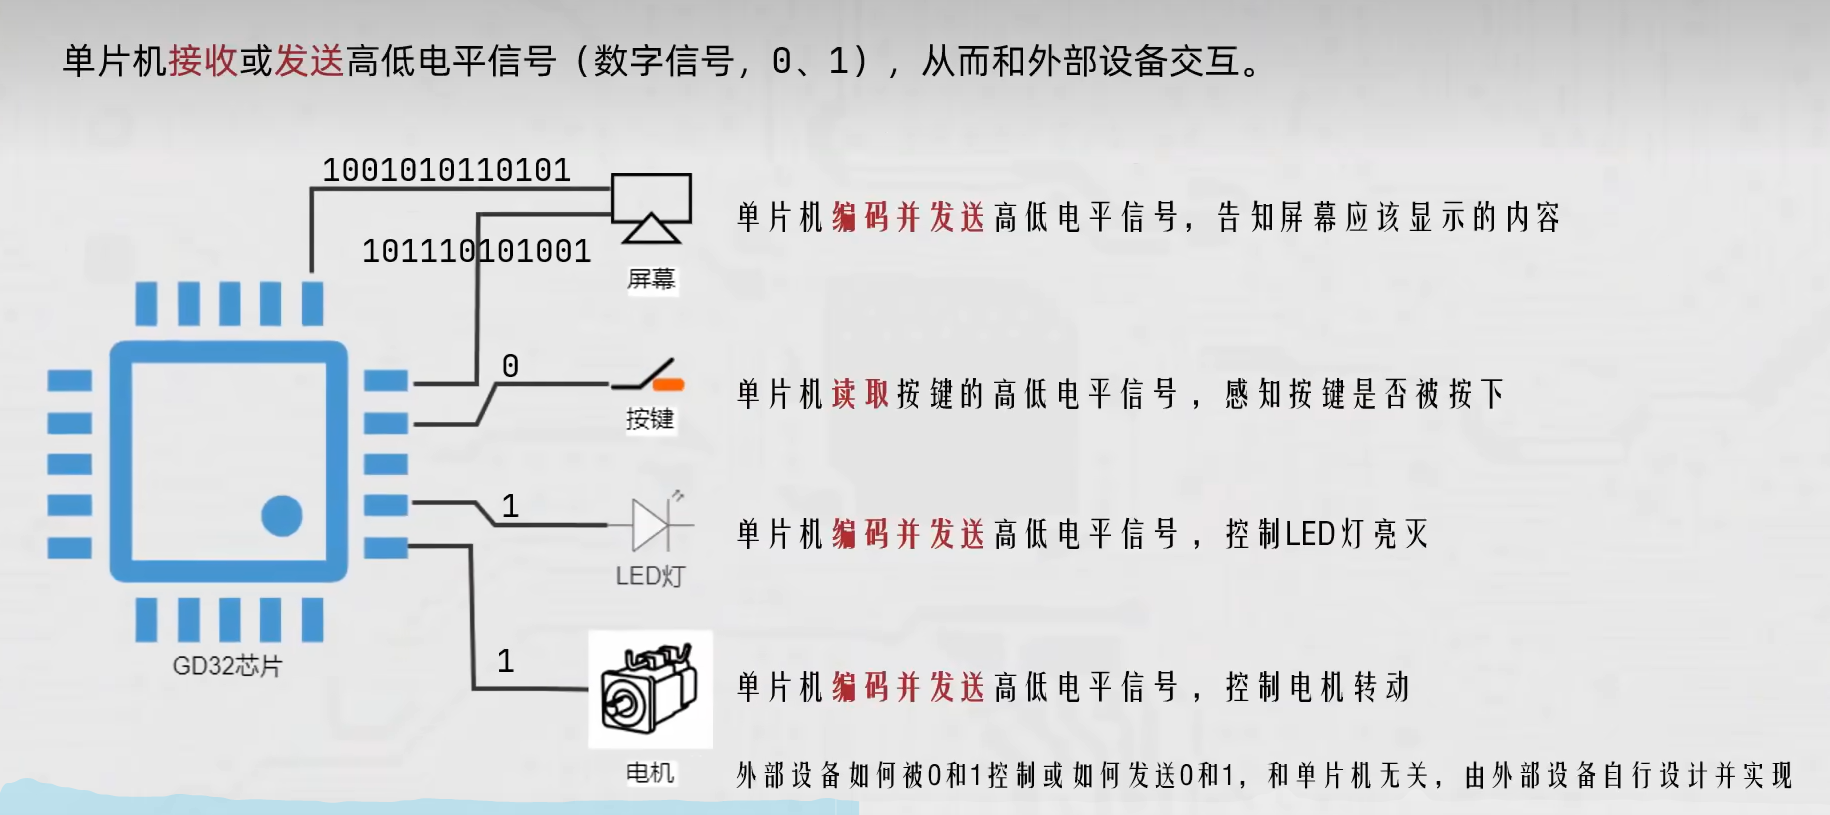
三、STM32简介
1.简介
STM32是ST公司基于ARMCortex-M内核开发的32位微控制器
STM32常应用在嵌入式领域如智能车、无人机、机器人无线通信、物联网、工业控制、娱乐电子产品等
STM32功能强大、性能优异片上资源丰富、功耗低,是一款经典的嵌入式微控制器
2.STM的种类
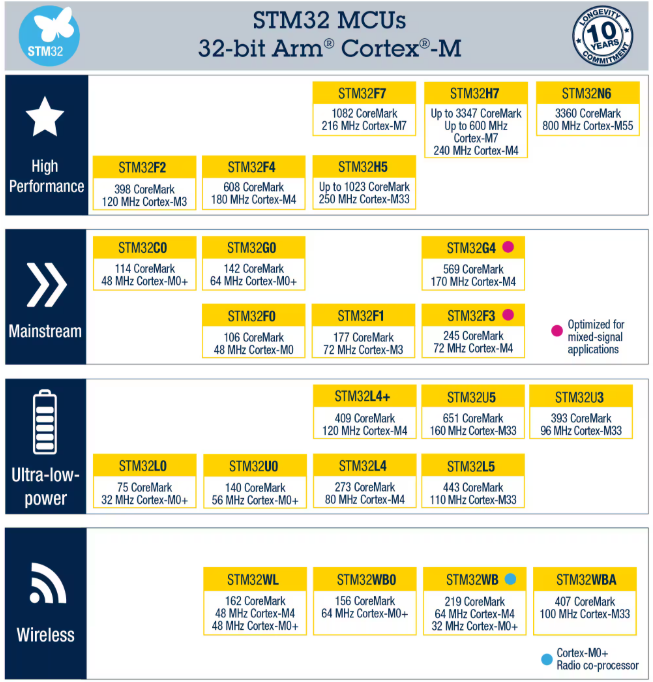
3.ARM简介
ARM既指ARM公司,也指ARM处理器内核
全世界超过ARM公司是全球领先的半导体知识产权(IP)提供商,全世界超过95%的智能手机和平板电脑都采用ARM架构
ARM公司设计ARM内核,半导体厂商完善内核周边电路并生产芯片
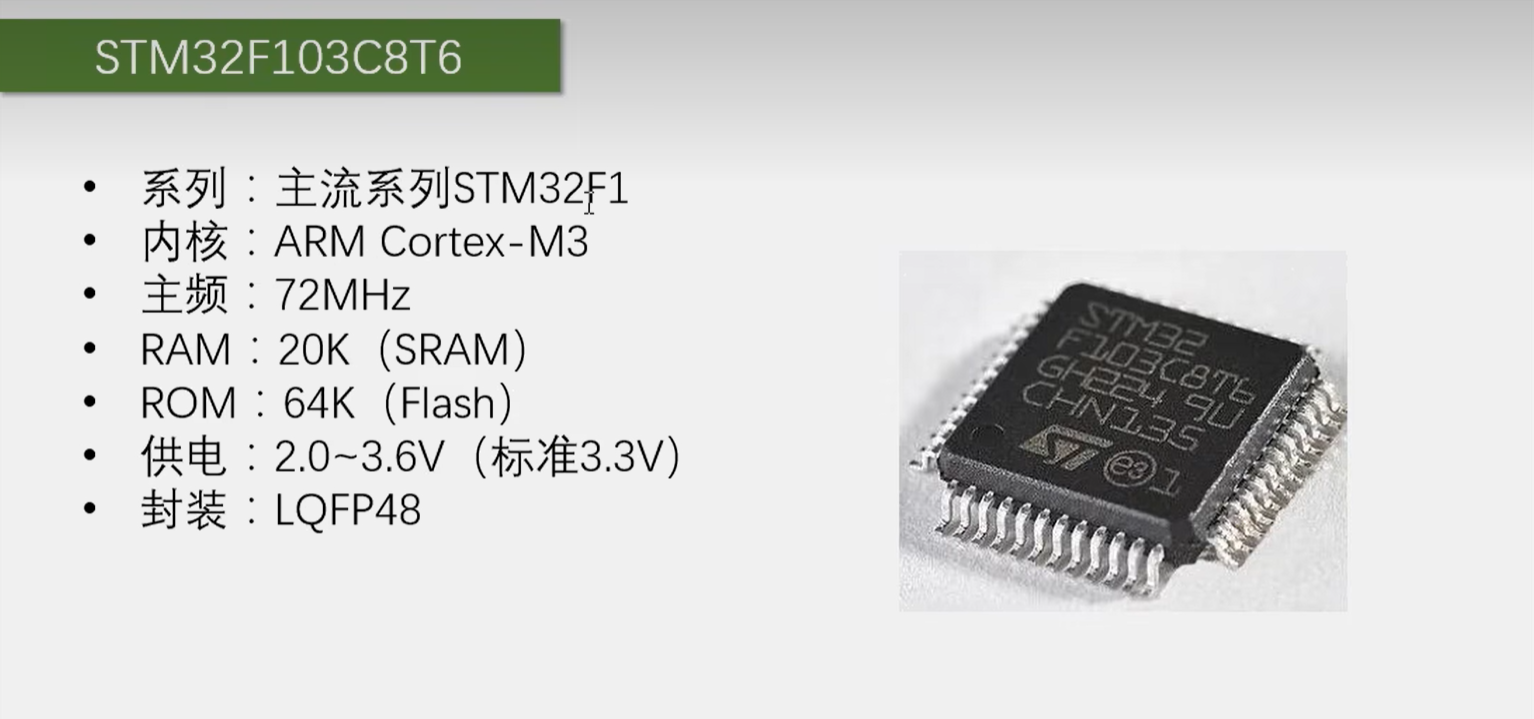
4.本次使用的STM32型号
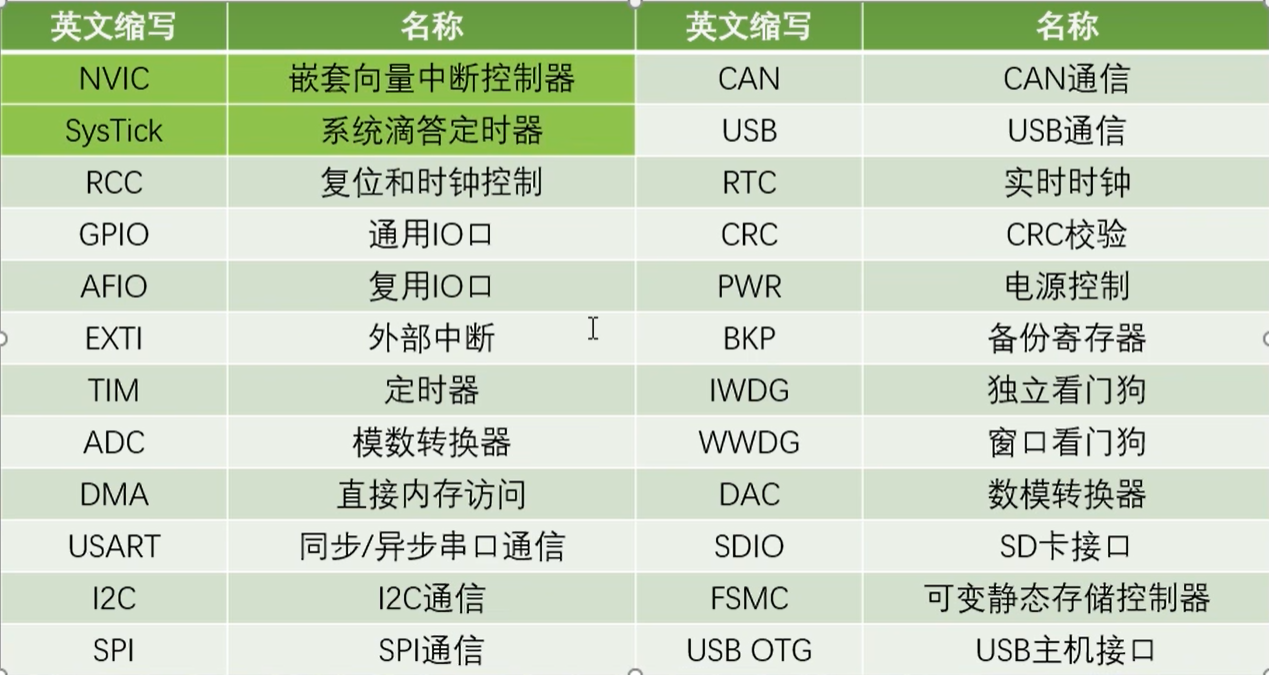
5.片上资源/外设
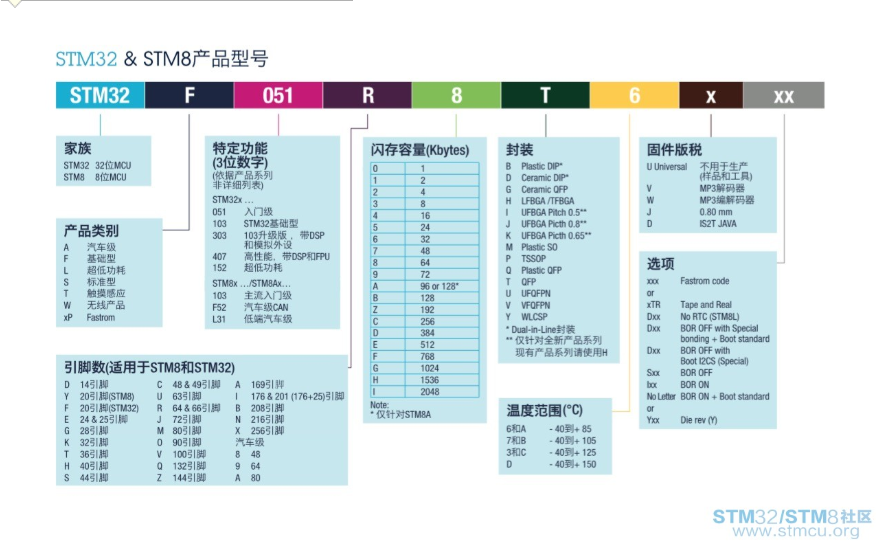
6.命名规则
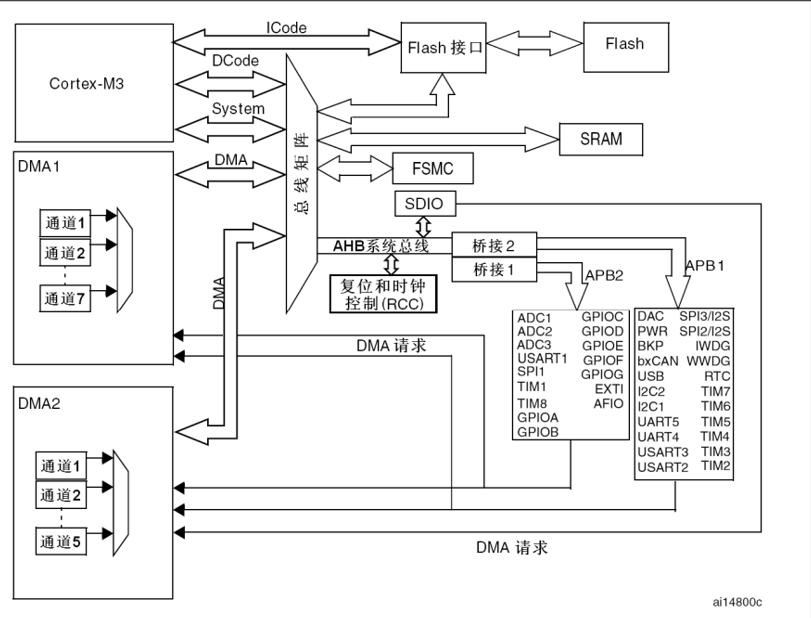
7.系统结构
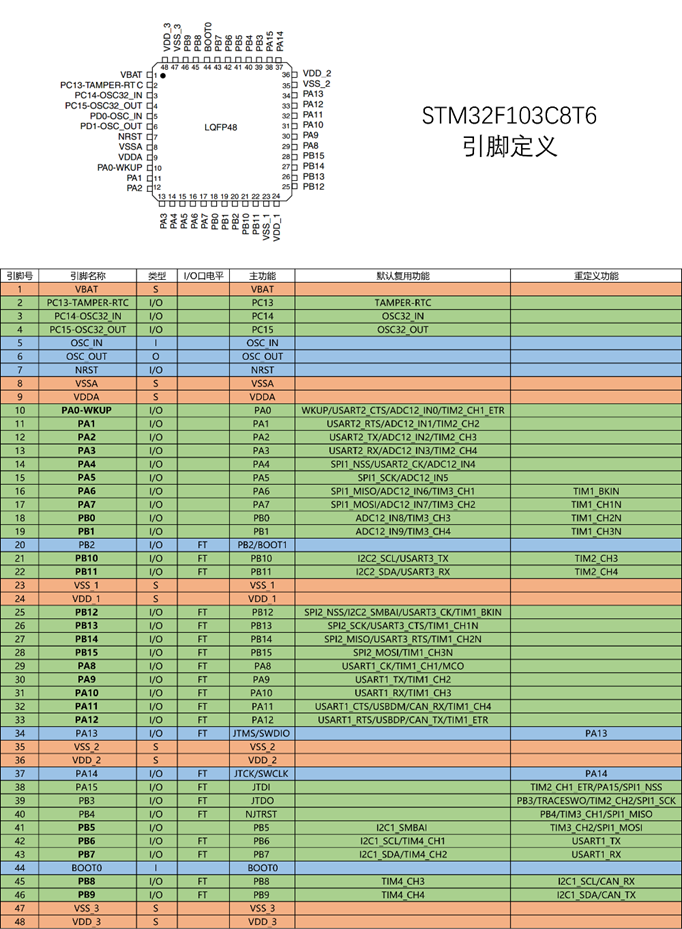
8.引脚定义
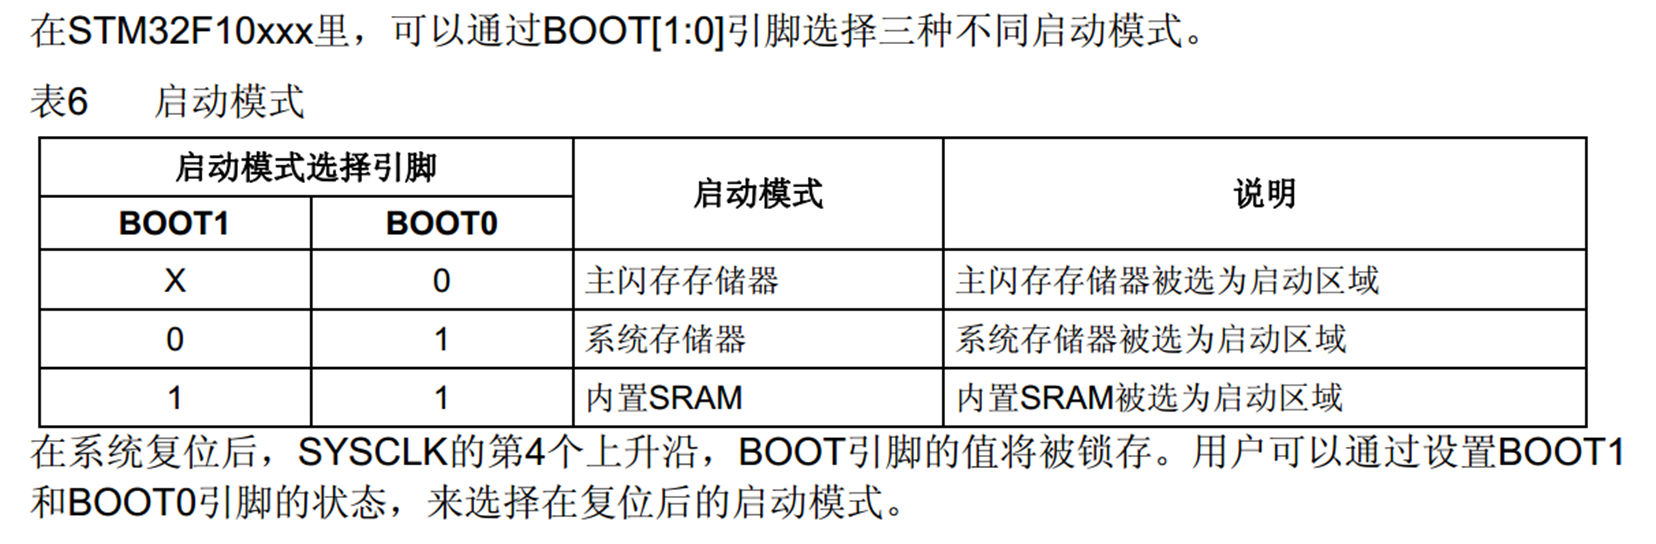
9.启动配置
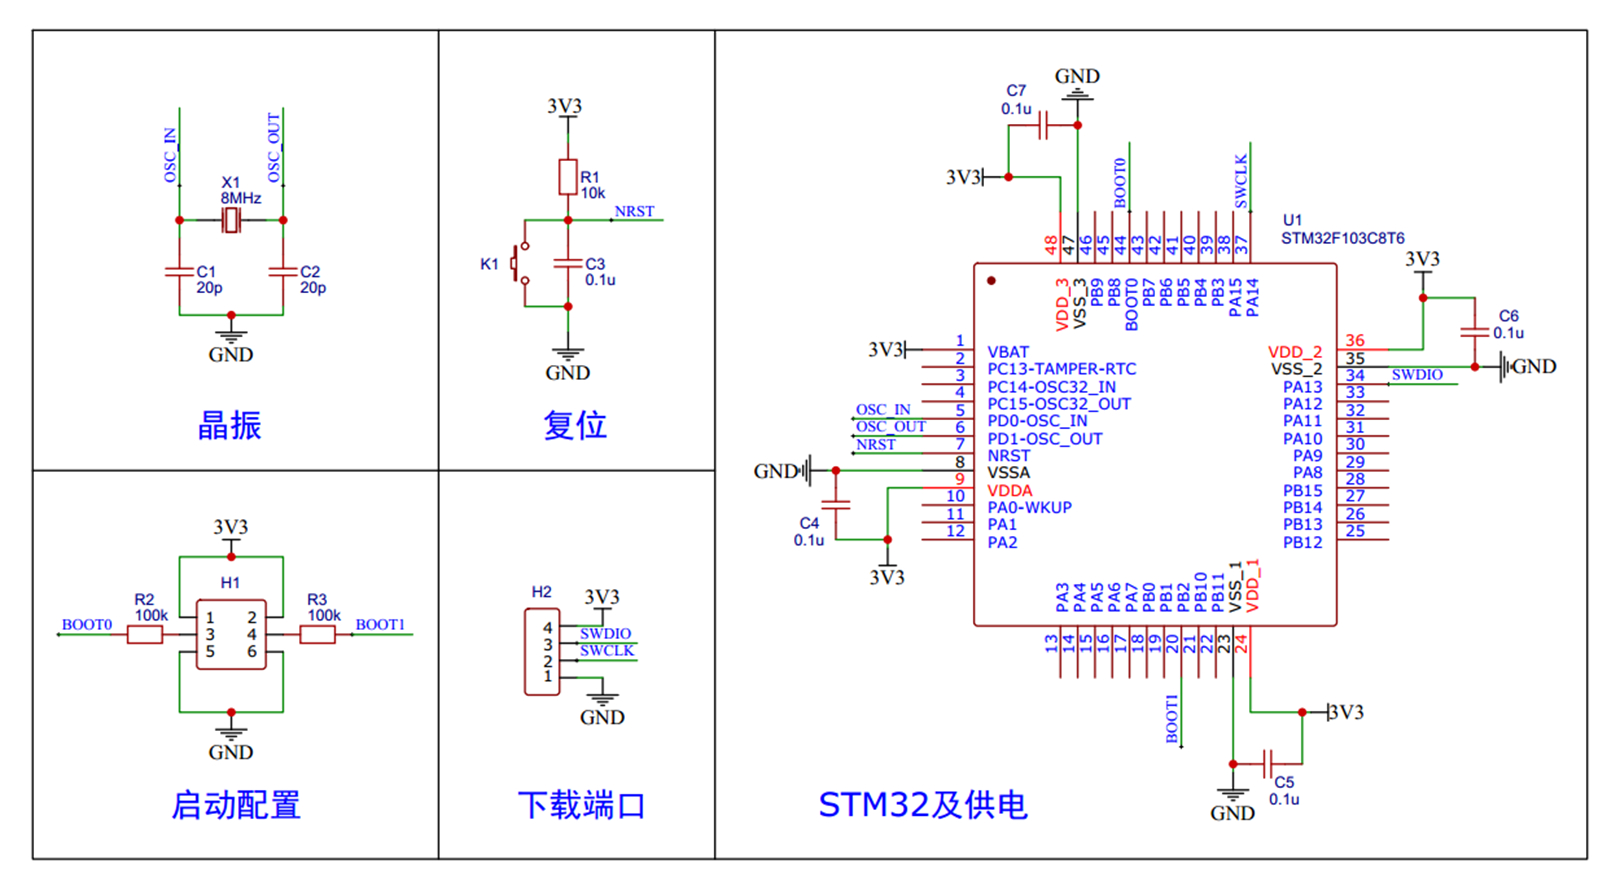
10.最小系统电路
四、软件安装与新建工程
1.软件安装
2.型号分类与缩写
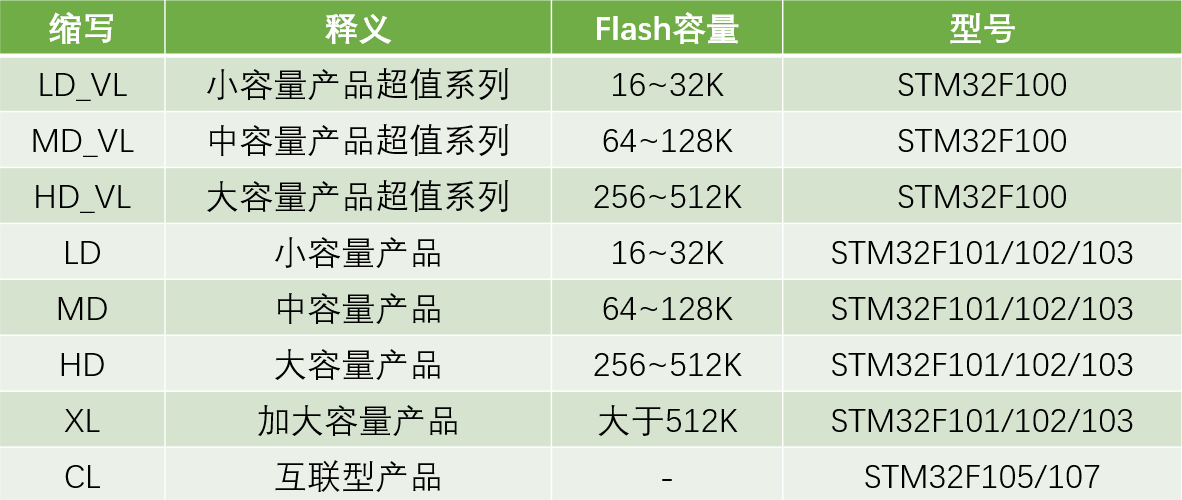
3.新建工程
①建立工程文件夹,Keil中新建工程,选择型号
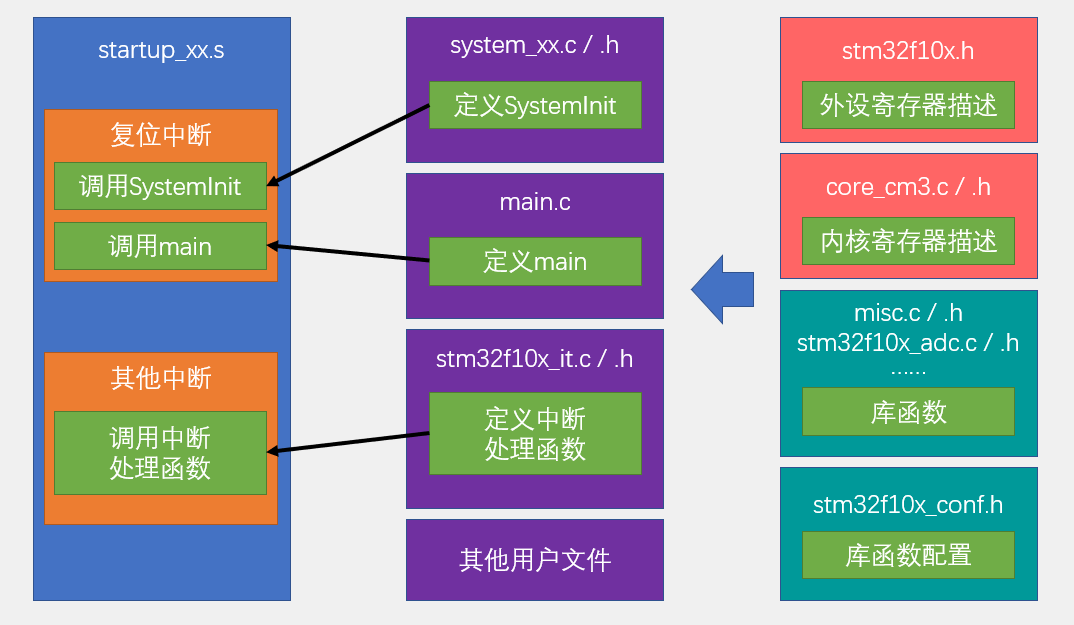
②工程文件夹里建立Start、Library、User等文件夹,复制固件库里面的文件到工程文件夹
③工程里对应建立Start、Library、User等同名称的分组,然后将文件夹内的文件添加到工程分组里
④工程选项,C/C++,Include Paths内声明所有包含头文件的文件夹
⑤工程选项,C/C++,Define内定义USE_STDPERIPH_DRIVER
⑥工程选项,Debug,下拉列表选择对应调试器,Settings,Flash Download里勾选Reset and Run
4.工程架构
五、GPIO通用输入输出口
1.GPIO输出
①简介
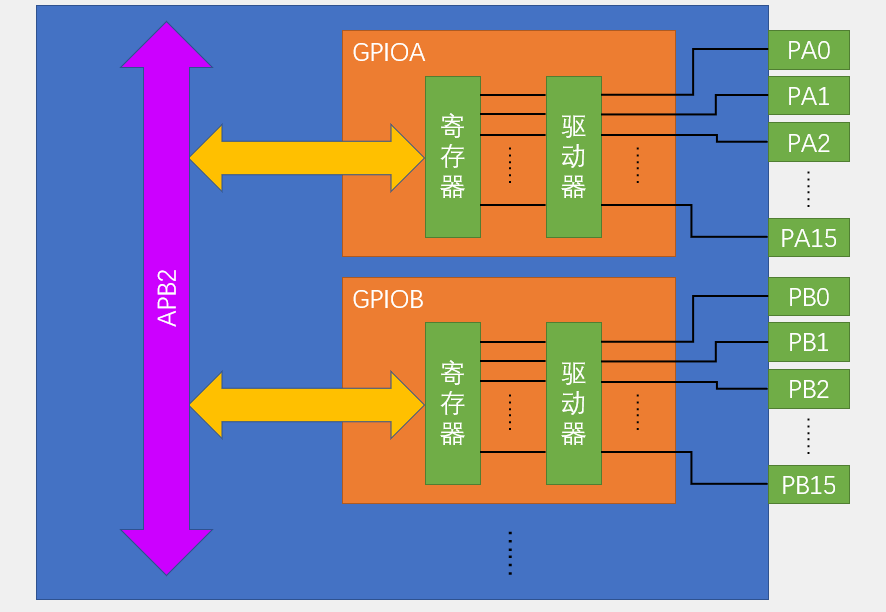
②GPIO基本结构
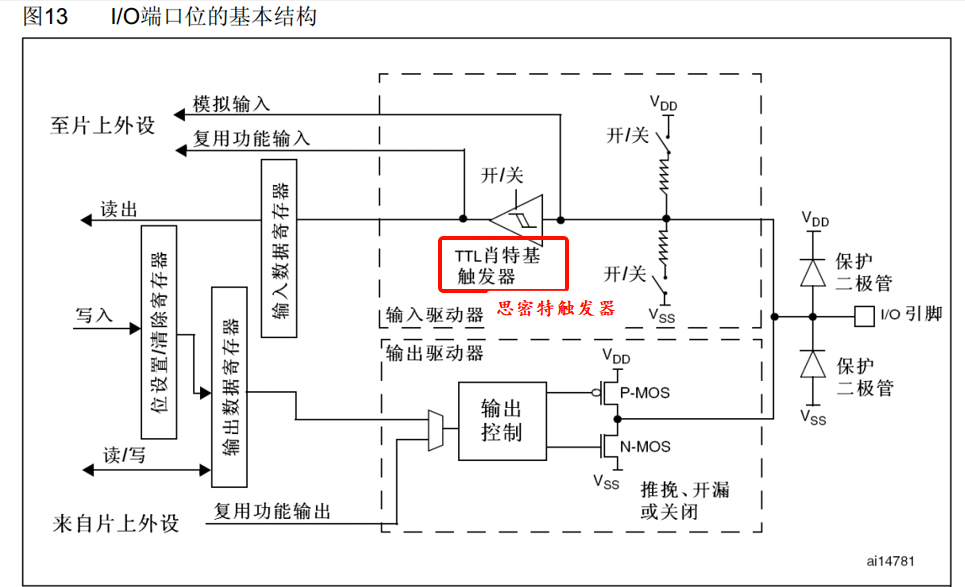
③GPIO位结构
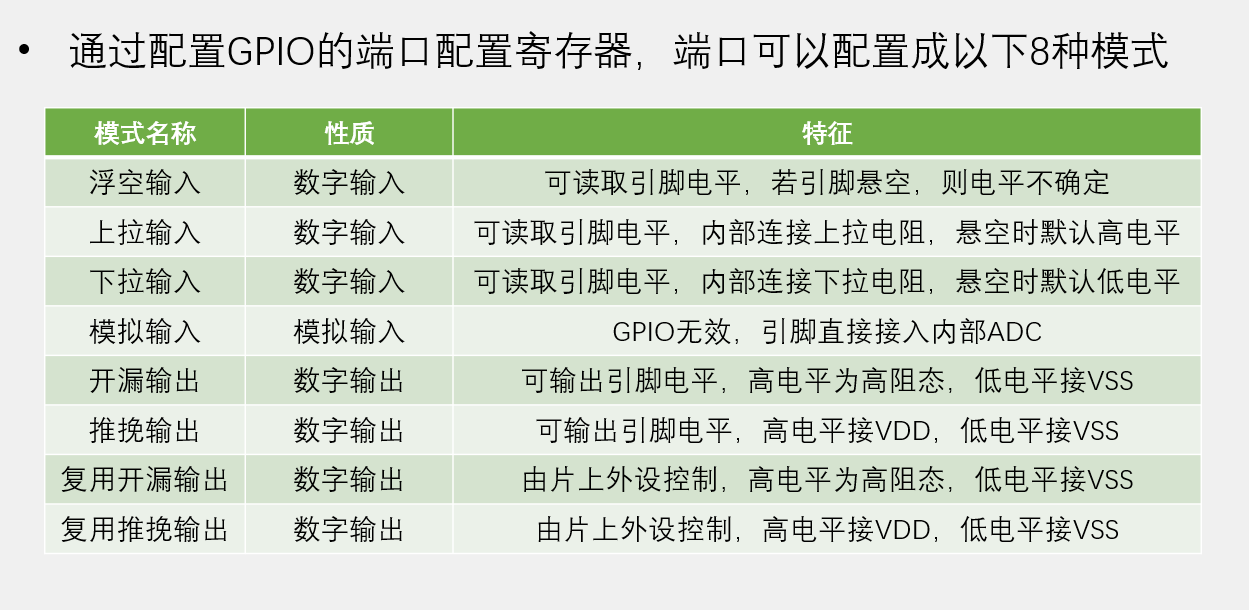
④GPIO的工作模式
2.LED和蜂鸣器
①简介
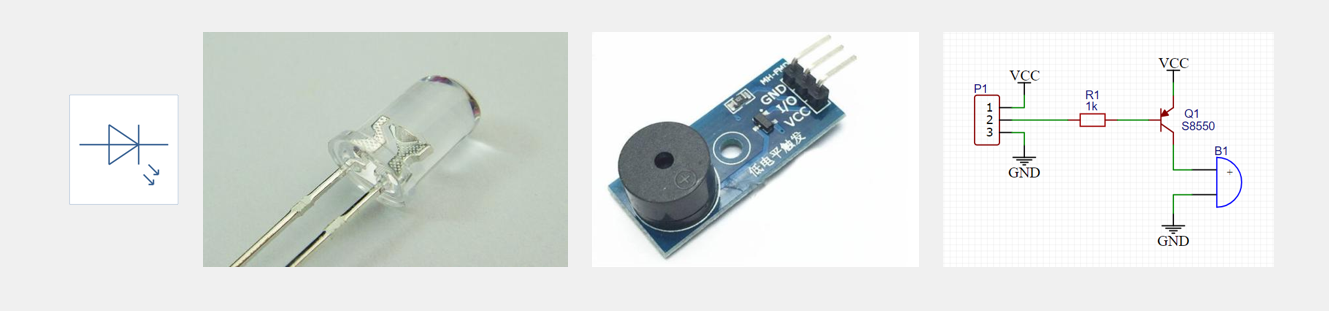
②LED灯
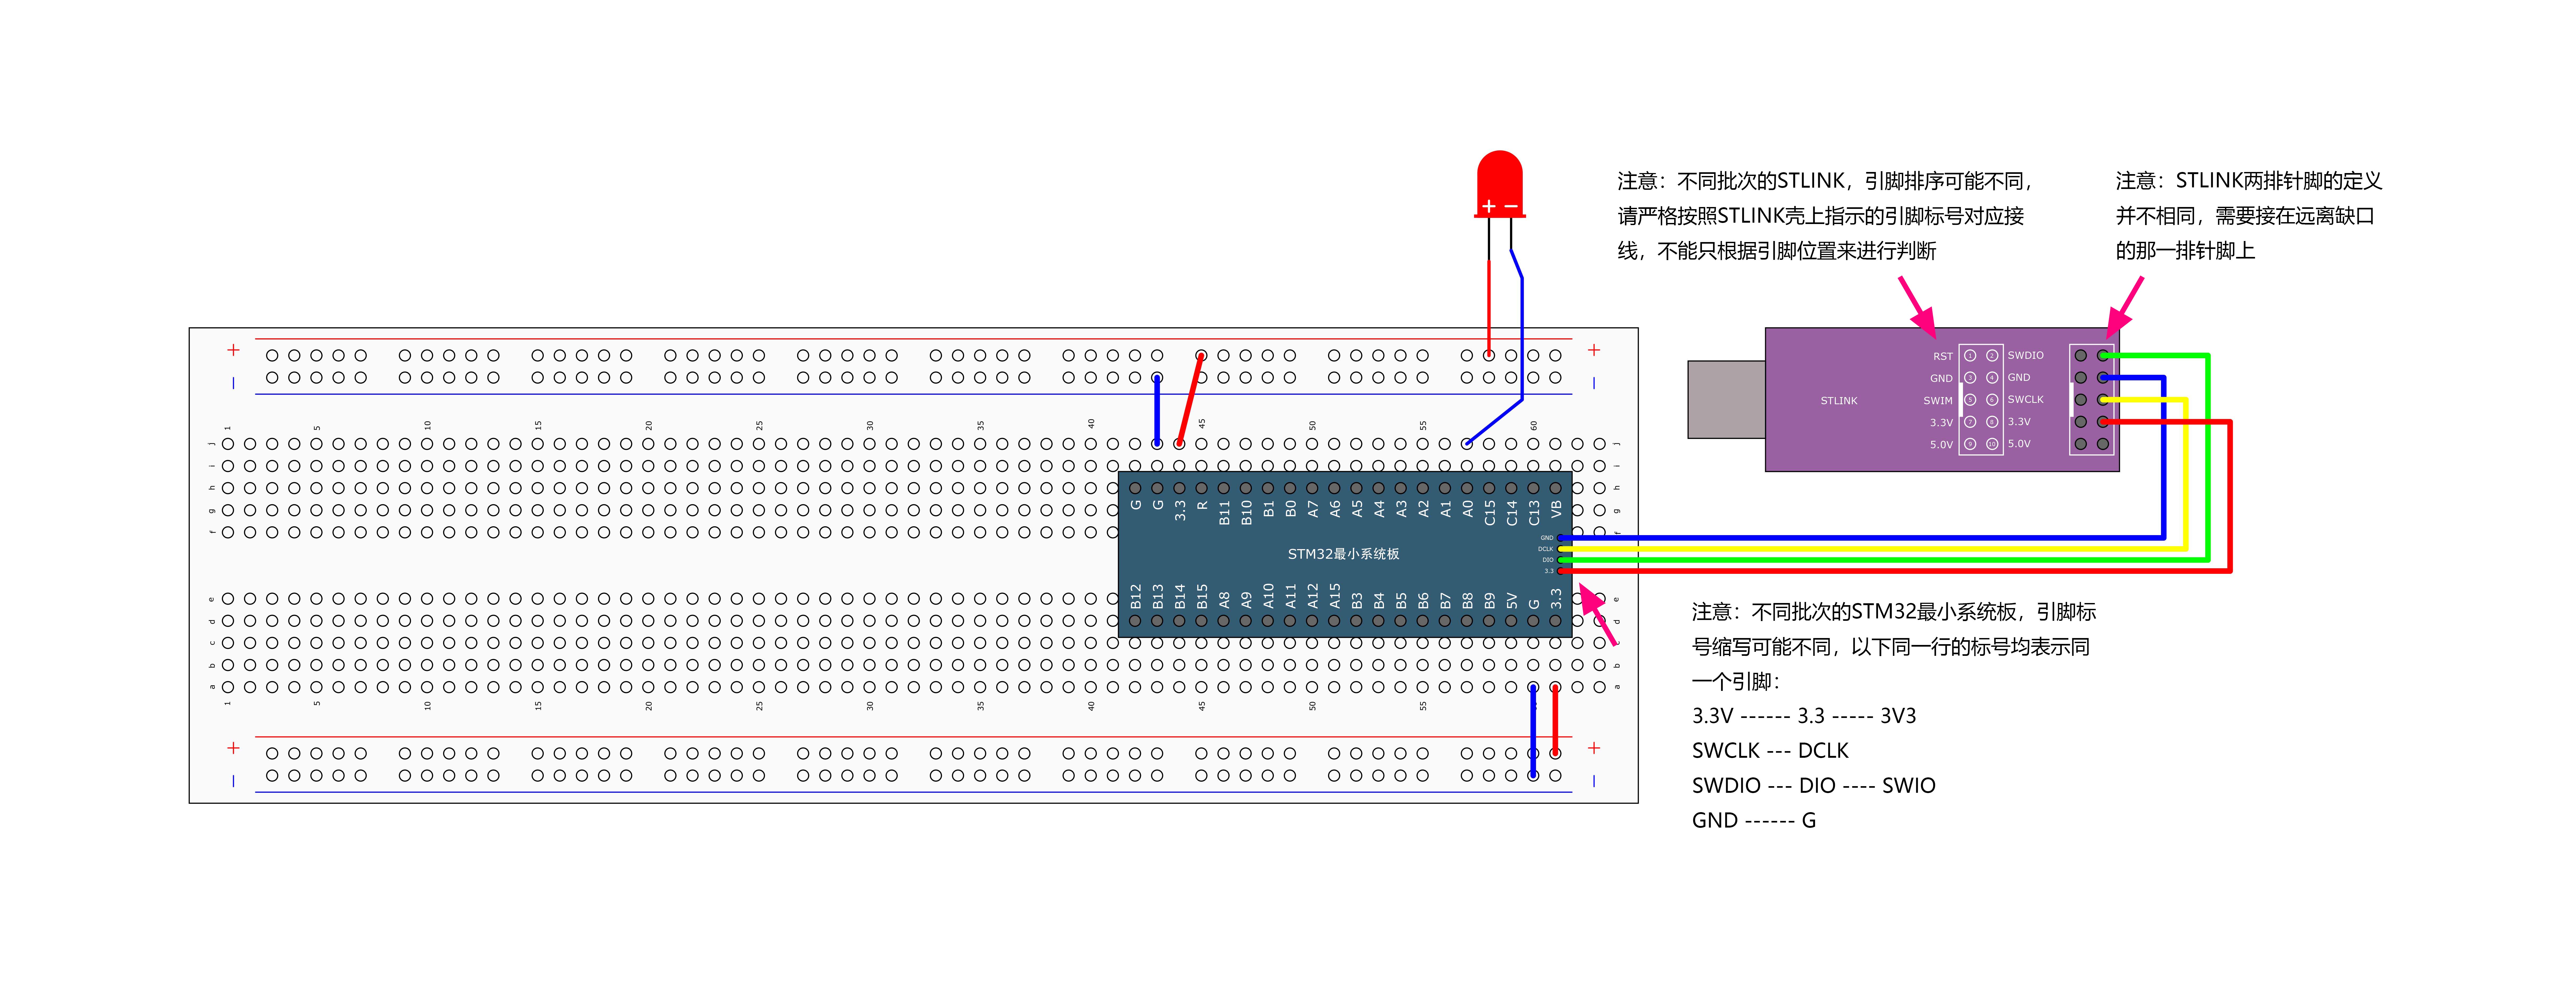
接线图:
代码:
#include "stm32f10x.h"                  // Device header
#include "Delay.h"
int main(void)
{
	RCC_APB2PeriphClockCmd(RCC_APB2Periph_GPIOA,ENABLE);


	GPIO_InitTypeDef GPIO_InitStructre;
	GPIO_InitStructre.GPIO_Mode = GPIO_Mode_Out_PP;
	GPIO_InitStructre.GPIO_Pin = GPIO_Pin_0;
	GPIO_InitStructre.GPIO_Speed = GPIO_Speed_50MHz;
	GPIO_Init(GPIOA,&GPIO_InitStructre);


	while (1)
	{
			GPIO_ResetBits(GPIOA,GPIO_Pin_0);
			Delay_ms(500);
			GPIO_SetBits(GPIOA,GPIO_Pin_0);
			Delay_ms(500);
			GPIO_WriteBit(GPIOA,GPIO_Pin_0,Bit_RESET);
			Delay_ms(500);
			GPIO_WriteBit(GPIOA,GPIO_Pin_0,Bit_SET);
		    Delay_ms(500);
	}
}
③蜂鸣器
代码:
#include "stm32f10x.h"                  // Device header
#include "Delay.h"
int main(void)
{
	RCC_APB2PeriphClockCmd(RCC_APB2Periph_GPIOB,ENABLE);


	GPIO_InitTypeDef GPIO_InitStructre;
	GPIO_InitStructre.GPIO_Mode = GPIO_Mode_Out_PP;
	GPIO_InitStructre.GPIO_Pin = GPIO_Pin_12;
	GPIO_InitStructre.GPIO_Speed = GPIO_Speed_50MHz;
	GPIO_Init(GPIOB,&GPIO_InitStructre);


	while (1)
	{
		GPIO_ResetBits(GPIOB,GPIO_Pin_12);
		Delay_ms(100);
		GPIO_SetBits(GPIOB,GPIO_Pin_12);
		Delay_ms(100);
		GPIO_ResetBits(GPIOB,GPIO_Pin_12);
		Delay_ms(100);
		GPIO_SetBits(GPIOB,GPIO_Pin_12);
		Delay_ms(700);

	}
}
3.GPIO输入
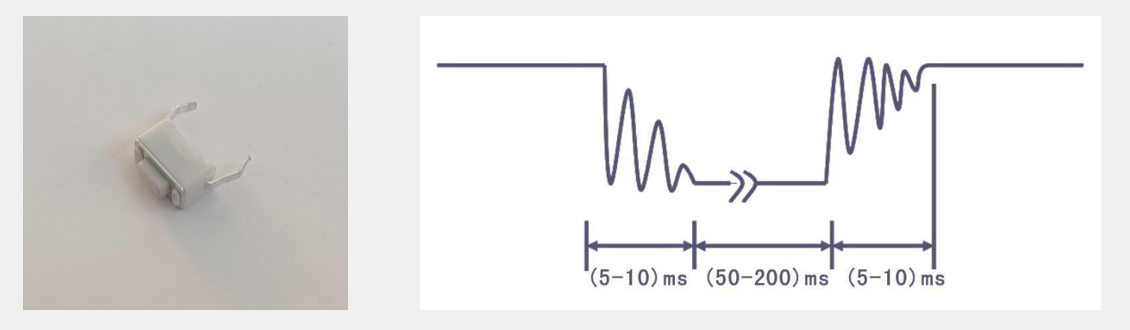
①按键
②传感器模块
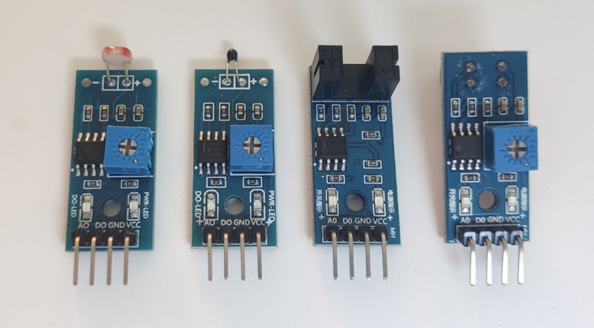
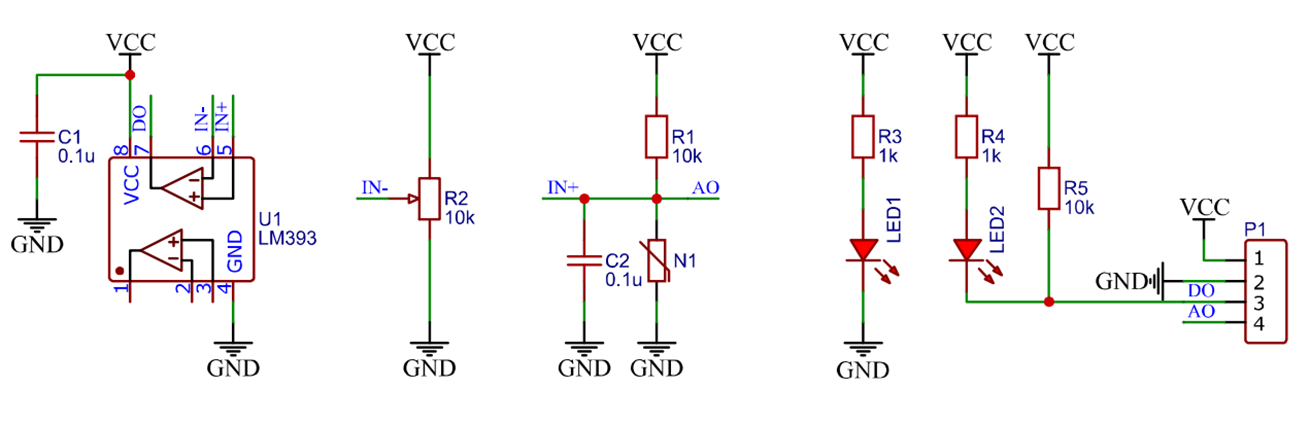
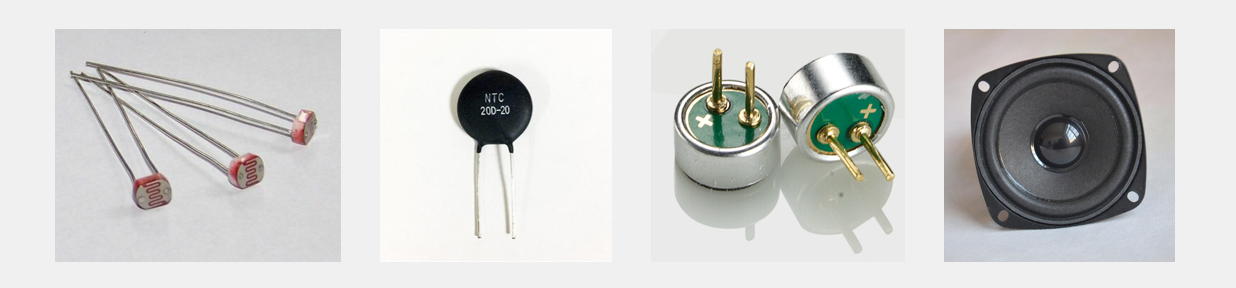
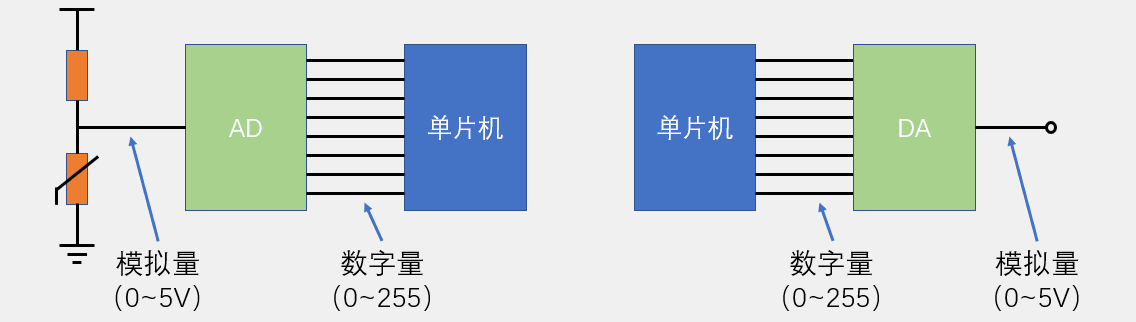
③AD/DA简介
④硬件电路模型
⑤运算放大器
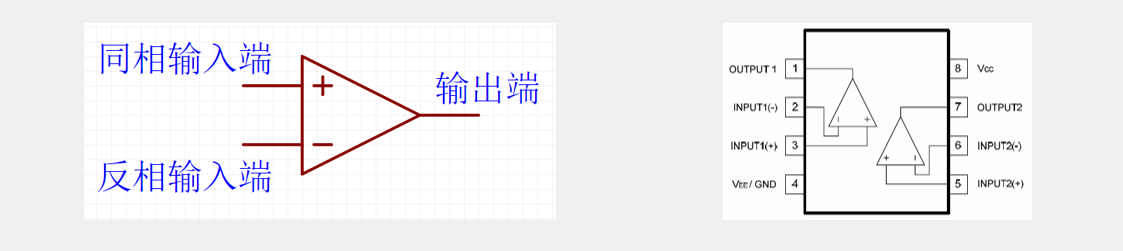
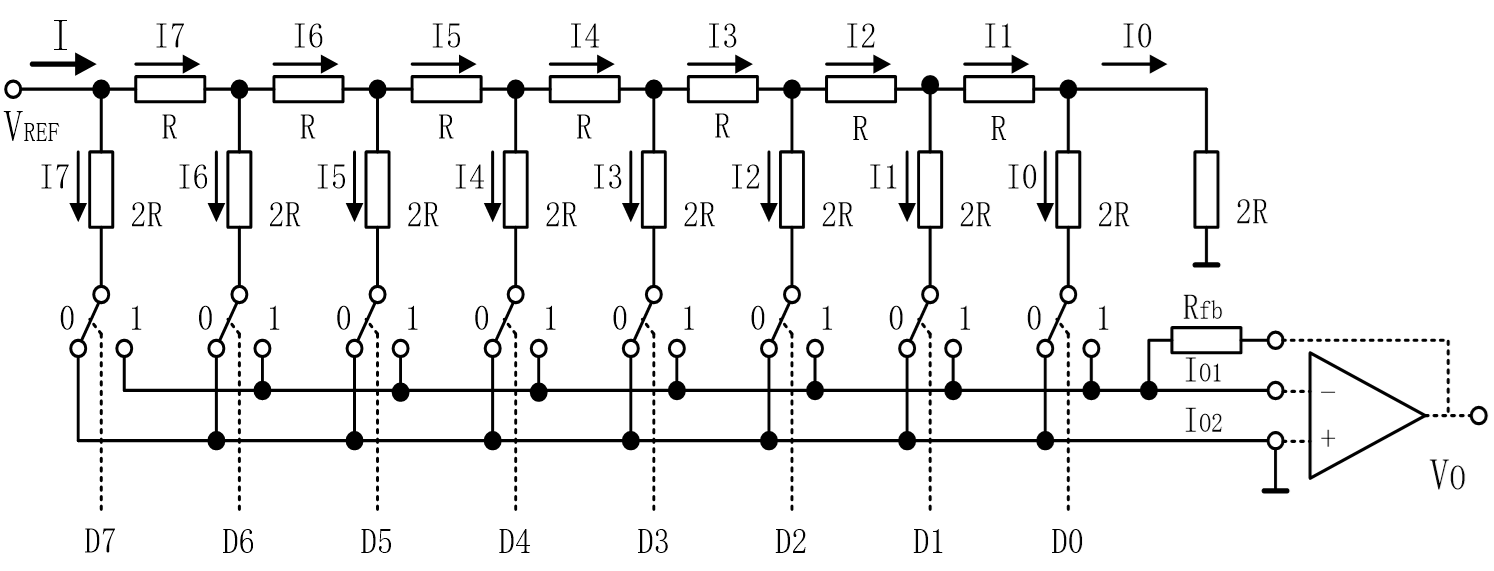
⑥DA原理
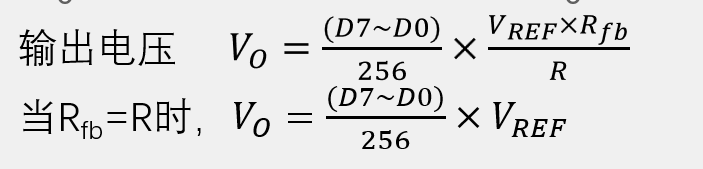
T型电阻网络DA转换器:
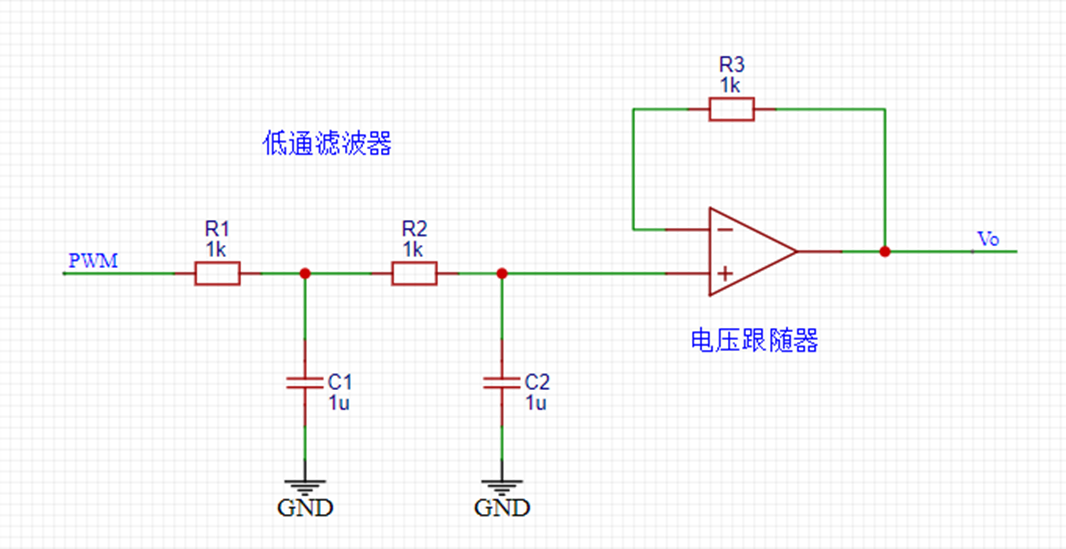
PWM型DA转换器:
⑦AD原理
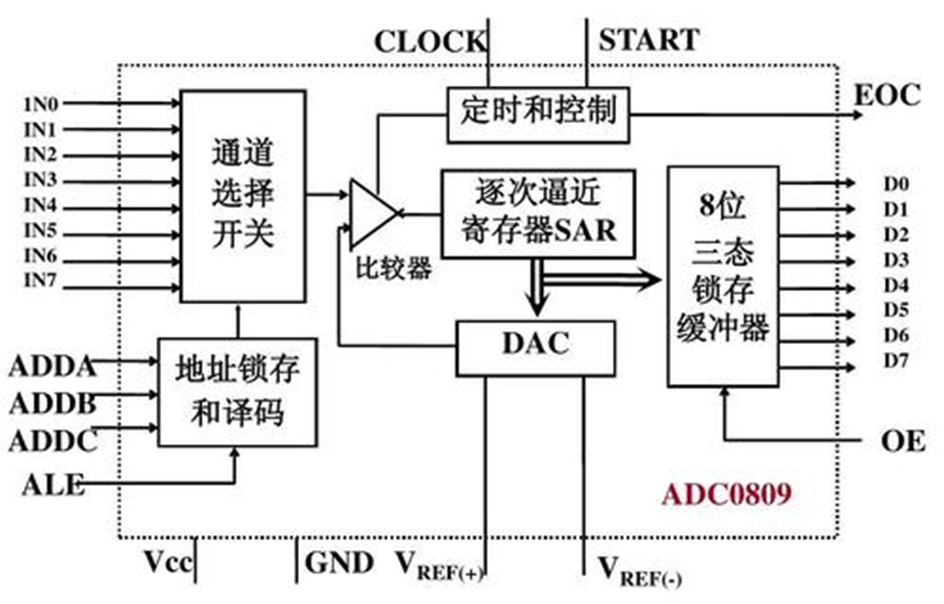
逐次逼近型AD转换器:

⑧AD/DA性能指标
⑨C语言各类定义
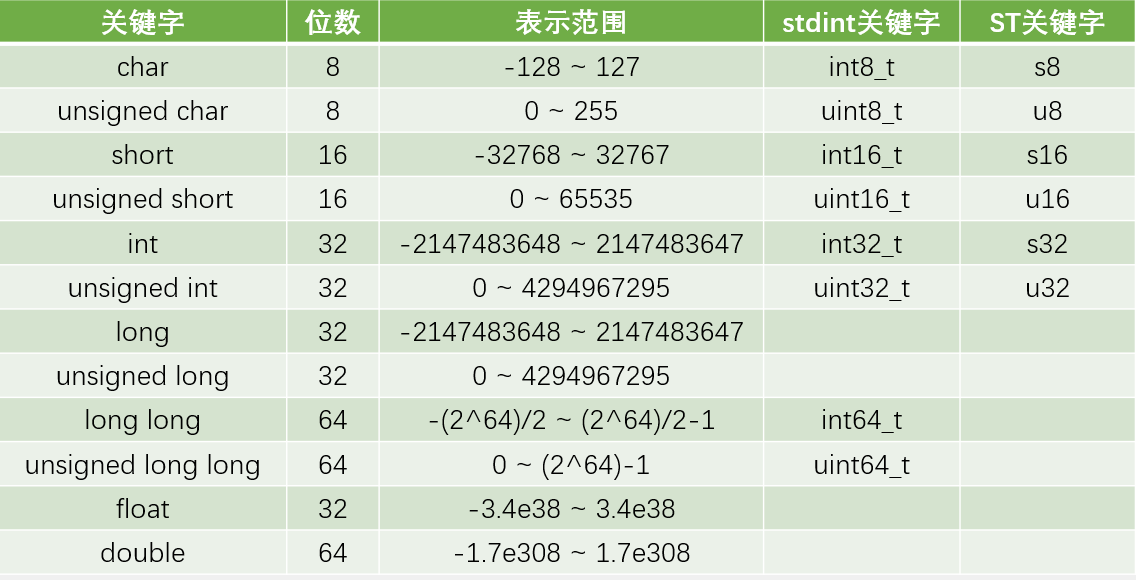
数据类型:
宏定义:
关键字:#define
用途:用一个字符串代替一个数字,便于理解,防止出错;提取程序中经常出现的参数,便于快速修改
定义宏定义:#define ABC 12345
引用宏定义: int a = ABC; //等效于int a = 12345;
C语言结构体
关键字:struct
用途:数据打包,不同类型变量的集合
定义结构体变量:
struct{char x; int y; float z;} StructName;
因为结构体变量类型较长,所以通常用typedef更改变量类型名
引用结构体成员:
StructName.x = 'A';
StructName.y = 66;
StructName.z = 1.23;
或 pStructName->x = 'A'; //pStructName为结构体的地址 pStructName->y = 66;
pStructName->z = 1.23;
C语言枚举:
关键字:enum
用途:定义一个取值受限制的整型变量,用于限制变量取值范围;宏定义的集合
定义枚举变量:
enum{FALSE = 0, TRUE = 1} EnumName;
因为枚举变量类型较长,所以通常用typedef更改变量类型名
引用枚举成员:
EnumName = FALSE;
EnumName = TRUE;
⑩按键控制LED&光敏传感器控制蜂鸣器
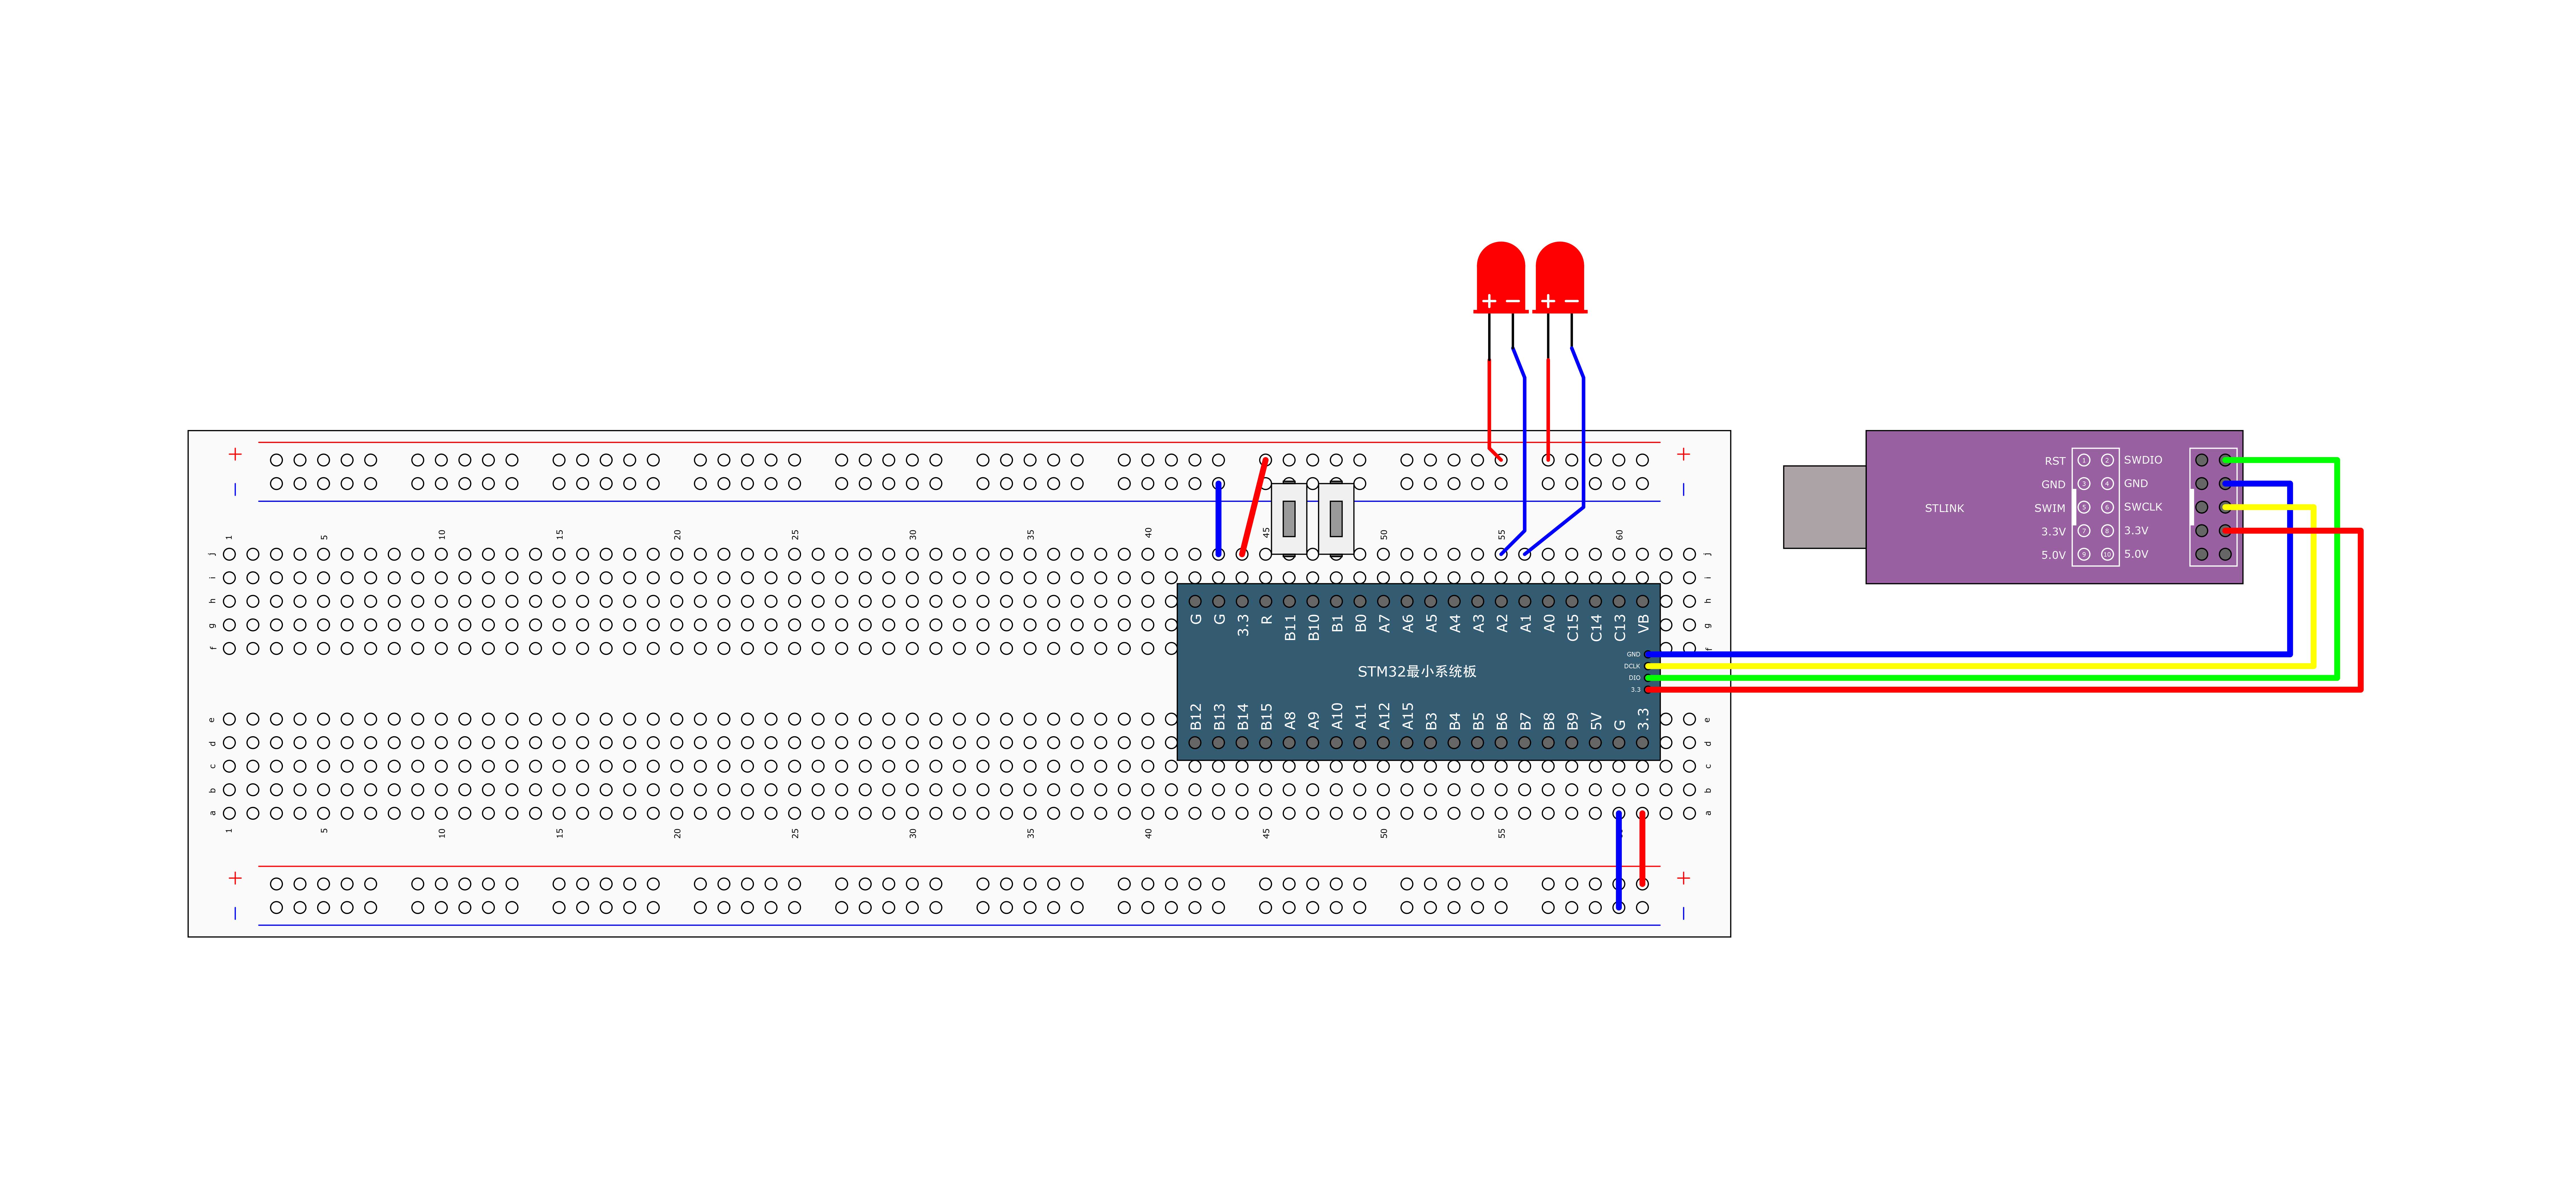
(1)按键控制LED
接线图:
代码:
#include "stm32f10x.h"                  // Device header
#include "Delay.h"
void Key_Init(void)
{
	RCC_APB2PeriphClockCmd(RCC_APB2Periph_GPIOB,ENABLE);
	GPIO_InitTypeDef GPIO_InitStructure;
	GPIO_InitStructure.GPIO_Mode = GPIO_Mode_IPU;
	GPIO_InitStructure.GPIO_Pin = GPIO_Pin_1 | GPIO_Pin_11;
	GPIO_InitStructure.GPIO_Speed = GPIO_Speed_50MHz;
	GPIO_Init(GPIOB,&GPIO_InitStructure);
}
uint8_t Key_GetNum(void)
{
	uint8_t KeyNum = 0;
	if (GPIO_ReadInputDataBit(GPIOB,GPIO_Pin_1)==0)
	{
		Delay_ms(20);
		while(GPIO_ReadInputDataBit(GPIOB,GPIO_Pin_1)==0);
		Delay_ms(20);
		KeyNum = 1;
	}
		if (GPIO_ReadInputDataBit(GPIOB,GPIO_Pin_11)==0)
	{
		Delay_ms(20);
		while(GPIO_ReadInputDataBit(GPIOB,GPIO_Pin_11)==0);
		Delay_ms(20);
		KeyNum = 2;
	}
	return KeyNum;
}
#include "stm32f10x.h"                  // Device header

void LED_Init(void)
{
	RCC_APB2PeriphClockCmd(RCC_APB2Periph_GPIOA,ENABLE);

	GPIO_InitTypeDef GPIO_InitStructure;
	GPIO_InitStructure.GPIO_Mode = GPIO_Mode_Out_PP;
	GPIO_InitStructure.GPIO_Pin =GPIO_Pin_1 | GPIO_Pin_2;
	GPIO_InitStructure.GPIO_Speed = GPIO_Speed_50MHz;
	GPIO_Init(GPIOA,&GPIO_InitStructure);

	GPIO_SetBits(GPIOA,GPIO_Pin_1 | GPIO_Pin_2);
}

void LED1_ON(void)
{
	GPIO_ResetBits(GPIOA,GPIO_Pin_1);
}

void LED1_OFF(void)
{
	GPIO_SetBits(GPIOA,GPIO_Pin_1);
}

void LED1_Turn(void)
{
	if(GPIO_ReadOutputDataBit(GPIOA,GPIO_Pin_1) == 0)
	{
		GPIO_SetBits(GPIOA,GPIO_Pin_1);
	}else
	{
		GPIO_ResetBits(GPIOA,GPIO_Pin_1);
	}
}

void LED2_ON(void)
{
	GPIO_ResetBits(GPIOA,GPIO_Pin_2);
}

void LED2_OFF(void)
{
	GPIO_SetBits(GPIOA,GPIO_Pin_2);
}
void LED2_Turn(void)
{
	if(GPIO_ReadOutputDataBit(GPIOA,GPIO_Pin_2) == 0)
	{
		GPIO_SetBits(GPIOA,GPIO_Pin_2);
	}else
	{
		GPIO_ResetBits(GPIOA,GPIO_Pin_2);
	}
}
#include "stm32f10x.h"                  // Device header
#include "Delay.h"
#include "LED.h"
#include "Key.h"

uint8_t KeyNum;

int main(void)
{
	LED_Init();
	Key_Init();
	while (1)
	{
		KeyNum = Key_GetNum();
		if(KeyNum == 1){
			LED1_Turn();
		}
		if(KeyNum == 2){
			LED2_Turn();
		}
	}
}
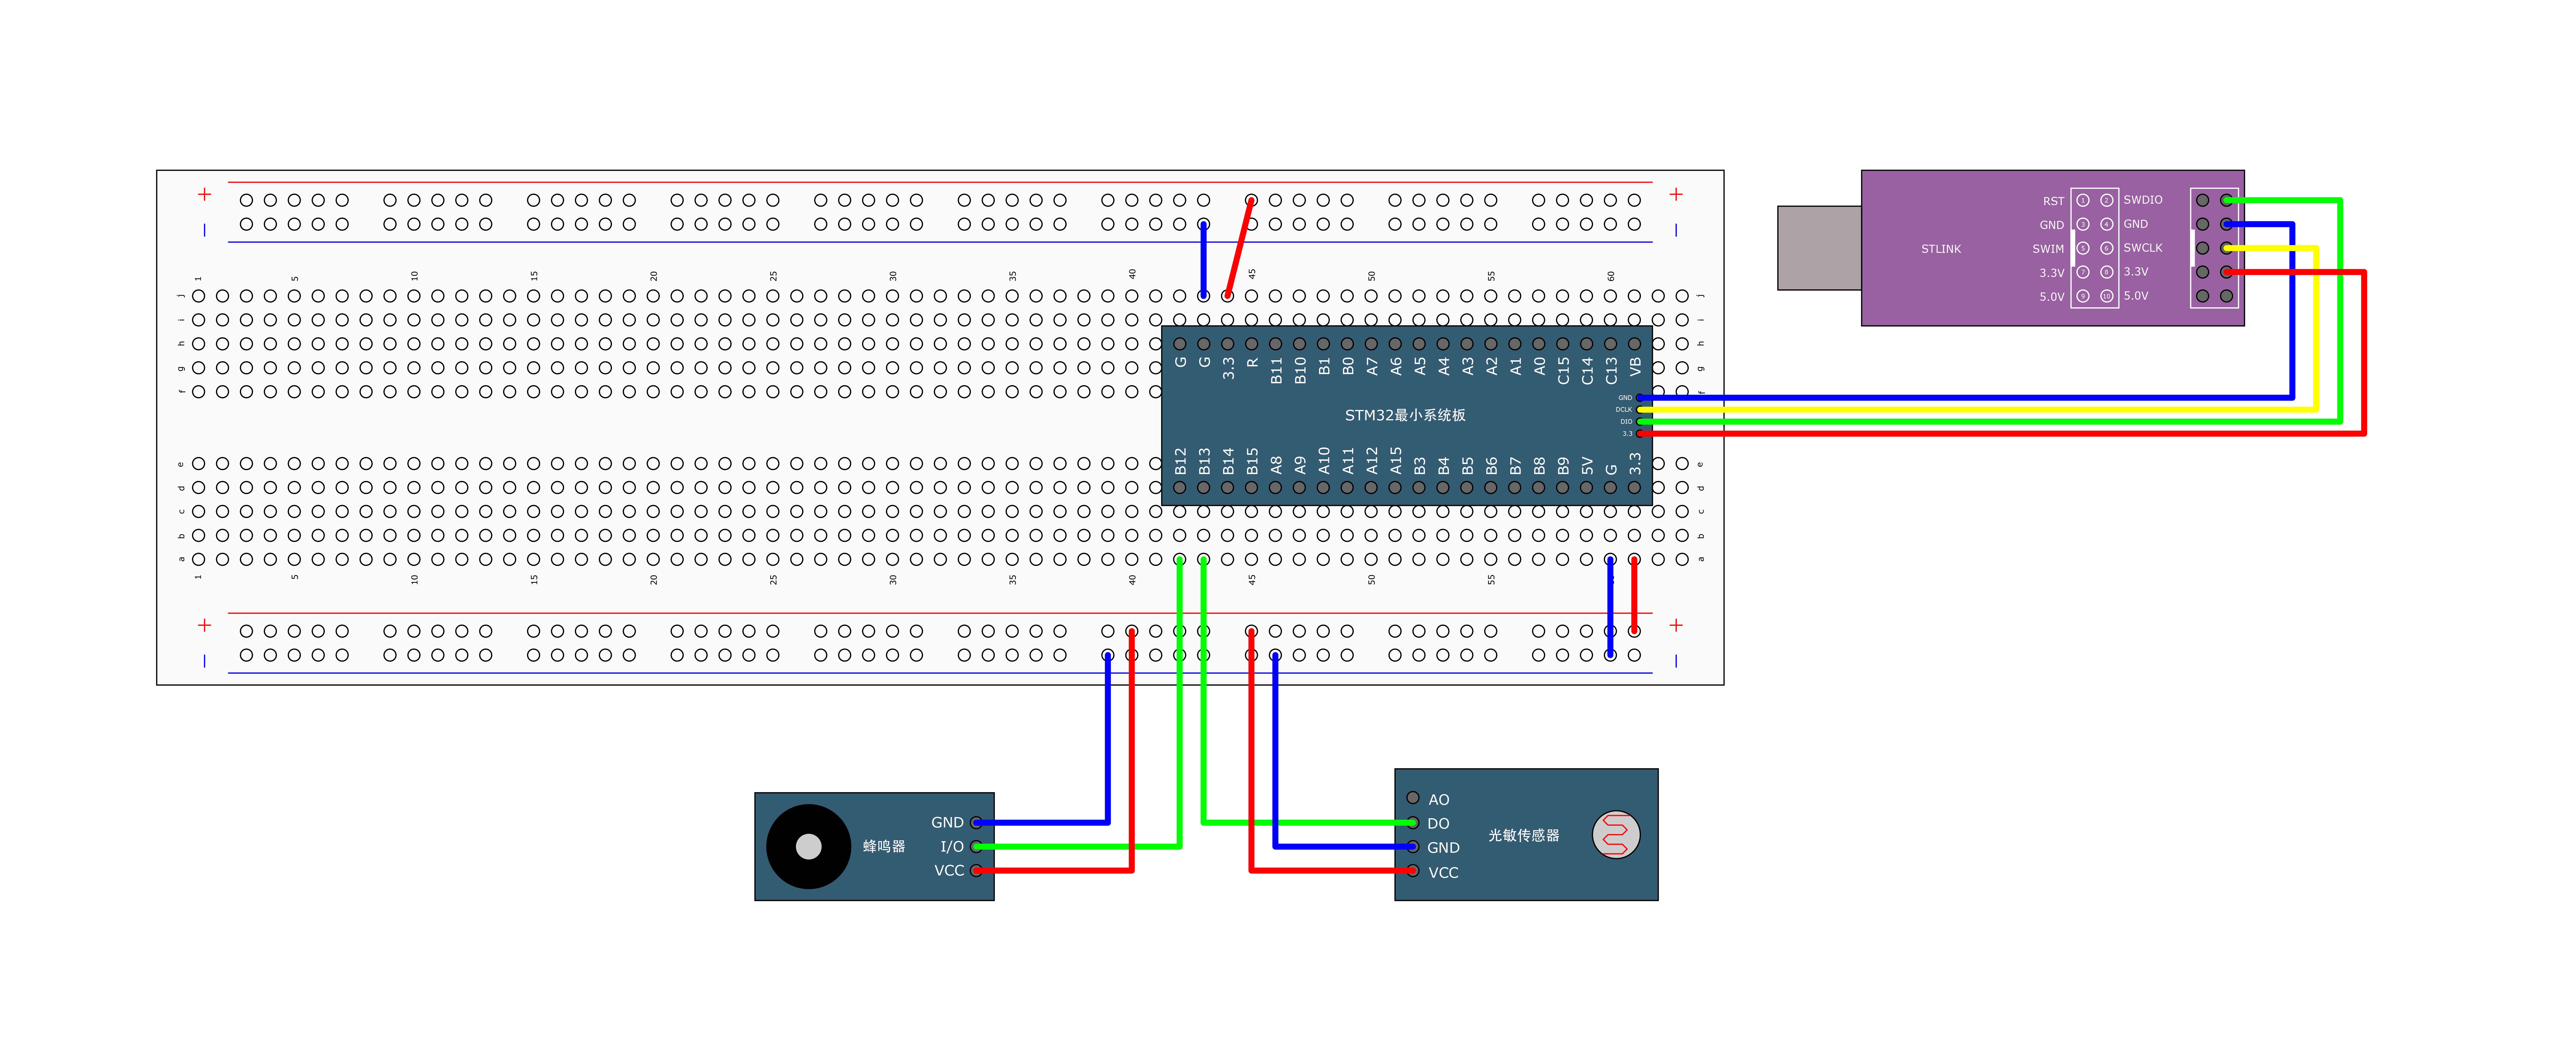
(2)光敏传感器控制蜂鸣器
接线图:
代码:
#include "stm32f10x.h"                  // Device header

void Buzzer_Init(void)
{
	RCC_APB2PeriphClockCmd(RCC_APB2Periph_GPIOB,ENABLE);

	GPIO_InitTypeDef GPIO_InitStructure;
	GPIO_InitStructure.GPIO_Mode = GPIO_Mode_Out_PP;
	GPIO_InitStructure.GPIO_Pin =GPIO_Pin_12;
	GPIO_InitStructure.GPIO_Speed = GPIO_Speed_50MHz;
	GPIO_Init(GPIOB,&GPIO_InitStructure);

	GPIO_SetBits(GPIOB,GPIO_Pin_12);
}

void Buzzer_ON(void)
{
	GPIO_ResetBits(GPIOB,GPIO_Pin_12);
}

void Buzzer_OFF(void)
{
	GPIO_SetBits(GPIOB,GPIO_Pin_12);
}

void Buzzer_Turn(void)
{
	if(GPIO_ReadOutputDataBit(GPIOB,GPIO_Pin_12) == 0)
	{
		GPIO_SetBits(GPIOB,GPIO_Pin_12);
	}else
	{
		GPIO_ResetBits(GPIOB,GPIO_Pin_12);
	}
}
#include "stm32f10x.h"                  // Device header

void LightSensor_Init(void)
{
	RCC_APB2PeriphClockCmd(RCC_APB2Periph_GPIOB,ENABLE);
	GPIO_InitTypeDef GPIO_InitStructure;
	GPIO_InitStructure.GPIO_Mode = GPIO_Mode_IPU;
	GPIO_InitStructure.GPIO_Pin = GPIO_Pin_13;
	GPIO_InitStructure.GPIO_Speed = GPIO_Speed_50MHz;
	GPIO_Init(GPIOB,&GPIO_InitStructure);
}

uint8_t LightSensor_Get(void)
{
	return GPIO_ReadInputDataBit(GPIOB,GPIO_Pin_13);
}
#include "stm32f10x.h"                  // Device header
#include "Delay.h"
#include "Buzzer.h"
#include "LightSensor.h"

uint8_t KeyNum;

int main(void)
{
	Buzzer_Init();
	LightSensor_Init();
	while (1)
	{
		if(LightSensor_Get() == 1)
		{
			Buzzer_ON();
		}
		else
		{
			Buzzer_OFF();
		}
	}
}
⑪OLED
简介:
OLED(Organic Light Emitting Diode):有机发光二极管
OLED显示屏:性能优异的新型显示屏,具有功耗低、相应速度快、宽视角、轻薄柔韧等特点
0.96寸OLED模块:小巧玲珑、占用接口少、简单易用,是电子设计中非常常见的显示屏模块
供电:3~5.5V,通信协议:I2C/SPI,分辨率:128*64

OLED驱动函数:
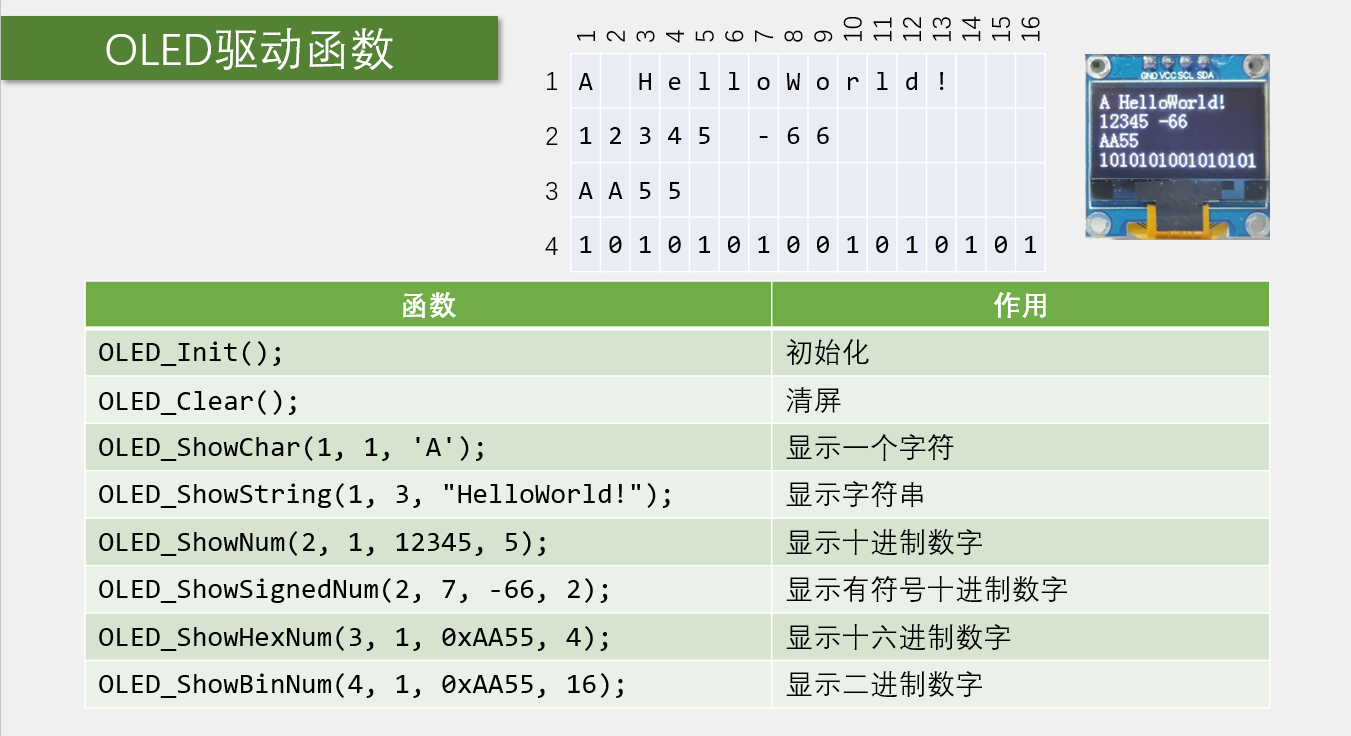
代码:
#include "stm32f10x.h"
#include "OLED_Font.h"

/*引脚配置*/
#define OLED_W_SCL(x)		GPIO_WriteBit(GPIOB, GPIO_Pin_8, (BitAction)(x))
#define OLED_W_SDA(x)		GPIO_WriteBit(GPIOB, GPIO_Pin_9, (BitAction)(x))

/*引脚初始化*/
void OLED_I2C_Init(void)
{
    RCC_APB2PeriphClockCmd(RCC_APB2Periph_GPIOB, ENABLE);

	GPIO_InitTypeDef GPIO_InitStructure;
 	GPIO_InitStructure.GPIO_Mode = GPIO_Mode_Out_OD;
	GPIO_InitStructure.GPIO_Speed = GPIO_Speed_50MHz;
	GPIO_InitStructure.GPIO_Pin = GPIO_Pin_8;
 	GPIO_Init(GPIOB, &GPIO_InitStructure);
	GPIO_InitStructure.GPIO_Pin = GPIO_Pin_9;
 	GPIO_Init(GPIOB, &GPIO_InitStructure);

	OLED_W_SCL(1);
	OLED_W_SDA(1);
}

/**
  * @brief  I2C开始
  * @param  无
  * @retval 无
  */
void OLED_I2C_Start(void)
{
	OLED_W_SDA(1);
	OLED_W_SCL(1);
	OLED_W_SDA(0);
	OLED_W_SCL(0);
}

/**
  * @brief  I2C停止
  * @param  无
  * @retval 无
  */
void OLED_I2C_Stop(void)
{
	OLED_W_SDA(0);
	OLED_W_SCL(1);
	OLED_W_SDA(1);
}

/**
  * @brief  I2C发送一个字节
  * @param  Byte 要发送的一个字节
  * @retval 无
  */
void OLED_I2C_SendByte(uint8_t Byte)
{
	uint8_t i;
	for (i = 0; i < 8; i++)
	{
		OLED_W_SDA(!!(Byte & (0x80 >> i)));
		OLED_W_SCL(1);
		OLED_W_SCL(0);
	}
	OLED_W_SCL(1);	//额外的一个时钟,不处理应答信号
	OLED_W_SCL(0);
}

/**
  * @brief  OLED写命令
  * @param  Command 要写入的命令
  * @retval 无
  */
void OLED_WriteCommand(uint8_t Command)
{
	OLED_I2C_Start();
	OLED_I2C_SendByte(0x78);		//从机地址
	OLED_I2C_SendByte(0x00);		//写命令
	OLED_I2C_SendByte(Command);
	OLED_I2C_Stop();
}

/**
  * @brief  OLED写数据
  * @param  Data 要写入的数据
  * @retval 无
  */
void OLED_WriteData(uint8_t Data)
{
	OLED_I2C_Start();
	OLED_I2C_SendByte(0x78);		//从机地址
	OLED_I2C_SendByte(0x40);		//写数据
	OLED_I2C_SendByte(Data);
	OLED_I2C_Stop();
}

/**
  * @brief  OLED设置光标位置
  * @param  Y 以左上角为原点,向下方向的坐标,范围:0~7
  * @param  X 以左上角为原点,向右方向的坐标,范围:0~127
  * @retval 无
  */
void OLED_SetCursor(uint8_t Y, uint8_t X)
{
	OLED_WriteCommand(0xB0 | Y);					//设置Y位置
	OLED_WriteCommand(0x10 | ((X & 0xF0) >> 4));	//设置X位置高4位
	OLED_WriteCommand(0x00 | (X & 0x0F));			//设置X位置低4位
}

/**
  * @brief  OLED清屏
  * @param  无
  * @retval 无
  */
void OLED_Clear(void)
{
	uint8_t i, j;
	for (j = 0; j < 8; j++)
	{
		OLED_SetCursor(j, 0);
		for(i = 0; i < 128; i++)
		{
			OLED_WriteData(0x00);
		}
	}
}

/**
  * @brief  OLED显示一个字符
  * @param  Line 行位置,范围:1~4
  * @param  Column 列位置,范围:1~16
  * @param  Char 要显示的一个字符,范围:ASCII可见字符
  * @retval 无
  */
void OLED_ShowChar(uint8_t Line, uint8_t Column, char Char)
{
	uint8_t i;
	OLED_SetCursor((Line - 1) * 2, (Column - 1) * 8);		//设置光标位置在上半部分
	for (i = 0; i < 8; i++)
	{
		OLED_WriteData(OLED_F8x16[Char - ' '][i]);			//显示上半部分内容
	}
	OLED_SetCursor((Line - 1) * 2 + 1, (Column - 1) * 8);	//设置光标位置在下半部分
	for (i = 0; i < 8; i++)
	{
		OLED_WriteData(OLED_F8x16[Char - ' '][i + 8]);		//显示下半部分内容
	}
}

/**
  * @brief  OLED显示字符串
  * @param  Line 起始行位置,范围:1~4
  * @param  Column 起始列位置,范围:1~16
  * @param  String 要显示的字符串,范围:ASCII可见字符
  * @retval 无
  */
void OLED_ShowString(uint8_t Line, uint8_t Column, char *String)
{
	uint8_t i;
	for (i = 0; String[i] != '\0'; i++)
	{
		OLED_ShowChar(Line, Column + i, String[i]);
	}
}

/**
  * @brief  OLED次方函数
  * @retval 返回值等于X的Y次方
  */
uint32_t OLED_Pow(uint32_t X, uint32_t Y)
{
	uint32_t Result = 1;
	while (Y--)
	{
		Result *= X;
	}
	return Result;
}

/**
  * @brief  OLED显示数字(十进制,正数)
  * @param  Line 起始行位置,范围:1~4
  * @param  Column 起始列位置,范围:1~16
  * @param  Number 要显示的数字,范围:0~4294967295
  * @param  Length 要显示数字的长度,范围:1~10
  * @retval 无
  */
void OLED_ShowNum(uint8_t Line, uint8_t Column, uint32_t Number, uint8_t Length)
{
	uint8_t i;
	for (i = 0; i < Length; i++)
	{
		OLED_ShowChar(Line, Column + i, Number / OLED_Pow(10, Length - i - 1) % 10 + '0');
	}
}

/**
  * @brief  OLED显示数字(十进制,带符号数)
  * @param  Line 起始行位置,范围:1~4
  * @param  Column 起始列位置,范围:1~16
  * @param  Number 要显示的数字,范围:-2147483648~2147483647
  * @param  Length 要显示数字的长度,范围:1~10
  * @retval 无
  */
void OLED_ShowSignedNum(uint8_t Line, uint8_t Column, int32_t Number, uint8_t Length)
{
	uint8_t i;
	uint32_t Number1;
	if (Number >= 0)
	{
		OLED_ShowChar(Line, Column, '+');
		Number1 = Number;
	}
	else
	{
		OLED_ShowChar(Line, Column, '-');
		Number1 = -Number;
	}
	for (i = 0; i < Length; i++)
	{
		OLED_ShowChar(Line, Column + i + 1, Number1 / OLED_Pow(10, Length - i - 1) % 10 + '0');
	}
}

/**
  * @brief  OLED显示数字(十六进制,正数)
  * @param  Line 起始行位置,范围:1~4
  * @param  Column 起始列位置,范围:1~16
  * @param  Number 要显示的数字,范围:0~0xFFFFFFFF
  * @param  Length 要显示数字的长度,范围:1~8
  * @retval 无
  */
void OLED_ShowHexNum(uint8_t Line, uint8_t Column, uint32_t Number, uint8_t Length)
{
	uint8_t i, SingleNumber;
	for (i = 0; i < Length; i++)
	{
		SingleNumber = Number / OLED_Pow(16, Length - i - 1) % 16;
		if (SingleNumber < 10)
		{
			OLED_ShowChar(Line, Column + i, SingleNumber + '0');
		}
		else
		{
			OLED_ShowChar(Line, Column + i, SingleNumber - 10 + 'A');
		}
	}
}

/**
  * @brief  OLED显示数字(二进制,正数)
  * @param  Line 起始行位置,范围:1~4
  * @param  Column 起始列位置,范围:1~16
  * @param  Number 要显示的数字,范围:0~1111 1111 1111 1111
  * @param  Length 要显示数字的长度,范围:1~16
  * @retval 无
  */
void OLED_ShowBinNum(uint8_t Line, uint8_t Column, uint32_t Number, uint8_t Length)
{
	uint8_t i;
	for (i = 0; i < Length; i++)
	{
		OLED_ShowChar(Line, Column + i, Number / OLED_Pow(2, Length - i - 1) % 2 + '0');
	}
}

/**
  * @brief  OLED初始化
  * @param  无
  * @retval 无
  */
void OLED_Init(void)
{
	uint32_t i, j;

	for (i = 0; i < 1000; i++)			//上电延时
	{
		for (j = 0; j < 1000; j++);
	}

	OLED_I2C_Init();			//端口初始化

	OLED_WriteCommand(0xAE);	//关闭显示

	OLED_WriteCommand(0xD5);	//设置显示时钟分频比/振荡器频率
	OLED_WriteCommand(0x80);

	OLED_WriteCommand(0xA8);	//设置多路复用率
	OLED_WriteCommand(0x3F);

	OLED_WriteCommand(0xD3);	//设置显示偏移
	OLED_WriteCommand(0x00);

	OLED_WriteCommand(0x40);	//设置显示开始行

	OLED_WriteCommand(0xA1);	//设置左右方向,0xA1正常 0xA0左右反置

	OLED_WriteCommand(0xC8);	//设置上下方向,0xC8正常 0xC0上下反置

	OLED_WriteCommand(0xDA);	//设置COM引脚硬件配置
	OLED_WriteCommand(0x12);

	OLED_WriteCommand(0x81);	//设置对比度控制
	OLED_WriteCommand(0xCF);

	OLED_WriteCommand(0xD9);	//设置预充电周期
	OLED_WriteCommand(0xF1);

	OLED_WriteCommand(0xDB);	//设置VCOMH取消选择级别
	OLED_WriteCommand(0x30);

	OLED_WriteCommand(0xA4);	//设置整个显示打开/关闭

	OLED_WriteCommand(0xA6);	//设置正常/倒转显示

	OLED_WriteCommand(0x8D);	//设置充电泵
	OLED_WriteCommand(0x14);

	OLED_WriteCommand(0xAF);	//开启显示

	OLED_Clear();				//OLED清屏
}
#ifndef __OLED_FONT_H
#define __OLED_FONT_H

/*OLED字模库,宽8像素,高16像素*/
const uint8_t OLED_F8x16[][16]=
{
	0x00,0x00,0x00,0x00,0x00,0x00,0x00,0x00,
	0x00,0x00,0x00,0x00,0x00,0x00,0x00,0x00,//  0

	0x00,0x00,0x00,0xF8,0x00,0x00,0x00,0x00,
	0x00,0x00,0x00,0x33,0x30,0x00,0x00,0x00,//! 1

	0x00,0x10,0x0C,0x06,0x10,0x0C,0x06,0x00,
	0x00,0x00,0x00,0x00,0x00,0x00,0x00,0x00,//" 2

	0x40,0xC0,0x78,0x40,0xC0,0x78,0x40,0x00,
	0x04,0x3F,0x04,0x04,0x3F,0x04,0x04,0x00,//# 3

	0x00,0x70,0x88,0xFC,0x08,0x30,0x00,0x00,
	0x00,0x18,0x20,0xFF,0x21,0x1E,0x00,0x00,//$ 4

	0xF0,0x08,0xF0,0x00,0xE0,0x18,0x00,0x00,
	0x00,0x21,0x1C,0x03,0x1E,0x21,0x1E,0x00,//% 5

	0x00,0xF0,0x08,0x88,0x70,0x00,0x00,0x00,
	0x1E,0x21,0x23,0x24,0x19,0x27,0x21,0x10,//& 6

	0x10,0x16,0x0E,0x00,0x00,0x00,0x00,0x00,
	0x00,0x00,0x00,0x00,0x00,0x00,0x00,0x00,//' 7

	0x00,0x00,0x00,0xE0,0x18,0x04,0x02,0x00,
	0x00,0x00,0x00,0x07,0x18,0x20,0x40,0x00,//( 8

	0x00,0x02,0x04,0x18,0xE0,0x00,0x00,0x00,
	0x00,0x40,0x20,0x18,0x07,0x00,0x00,0x00,//) 9

	0x40,0x40,0x80,0xF0,0x80,0x40,0x40,0x00,
	0x02,0x02,0x01,0x0F,0x01,0x02,0x02,0x00,//* 10

	0x00,0x00,0x00,0xF0,0x00,0x00,0x00,0x00,
	0x01,0x01,0x01,0x1F,0x01,0x01,0x01,0x00,//+ 11

	0x00,0x00,0x00,0x00,0x00,0x00,0x00,0x00,
	0x80,0xB0,0x70,0x00,0x00,0x00,0x00,0x00,//, 12

	0x00,0x00,0x00,0x00,0x00,0x00,0x00,0x00,
	0x00,0x01,0x01,0x01,0x01,0x01,0x01,0x01,//- 13

	0x00,0x00,0x00,0x00,0x00,0x00,0x00,0x00,
	0x00,0x30,0x30,0x00,0x00,0x00,0x00,0x00,//. 14

	0x00,0x00,0x00,0x00,0x80,0x60,0x18,0x04,
	0x00,0x60,0x18,0x06,0x01,0x00,0x00,0x00,/// 15

	0x00,0xE0,0x10,0x08,0x08,0x10,0xE0,0x00,
	0x00,0x0F,0x10,0x20,0x20,0x10,0x0F,0x00,//0 16

	0x00,0x10,0x10,0xF8,0x00,0x00,0x00,0x00,
	0x00,0x20,0x20,0x3F,0x20,0x20,0x00,0x00,//1 17

	0x00,0x70,0x08,0x08,0x08,0x88,0x70,0x00,
	0x00,0x30,0x28,0x24,0x22,0x21,0x30,0x00,//2 18

	0x00,0x30,0x08,0x88,0x88,0x48,0x30,0x00,
	0x00,0x18,0x20,0x20,0x20,0x11,0x0E,0x00,//3 19

	0x00,0x00,0xC0,0x20,0x10,0xF8,0x00,0x00,
	0x00,0x07,0x04,0x24,0x24,0x3F,0x24,0x00,//4 20

	0x00,0xF8,0x08,0x88,0x88,0x08,0x08,0x00,
	0x00,0x19,0x21,0x20,0x20,0x11,0x0E,0x00,//5 21

	0x00,0xE0,0x10,0x88,0x88,0x18,0x00,0x00,
	0x00,0x0F,0x11,0x20,0x20,0x11,0x0E,0x00,//6 22

	0x00,0x38,0x08,0x08,0xC8,0x38,0x08,0x00,
	0x00,0x00,0x00,0x3F,0x00,0x00,0x00,0x00,//7 23

	0x00,0x70,0x88,0x08,0x08,0x88,0x70,0x00,
	0x00,0x1C,0x22,0x21,0x21,0x22,0x1C,0x00,//8 24

	0x00,0xE0,0x10,0x08,0x08,0x10,0xE0,0x00,
	0x00,0x00,0x31,0x22,0x22,0x11,0x0F,0x00,//9 25

	0x00,0x00,0x00,0xC0,0xC0,0x00,0x00,0x00,
	0x00,0x00,0x00,0x30,0x30,0x00,0x00,0x00,//: 26

	0x00,0x00,0x00,0x80,0x00,0x00,0x00,0x00,
	0x00,0x00,0x80,0x60,0x00,0x00,0x00,0x00,//; 27

	0x00,0x00,0x80,0x40,0x20,0x10,0x08,0x00,
	0x00,0x01,0x02,0x04,0x08,0x10,0x20,0x00,//< 28

	0x40,0x40,0x40,0x40,0x40,0x40,0x40,0x00,
	0x04,0x04,0x04,0x04,0x04,0x04,0x04,0x00,//= 29

	0x00,0x08,0x10,0x20,0x40,0x80,0x00,0x00,
	0x00,0x20,0x10,0x08,0x04,0x02,0x01,0x00,//> 30

	0x00,0x70,0x48,0x08,0x08,0x08,0xF0,0x00,
	0x00,0x00,0x00,0x30,0x36,0x01,0x00,0x00,//? 31

	0xC0,0x30,0xC8,0x28,0xE8,0x10,0xE0,0x00,
	0x07,0x18,0x27,0x24,0x23,0x14,0x0B,0x00,//@ 32

	0x00,0x00,0xC0,0x38,0xE0,0x00,0x00,0x00,
	0x20,0x3C,0x23,0x02,0x02,0x27,0x38,0x20,//A 33

	0x08,0xF8,0x88,0x88,0x88,0x70,0x00,0x00,
	0x20,0x3F,0x20,0x20,0x20,0x11,0x0E,0x00,//B 34

	0xC0,0x30,0x08,0x08,0x08,0x08,0x38,0x00,
	0x07,0x18,0x20,0x20,0x20,0x10,0x08,0x00,//C 35

	0x08,0xF8,0x08,0x08,0x08,0x10,0xE0,0x00,
	0x20,0x3F,0x20,0x20,0x20,0x10,0x0F,0x00,//D 36

	0x08,0xF8,0x88,0x88,0xE8,0x08,0x10,0x00,
	0x20,0x3F,0x20,0x20,0x23,0x20,0x18,0x00,//E 37

	0x08,0xF8,0x88,0x88,0xE8,0x08,0x10,0x00,
	0x20,0x3F,0x20,0x00,0x03,0x00,0x00,0x00,//F 38

	0xC0,0x30,0x08,0x08,0x08,0x38,0x00,0x00,
	0x07,0x18,0x20,0x20,0x22,0x1E,0x02,0x00,//G 39

	0x08,0xF8,0x08,0x00,0x00,0x08,0xF8,0x08,
	0x20,0x3F,0x21,0x01,0x01,0x21,0x3F,0x20,//H 40

	0x00,0x08,0x08,0xF8,0x08,0x08,0x00,0x00,
	0x00,0x20,0x20,0x3F,0x20,0x20,0x00,0x00,//I 41

	0x00,0x00,0x08,0x08,0xF8,0x08,0x08,0x00,
	0xC0,0x80,0x80,0x80,0x7F,0x00,0x00,0x00,//J 42

	0x08,0xF8,0x88,0xC0,0x28,0x18,0x08,0x00,
	0x20,0x3F,0x20,0x01,0x26,0x38,0x20,0x00,//K 43

	0x08,0xF8,0x08,0x00,0x00,0x00,0x00,0x00,
	0x20,0x3F,0x20,0x20,0x20,0x20,0x30,0x00,//L 44

	0x08,0xF8,0xF8,0x00,0xF8,0xF8,0x08,0x00,
	0x20,0x3F,0x00,0x3F,0x00,0x3F,0x20,0x00,//M 45

	0x08,0xF8,0x30,0xC0,0x00,0x08,0xF8,0x08,
	0x20,0x3F,0x20,0x00,0x07,0x18,0x3F,0x00,//N 46

	0xE0,0x10,0x08,0x08,0x08,0x10,0xE0,0x00,
	0x0F,0x10,0x20,0x20,0x20,0x10,0x0F,0x00,//O 47

	0x08,0xF8,0x08,0x08,0x08,0x08,0xF0,0x00,
	0x20,0x3F,0x21,0x01,0x01,0x01,0x00,0x00,//P 48

	0xE0,0x10,0x08,0x08,0x08,0x10,0xE0,0x00,
	0x0F,0x18,0x24,0x24,0x38,0x50,0x4F,0x00,//Q 49

	0x08,0xF8,0x88,0x88,0x88,0x88,0x70,0x00,
	0x20,0x3F,0x20,0x00,0x03,0x0C,0x30,0x20,//R 50

	0x00,0x70,0x88,0x08,0x08,0x08,0x38,0x00,
	0x00,0x38,0x20,0x21,0x21,0x22,0x1C,0x00,//S 51

	0x18,0x08,0x08,0xF8,0x08,0x08,0x18,0x00,
	0x00,0x00,0x20,0x3F,0x20,0x00,0x00,0x00,//T 52

	0x08,0xF8,0x08,0x00,0x00,0x08,0xF8,0x08,
	0x00,0x1F,0x20,0x20,0x20,0x20,0x1F,0x00,//U 53

	0x08,0x78,0x88,0x00,0x00,0xC8,0x38,0x08,
	0x00,0x00,0x07,0x38,0x0E,0x01,0x00,0x00,//V 54

	0xF8,0x08,0x00,0xF8,0x00,0x08,0xF8,0x00,
	0x03,0x3C,0x07,0x00,0x07,0x3C,0x03,0x00,//W 55

	0x08,0x18,0x68,0x80,0x80,0x68,0x18,0x08,
	0x20,0x30,0x2C,0x03,0x03,0x2C,0x30,0x20,//X 56

	0x08,0x38,0xC8,0x00,0xC8,0x38,0x08,0x00,
	0x00,0x00,0x20,0x3F,0x20,0x00,0x00,0x00,//Y 57

	0x10,0x08,0x08,0x08,0xC8,0x38,0x08,0x00,
	0x20,0x38,0x26,0x21,0x20,0x20,0x18,0x00,//Z 58

	0x00,0x00,0x00,0xFE,0x02,0x02,0x02,0x00,
	0x00,0x00,0x00,0x7F,0x40,0x40,0x40,0x00,//[ 59

	0x00,0x0C,0x30,0xC0,0x00,0x00,0x00,0x00,
	0x00,0x00,0x00,0x01,0x06,0x38,0xC0,0x00,//\ 60

	0x00,0x02,0x02,0x02,0xFE,0x00,0x00,0x00,
	0x00,0x40,0x40,0x40,0x7F,0x00,0x00,0x00,//] 61

	0x00,0x00,0x04,0x02,0x02,0x02,0x04,0x00,
	0x00,0x00,0x00,0x00,0x00,0x00,0x00,0x00,//^ 62

	0x00,0x00,0x00,0x00,0x00,0x00,0x00,0x00,
	0x80,0x80,0x80,0x80,0x80,0x80,0x80,0x80,//_ 63

	0x00,0x02,0x02,0x04,0x00,0x00,0x00,0x00,
	0x00,0x00,0x00,0x00,0x00,0x00,0x00,0x00,//` 64

	0x00,0x00,0x80,0x80,0x80,0x80,0x00,0x00,
	0x00,0x19,0x24,0x22,0x22,0x22,0x3F,0x20,//a 65

	0x08,0xF8,0x00,0x80,0x80,0x00,0x00,0x00,
	0x00,0x3F,0x11,0x20,0x20,0x11,0x0E,0x00,//b 66

	0x00,0x00,0x00,0x80,0x80,0x80,0x00,0x00,
	0x00,0x0E,0x11,0x20,0x20,0x20,0x11,0x00,//c 67

	0x00,0x00,0x00,0x80,0x80,0x88,0xF8,0x00,
	0x00,0x0E,0x11,0x20,0x20,0x10,0x3F,0x20,//d 68

	0x00,0x00,0x80,0x80,0x80,0x80,0x00,0x00,
	0x00,0x1F,0x22,0x22,0x22,0x22,0x13,0x00,//e 69

	0x00,0x80,0x80,0xF0,0x88,0x88,0x88,0x18,
	0x00,0x20,0x20,0x3F,0x20,0x20,0x00,0x00,//f 70

	0x00,0x00,0x80,0x80,0x80,0x80,0x80,0x00,
	0x00,0x6B,0x94,0x94,0x94,0x93,0x60,0x00,//g 71

	0x08,0xF8,0x00,0x80,0x80,0x80,0x00,0x00,
	0x20,0x3F,0x21,0x00,0x00,0x20,0x3F,0x20,//h 72

	0x00,0x80,0x98,0x98,0x00,0x00,0x00,0x00,
	0x00,0x20,0x20,0x3F,0x20,0x20,0x00,0x00,//i 73

	0x00,0x00,0x00,0x80,0x98,0x98,0x00,0x00,
	0x00,0xC0,0x80,0x80,0x80,0x7F,0x00,0x00,//j 74

	0x08,0xF8,0x00,0x00,0x80,0x80,0x80,0x00,
	0x20,0x3F,0x24,0x02,0x2D,0x30,0x20,0x00,//k 75

	0x00,0x08,0x08,0xF8,0x00,0x00,0x00,0x00,
	0x00,0x20,0x20,0x3F,0x20,0x20,0x00,0x00,//l 76

	0x80,0x80,0x80,0x80,0x80,0x80,0x80,0x00,
	0x20,0x3F,0x20,0x00,0x3F,0x20,0x00,0x3F,//m 77

	0x80,0x80,0x00,0x80,0x80,0x80,0x00,0x00,
	0x20,0x3F,0x21,0x00,0x00,0x20,0x3F,0x20,//n 78

	0x00,0x00,0x80,0x80,0x80,0x80,0x00,0x00,
	0x00,0x1F,0x20,0x20,0x20,0x20,0x1F,0x00,//o 79

	0x80,0x80,0x00,0x80,0x80,0x00,0x00,0x00,
	0x80,0xFF,0xA1,0x20,0x20,0x11,0x0E,0x00,//p 80

	0x00,0x00,0x00,0x80,0x80,0x80,0x80,0x00,
	0x00,0x0E,0x11,0x20,0x20,0xA0,0xFF,0x80,//q 81

	0x80,0x80,0x80,0x00,0x80,0x80,0x80,0x00,
	0x20,0x20,0x3F,0x21,0x20,0x00,0x01,0x00,//r 82

	0x00,0x00,0x80,0x80,0x80,0x80,0x80,0x00,
	0x00,0x33,0x24,0x24,0x24,0x24,0x19,0x00,//s 83

	0x00,0x80,0x80,0xE0,0x80,0x80,0x00,0x00,
	0x00,0x00,0x00,0x1F,0x20,0x20,0x00,0x00,//t 84

	0x80,0x80,0x00,0x00,0x00,0x80,0x80,0x00,
	0x00,0x1F,0x20,0x20,0x20,0x10,0x3F,0x20,//u 85

	0x80,0x80,0x80,0x00,0x00,0x80,0x80,0x80,
	0x00,0x01,0x0E,0x30,0x08,0x06,0x01,0x00,//v 86

	0x80,0x80,0x00,0x80,0x00,0x80,0x80,0x80,
	0x0F,0x30,0x0C,0x03,0x0C,0x30,0x0F,0x00,//w 87

	0x00,0x80,0x80,0x00,0x80,0x80,0x80,0x00,
	0x00,0x20,0x31,0x2E,0x0E,0x31,0x20,0x00,//x 88

	0x80,0x80,0x80,0x00,0x00,0x80,0x80,0x80,
	0x80,0x81,0x8E,0x70,0x18,0x06,0x01,0x00,//y 89

	0x00,0x80,0x80,0x80,0x80,0x80,0x80,0x00,
	0x00,0x21,0x30,0x2C,0x22,0x21,0x30,0x00,//z 90

	0x00,0x00,0x00,0x00,0x80,0x7C,0x02,0x02,
	0x00,0x00,0x00,0x00,0x00,0x3F,0x40,0x40,//{ 91

	0x00,0x00,0x00,0x00,0xFF,0x00,0x00,0x00,
	0x00,0x00,0x00,0x00,0xFF,0x00,0x00,0x00,//| 92

	0x00,0x02,0x02,0x7C,0x80,0x00,0x00,0x00,
	0x00,0x40,0x40,0x3F,0x00,0x00,0x00,0x00,//} 93

	0x00,0x06,0x01,0x01,0x02,0x02,0x04,0x04,
	0x00,0x00,0x00,0x00,0x00,0x00,0x00,0x00,//~ 94
};

#endif
#include "stm32f10x.h"                  // Device header
#include "Delay.h"
#include "OLED.h"

int main(void)
{
	OLED_Init();
    OLED_ShowChar(1,1,'A');
	OLED_ShowString(1,3,"Fawvw ");
	OLED_ShowNum(2,1,12345,6);        //无符号数字
	OLED_ShowSignedNum(2,8,-10,2);    //有符号十进制数字
	OLED_ShowHexNum(3,1,0xAA55,4);    //十六进制数字
	OLED_ShowBinNum(4,1,0XAA55,16);   //不支持直接写二进制,用十六进制表示,这个数字是二进制16位的

	//OLED_Clear();
	while (1)
	{

	}
}
六、EXTI外部中断
1.中断系统
中断:在主程序运行过程中,出现了特定的中断触发条件(中断源),使得CPU暂停当前正在运行的程序,转而去处理中断程序,处理完成后又返回原来被暂停的位置继续运行
中断优先级:当有多个中断源同时申请中断时,CPU会根据中断源的轻重缓急进行裁决,优先响应更加紧急的中断源
中断嵌套:当一个中断程序正在运行时,又有新的更高优先级的中断源申请中断,CPU再次暂停当前中断程序,转而去处理新的中断程序,处理完成后依次进行返回
2.中断的执行流程
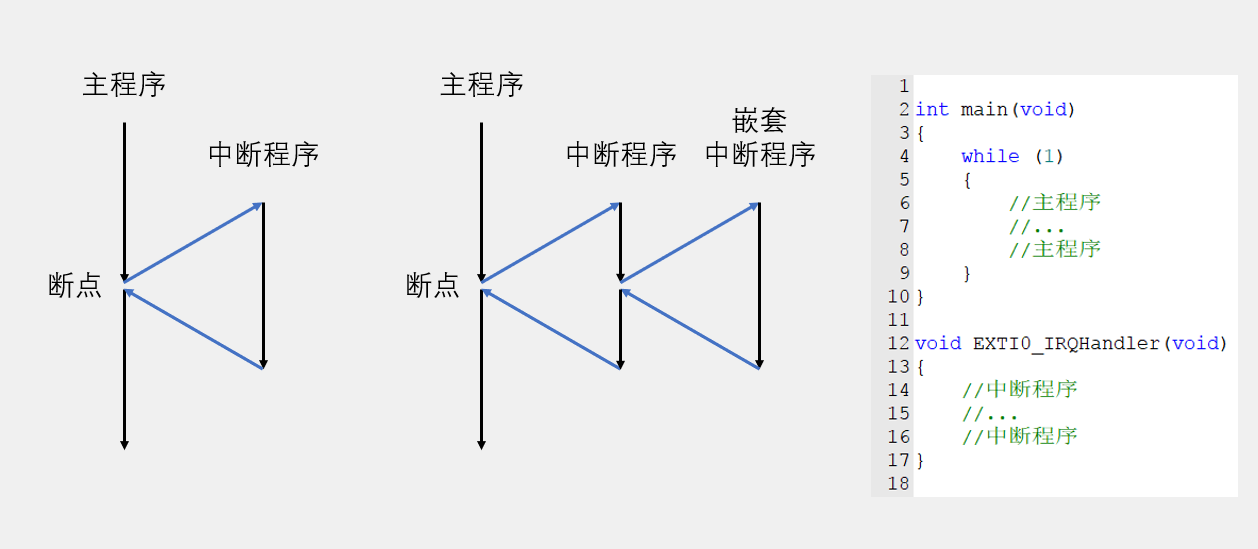
3.STM32中断
68个可屏蔽中断通道,包含EXTI、TIM、ADC、USART、SPI、I2C、RTC等多个外设
使用NVIC统一管理中断,每个中断通道都拥有16个可编程的优先等级,可对优先级进行分组,进一步设置抢占优先级和响应优先级
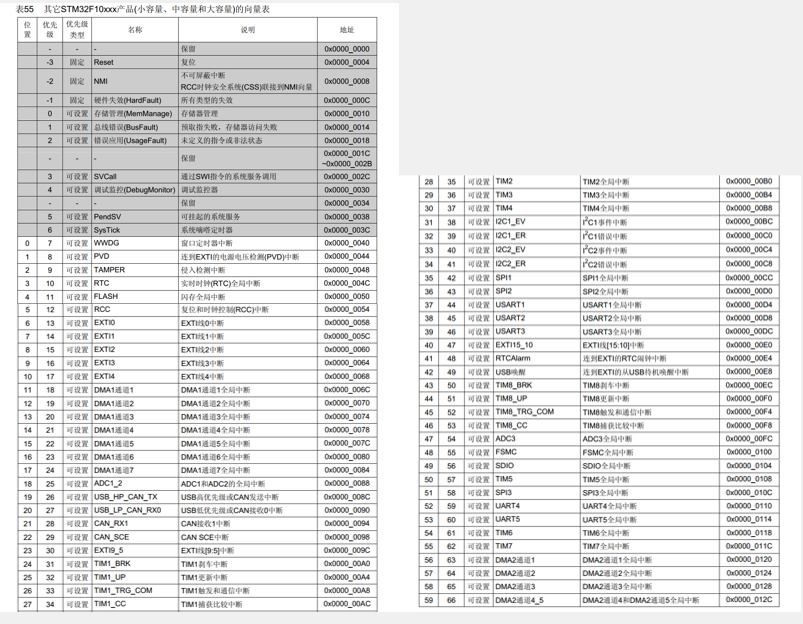 I
I
4.NVIC基本结构
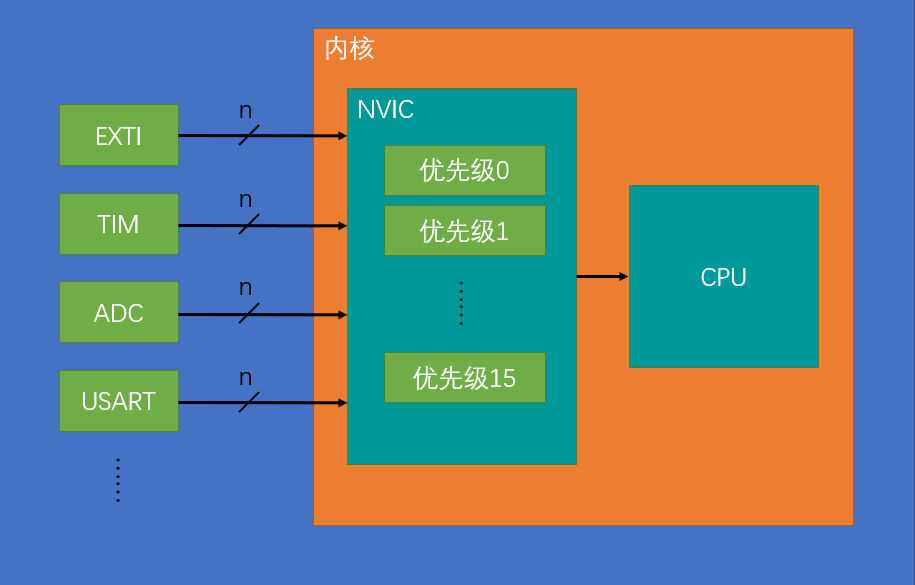
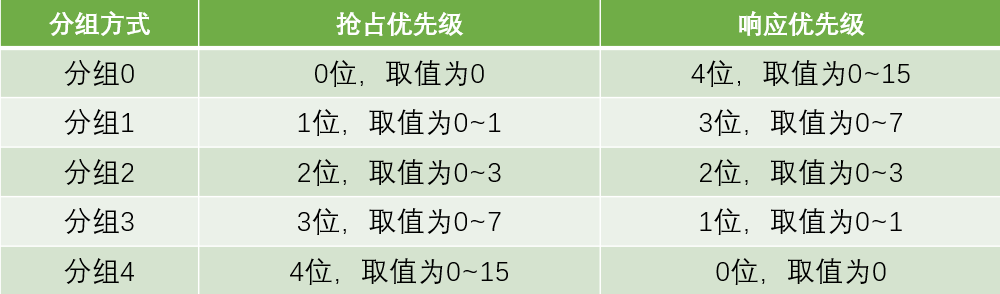
5.NVIC优先级分组
NVIC的中断优先级由优先级寄存器的4位(0~15)决定,这4位可以进行切分,分为高n位的抢占优先级和低4-n位的响应优先级
抢占优先级高的可以中断嵌套,响应优先级高的可以优先排队,抢占优先级和响应优先级均相同的按中断号排队
6.EXTI简介
EXTI(Extern Interrupt)外部中断
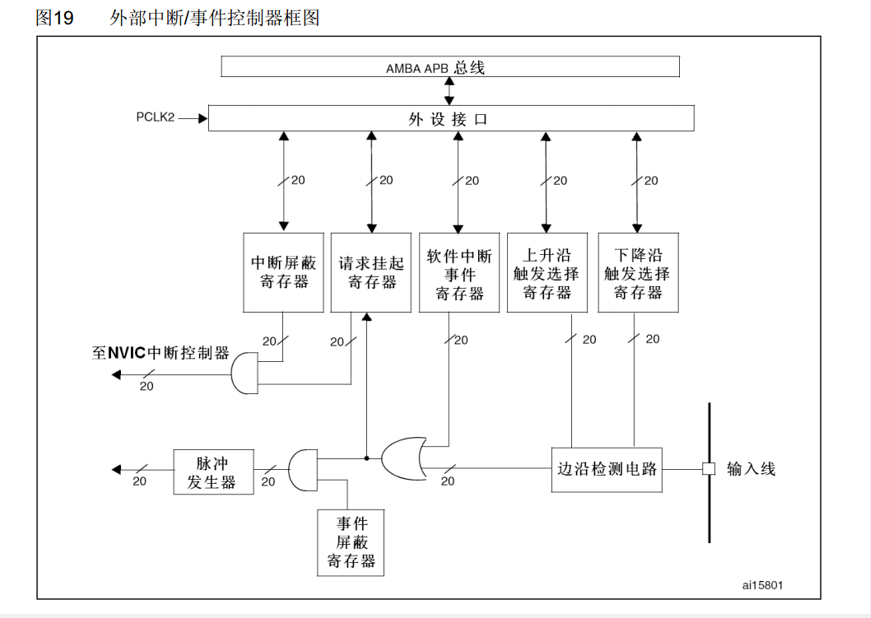
EXTI可以监测指定GPIO口的电平信号,当其指定的GPIO口产生电平变化时,EXTI将立即向NVIC发出中断申请,经过NVIC裁决后即可中断CPU主程序,使CPU执行EXTI对应的中断程序
支持的触发方式:上升沿/下降沿/双边沿/软件触发
支持的GPIO口:所有GPIO口,但相同的Pin不能同时触发中断
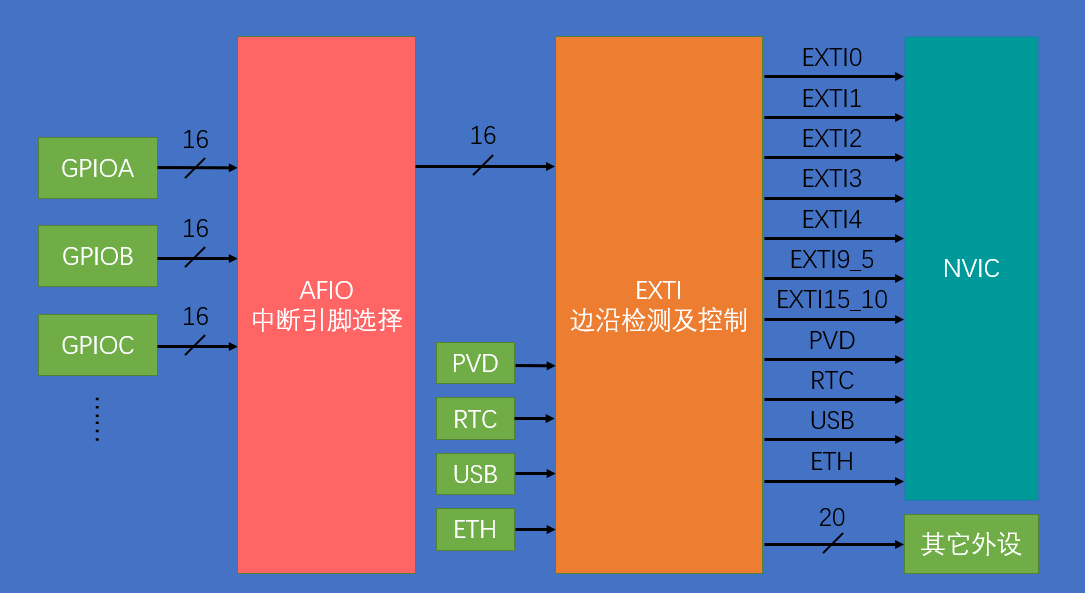
通道数:16个GPIO_Pin,外加PVD输出、RTC闹钟、USB唤醒、以太网唤醒
触发响应方式:中断响应/事件响应
7.EXTI的基本结构
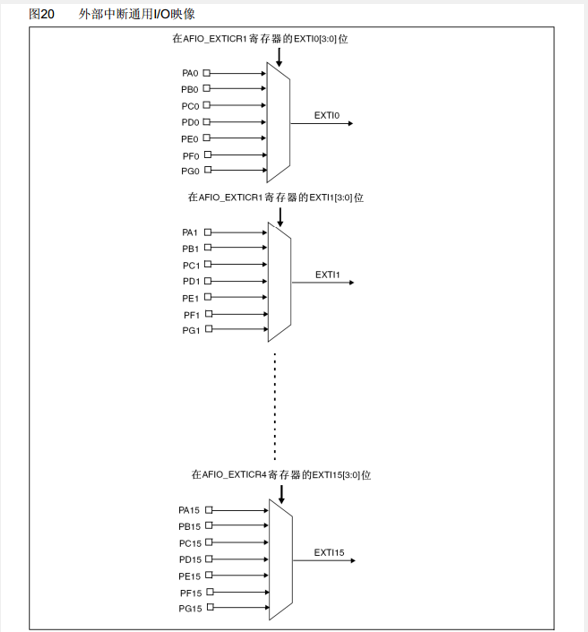
8.AFIO复用IO口
AFIO主要用于引脚复用功能的选择和重定义
在STM32中,AFIO主要完成两个任务:复用功能引脚重映射、中断引脚选择
9.EXTI框图
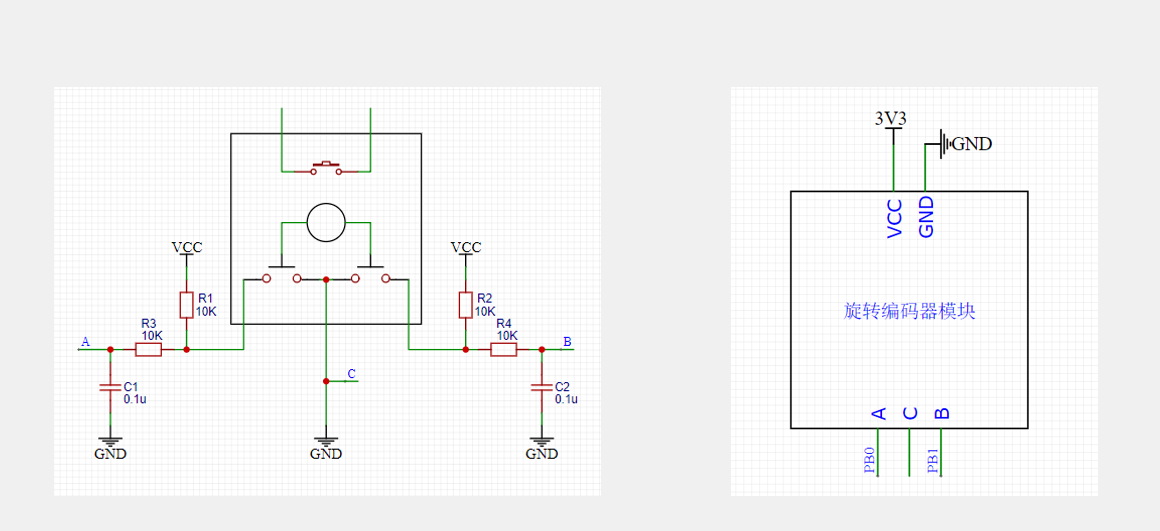
10.旋转编码器简介
旋转编码器:用来测量位置、速度或旋转方向的装置,当其旋转轴旋转时,其输出端可以输出与旋转速度和方向对应的方波信号,读取方波信号的频率和相位信息即可得知旋转轴的速度和方向
类型:机械触点式/霍尔传感器式/光栅式

11.硬件电路
12.对射式红外传感器&旋转编码器
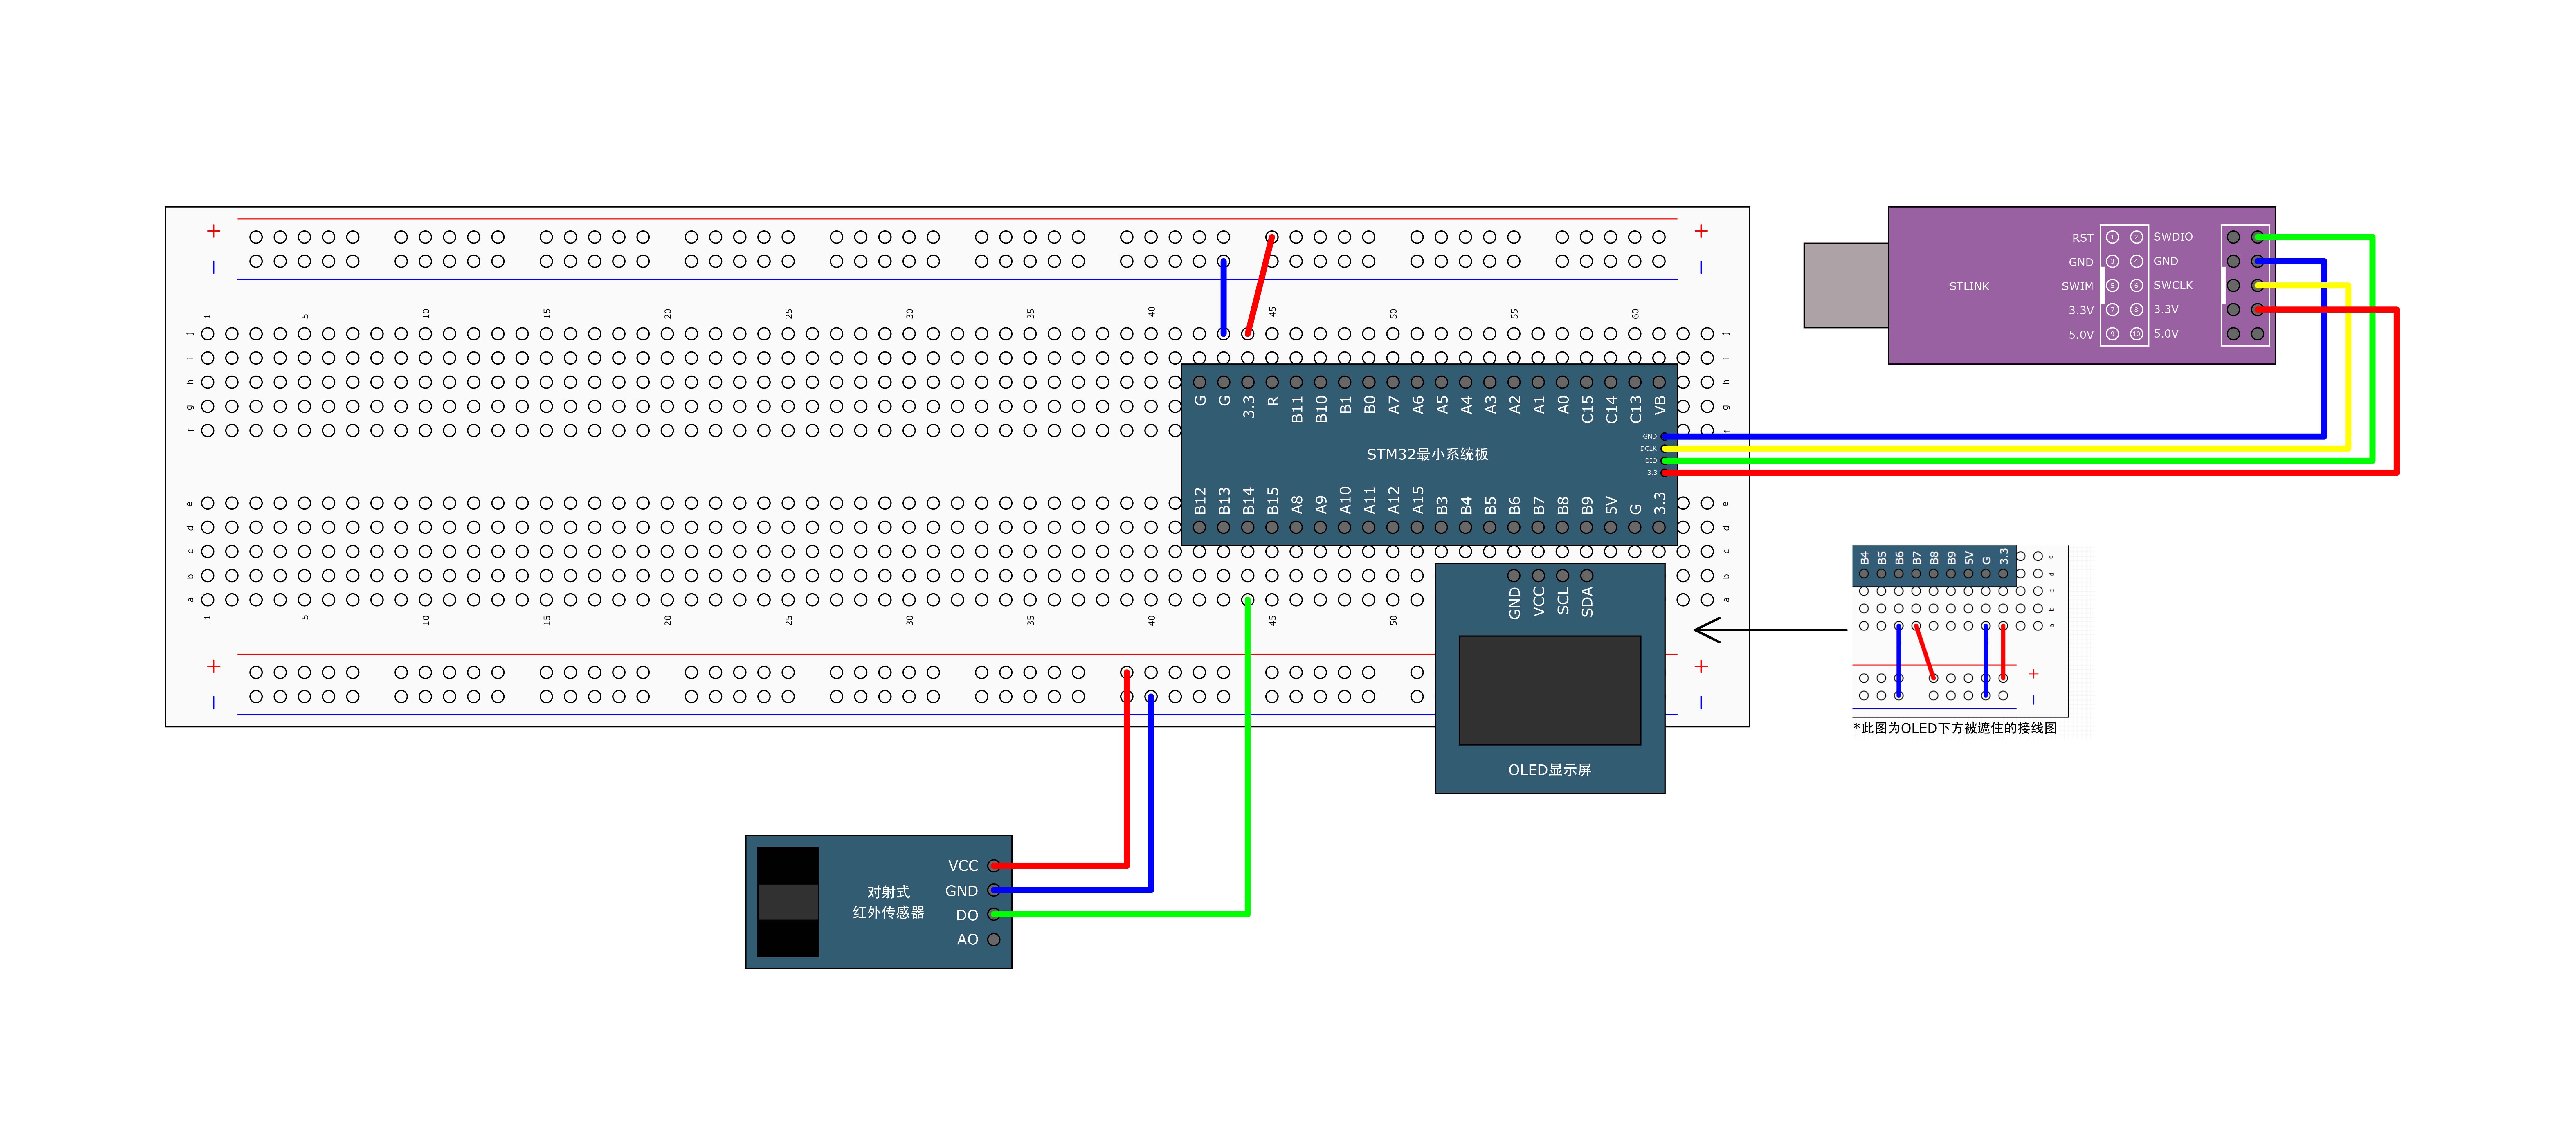
①对射式红外传感器计次
接线图:
代码:
#include "stm32f10x.h"                  // Device header


uint16_t CountSensor_Count;
void CountSensor_Init(void)
{
	//开启时钟
	RCC_APB2PeriphClockCmd(RCC_APB2Periph_GPIOB,ENABLE);
	RCC_APB2PeriphClockCmd(RCC_APB2Periph_AFIO,ENABLE);

	//配置GPIO
	GPIO_InitTypeDef GPIO_InitStructure;
	GPIO_InitStructure.GPIO_Mode = GPIO_Mode_IPU;
	GPIO_InitStructure.GPIO_Pin = GPIO_Pin_14;
	GPIO_InitStructure.GPIO_Speed = GPIO_Speed_50MHz;
	GPIO_Init(GPIOB,&GPIO_InitStructure);

	//配置AFIO
	GPIO_EXTILineConfig(GPIO_PortSourceGPIOB,GPIO_PinSource14);

	//配置EXTI
	EXTI_InitTypeDef EXTI_InitStructure;
	EXTI_InitStructure.EXTI_Line = EXTI_Line14;
	EXTI_InitStructure.EXTI_LineCmd = ENABLE;
	EXTI_InitStructure.EXTI_Mode = EXTI_Mode_Interrupt;
	EXTI_InitStructure.EXTI_Trigger = EXTI_Trigger_Falling;
	EXTI_Init(&EXTI_InitStructure);

	//配置NVIC
	NVIC_PriorityGroupConfig(NVIC_PriorityGroup_2);
	NVIC_InitTypeDef NVIC_InitStruct;
	NVIC_InitStruct.NVIC_IRQChannel = EXTI15_10_IRQn;
	NVIC_InitStruct.NVIC_IRQChannelCmd = ENABLE;
	NVIC_InitStruct.NVIC_IRQChannelPreemptionPriority = 1;
	NVIC_InitStruct.NVIC_IRQChannelSubPriority = 1;
	NVIC_Init(&NVIC_InitStruct);
}


uint16_t CountSensor_Get(void)
{
	return CountSensor_Count;
}
void EXTI15_10_IRQHandler(void)
{
	if(EXTI_GetITStatus(EXTI_Line14) == SET)
	{
		CountSensor_Count ++;
		EXTI_ClearITPendingBit(EXTI_Line14);
	}
}
#include "stm32f10x.h"                  // Device header
#include "Delay.h"
#include "OLED.h"
#include "CountSensor.h"

int main(void)
{
	OLED_Init();
	CountSensor_Init();
	OLED_ShowString(1,1,"Count:");
	//OLED_Clear();
	while (1)
	{
		OLED_ShowNum(1,7,CountSensor_Get(),5);
	}
}
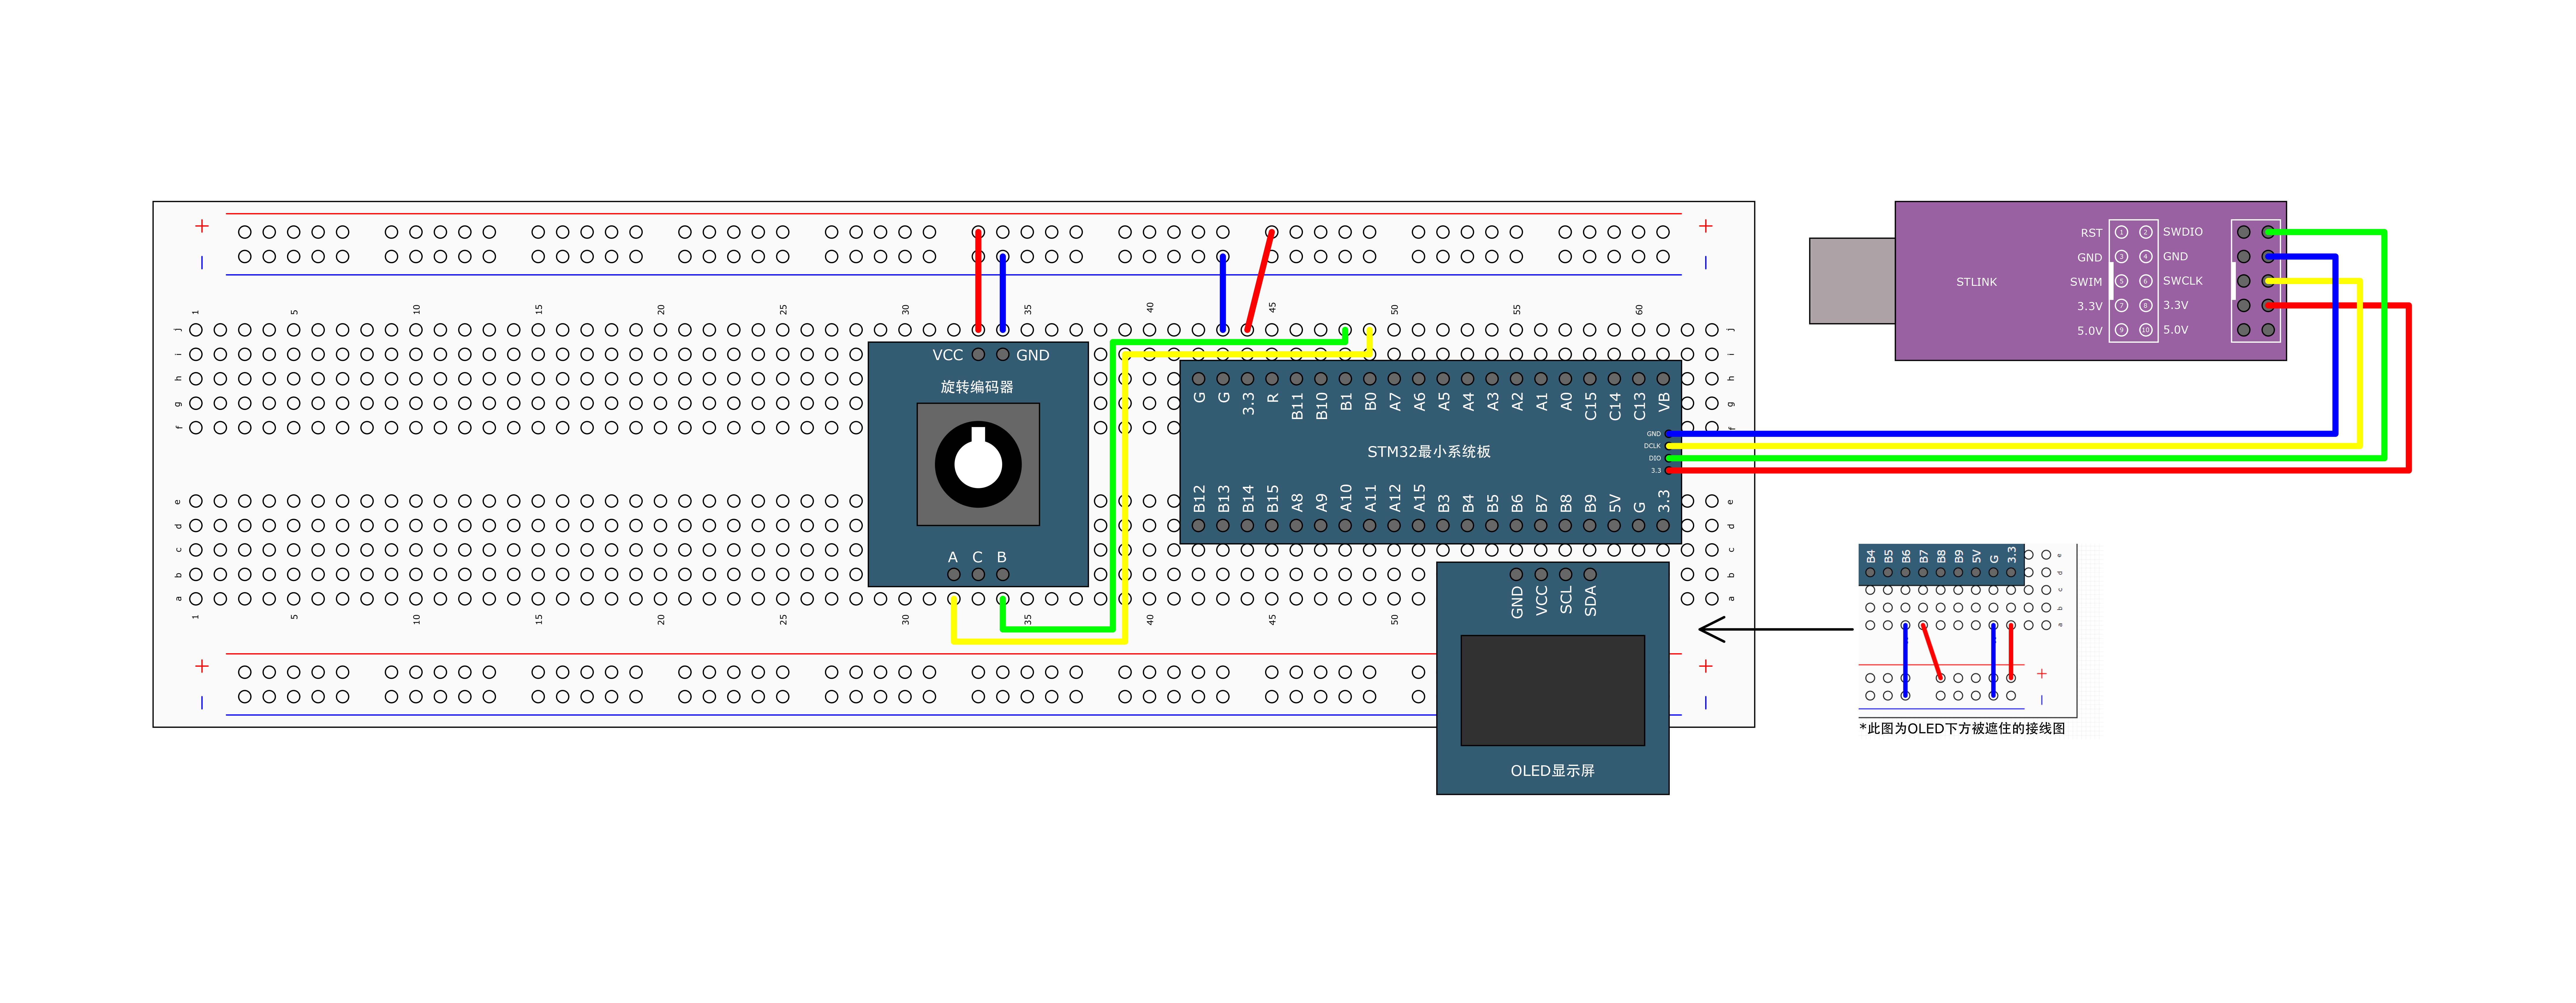
②旋转编码器计次
接线图:
代码:
#include "stm32f10x.h"                  // Device header


int16_t Encoder_Count;
void Encoder_Init(void)
{
	//开启时钟
	RCC_APB2PeriphClockCmd(RCC_APB2Periph_GPIOB,ENABLE);
	RCC_APB2PeriphClockCmd(RCC_APB2Periph_AFIO,ENABLE);

	//配置GPIO
	GPIO_InitTypeDef GPIO_InitStructure;
	GPIO_InitStructure.GPIO_Mode = GPIO_Mode_IPU;
	GPIO_InitStructure.GPIO_Pin = GPIO_Pin_0 | GPIO_Pin_1;
	GPIO_InitStructure.GPIO_Speed = GPIO_Speed_50MHz;
	GPIO_Init(GPIOB,&GPIO_InitStructure);

	//配置AFIO
	GPIO_EXTILineConfig(GPIO_PortSourceGPIOB,GPIO_PinSource0);
	GPIO_EXTILineConfig(GPIO_PortSourceGPIOB,GPIO_PinSource1);

	//配置EXTI
	EXTI_InitTypeDef EXTI_InitStructure;
	EXTI_InitStructure.EXTI_Line = EXTI_Line0 | EXTI_Line1;
	EXTI_InitStructure.EXTI_LineCmd = ENABLE;
	EXTI_InitStructure.EXTI_Mode = EXTI_Mode_Interrupt;
	EXTI_InitStructure.EXTI_Trigger = EXTI_Trigger_Falling;
	EXTI_Init(&EXTI_InitStructure);

	//配置NVIC
	NVIC_PriorityGroupConfig(NVIC_PriorityGroup_2);

	NVIC_InitTypeDef NVIC_InitStruct;

	NVIC_InitStruct.NVIC_IRQChannel = EXTI0_IRQn;
	NVIC_InitStruct.NVIC_IRQChannelCmd = ENABLE;
	NVIC_InitStruct.NVIC_IRQChannelPreemptionPriority = 1;
	NVIC_InitStruct.NVIC_IRQChannelSubPriority = 1;
	NVIC_Init(&NVIC_InitStruct);

	NVIC_InitStruct.NVIC_IRQChannel = EXTI1_IRQn;
	NVIC_InitStruct.NVIC_IRQChannelCmd = ENABLE;
	NVIC_InitStruct.NVIC_IRQChannelPreemptionPriority = 1;
	NVIC_InitStruct.NVIC_IRQChannelSubPriority = 2;
	NVIC_Init(&NVIC_InitStruct);
}

int16_t Encoder_Get(void)
{
	int16_t temp = Encoder_Count;
	Encoder_Count = 0;
	return temp;
}
void EXTI0_IRQHandler(void)
{
	if(EXTI_GetITStatus(EXTI_Line0) == SET)
	{	if(GPIO_ReadInputDataBit(GPIOB,GPIO_Pin_1) == 0)
		{
			Encoder_Count --;
		}
		EXTI_ClearITPendingBit(EXTI_Line0);
	}
}
void EXTI1_IRQHandler(void)
{
	if(EXTI_GetITStatus(EXTI_Line1) == SET)
	{   if(GPIO_ReadInputDataBit(GPIOB,GPIO_Pin_0) == 0)
		{
			Encoder_Count ++;
		}
		EXTI_ClearITPendingBit(EXTI_Line1);
	}
}
#include "stm32f10x.h"                  // Device header
#include "Delay.h"
#include "OLED.h"
#include "Encoder.h"


int16_t num;
int main(void)
{
	OLED_Init();
	Encoder_Init();
	OLED_ShowString(1,1,"Num::");


	//OLED_Clear();
	while (1)
	{
		num += Encoder_Get();
		OLED_ShowSignedNum(1,5,num,5);
	}
}
最后记录一下中断编程的建议:
不要在中断函数中执行耗时过长的代码!中断函数要简短快速!
最好不要在中断函数和主函数操作可能产生冲突的硬件或相同的一个硬件!我们最好在中断函数里面操作变量或标志位,当中断返回时再对这个变量显示或操作。这样既能保证中断函数的简短快速,又能不产生硬件冲突的硬件操作
七、TIM定时中断
1.TIM简介
TIM(Timer)定时器
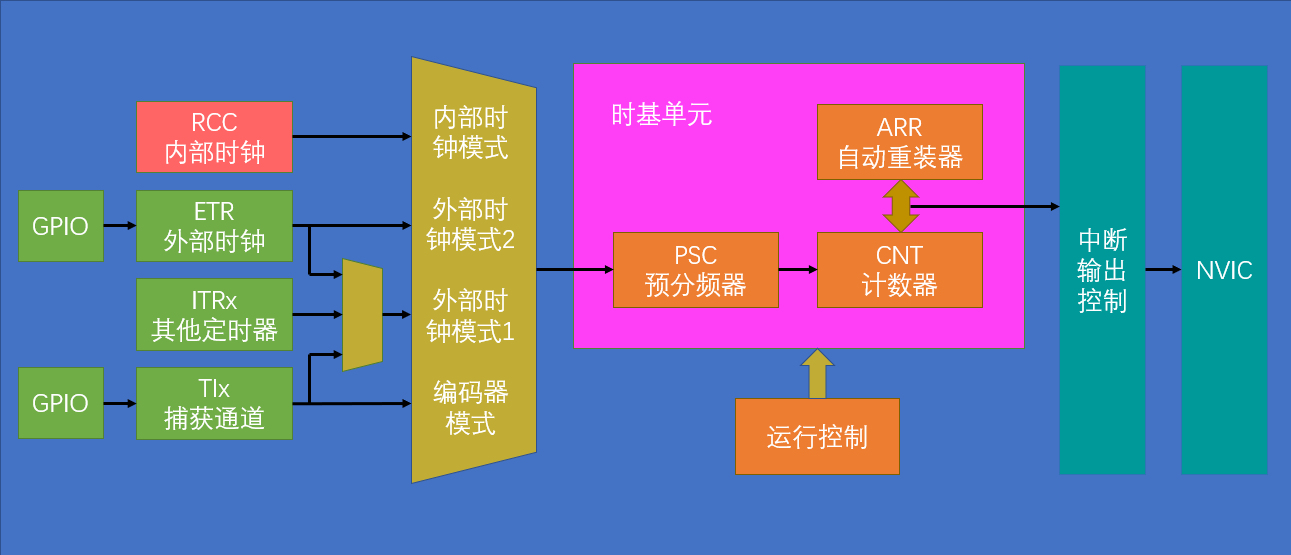
定时器可以对输入的时钟进行计数,并在计数值达到设定值时触发中断
16位计数器、预分频器、自动重装寄存器的时基单元,在72MHz计数时钟下可以实现最大59.65s的定时
不仅具备基本的定时中断功能,而且还包含内外时钟源选择、输入捕获、输出比较、编码器接口、主从触发模式等多种功能
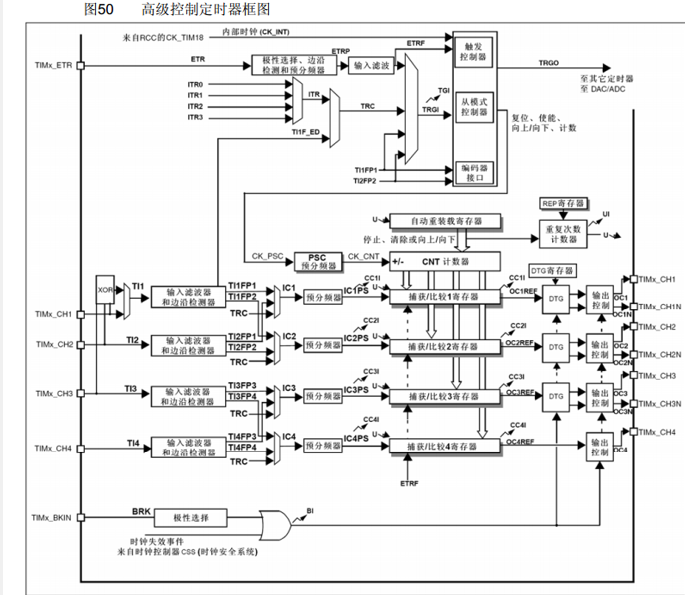
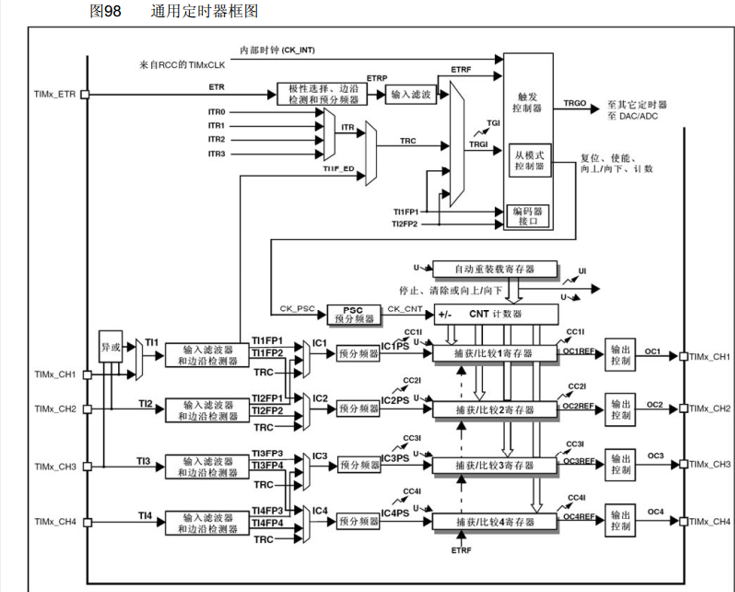
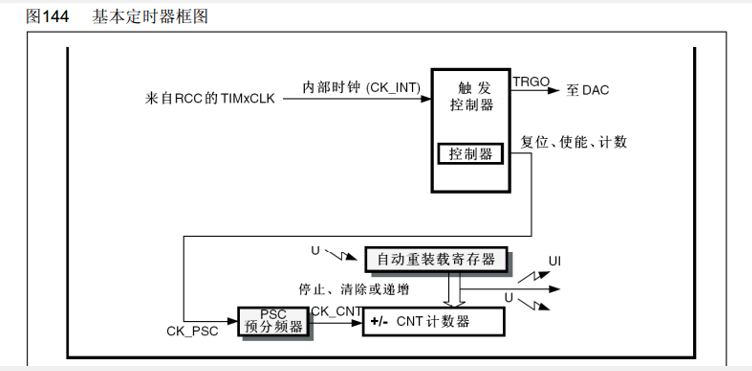
根据复杂度和应用场景分为了高级定时器、通用定时器、基本定时器三种类型
2.定时器类型
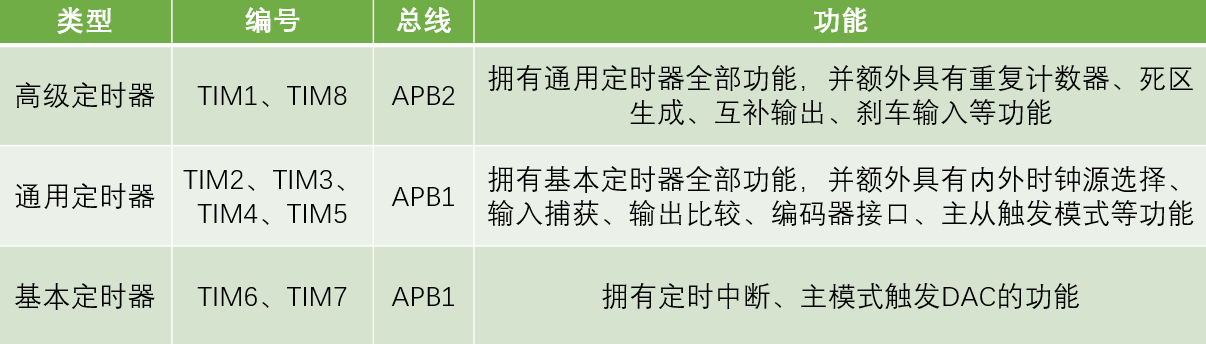
STM32F103C8T6定时器资源:TIM1、TIM2、TIM3、TIM4
3.高级定时器
4.通用定时器
5.基本定时器
6.定时中断基本结构
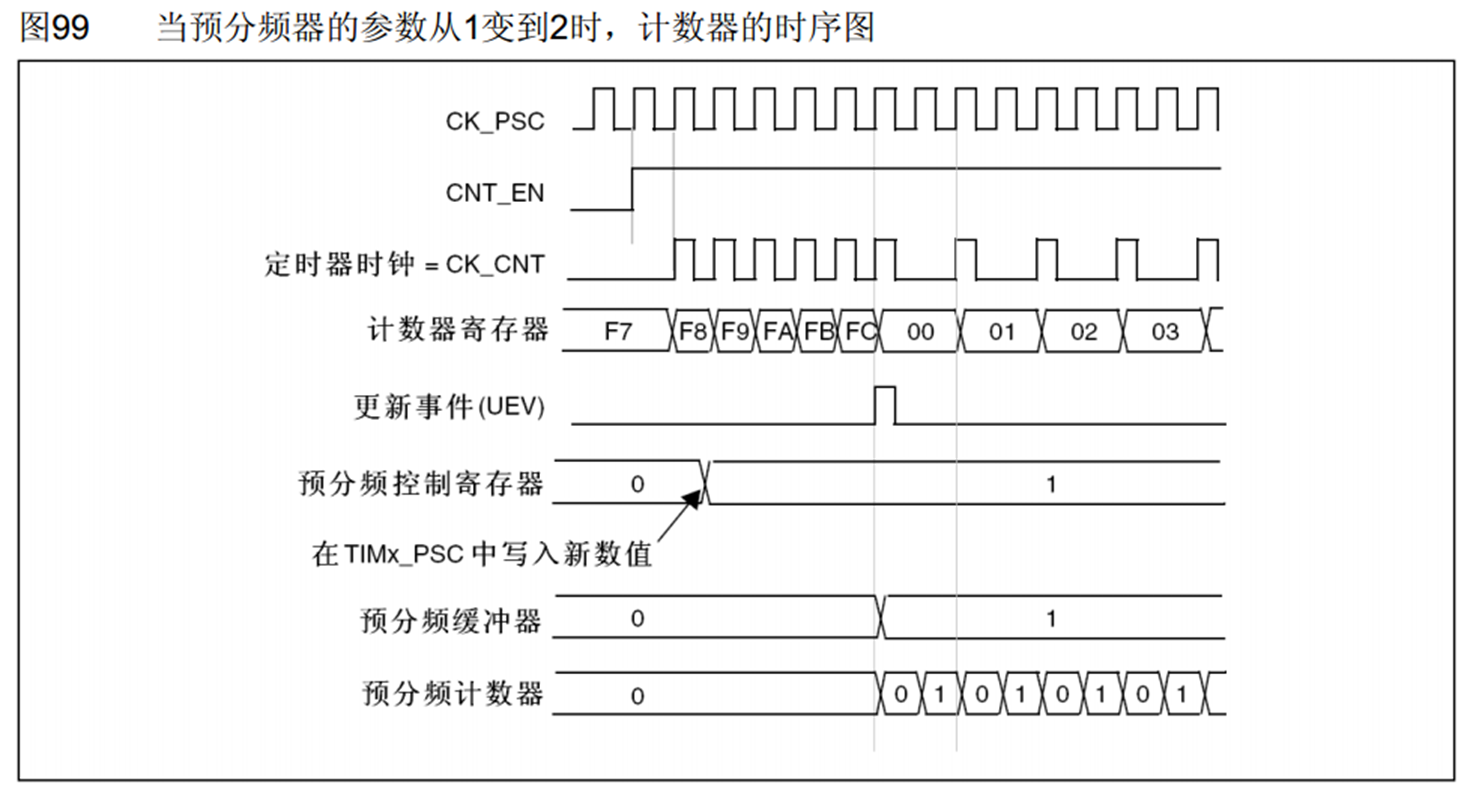
预分频器时序:
计数器时序:
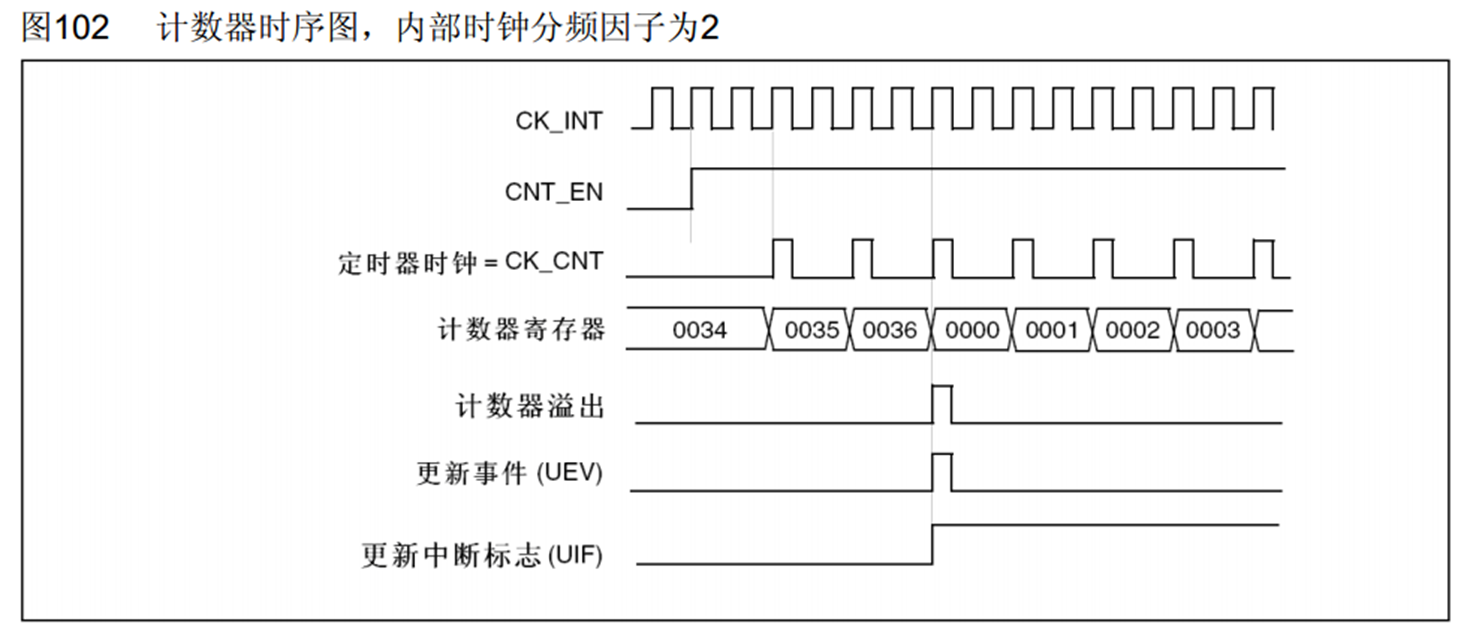
= CK_PSC / (PSC + 1) / (ARR + 1)
计数器无预装时序:
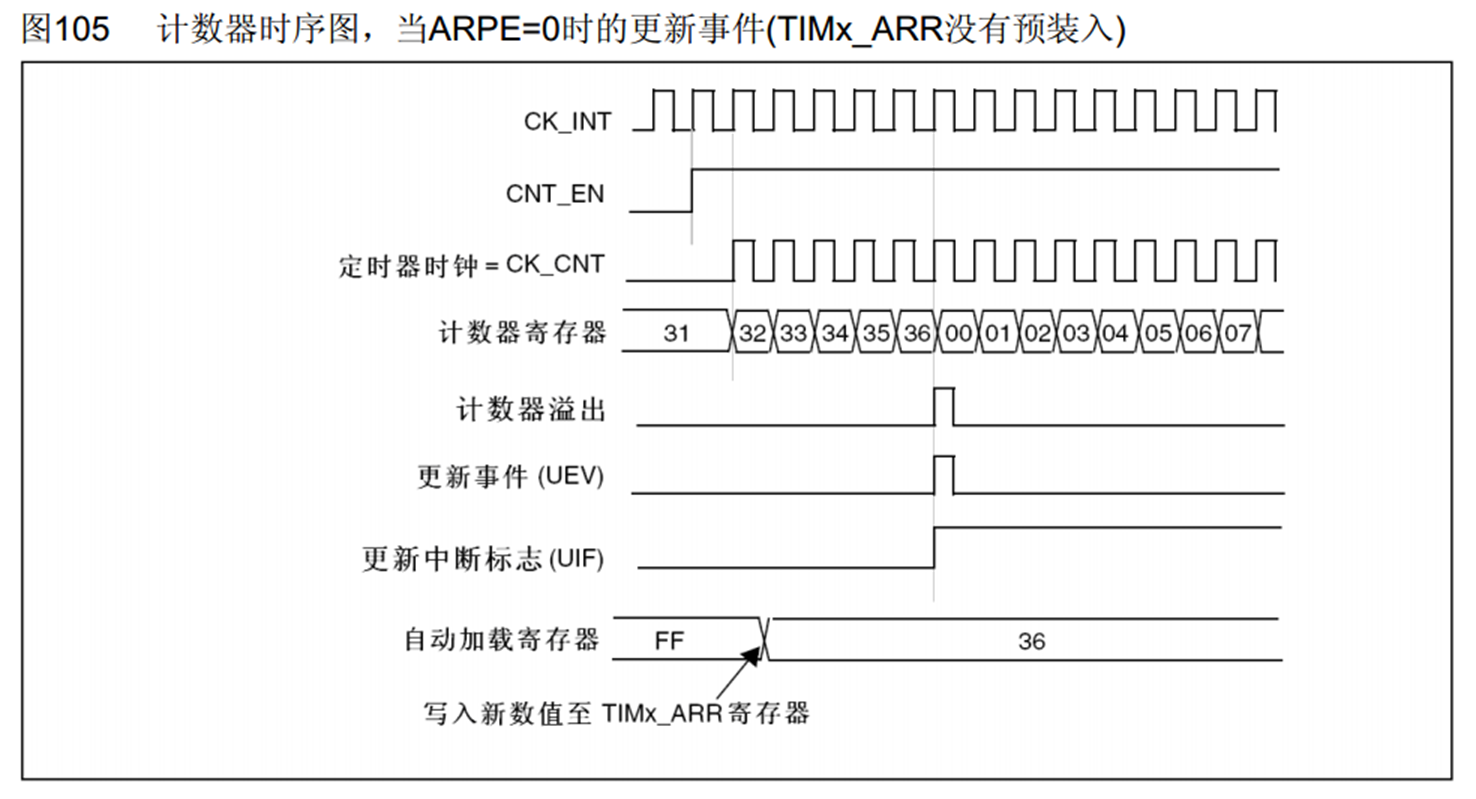
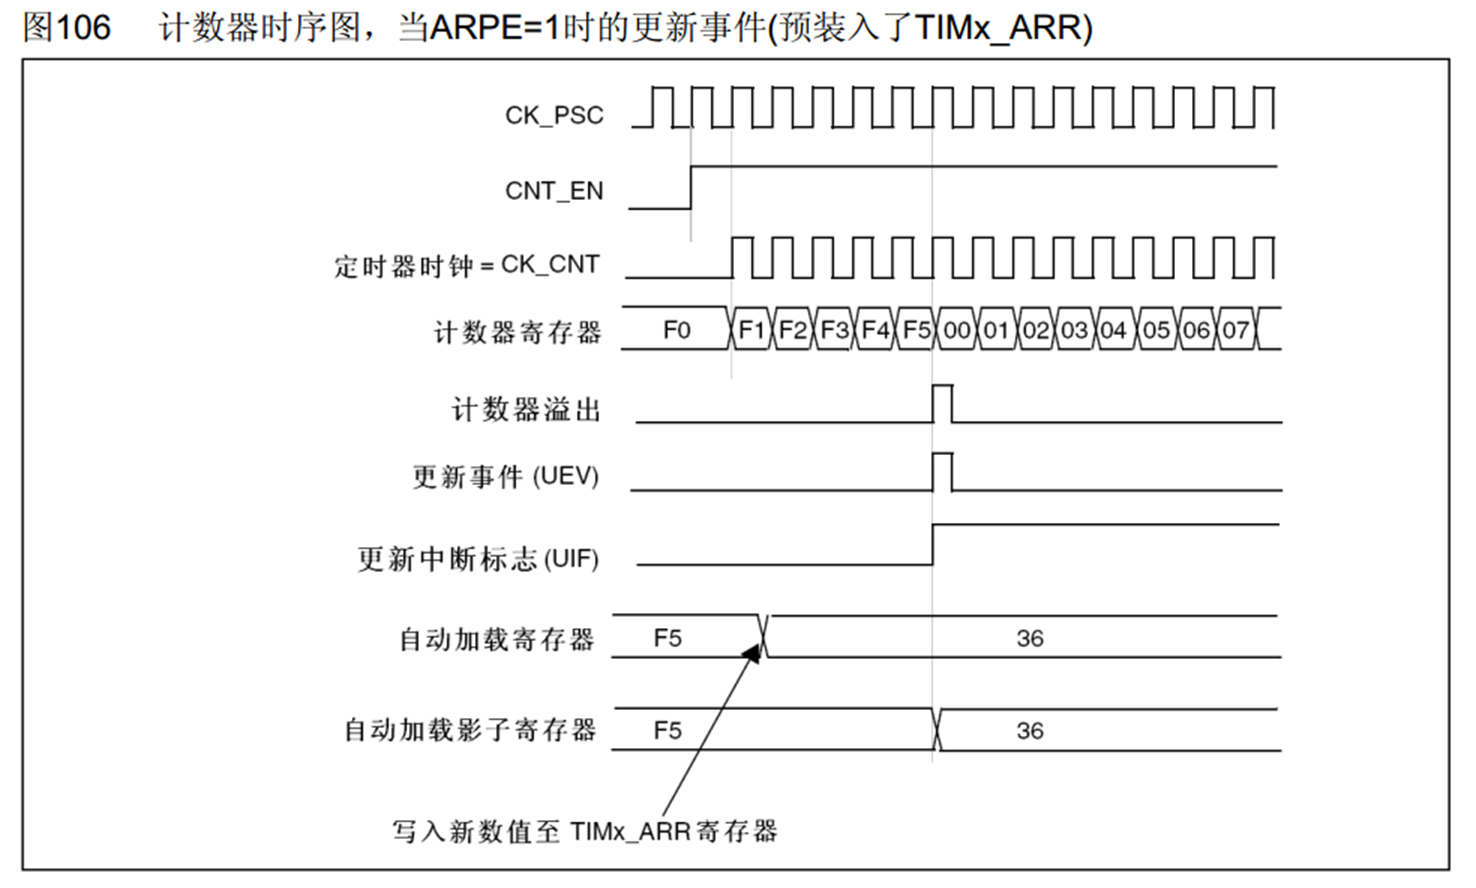
计数器有预装时序:
RCC时钟树:
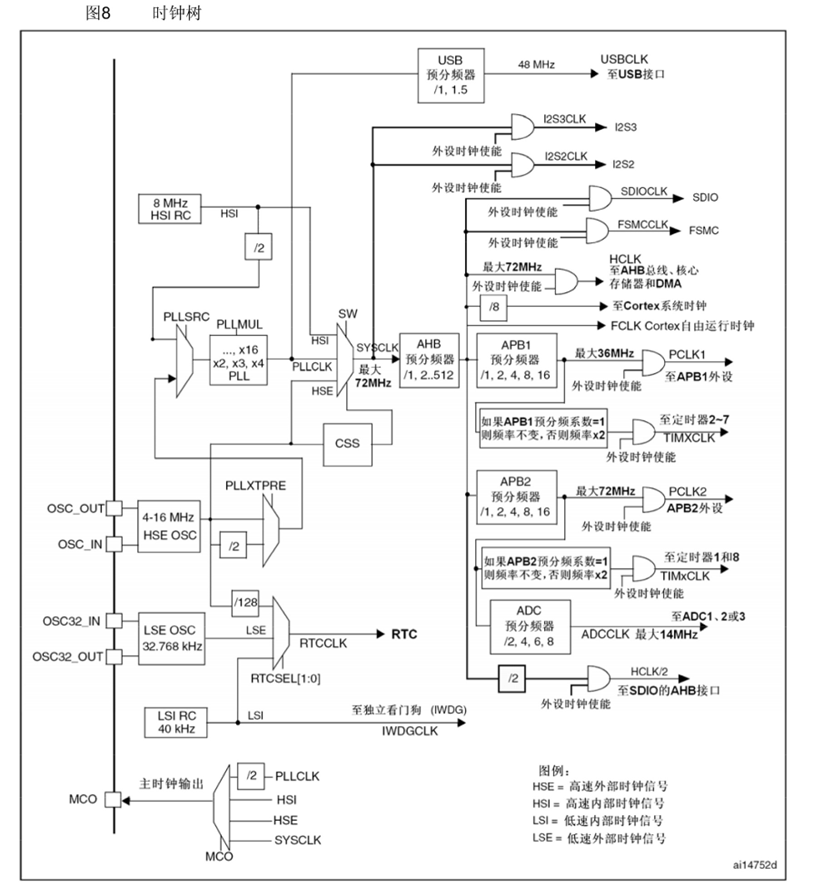
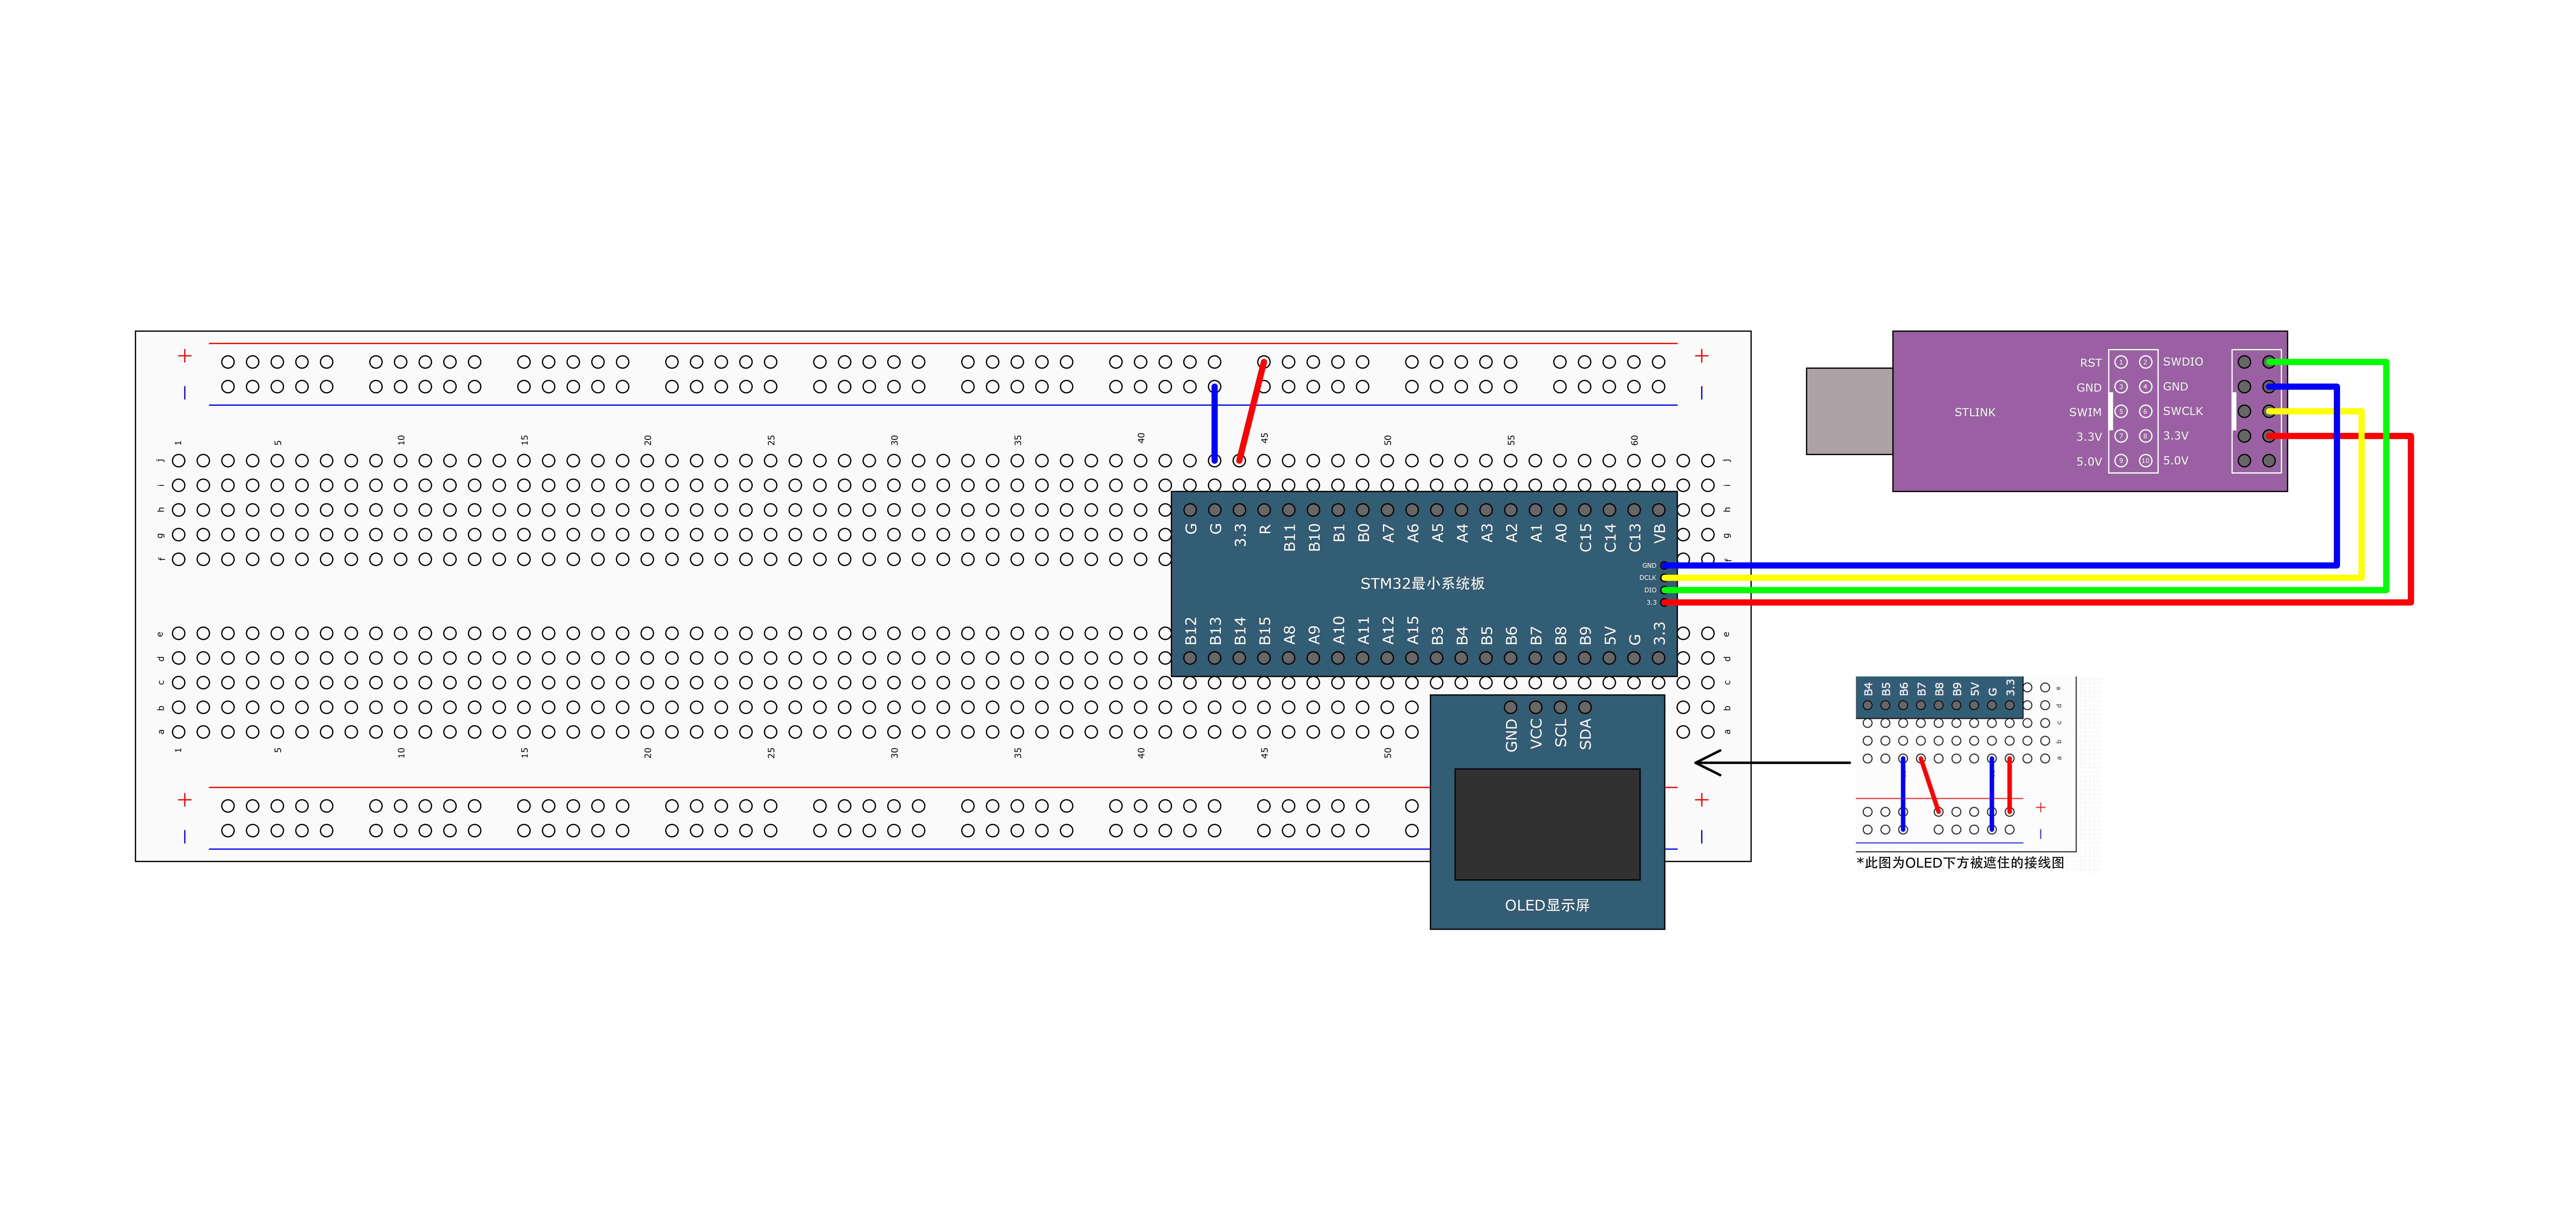
定时器定时中断示例接线图:
定时器定时中断代码:
#include "stm32f10x.h"                  // Device header

extern uint16_t Num;

void Timer_Init(void)
{
	//开启时钟
	RCC_APB1PeriphClockCmd(RCC_APB1Periph_TIM2,ENABLE);

	//设置内部时钟
	TIM_InternalClockConfig(TIM2);

	//设置时基单元
	TIM_TimeBaseInitTypeDef TIM_TimeBaseInitStructure;
	//分频
	TIM_TimeBaseInitStructure.TIM_ClockDivision = TIM_CKD_DIV1;
	//向上计数
	TIM_TimeBaseInitStructure.TIM_CounterMode = TIM_CounterMode_Up;
	TIM_TimeBaseInitStructure.TIM_Period = 10000 - 1;
	TIM_TimeBaseInitStructure.TIM_Prescaler = 7200 - 1;
	//重复计数器,高级定时器使用,此处不用,给0
	TIM_TimeBaseInitStructure.TIM_RepetitionCounter = 0;
	TIM_TimeBaseInit(TIM2,&TIM_TimeBaseInitStructure);

	//手动清除标志位
	TIM_ClearFlag(TIM2,TIM_IT_Update);

	//使能更新中断
	TIM_ITConfig(TIM2,TIM_IT_Update,ENABLE);

	//NVIC
	//NVIC分组
	NVIC_PriorityGroupConfig(NVIC_PriorityGroup_2);
	//结构体
	NVIC_InitTypeDef NVIC_InitStructure;
	//定时器2在NVIC里面的通道
	NVIC_InitStructure.NVIC_IRQChannel = TIM2_IRQn;
	NVIC_InitStructure.NVIC_IRQChannelCmd = ENABLE;
	NVIC_InitStructure.NVIC_IRQChannelPreemptionPriority = 2;
	NVIC_InitStructure.NVIC_IRQChannelSubPriority = 1;
	NVIC_Init(&NVIC_InitStructure);

	//启动定时器
	TIM_Cmd(TIM2,ENABLE);

}
void TIM2_IRQHandler(void)
{
	if(TIM_GetITStatus(TIM2,TIM_IT_Update) == SET)
	{
		Num++;
		TIM_ClearITPendingBit(TIM2,TIM_IT_Update);
	}
}
#include "stm32f10x.h"                  // Device header
#include "Delay.h"
#include "OLED.h"
#include "Timer.h"

uint16_t Num;

int main(void)
{
	OLED_Init();

	Timer_Init();
	OLED_ShowString(1,1,"Num:");

	while (1)
	{
		OLED_ShowNum(1,5,Num,5);
		OLED_ShowNum(2,5,TIM_GetCounter(TIM2),5);
	}
}
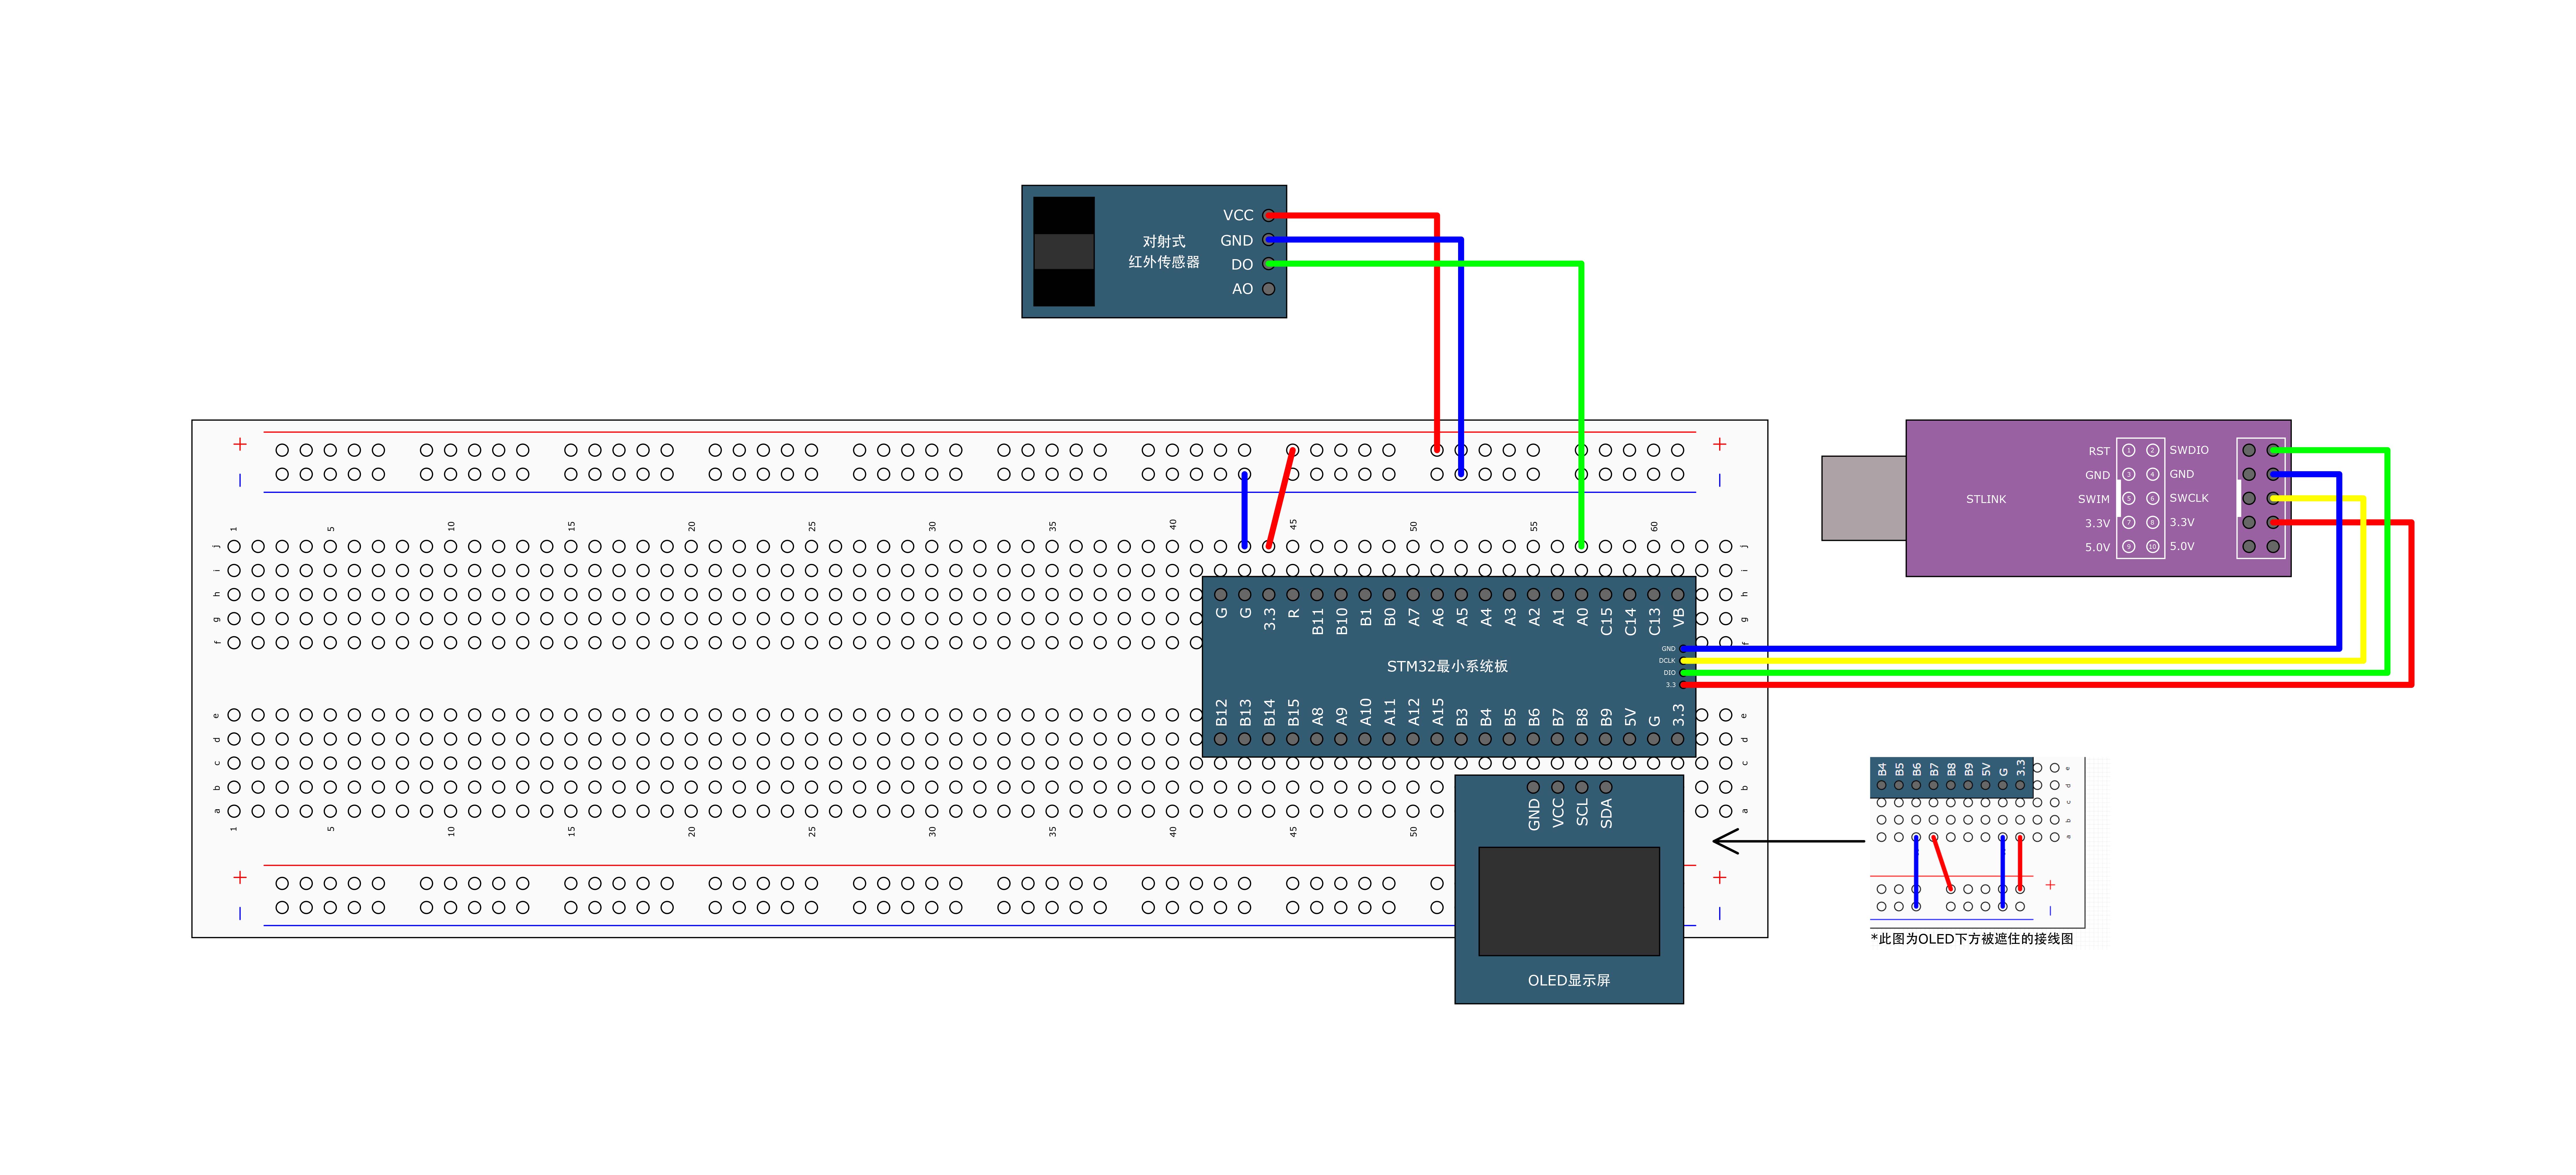
定时器外部时钟接线图:
定时器外部时钟代码:
#include "stm32f10x.h"                  // Device header

extern uint16_t Num;

void Timer_Init(void)
{
	//开启时钟
	RCC_APB1PeriphClockCmd(RCC_APB1Periph_TIM2,ENABLE);

	//配置GPIO
	RCC_APB2PeriphClockCmd(RCC_APB2Periph_GPIOA,ENABLE);
	GPIO_InitTypeDef GPIO_Initstructure;
	GPIO_Initstructure.GPIO_Mode = GPIO_Mode_IPU;
	GPIO_Initstructure.GPIO_Pin = GPIO_Pin_0;
	GPIO_Initstructure.GPIO_Speed = GPIO_Speed_50MHz;
	GPIO_Init(GPIOA,&GPIO_Initstructure);


	//设置外部时钟
	TIM_ETRClockMode2Config(TIM2,TIM_ExtTRGPSC_OFF,TIM_ExtTRGPolarity_NonInverted,0x00);

	//设置时基单元
	TIM_TimeBaseInitTypeDef TIM_TimeBaseInitStructure;
	//分频
	TIM_TimeBaseInitStructure.TIM_ClockDivision = TIM_CKD_DIV1;
	//向上计数
	TIM_TimeBaseInitStructure.TIM_CounterMode = TIM_CounterMode_Up;
	TIM_TimeBaseInitStructure.TIM_Period = 10 - 1;
	TIM_TimeBaseInitStructure.TIM_Prescaler = 1- 1;
	//重复计数器,高级定时器使用,此处不用,给0
	TIM_TimeBaseInitStructure.TIM_RepetitionCounter = 0;
	TIM_TimeBaseInit(TIM2,&TIM_TimeBaseInitStructure);

	//手动清除标志位
	TIM_ClearFlag(TIM2,TIM_IT_Update);

	//使能更新中断
	TIM_ITConfig(TIM2,TIM_IT_Update,ENABLE);

	//NVIC
	//NVIC分组
	NVIC_PriorityGroupConfig(NVIC_PriorityGroup_2);
	//结构体
	NVIC_InitTypeDef NVIC_InitStructure;
	//定时器2在NVIC里面的通道
	NVIC_InitStructure.NVIC_IRQChannel = TIM2_IRQn;
	NVIC_InitStructure.NVIC_IRQChannelCmd = ENABLE;
	NVIC_InitStructure.NVIC_IRQChannelPreemptionPriority = 2;
	NVIC_InitStructure.NVIC_IRQChannelSubPriority = 1;
	NVIC_Init(&NVIC_InitStructure);

	//启动定时器
	TIM_Cmd(TIM2,ENABLE);

}
void TIM2_IRQHandler(void)
{
	if(TIM_GetITStatus(TIM2,TIM_IT_Update) == SET)
	{
		Num++;
		TIM_ClearITPendingBit(TIM2,TIM_IT_Update);
	}
}

uint16_t Timer_GetCounter(void)
{
	return TIM_GetCounter(TIM2);
}
#include "stm32f10x.h"                  // Device header
#include "Delay.h"
#include "OLED.h"
#include "Timer.h"

uint16_t Num;

int main(void)
{
	OLED_Init();

	Timer_Init();
	OLED_ShowString(1,1,"Num:");
	OLED_ShowString(2,1,"CNT:");

	while (1)
	{
		OLED_ShowNum(1,5,Num,5);
		OLED_ShowNum(2,5,Timer_GetCounter(),5);
	}
}
TIM输出比较

DAMO开发者矩阵,由阿里巴巴达摩院和中国互联网协会联合发起,致力于探讨最前沿的技术趋势与应用成果,搭建高质量的交流与分享平台,推动技术创新与产业应用链接,围绕“人工智能与新型计算”构建开放共享的开发者生态。
更多推荐

 10
10 0
0- 0


 已为社区贡献1条内容

所有评论(0)