Datawhale-AI硬件与机器人[Task2学习]
Datawhale-AI硬件与机器人[Task2学习]
手眼标定
AX=XB,其中,A 是机器人本体的运动变换,B 是相机观测到的目标物运动变换,X 即为待求的手眼矩阵。
坐标系定义
F b F_b Fb: 基座坐标系(Base Frame),固定在机械臂的底座上,是机械臂运动的全局参考坐标系。
F e F_e Fe: 末端执行器坐标系(End-Effector Frame)固定在机械臂末端执行器(例如夹爪或工具)上。
F c F_c Fc: 相机坐标系(Camera Frame),固定在相机光心的位置,是视觉感知的参考系。
F t F_t Ft: 标定目标坐标系(Calibration Target Frame):固定在标定目标固定在标定目标(如棋盘格、圆点板)上。
Eye In Hand
眼在手上:相机固定在机械臂末端时,相机与末端执行器之间的变换是固定的。
利用标定板与基座的位置关系保持不变,进行计算:
T t b = T e 1 b T c 1 e 1 T t c 1 = T e 2 b T c 2 e 2 T t c 2 T^b_t = T^b_{e1}\ T^{e1}_{c1}\ T^{c1}_{t} = T^b_{e2}\ T^{e2}_{c2}\ T^{c2}_{t} Ttb=Te1b Tc1e1 Ttc1=Te2b Tc2e2 Ttc2
T e 1 e 2 T c e = T c e T c 1 c 2 T^{e2}_{e1}T^{e}_{c} = T^{e}_{c}T^{c2}_{c1} Te1e2Tce=TceTc1c2
其中 T c e T^e_c Tce就是最终需要求解的X。
Eye To Hand
眼在手外:相机固定在机械臂以外时,相机与末端执行器的相对位置会随着机械臂的运动而改变。
利用标定板与末端执行器的位置关系保持不变,进行计算:
T t e = T b e 1 T c b T t 1 c = T b e 2 T c b T t 2 c T^e_t = T^{e1}_bT^{b}_{c}T^{c}_{t1} = T^{e2}_bT^{b}_{c}T^{c}_{t2} Tte=Tbe1TcbTt1c=Tbe2TcbTt2c
( T e 2 b T b e 1 ) T c b = T c b ( T t 2 c T c t 1 ) (T^b_{e2}T^{e1}_b)T^{b}_{c} = T^{b}_{c}(T^{c}_{t2}T^{t1}_c) (Te2bTbe1)Tcb=Tcb(Tt2cTct1)
其中 T c b T^b_c Tcb就是最终需要求解的X。
sam和深度估计
Segment Anything Model (SAM)
SAM发展历程
| 特性 | SAM 1 (2023) | SAM 2 (2024) | SAM 3 (2025) |
|---|---|---|---|
| 核心能力 | 静态图像通用分割 (Zero-shot) | 视频流实时分割与记忆 (Temporal Memory) | 概念理解 + 全量实例分割 (Semantic/Concept) |
| 主要输入 | 点、框 (Prompts) | 点、框 + 记忆库上下文 | 文本 (Text) + 图像示例 + 点/框 |
| 语义理解 | 无 (只懂几何边界) | 弱 (仅靠时序关联) | 强 (懂"什么是猫"、“什么是红色的”) |
| 输出逻辑 | 一次交互 → 一个掩码 | 一次交互 → 一个时序轨迹 | 一个概念 → 所有实例的轨迹 |
| 典型缺陷 | 不懂物体是什么;无法处理视频 | 需要持续交互来修正遮挡 | 对极其抽象的文本概念可能仍有歧义 |
| 最佳场景 | PS抠图、辅助标注 | 视频剪辑、物体追踪 | 视频搜索、自动驾驶语义分析、机器人指令 |
单目深度估计
单目深度估计(Monocular Depth Estimation)就是利用人工智能,仅从单张 RGB 图像中,推断出这个丢失的深度信息。单目深度估计通过物体的相对大小,纹理等进行判断相对深度。
测试代码
import torch
import numpy as np
from PIL import Image
import matplotlib.pyplot as plt
import os
import time

# --- Transformers Imports for Depth Estimation ---
from transformers import DPTImageProcessor, DPTForDepthEstimation

# --- SAM Imports ---
from segment_anything import sam_model_registry, SamAutomaticMaskGenerator

plt.rcParams["font.family"] = ["SimHei"]  # Windows默认有黑体(SimHei)
plt.rcParams["axes.unicode_minus"] = False  # 解决负号显示异常
# --- Device Setup ---
device = "cuda" if torch.cuda.is_available() else "cpu"
print(f"使用设备: {device}")
torch_dtype = torch.float16 if torch.cuda.is_available() else torch.float32

# --- Global Variables for Models (Load once) ---
sam_model_instance = None # Changed name for clarity
depth_model = None
depth_processor = None

# --------------------------------------------------------------------------
# Model Loading Functions
# --------------------------------------------------------------------------

def load_sam_for_automatic_maskgen(model_path, model_type="vit_h"):
    """
    加载 SAM 模型用于 SamAutomaticMaskGenerator.
    如果成功则返回 SamAutomaticMaskGenerator 实例,否则返回 None.
    """
    global sam_model_instance
    if sam_model_instance is None:
        print(f"正在从 {model_path} (类型: {model_type}) 加载 SAM 模型...")
        if not os.path.exists(model_path):
            print(f"错误: 在 {model_path} 未找到 SAM 模型文件")
            return None
        try:
            sam_model_instance = sam_model_registry[model_type](checkpoint=model_path)
            sam_model_instance.to(device=device)
            print("SAM 模型加载成功。")
        except Exception as e:
            print(f"加载 SAM 模型时出错: {e}")
            sam_model_instance = None
            return None

    if sam_model_instance:
        try:
            mask_generator = SamAutomaticMaskGenerator(sam_model_instance)
            print("SamAutomaticMaskGenerator 创建成功。")
            return mask_generator
        except Exception as e:
            print(f"创建 SamAutomaticMaskGenerator 时出错: {e}")
            return None
    return None

def load_depth_estimation_model(model_name="Intel/dpt-large"):
    """
    加载深度估计模型和处理器 (例如 DPT).
    如果成功则返回 True,否则返回 False.
    """
    global depth_model, depth_processor
    if depth_model is None or depth_processor is None:
        print(f"正在加载深度估计模型 ({model_name})...")
        try:
            depth_processor = DPTImageProcessor.from_pretrained(model_name)
            depth_model = DPTForDepthEstimation.from_pretrained(model_name, torch_dtype=torch_dtype)
            depth_model.to(device)
            depth_model.eval() # 设置为评估模式
            print("深度估计模型加载成功。")
            return True
        except Exception as e:
            print(f"加载深度估计模型时出错: {e}")
            depth_model = None
            depth_processor = None
            return False
    return True

# --------------------------------------------------------------------------
# Perception Functions
# --------------------------------------------------------------------------

def segment_image_fully_sam(image_np, mask_generator):
    """
    使用 SAM AutomaticMaskGenerator 对整个图像进行分割。
    (函数与之前版本相同)
    """
    if mask_generator is None:
        print("错误: SamAutomaticMaskGenerator 未加载。")
        return None
    try:
        print("SAM: 正在为整个图像生成掩码...")
        if image_np.shape[2] != 3:
            print(f"错误: 图像需要是 3 通道 RGB,但得到 {image_np.shape[2]} 通道。")
            return None
        if image_np.dtype != np.uint8:
            print(f"警告: 图像数据类型应为 np.uint8,但得到 {image_np.dtype}。正在尝试转换...")
            image_np = image_np.astype(np.uint8)
        masks = mask_generator.generate(image_np)
        print(f"SAM: 生成了 {len(masks)} 个掩码。")
        if not masks:
            print("SAM: 未生成掩码。")
            return None
        return masks
    except Exception as e:
        print(f"SAM 全图分割过程中出错: {e}")
        return None

def estimate_depth_from_rgb(image_pil):
    """
    从 RGB 图像估计深度。

    Args:
        image_pil (PIL.Image): 输入 RGB 图像。

    Returns:
        np.ndarray or None: 预测的深度图 (H, W),如果出错则为 None。
    """
    if depth_model is None or depth_processor is None:
        print("错误: 深度估计模型未加载。")
        return None

    try:
        print("深度估计: 正在处理图像并预测深度...")
        inputs = depth_processor(images=image_pil, return_tensors="pt").to(device, dtype=torch_dtype)
        with torch.no_grad():
            outputs = depth_model(**inputs)
            predicted_depth = outputs.predicted_depth

        # 将深度图插值到原始图像大小
        prediction = torch.nn.functional.interpolate(
            predicted_depth.unsqueeze(1),
            size=image_pil.size[::-1], # (height, width)
            mode="bicubic",
            align_corners=False,
        )
        prediction = prediction.squeeze().cpu().numpy()
        print("深度估计完成。")
        return prediction
    except Exception as e:
        print(f"深度估计过程中出错: {e}")
        return None

# --------------------------------------------------------------------------
# Visualization Functions
# --------------------------------------------------------------------------

def show_sam_anns(anns, image_np, output_filename="sam_segmented_output.png"):
    """
    在图像上显示 SamAutomaticMaskGenerator 生成的注释(掩码)。
    (函数与之前版本类似,增加了保存功能)
    """
    if not anns:
        print("没有可显示的 SAM 注释。")
        plt.figure(figsize=(10, 8))
        plt.imshow(image_np)
        plt.title("原始图像 (无 SAM 掩码)")
        plt.axis('off')
        plt.savefig(output_filename.replace(".png", "_no_anns.png"))
        plt.show()
        return

    plt.figure(figsize=(12, 10))
    plt.imshow(image_np)
    ax = plt.gca()
    ax.set_autoscale_on(False)
    sorted_anns = sorted(anns, key=(lambda x: x['area']), reverse=True)
    img_overlay = np.ones((sorted_anns[0]['segmentation'].shape[0], sorted_anns[0]['segmentation'].shape[1], 4))
    img_overlay[:,:,3] = 0
    for ann in sorted_anns:
        m = ann['segmentation']
        color_mask = np.concatenate([np.random.random(3), [0.35]])
        img_overlay[m] = color_mask
    ax.imshow(img_overlay)
    plt.title("SAM 全图分割结果")
    plt.axis('off')
    plt.savefig(output_filename)
    print(f"SAM 分割结果已保存到 {output_filename}")
    plt.show()

def show_depth_map(depth_map_np, original_image_np, output_filename="depth_estimation_output.png"):
    """
    显示估计的深度图。

    Args:
        depth_map_np (np.ndarray): 估计的深度图 (H, W)。
        original_image_np (np.ndarray): 原始 RGB 图像 (H, W, 3),用于并排显示。
        output_filename (str): 保存深度图可视化结果的文件名。
    """
    if depth_map_np is None:
        print("没有可显示的深度图。")
        return

    plt.figure(figsize=(12, 6)) # 调整大小以适应两个子图

    plt.subplot(1, 2, 1)
    plt.imshow(original_image_np)
    plt.title("原始 RGB 图像")
    plt.axis('off')

    plt.subplot(1, 2, 2)
    plt.imshow(depth_map_np, cmap="plasma") # 使用 'plasma' 或 'viridis' 等 colormap
    plt.colorbar(label="相对深度")
    plt.title("估计的深度图")
    plt.axis('off')

    plt.tight_layout()
    plt.savefig(output_filename)
    print(f"深度图可视化结果已保存到 {output_filename}")
    plt.show()

# --------------------------------------------------------------------------
# Main Pipeline Function
# --------------------------------------------------------------------------

def run_perception_pipeline(
    rgb_image_path,
    sam_model_path=None, # SAM 模型路径变为可选
    sam_model_type="vit_h",
    depth_model_name="Intel/dpt-large",
    run_sam_segmentation=False, # 控制是否运行 SAM
    run_depth_estimation=True,  # 控制是否运行深度估计
    show_visuals=True
):
    """
    运行感知流程,可以选择执行 SAM 分割和/或深度估计。
    """
    start_time = time.time()

    # --- 加载输入数据 ---
    print("--- 加载数据 ---")
    if not os.path.exists(rgb_image_path):
        print(f"错误: RGB 图像未在 {rgb_image_path} 找到")
        return None
    try:
        image_pil = Image.open(rgb_image_path).convert("RGB")
        image_np = np.array(image_pil)
        print(f"已加载 RGB 图像: {image_np.shape}, 类型: {image_np.dtype}")
    except Exception as e:
        print(f"加载图像时出错: {e}")
        return None

    # --- 深度估计 ---
    estimated_depth_map = None
    if run_depth_estimation:
        print("\n--- 运行深度估计 ---")
        if not load_depth_estimation_model(depth_model_name):
            print("深度估计模型加载失败,跳过深度估计。")
        else:
            estimated_depth_map = estimate_depth_from_rgb(image_pil)
            if estimated_depth_map is not None and show_visuals:
                show_depth_map(estimated_depth_map, image_np, output_filename=f"{os.path.splitext(os.path.basename(rgb_image_path))[0]}_depth.png")

    # --- SAM 全图分割 ---
    sam_masks = None
    if run_sam_segmentation:
        print("\n--- 运行 SAM 全图分割 ---")
        if sam_model_path is None:
            print("错误: 未提供 SAM 模型路径,跳过 SAM 分割。")
        else:
            sam_mask_generator = load_sam_for_automatic_maskgen(sam_model_path, sam_model_type)
            if sam_mask_generator is None:
                print("SAM MaskGenerator 加载失败,跳过 SAM 分割。")
            else:
                sam_masks = segment_image_fully_sam(image_np, sam_mask_generator)
                if sam_masks is not None and show_visuals:
                    show_sam_anns(sam_masks, image_np, output_filename=f"{os.path.splitext(os.path.basename(rgb_image_path))[0]}_sam_seg.png")

    end_time = time.time()
    print(f"\n感知流程在 {end_time - start_time:.2f} 秒内完成。")

    results = {}
    if estimated_depth_map is not None:
        results["depth_map"] = estimated_depth_map
    if sam_masks is not None:
        results["sam_masks"] = sam_masks
    return results if results else None

# --- Example Usage (for testing this script directly) ---
if __name__ == "__main__":
    print("运行感知流程示例...")

    # --- 配置 ---
    rgb_path = "1687312919874923.png" # 可以找一张网图
    sam_ckpt_path = "sam_vit_h_4b8939.pth" # 您的 SAM 模型路径

    # 检查文件是否存在
    if not os.path.exists(rgb_path):
        print(f"错误: 示例图像 '{rgb_path}' 未找到。请将其放置在脚本目录或更新路径。")
    else:
        # 示例 1: 只运行深度估计
        print("\n--- 示例 1: 仅运行深度估计 ---")
        results_depth_only = run_perception_pipeline(
            rgb_image_path=rgb_path,
            run_depth_estimation=True,
            run_sam_segmentation=False, # 关闭 SAM
            show_visuals=True
        )
        if results_depth_only and "depth_map" in results_depth_only:
            print(f"深度估计成功。深度图形状: {results_depth_only['depth_map'].shape}")
        else:
            print("深度估计失败或未运行。")

        # 示例 2: 运行深度估计和 SAM 分割 (确保 SAM 检查点路径有效)
        if os.path.exists(sam_ckpt_path):
            print("\n--- 示例 2: 运行深度估计和 SAM 分割 ---")
            results_both = run_perception_pipeline(
                rgb_image_path=rgb_path,
                sam_model_path=sam_ckpt_path,
                run_depth_estimation=True,
                run_sam_segmentation=True,
                show_visuals=True
            )
            if results_both:
                if "depth_map" in results_both:
                    print(f"深度估计成功。深度图形状: {results_both['depth_map'].shape}")
                if "sam_masks" in results_both:
                     print(f"SAM 分割成功。生成了 {len(results_both['sam_masks'])} 个掩码。")
            else:
                print("深度估计和/或 SAM 分割失败或未运行。")
        else:
            print(f"\n警告: SAM 检查点 '{sam_ckpt_path}' 未找到。跳过运行 SAM 分割的示例。")

        # 示例 3: 只运行 SAM 分割 (确保 SAM 检查点路径有效)
        if os.path.exists(sam_ckpt_path):
            print("\n--- 示例 3: 仅运行 SAM 分割 ---")
            results_sam_only = run_perception_pipeline(
                rgb_image_path=rgb_path,
                sam_model_path=sam_ckpt_path,
                run_depth_estimation=False, # 关闭深度估计
                run_sam_segmentation=True,
                show_visuals=True
            )
            if results_sam_only and "sam_masks" in results_sam_only:
                print(f"SAM 分割成功。生成了 {len(results_sam_only['sam_masks'])} 个掩码。")
            else:
                print("SAM 分割失败或未运行。")
        else:
            print(f"\n警告: SAM 检查点 '{sam_ckpt_path}' 未找到。跳过仅运行 SAM 分割的示例。")
运行结果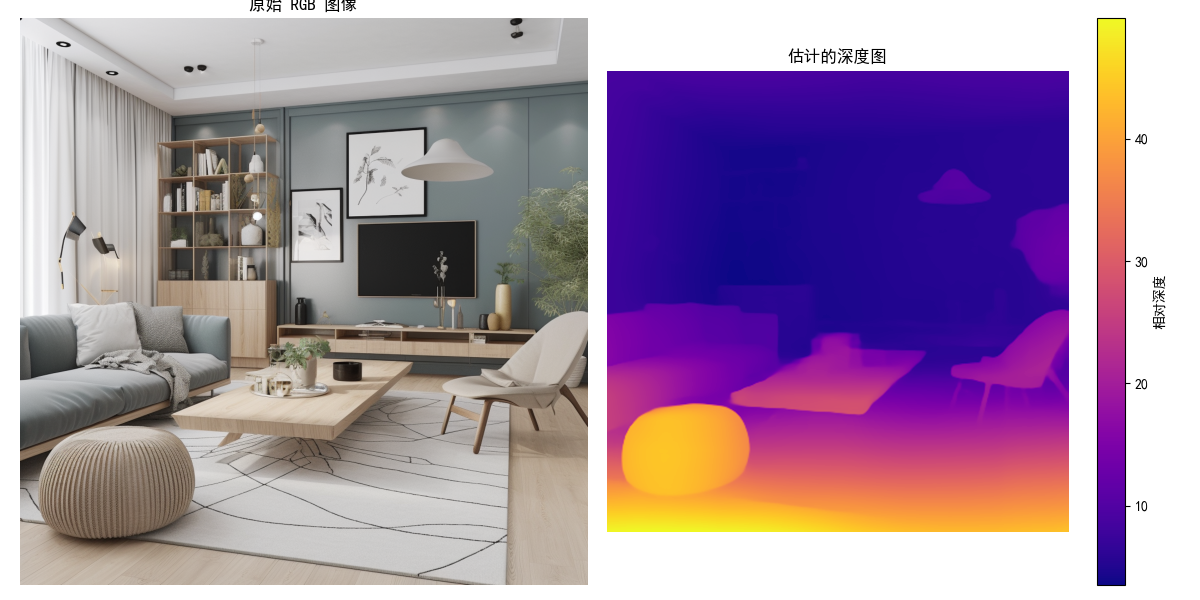

抓取注意力热图
测试代码
import matplotlib.pyplot as plt
import numpy as np
from PIL import Image, ImageDraw # 用于图像处理和在占位符上绘制文本
import matplotlib.colors
import cv2 # OpenCV 用于高斯模糊

# 尝试导入YOLO模型库
try:
    from ultralytics import YOLO
    YOLO_AVAILABLE = True
except ImportError:
    print("Warning: 'ultralytics' library not found. YOLO model functionality will be unavailable, falling back to simulated heatmap.")
    print("Please install the required libraries with 'pip install ultralytics opencv-python'.")
    YOLO_AVAILABLE = False

# --- 辅助函数:生成模拟热力图 (用作占位符或回退) ---
def generate_simulated_heatmap(image_width, image_height, object_center_x, object_center_y, object_width, object_height, max_intensity=255, falloff_rate=0.0005):
    """
    Generates a simulated heatmap for an object.
    Intensity is highest at the object's center and falls off.
    This function serves as a placeholder for actual model output or as a fallback.
    """
    y, x = np.ogrid[:image_height, :image_width]
    std_x = object_width / 2
    std_y = object_height / 2
    std_x = max(std_x, 1) # Avoid division by zero
    std_y = max(std_y, 1) # Avoid division by zero

    dist_sq = (((x - object_center_x)**2) / (2 * std_x**2)) + \
              (((y - object_center_y)**2) / (2 * std_y**2))
    heatmap = max_intensity * np.exp(-dist_sq * falloff_rate * 10)
    return np.clip(heatmap, 0, max_intensity)

# --- 函数:从真实模型获取热力图 ---
def get_heatmap_from_actual_model(image_np, model_type='detection', object_class_name='cat'):
    """
    Attempts to get a heatmap from a real model.
    Uses YOLOv10x if available for object detection and heatmap generation.
    Otherwise, falls back to a simulated heatmap.

    Args:
        image_np (numpy.ndarray): Input image as a NumPy array (H, W, C).
        model_type (str): Currently only 'detection' is supported.
        object_class_name (str): Target class name for detection (e.g., 'cat').

    Returns:
        numpy.ndarray: Generated heatmap (2D array).
    """
    print(f"Attempting to generate heatmap using '{model_type}' model approach.")
    image_height, image_width = image_np.shape[:2]

    if model_type == 'detection' and YOLO_AVAILABLE:
        try:
            model_name = 'yolov10x.pt' # 尝试YOLOv10x, 这是YOLOv10系列中较大的模型
            # model_name = 'yolov9c.pt' # 可以改回YOLOv9c或其他模型进行测试
            # model_name = 'yolov8s.pt'
            print(f"  Step: Loading pre-trained {model_name} model.")
            model = YOLO(model_name)
            print("  Step: Preprocessing image and performing inference.")
            # 可以调整推理参数,例如置信度阈值 conf
            results = model(image_np, verbose=False, conf=0.25) # verbose=False, 增加conf参数示例

            heatmap = np.zeros((image_height, image_width), dtype=np.float32)
            detections_found = 0

            print(f"  Step: Filtering for '{object_class_name}' class detections.")
            target_cls_id = -1
            if hasattr(model, 'names') and isinstance(model.names, dict):
                for cls_id, name_val in model.names.items(): # Renamed 'name' to 'name_val' to avoid conflict
                    if name_val == object_class_name:
                        target_cls_id = cls_id
                        break
            else:
                print(f"  Warning: Model class names (model.names) not available in the expected format. Cannot map '{object_class_name}' to class ID.")


            if target_cls_id == -1:
                print(f"  Warning: Class '{object_class_name}' not found in model's classes or model.names not accessible. Will display an empty heatmap.")
            else:
                print(f"  Class ID for '{object_class_name}': {target_cls_id}")

                for result in results:
                    for box in result.boxes:
                        cls = int(box.cls)
                        conf = float(box.conf)
                        if cls == target_cls_id:
                            detections_found += 1
                            x1, y1, x2, y2 = map(int, box.xyxy[0])
                            # 使用置信度作为热度值填充矩形
                            cv2.rectangle(heatmap, (x1, y1), (x2, y2), conf, thickness=cv2.FILLED)

                if detections_found > 0:
                    print(f"  Found {detections_found} '{object_class_name}' detection(s).")
                    # 调整高斯模糊的核大小,可以根据效果调整
                    # 较大的核会产生更模糊(弥散)的热力图
                    blur_kernel_size = (101, 101) # 可以尝试减小如 (51,51) 或增大
                    heatmap = cv2.GaussianBlur(heatmap, blur_kernel_size, 0)
                    if heatmap.max() > 0:
                        heatmap = (heatmap / heatmap.max()) * 255 # 归一化到0-255
                    print("  Step: Heatmap generated based on detections.")
                    return heatmap.astype(np.uint8)
                else:
                    print(f"  No '{object_class_name}' detections found with current settings. Will display an empty heatmap.")
                    return heatmap # Return empty heatmap

        except Exception as e:
            print(f"  Error during YOLO model operation: {e}")
            print("  Fallback: Using simulated heatmap.")
            # Fallthrough to simulated heatmap generation

    # ----- Fallback to simulated heatmap if model is unavailable or an error occurs -----
    print("  Fallback: Using simulated heatmap as a placeholder.")
    center_x_ratio = 0.47
    center_y_ratio = 0.45
    width_ratio = 0.20
    height_ratio = 0.30

    obj_center_x_abs = int(center_x_ratio * image_width)
    obj_center_y_abs = int(center_y_ratio * image_height)
    obj_width_abs = int(width_ratio * image_width)
    obj_height_abs = int(height_ratio * image_height)

    simulated_heatmap = generate_simulated_heatmap(
        image_width, image_height,
        obj_center_x_abs, obj_center_y_abs,
        obj_width_abs, obj_height_abs
    )
    return simulated_heatmap

def plot_image_with_heatmap(image_path, heatmap_data, title="Object Detection Heatmap", alpha=0.6, cmap_name='inferno'):
    """
    Overlays a heatmap on an image and displays it. All plot text is in English.
    """
    try:
        img = Image.open(image_path).convert('RGB')
    except FileNotFoundError:
        print(f"Error: Image file not found at {image_path}.")
        img = Image.new('RGB', (500, 500), color = (128, 128, 128))
        draw = ImageDraw.Draw(img)
        draw.text((50, 230), "Image not found.\nPlease use a valid path.", fill=(255,0,0))
        heatmap_data = np.zeros((500, 500))
        print("Displaying placeholder image and empty heatmap.")

    img_np = np.array(img)

    fig, ax = plt.subplots(1, 1, figsize=(10, 8))
    ax.imshow(img_np)

    if heatmap_data.max() > 0:
        if heatmap_data.shape[0] != img_np.shape[0] or heatmap_data.shape[1] != img_np.shape[1]:
            print(f"Warning: Heatmap dimensions ({heatmap_data.shape}) differ from image dimensions ({img_np.shape[:2]}). Resizing heatmap.")
            heatmap_pil = Image.fromarray(heatmap_data.astype(np.uint8))
            heatmap_resized_pil = heatmap_pil.resize((img_np.shape[1], img_np.shape[0]), Image.BICUBIC)
            heatmap_data_resized = np.array(heatmap_resized_pil)
            cax = ax.imshow(heatmap_data_resized, cmap=plt.get_cmap(cmap_name), alpha=alpha, extent=(0, img_np.shape[1], img_np.shape[0], 0))
        else:
            cax = ax.imshow(heatmap_data, cmap=plt.get_cmap(cmap_name), alpha=alpha, extent=(0, img_np.shape[1], img_np.shape[0], 0))

        cbar = fig.colorbar(cax, ax=ax, orientation='vertical', fraction=0.046, pad=0.04)
        cbar.set_label('Heatmap Intensity (Model-derived or Simulated)', rotation=270, labelpad=15)
    else:
        print("Heatmap is empty (no detections or model not run), not overlaying.")

    ax.set_title(title, fontsize=16)
    ax.set_xlabel("X-coordinate (pixels)", fontsize=12)
    ax.set_ylabel("Y-coordinate (pixels)", fontsize=12)
    ax.axis('on')
    plt.tight_layout()
    plt.show()

if __name__ == '__main__':
    # --- Configuration ---
    image_file_path = 'cat.jpg' # 默认使用您提到识别有困难的俯视图图像
    # image_file_path = 'image_2d8ceb.png' # 之前可以识别的图像
    # image_file_path = 'image_2d208d.jpg' # 另一张测试图像

    target_object_name = 'cat'

    # --- 加载图像 ---
    try:
        img_for_model = Image.open(image_file_path).convert('RGB')
        img_np_for_model = np.array(img_for_model)
        img_height, img_width = img_np_for_model.shape[:2]
        print(f"Preparing to generate heatmap for image: {image_file_path} (Dimensions: {img_width}x{img_height})")
    except FileNotFoundError:
        print(f"Fatal Error: Image file '{image_file_path}' not found. Cannot proceed.")
        img_np_for_model = np.zeros((500, 500, 3), dtype=np.uint8)
        img_width, img_height = 500, 500


    # --- Generate Heatmap ---
    heatmap_output = get_heatmap_from_actual_model(
        img_np_for_model,
        model_type='detection',
        object_class_name=target_object_name
    )

    # --- Plot Image with Heatmap ---
    plot_title = f"Heatmap for '{target_object_name}' (YOLOv10x or Simulated)"
    plot_image_with_heatmap(
        image_path=image_file_path,
        heatmap_data=heatmap_output,
        title=plot_title,
        alpha=0.5,
        cmap_name='inferno'
    )

    if not YOLO_AVAILABLE:
        print("\nReminder: To use the actual YOLO model for heatmap generation, ensure 'ultralytics' and 'opencv-python' are installed.")
        print("You can install them via 'pip install ultralytics opencv-python'.")
        print("Currently displaying a simulated heatmap.")
运行结果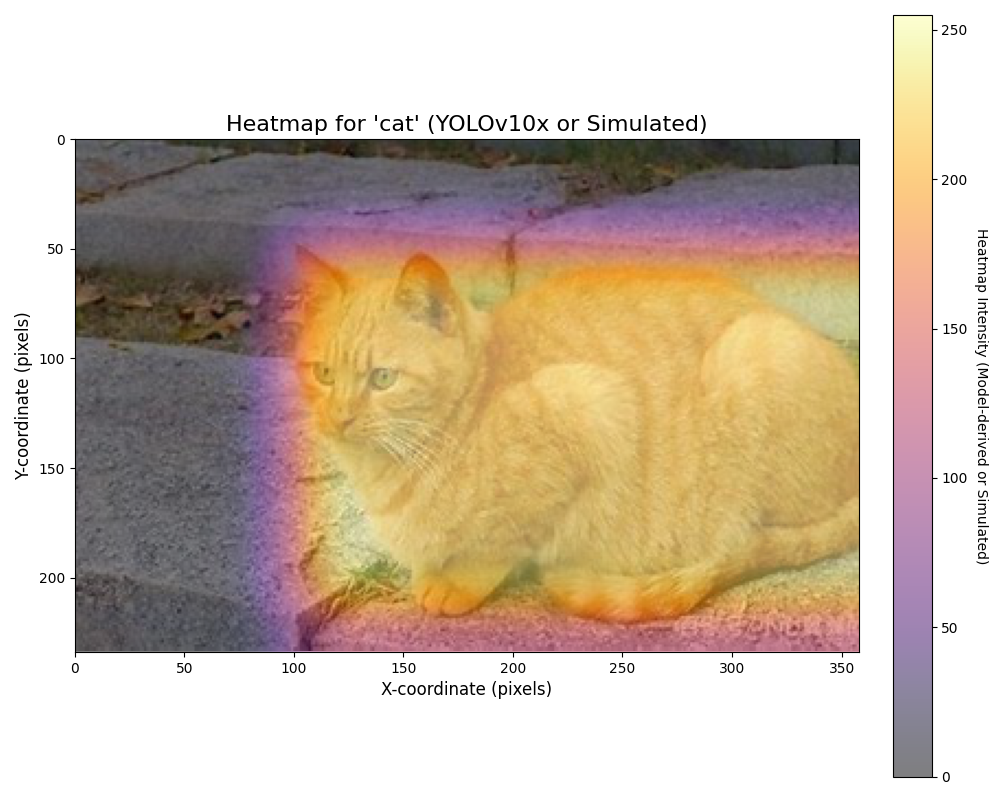
[1]: https://github.com/datawhalechina/ai-hardware-robotics

DAMO开发者矩阵,由阿里巴巴达摩院和中国互联网协会联合发起,致力于探讨最前沿的技术趋势与应用成果,搭建高质量的交流与分享平台,推动技术创新与产业应用链接,围绕“人工智能与新型计算”构建开放共享的开发者生态。
更多推荐


 23
23 0
0- 0


 已为社区贡献1条内容

所有评论(0)