Sqoop数据导入 第3关:Mysql导入数据至Hive中
Sqoop数据导入第3关:Mysql导入数据至Hive中
·
注意!如果重置了代码仓库请用以下步骤:
start-all.sh

schematool -dbType mysql -initSchema

重置之后mysql数据库里数据没了,所以重新输入就行。

mysql -uroot -p123123 -h127.0.0.1

create database hdfsdb;

use hdfsdb;

create table student(stu_no int primary key, stu_name varchar(20), stu_age int);

insert into student values(202001,"zhangsan",18);

insert into student values(202002,"lisi",19);

insert into student values(202003,"wangwu",20);

exit;

hive

create table test2(stu_no int,stu_name string,stu_age int)

row format delimited

fields terminated by ",";

exit;

sqoop import --connect jdbc:mysql://127.0.0.1:3306/hdfsdb --username root --password 123123 --query 'select stu_no, stu_name,stu_age from student where stu_age>=20 and $CONDITIONS' --target-dir /user/root/hdfsdb6   --fields-terminated-by ',' -m 1

hive

load data inpath '/user/root/hdfsdb6/part-m-00000' into table test2;
这样就可以了。
为了完成本关任务,你需要掌握:MySQL 数据导入至 Hive 中。
我重置代码行,执行以下操作
#start-all.sh
#mysql -uroot -p123123 -h127.0.0.1

create database hdfsdb;

mysql> use hdfsdb;

mysql> create table student(stu_no int primary key, stu_name varchar(20), stu_age int);

mysql> insert into student values(202001,"zhangsan",18);

mysql> insert into student values(202002,"lisi",19);

mysql> insert into student values(202003,"wangwu",20);

mysql> exit;

#sqoop import --connect jdbc:mysql://127.0.0.1:3306/hdfsdb --username root --password 123123 --query 'select stu_name,stu_age from student where $CONDITIONS' --target-dir /user/root/hdfsdb3 --fields-terminated-by '-' -m 1

#schematool -dbType mysql -initSchema
hive
create table test2(stu_no int,stu_name string,stu_age int)
row format delimited
fields terminated by ",";
exit;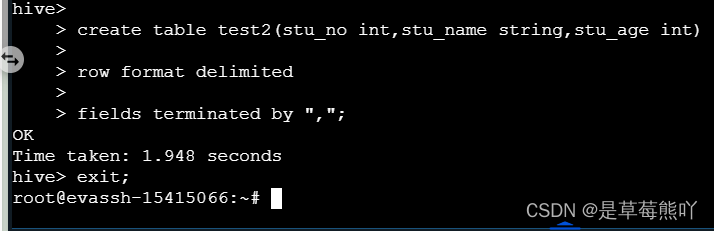
MySQL 数据导入至Hive
1、直接导入。 我们可以使用上一关的数据库,如果没有的话,需要重新创建。
sqoop import --connect jdbc:mysql://127.0.0.1:3306/hdfsdb --username root --password 123123 --table student --hive-import -m1 --hive-table test
这里会发生一个报错,如图: 解决方法 这里缺少了hive-common-3.1.0.jar包,我们在 Hive 的lib目录下,拷贝到 Sqoop 的lib目录下即可。
cp /opt/hive/lib/hive-common-3.1.0.jar /opt/sqoop-1.4.7.bin__hadoop-2.6.0/lib/这边输出文件经过上次已经创建好了,所以我们要不自己手动删除,要不用sqoop参数: --delete-target-dir:如果输出文件存在,则先删除。
sqoop import --connect jdbc:mysql://127.0.0.1:3306/hdfsdb --username root --password 123123 --table student --hive-import --delete-target-dir -m1 --hive-table test
成功之后我们可以通过hive来查看是否成功转输。
2、通过传输至HDFS上,Hive再从HDFS导入数据。 MySQL数据导入至Hive。
sqoop import --connect jdbc:mysql://127.0.0.1:3306/hdfsdb --username root --password 123123 --table student -m 1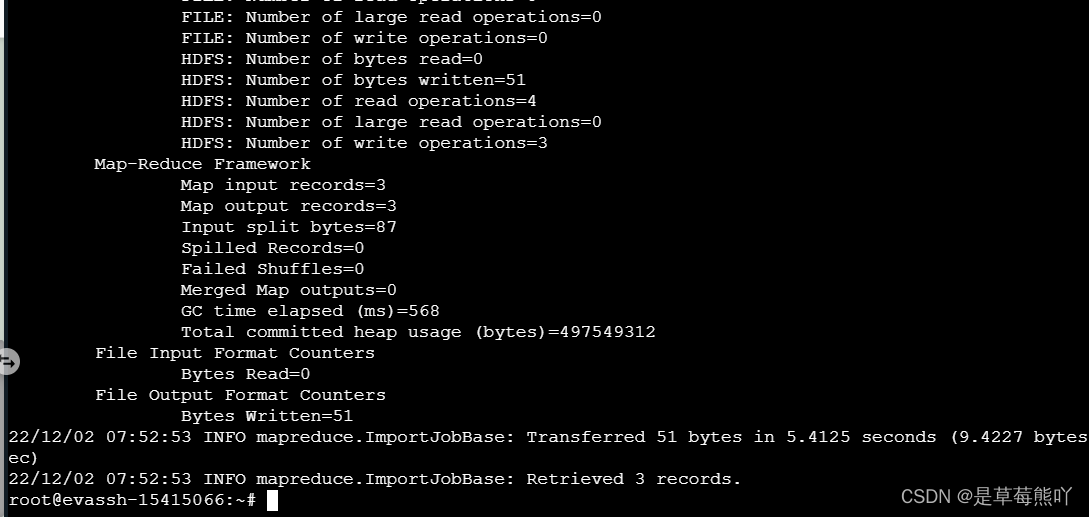
Hive依据格式建表。
hive> create table test1(
stu_no int,stu_name string,stu_age int)
row format delimited
fields terminated by ",";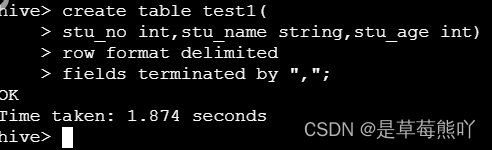
从HDFS导入数据。
load data inpath '/user/root/student/part-m-00000' into table test1;
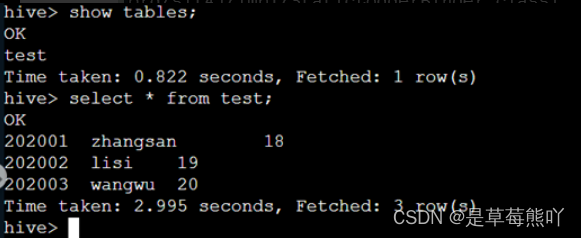
select * from test1;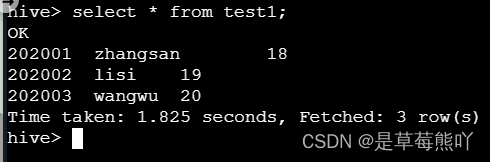
查看是否成功。
编程要求
将学生年龄大于20的学生信息放入Hive表test2中,要求如下:
- 指定一个Mapreduce任务。
- 指定分隔符为
,。
sqoop import --connect jdbc:mysql://127.0.0.1:3306/hdfsdb --username root --password 123123 --query 'select stu_no, stu_name,stu_age from student where stu_age>=20 and $CONDITIONS' --target-dir /user/root/hdfsdb6 --fields-terminated-by ',' -m 1
hive
load data inpath '/user/root/hdfsdb6/part-m-00000' into table test2;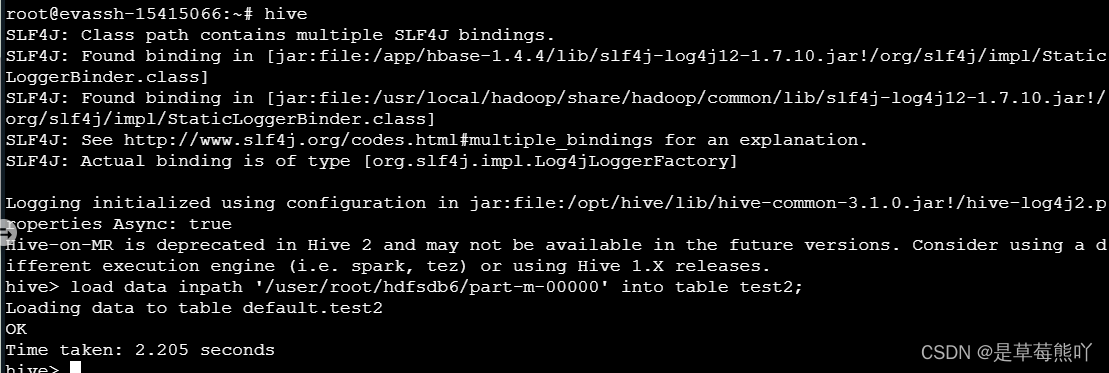

DAMO开发者矩阵,由阿里巴巴达摩院和中国互联网协会联合发起,致力于探讨最前沿的技术趋势与应用成果,搭建高质量的交流与分享平台,推动技术创新与产业应用链接,围绕“人工智能与新型计算”构建开放共享的开发者生态。
更多推荐


 1
1 0
0- 0


 已为社区贡献1条内容

所有评论(0)