03 深度学习模型部署(C++)-Libtorch初探
Libtorch(c++)模型部署
·
Libtorch(c++)模型部署
一、前言
需要预先准备libtorch(c++)环境,可以看这篇Libtorch(C++)环境配置,如果要读入图片,则建议提前准备OpenCV环境,可以看这篇OpenCV(C++)环境配置(windows)
二、模型部署步骤
1.Python端利用torch.jit.trace将训练完成的模型保存成Libtorch模型
有两种方法,一种是训练过程中直接整个模型保存了,可利用示例一进行转换保存;第二种是训练过程中仅保存了模型权重,需要再次构建模型再进行转换,可利用示例二进行转换保存。
本文采用的示例一
python代码如下(示例一):
# 转换模型,保存成libtorch可读模型
from torch.autograd import Variable

model=torch.load("./model/LeNet.pt") #加载保存的模型

from torchsummary import summary
summary(model, input_size=(30,5,5)) #打印model summary

use_gpu = torch.cuda.is_available()  # 判断是否有GPU加速
if use_gpu:
    model = model.cuda()

model.eval()

torch.no_grad()
# An example input you would normally provide to your model's forward() method.
example = torch.rand(1, 30, 5, 5) #根据自己的模型输入进行修改

if use_gpu:
    example = Variable(example).cuda()
    # label = Variable(label, volatile=True).cuda()
else:
    example = Variable(example)
    # label = Variable(label)

# Use torch.jit.trace to generate a torch.jit.ScriptModule via tracing.
traced_script_module = torch.jit.trace(model, example)
traced_script_module.save("./model/libtorch/LeNet.pt")
python代码如下(示例二):
# 转换模型,保存成libtorch可读模型
from torch.autograd import Variable


model = VGG16() #创建model实例对象,VGG16()即是你的模型函数

use_gpu = torch.cuda.is_available()  # 判断是否有GPU加速
if use_gpu:
    model = model.cuda()

model.eval() #关闭dropout等

model.load_state_dict(torch.load("./cnn.pth")) #加载保存的权重
torch.no_grad()
# An example input you would normally provide to your model's forward() method.
example = torch.rand(1, 30, 5, 5)

if use_gpu:
    example = Variable(example).cuda()
    # label = Variable(label, volatile=True).cuda()
else:
    example = Variable(example)
    # label = Variable(label)

# Use torch.jit.trace to generate a torch.jit.ScriptModule via tracing.
traced_script_module = torch.jit.trace(model, example)
traced_script_module.save("./model/libtorch/LeNet.pt")
2.C++端加载保存的模型和测试用的my_tensor_test.txt文件
需要提前设置模型路径,项目上右键属性,命令参数中添加模型名称,然后将模型和测试tensor拷贝到.cpp同路径下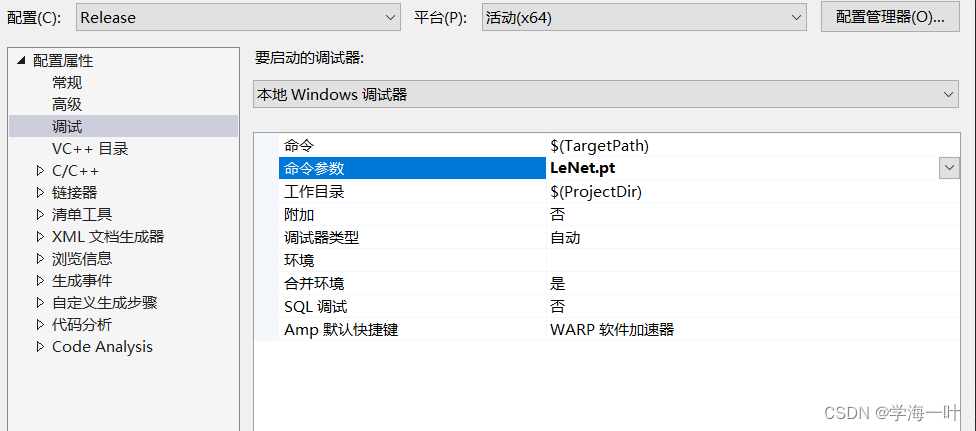
c++代码如下(示例):
#include<iostream>
#include<string>

#include<opencv2/opencv.hpp>
#include<torch/torch.h>
#include<torch/script.h>

#include<direct.h> //输出当前目录

using namespace cv;
using namespace torch;
using namespace std;

//定义读取的tensor(.txt文件,二维)
template <typename T>
std::vector<T> InputData_To_Vector(const std::string& path)
{
	std::vector<T> p;
	std::ifstream infile(path);
	assert(infile.is_open() && "Unable to open txt file. please check if the .txt file path is right!");
	T number;
	std::string s;
	while (getline(infile, s)) {
		std::istringstream is(s);
		T d;
		while (!is.eof()) {
			is >> d;
			p.push_back(d);
		}
		s.clear();
	}
	infile.close();
	return p;
}

// argc代表的是命令参数的数量,至少为1(argv[0]即.exe文件的路径)。argv为指针表示的参数, argv[0]表示第一个参数,argv[1]表示第二个参数,以此类推。
int main(int argc, const char* argv[]) {

	//cout << "argc=" << argc << endl;       //3个参数
	//cout << "argv[0]=" << argv[0] << endl; //E:\2022学习文档\c++\Libtorch_test\x64\Release\Libtorch_test.exe
	//cout << "argv[1]=" << argv[1] << endl; //LeNet.pt
	//cout << "argv[2]=" << argv[2] << endl; //cnn.pt

	//char buff[250];
	//_getcwd(buff, 250);
	//std::string current_working_directory(buff);
	//cout << "Current path is " << current_working_directory << '\n'; //输出当前路径,记得把模型文件放在该路径下

	//查看c++版本,默认为c++98,修改步骤如下:https://blog.csdn.net/chinabinlang/article/details/95597347
	//1.属性--c/c++ 所有选项--c++语言标准修改
	//2.属性–C/C++–命令行–其他选项  输入 /Zc:__cplusplus
	//if (__cplusplus == 201703l)
	//	std::cout << "c++17" << endl;
	//else if (__cplusplus == 201402l)
	//	std::cout << "c++14" << endl;
	//else if (__cplusplus == 201103l)
	//	std::cout << "c++11" << endl;
	//else if (__cplusplus == 199711l)
	//	std::cout << "c++98" << endl;
	//else
	//	std::cout << "pre-standard c++" << endl;

    //cpu形式加载模型
	DeviceType device_type = kCPU;
	Device device(device_type);
	jit::script::Module module;

	try {
		// Deserialize the scriptmodule from a file using torch::jit::load().
		module = torch::jit::load(argv[1], device);//这里一定要加device,不然加载失败
		//module = torch::jit::load("cnn.pt", device);
		cout << "成功加载模型!" << endl;
	}
	catch (const c10::Error& e) {
		std::cerr << "error loading the model\n";
		return -1;
	}

    //加载保存的tensor,并进行处理
	std::vector<float> data = InputData_To_Vector<float>("my_tensor_test.txt");
	auto ten = torch::tensor(data).reshape({ 30,5,5 }).toType(torch::kFloat32); //reshape回正常shape
	cout << ten.sizes() << endl;

	ten = ten.unsqueeze(0);//增加一维,拓展维度,在最前面
	cout << ten.sizes() << endl;

	std::vector<torch::jit::IValue> inputs;
	inputs.push_back(ten);

    //前向传播,进行预测
	Tensor output = module.forward(inputs).toTensor();
	torch::Tensor output_max = output.argmax(1);
	int a = output_max.item().toInt();

	vector<string> out_list = { "Alfalfa", "Corn-notill", "Corn-mintill", "Corn"
					,"Grass-pasture", "Grass-trees", "Grass-pasture-mowed",
					"Hay-windrowed", "Oats", "Soybean-notill", "Soybean-mintill",
					"Soybean-clean", "Wheat", "Woods", "Buildings-Grass-Trees-Drives",
					"Stone-Steel-Towers" };
	cout << "分类预测的结果为:" << a << endl;
	cout << "分类预测的结果为:" << out_list[a] << endl;

	return 0;
}
3.测试结果
python端:
真值:10
预测值:10
实际类别:Soybean-mintill
c++端: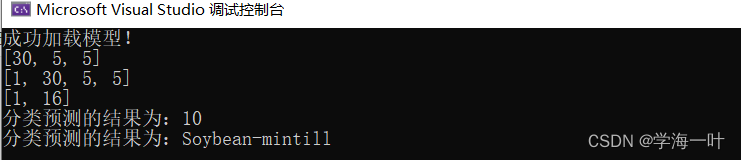
两者结果一致
总结
以上就是今天要讲的内容,本文仅仅简单介绍了Libtorch的模型读入和预测,未来可能进一步研究利用Libtorch进行模型搭建及训练。

DAMO开发者矩阵,由阿里巴巴达摩院和中国互联网协会联合发起,致力于探讨最前沿的技术趋势与应用成果,搭建高质量的交流与分享平台,推动技术创新与产业应用链接,围绕“人工智能与新型计算”构建开放共享的开发者生态。
更多推荐


 1
1 0
0- 0


 已为社区贡献3条内容

所有评论(0)