人脸识别应用UI设计和开发
本专栏将为您呈现 iOS 人脸识别SDK的完整系列文章,为大家详细介绍人脸识别的核心技术及SDK开发过程,带您从0到1写一款人脸识别SDK应用,Github 实战Demo地址在最后一篇文章,敬请期待。
本系列文章分为5篇,分别为:
人脸识别技术应用及核心技术简介
如何在Mac上编译iOS版NCNN
iOS开发环境及资源准备
人脸识别应用UI设计和开发(即本篇)
人脸识别应用完整项目介绍和Github示例
人脸识别UI效果构建
今天这篇文章我们带领大家一起开发设计人脸识别SDK应用的UI部分。
先给大家介绍下我们人脸识别应用的整体流程,如下图所示:
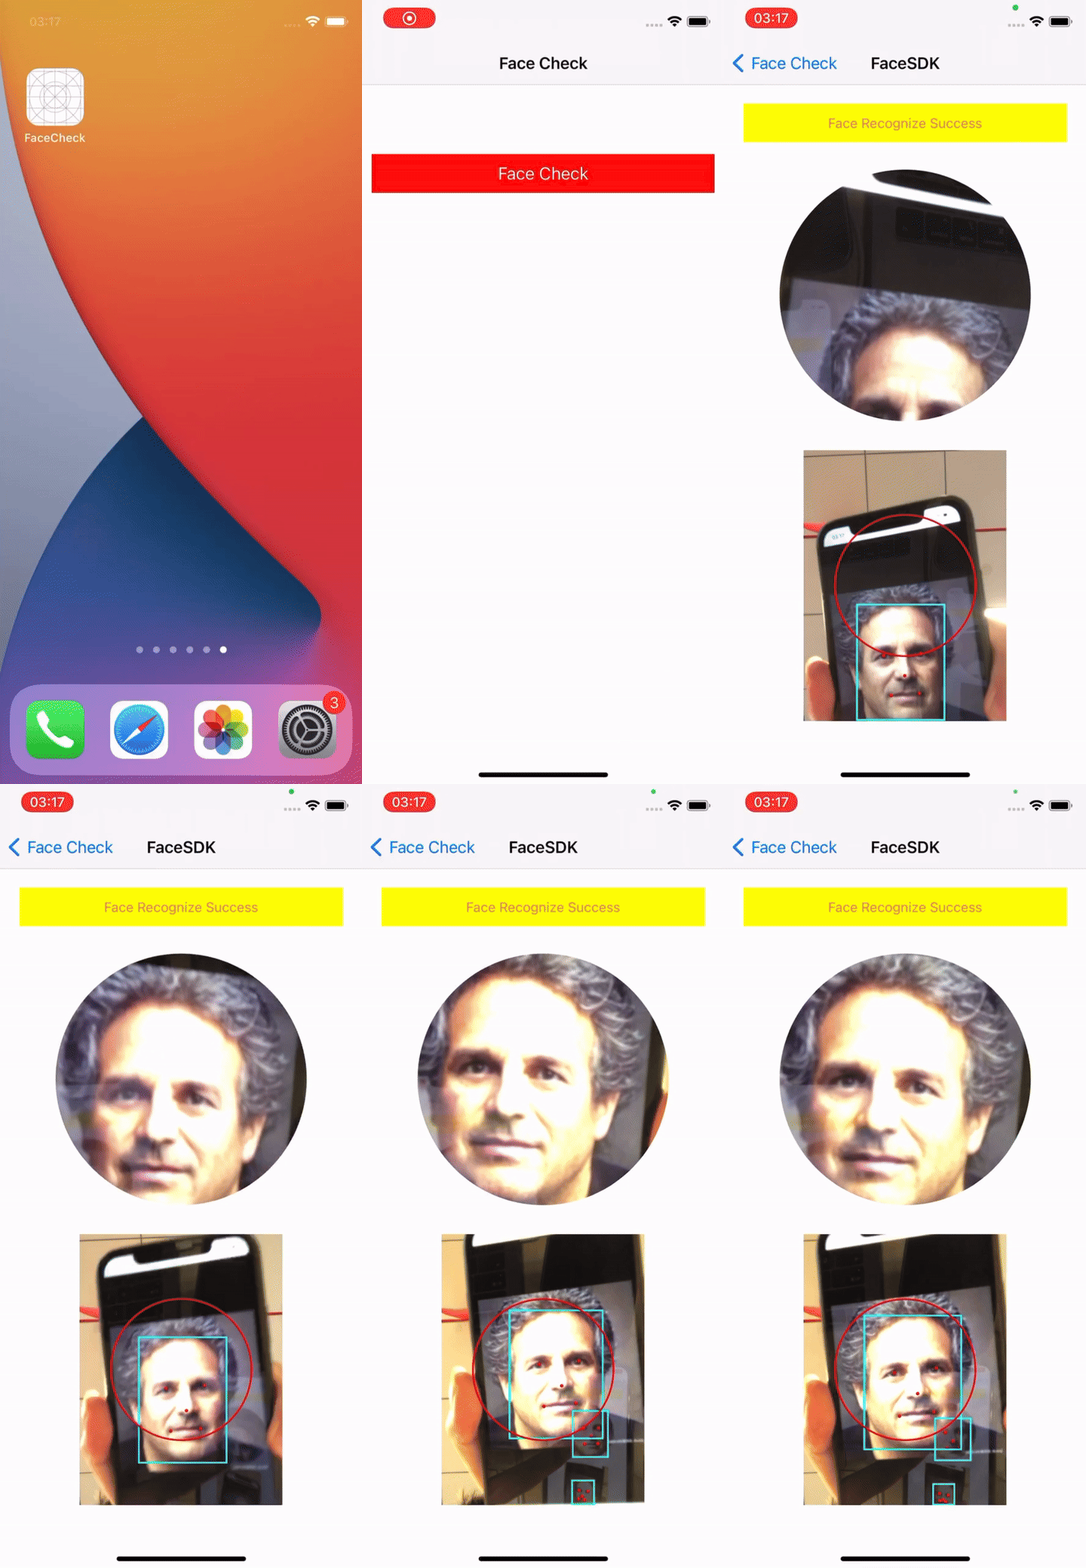
整体工作流程:在目标页面中,创建一个按钮,点击按钮进入人脸识别检测页面,此时调用手机设备的相机功能采集画面,并将画面数据信息实时传递给模型进行识别和检测,检测完毕后返回结果给到应用,应用程序进行处理和标记,将人脸区域和关键点位置信息标注出来,显示在人脸识别检测页面的下方。
对于页面UI设计,我们一共涉及到两个页面,一个目标页面,一个人脸识别检测页面。
(1)目标页面:我们放置一个按钮,用于触发并进入人脸识别检测页面。
(2)人脸识别检测页面:我们放置一个Label,用于提示用户注意事项;一个相机采集区域的画面;一个识别检测结果的处理画面。
接下来,让我们继续开发和完善我们之前的项目。
1、目标页面UI创建
进入ViewController.m文件,在- (void)viewDidLoad方法中设置标题和背景颜色,如下所示:
self.title = @"Face Check";self.view.backgroundColor = UIColor.whiteColor;
接下来我们开始初始化人脸识别检测的入口按钮和按钮的点击事件,如下所示:
- (void)viewDidLoad {[super viewDidLoad];// Do any additional setup after loading the view.self.title = @"Face Check";self.view.backgroundColor = UIColor.whiteColor;UIButton *button = [UIButton buttonWithType:UIButtonTypeCustom];button.backgroundColor = UIColor.redColor;button.frame = CGRectMake(10, 160, self.view.frame.size.width - 20, 40);[button setTitle:@"Face Check" forState:UIControlStateNormal];[button addTarget:self action:@selector(btnClick:) forControlEvents:UIControlEventTouchUpInside];[self.view addSubview:button];}- (void)btnClick:(UIButton *)btn {}
点击运行即可看到我们添加的人脸检测按钮,由于点击事件此时未做任何处理,因此点击按钮后并不会有任何响应。
现在我们来处理这部分的逻辑,由于人脸识别检测的整个过程我们都可以封装起来,作为一个完整的模块供其他模块功能调用,因此在项目的结构上,我们需要进行一些设计,单独创建一个独立的文件夹,用来放置人脸识别检测部分的代码。
我们创建一个文件夹FaceSDK,里面需要包含这些文件夹:Resources、FaceKit、Extension、Tool、Interface、View、Engine、Toast、Controller,如下图所示:
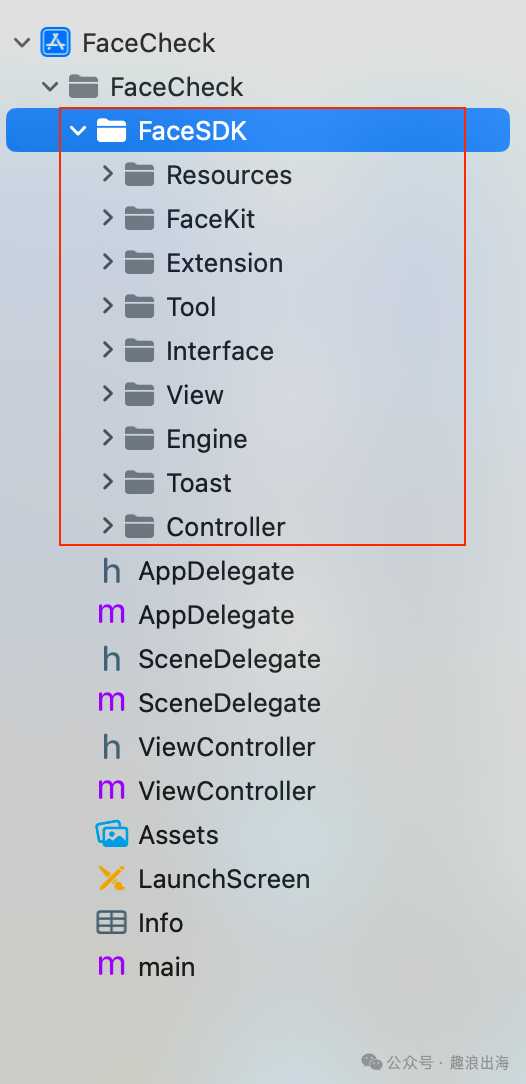
我们后续主要都是在FaceSDK中进行编辑和开发操作。
为了方便外部调用,除了上述文件夹之外,我们还需要创建一个文件,用于供其他模块调用和信息交互传递。我们在FaceSDK文件夹中创建一个FaceSDK的Cocoa Touch Class,如图所示:
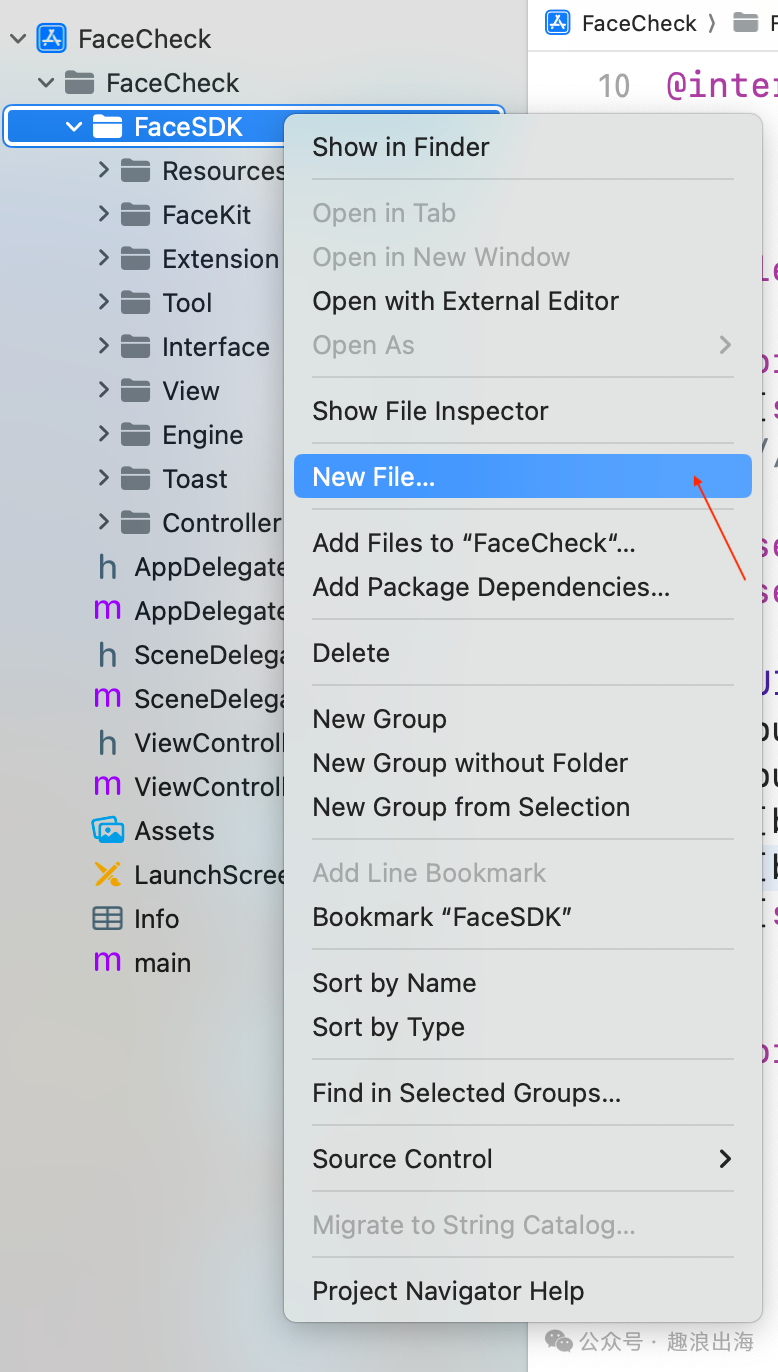
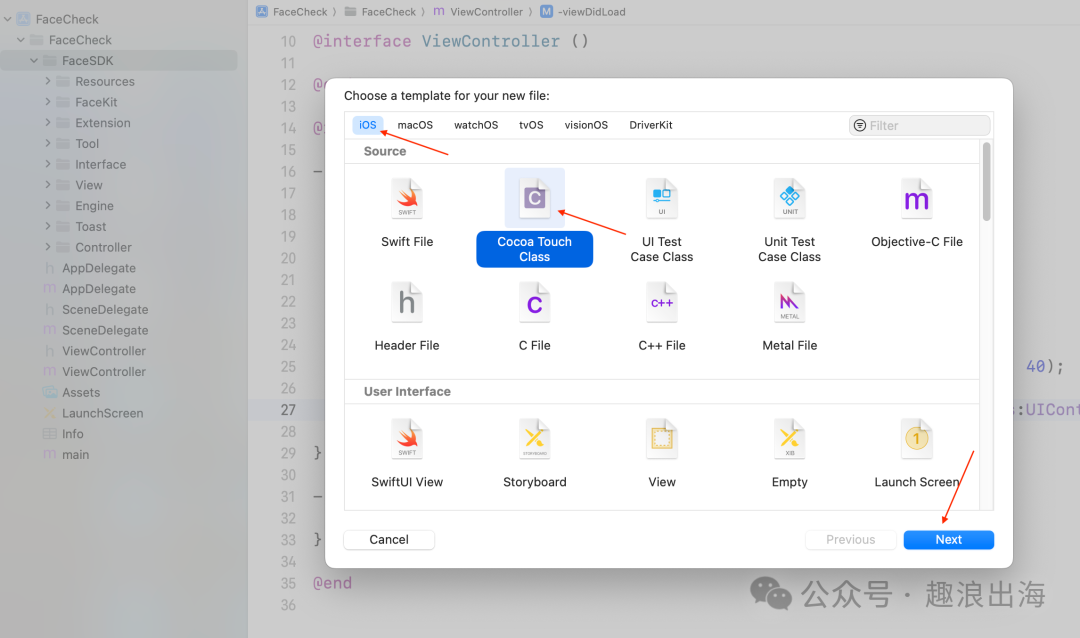
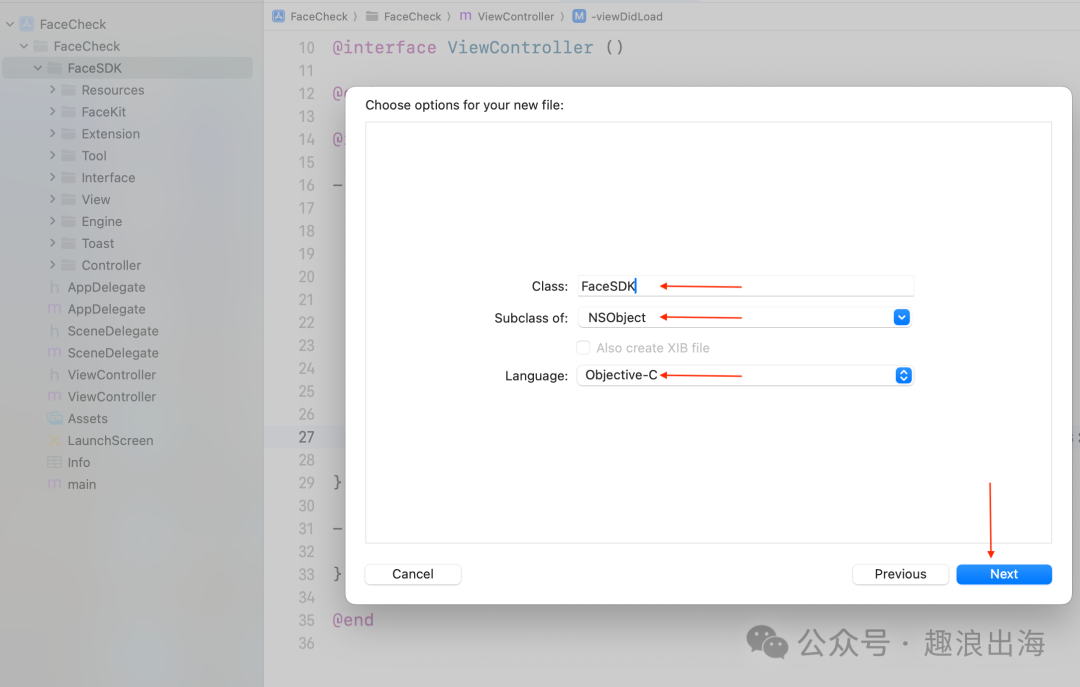
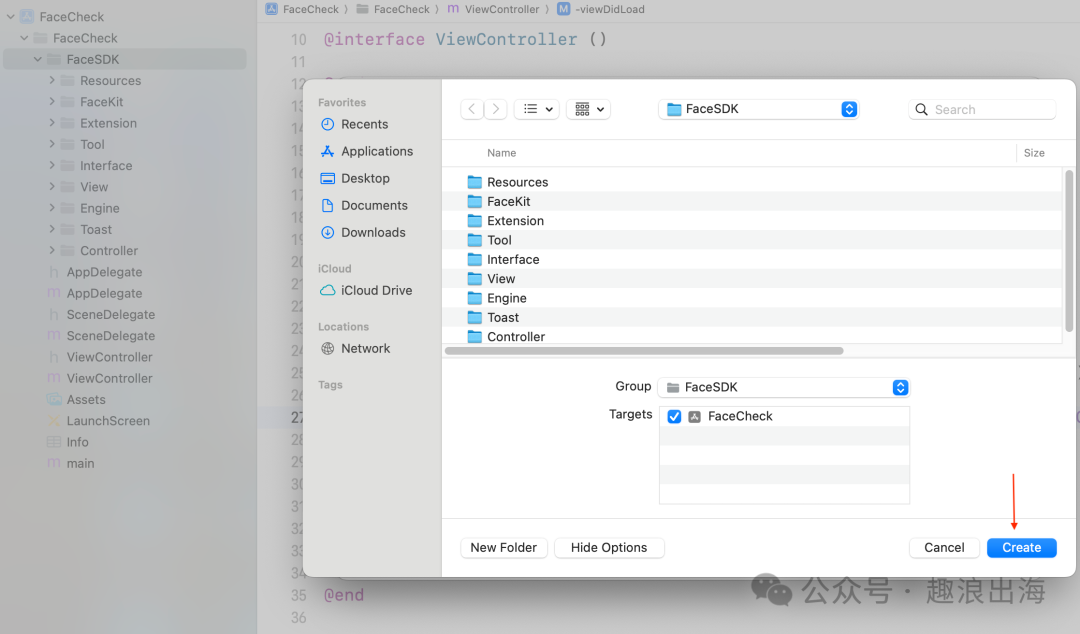
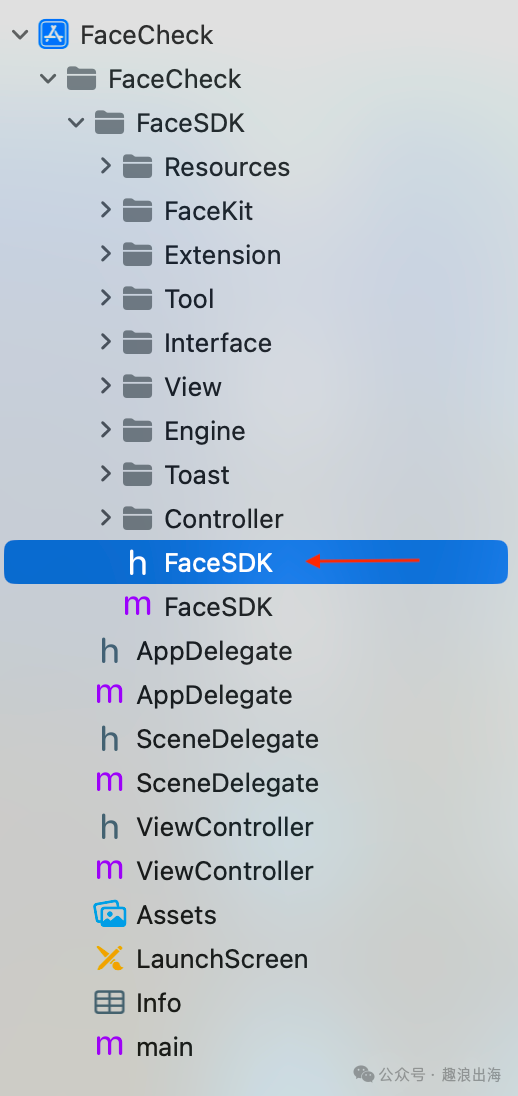
到这里FaceSDK文件夹的目录结构就已经设计完成。
2、FaceSDK代码设计
我们在FaceSDK.h头文件中提供如下方法,包含三个参数:一个是目标页面控制器,一个是识别检测成功的回调,最后一个是识别检测失败的回调,代码如下:
@interface FaceSDK : NSObject+ (void)startFaceRecognizeWithViewController:(UIViewController *)target success:(void(^)(UIImage *image))successBlock failure:(void(^)(NSError *error))failureBlock;@end
FaceSDK.m的代码实现如下,我们来一一介绍:
#import "FaceSDK.h"#import "FaceViewController.h"@implementation FaceSDK+ (void)startFaceRecognizeWithViewController:(UIViewController *)target success:(void(^)(UIImage *image))successBlock failure:(void(^)(NSError *error))failureBlock{FaceViewController *vc = [[FaceViewController alloc] init];vc.successBlock = successBlock;vc.failureBlock = failureBlock;if (target.navigationController) {[target.navigationController pushViewController:vc animated:YES];} else {[target presentViewController:vc animated:YES completion:^{NSLog(@"completed");}];}}@end
外部模块调用FaceSDK的+ (void)startFaceRecognizeWithViewController:(UIViewController *)target success:(void(^)(UIImage *image))successBlock failure:(void(^)(NSError *error))failureBlock方法后,会先初始化一个全新页面,这个页面就是我们上面所说的人脸识别检测页面,借助传入的目标页面,通过pushViewController或presentViewController的方式,进入到人脸识别检测页面,并将成功的回调和失败的回调传递给人脸识别检测页面,用于外部的目标页面接收识别检测结果。
在这里我们通过target.navigationController是否为真来判断选用push还是present的方式进行页面跳转。
3、创建人脸识别检测页面
我们在FaceSDK文件夹中的Controller文件夹创建人脸识别检测页面,如图所示:
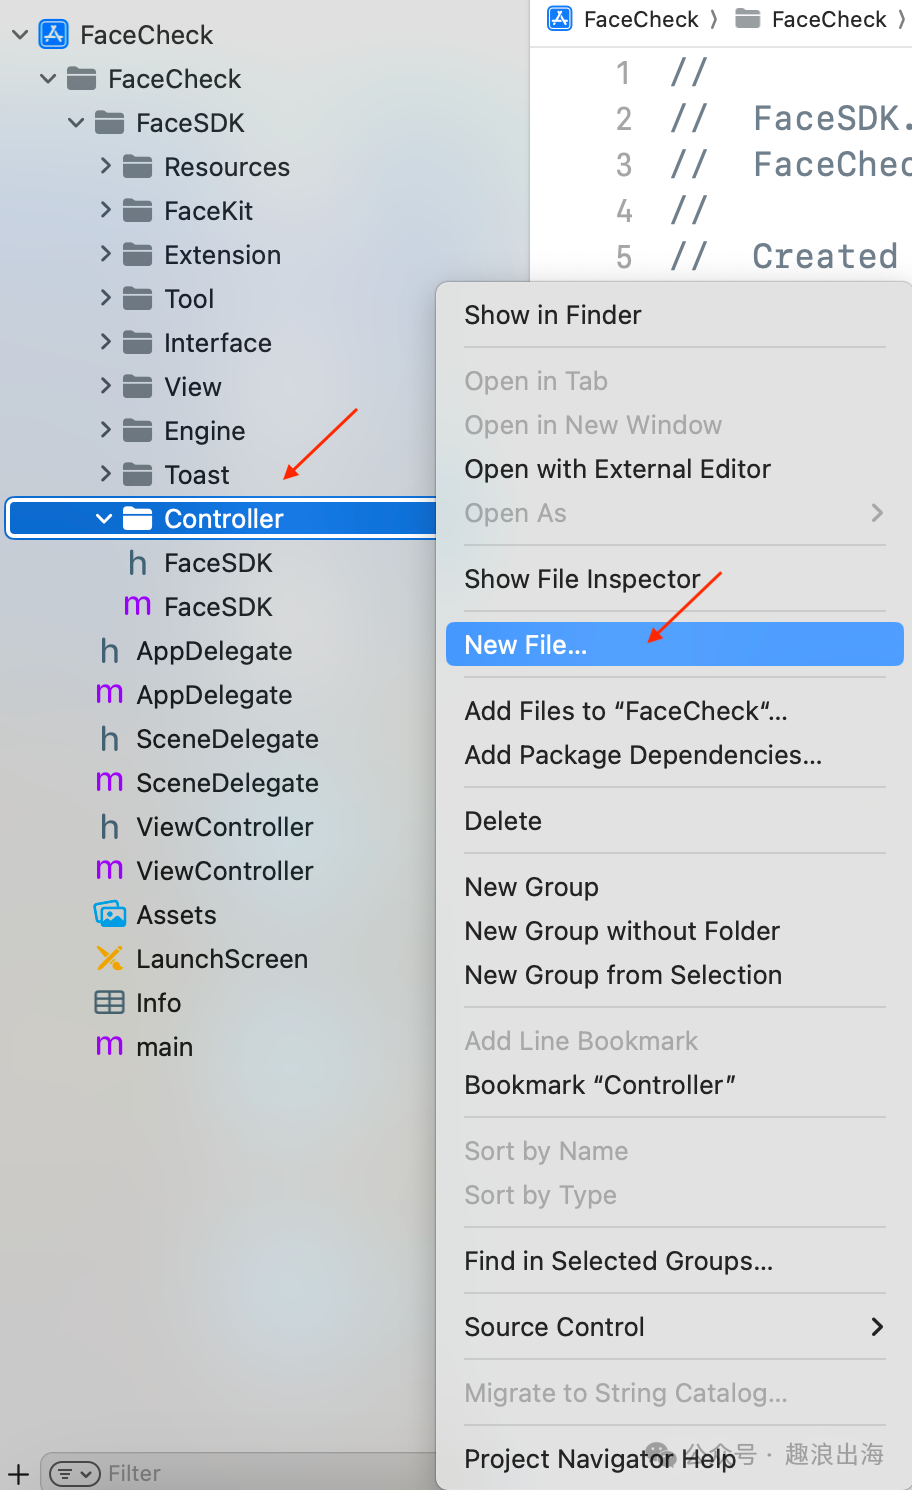
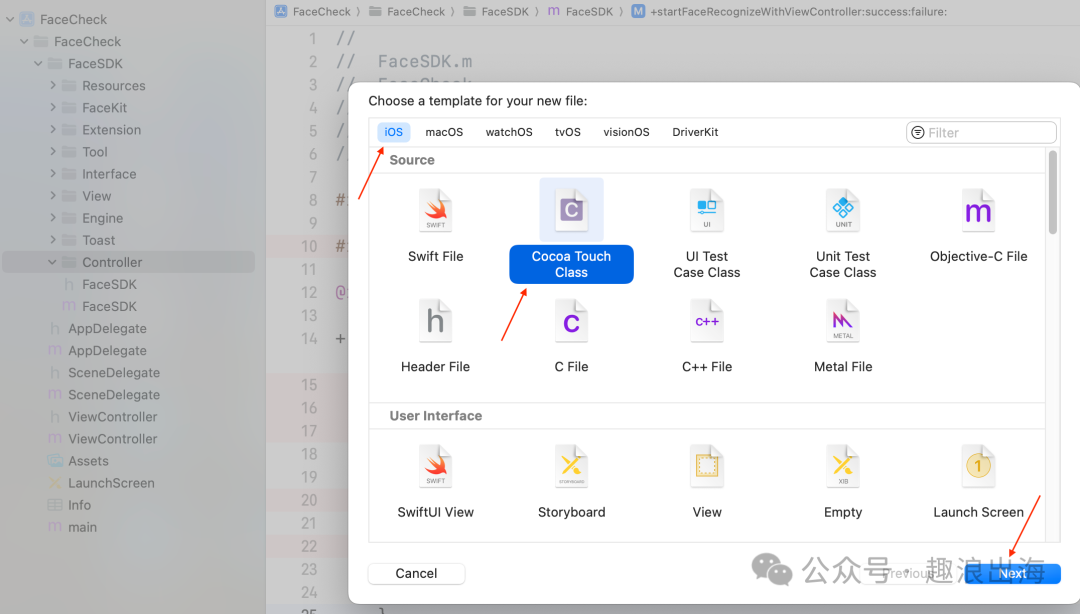
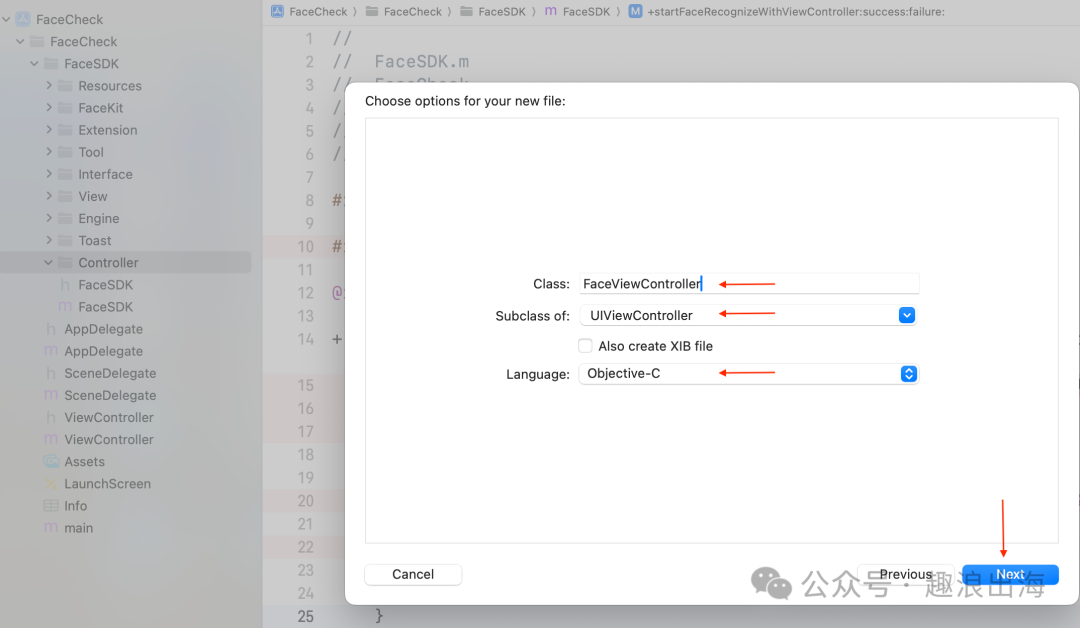
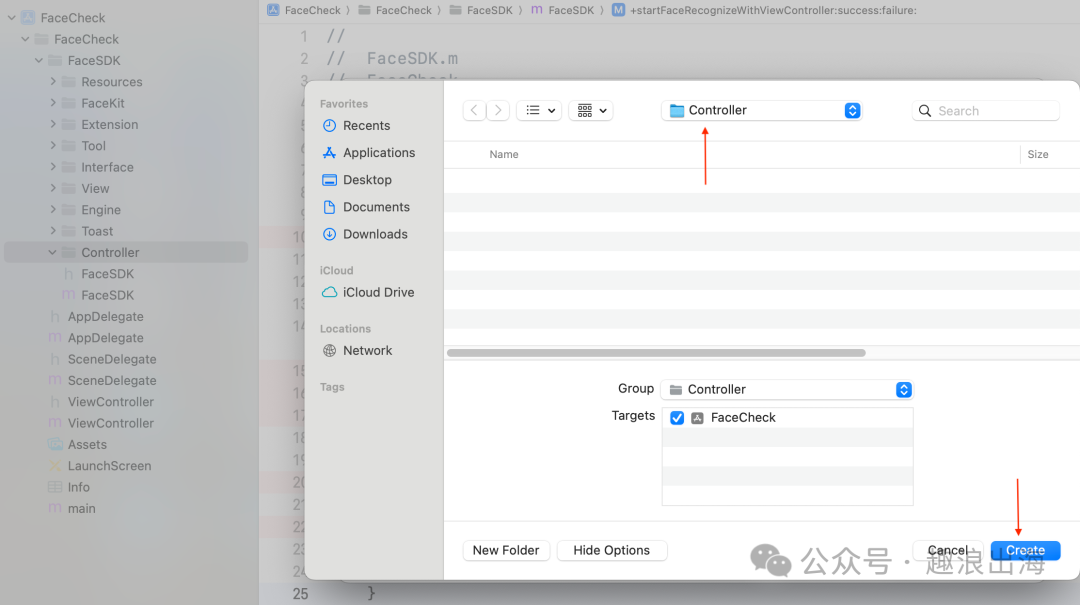
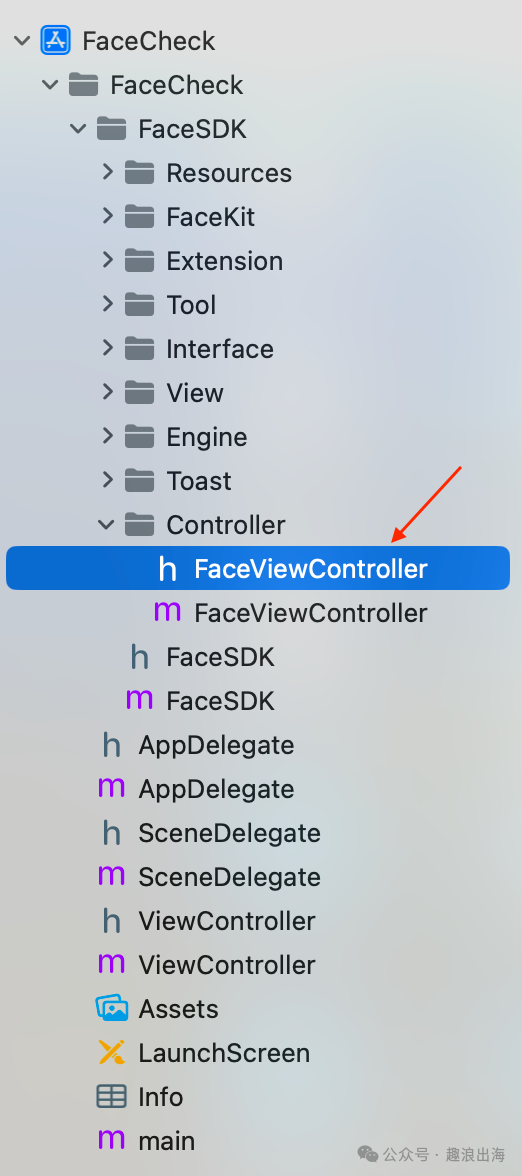
由于需要接收外部模块传入的成功回调和失败回调,因此我们在人脸识别检测页面FaceViewController.h的头文件中设置两个属性,这样我们在FaceSDK.m文件中就可以把回调传递过来了,如下图所示:
typedef void(^FaceSuccess)(UIImage *image);typedef void(^FaceFailure)(NSError *error);@interface FaceViewController : UIViewController@property (nonatomic, copy) FaceSuccess successBlock;@property (nonatomic, copy) FaceFailure failureBlock;@end
4、人脸识别检测SDK代码结构设计
由于人脸识别检测页面需要处理的事情比较多,基于我们之前在FaceSDK文件夹下面新建的这些文件夹,通过合理划分模块和结构,让程序代码的设计编写更加高效,接下来介绍各个子文件夹内的各个类及代码和功能职责。
(1)Resources
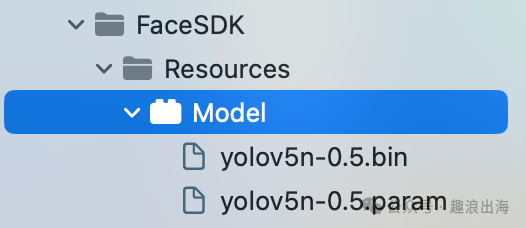
该文件夹是放置资源的地方,为了规范引入模型资源文件,我们需要新建一个Settings Build,命名为Model,创建完毕后,其中的en.lproj文件夹和Root.plist文件夹都可以删除,把我们用到的两个模型(yolov5n-0.5.bin和yolov5n-0.5.param)导入到这里,如图所示:
(2)FaceKit
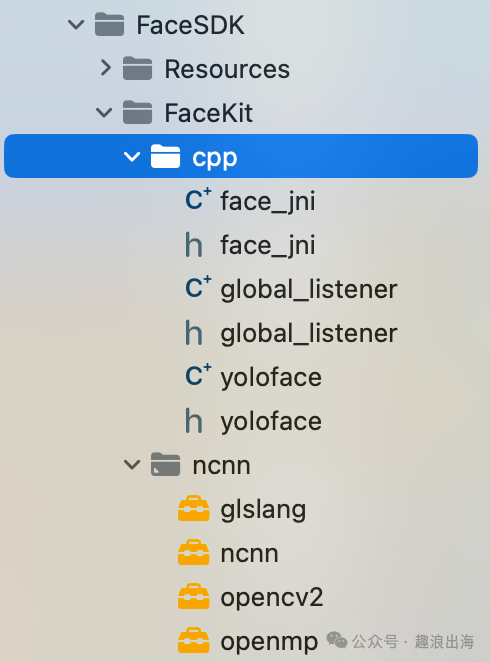
FaceKit文件夹,我们把之前下载好的或者自己编译好的这四个framework,分别是:glslang.framework、ncnn.framework、opencv2.framework、openmp.framework,放到ncnn文件夹中。
创建cpp文件夹,用于放置人脸识别检测的C++调用代码,face_jni:人脸识别检测类,global_listener:监听触发事件类,yoloface:YOLOFace识别和处理类,如图所示:
(3)Extension
由于涉及到UI的绘制和布局,我们需要对UIView进行属性的扩展,通过增加额外的属性来支持灵活的Frame布局。由于代码比较简单,大家可以参考如下代码。
@interface UIView (Face)@property (nonatomic) CGFloat top;@property (nonatomic) CGFloat bottom;@property (nonatomic) CGFloat left;@property (nonatomic) CGFloat right;@property (nonatomic) CGFloat width;@property (nonatomic) CGFloat height;@property (nonatomic) CGPoint origin;@property (nonatomic) CGSize size;@property (nonatomic) CGFloat centerX;@property (nonatomic) CGFloat centerY;@end@interface CALayer (Face)@property (nonatomic) CGFloat top;@property (nonatomic) CGFloat bottom;@property (nonatomic) CGFloat left;@property (nonatomic) CGFloat right;@property (nonatomic) CGFloat width;@property (nonatomic) CGFloat height;@property (nonatomic) CGPoint origin;@property (nonatomic) CGSize size;@property (nonatomic) CGPoint center;@property (nonatomic) CGFloat centerX;@property (nonatomic) CGFloat centerY;@end@implementation UIView (Face)- (CGFloat)top {return self.frame.origin.y;}- (void)setTop:(CGFloat)top {CGRect frame = self.frame;frame.origin.y = top;self.frame = frame;}- (CGFloat)bottom {return self.frame.origin.y + self.frame.size.height;}- (void)setBottom:(CGFloat)bottom {CGRect frame = self.frame;frame.origin.y = bottom - frame.size.height;self.frame = frame;}- (CGFloat)left {return self.frame.origin.x;}- (void)setLeft:(CGFloat)left {CGRect frame = self.frame;frame.origin.x = left;self.frame = frame;}- (CGFloat)right {return self.frame.origin.x+self.frame.size.width;}- (void)setRight:(CGFloat)right {CGRect frame = self.frame;frame.origin.x = right - frame.size.width;self.frame = frame;}- (CGFloat)width {return self.frame.size.width;}- (void)setWidth:(CGFloat)width {CGRect frame = self.frame;frame.size.width = width;self.frame = frame;}- (CGFloat)height {return self.frame.size.height;}- (void)setHeight:(CGFloat)height {CGRect frame = self.frame;frame.size.height = height;self.frame = frame;}- (CGFloat)centerX {return self.center.x;}- (void)setCenterX:(CGFloat)centerX {self.center = CGPointMake(centerX, self.center.y);}- (CGFloat)centerY {return self.center.y;}- (void)setCenterY:(CGFloat)centerY {self.center = CGPointMake(self.center.x, centerY);}- (CGPoint)origin {return self.frame.origin;}- (void)setOrigin:(CGPoint)origin {CGRect frame = self.frame;frame.origin = origin;self.frame = frame;}- (CGSize)size {return self.frame.size;}- (void)setSize:(CGSize)size {CGRect frame = self.frame;frame.size = size;self.frame = frame;}@end@implementation CALayer (Face)- (CGFloat)top {return self.frame.origin.y;}- (void)setTop:(CGFloat)top {CGRect frame = self.frame;frame.origin.y = top;self.frame = frame;}- (CGFloat)bottom {return self.frame.origin.y + self.frame.size.height;}- (void)setBottom:(CGFloat)bottom {CGRect frame = self.frame;frame.origin.y = bottom - frame.size.height;self.frame = frame;}- (CGFloat)left {return self.frame.origin.x;}- (void)setLeft:(CGFloat)left {CGRect frame = self.frame;frame.origin.x = left;self.frame = frame;}- (CGFloat)right {return self.frame.origin.x + self.frame.size.width;}- (void)setRight:(CGFloat)right {CGRect frame = self.frame;frame.origin.x = right - frame.size.width;self.frame = frame;}- (CGFloat)width {return self.frame.size.width;}- (void)setWidth:(CGFloat)width {CGRect frame = self.frame;frame.size.width = width;self.frame = frame;}- (CGFloat)height {return self.frame.size.height;}- (void)setHeight:(CGFloat)height {CGRect frame = self.frame;frame.size.height = height;self.frame = frame;}- (CGPoint)center {return CGPointMake(self.left + self.width/2.0, self.top + self.height/2.0);}- (void)setCenter:(CGPoint)center {CGRect frame = self.frame;frame.origin = CGPointMake(center.x - self.width/2.0, center.y - self.height/2.0);self.frame = frame;}- (CGFloat)centerX {return self.center.x;}- (void)setCenterX:(CGFloat)centerX {self.center = CGPointMake(centerX, self.center.y);}- (CGFloat)centerY {return self.center.y;}- (void)setCenterY:(CGFloat)centerY {self.center = CGPointMake(self.center.x, centerY);}- (CGPoint)origin {return self.frame.origin;}- (void)setOrigin:(CGPoint)origin {CGRect frame = self.frame;frame.origin = origin;self.frame = frame;}- (CGSize)size {return self.frame.size;}- (void)setSize:(CGSize)size {CGRect frame = self.frame;frame.size = size;self.frame = frame;}@end
这个扩展类中的属性是对于UIView和CALayer的扩展和补充,这样我们在绘制UI的时候,就可以很方便地进行frame的设置以及UI控件的布局了。
(4)Tool
我们在Tool这个文件夹中放置一些通用的工具,比如图像转换工具FaceImageTool、设备相机权限检测工具CameraAuthTool、人脸坐标工具FacePoint、人脸识别检测工具FaceTool。
这里要特别说明的是人脸识别检测工具FaceTool,因为要直接调用C++代码,所以我们需要将文件名FaceTool.m修改为FaceTool.mm,以便支持对C++代码的调用。
现在我们来一一介绍这四个部分。
设备相机权限检测工具CameraAuthTool
+ (void)checkAuthWithReject:(void(^)(void))rejectBlock agree:(void(^)(void))agreeBlock {AVAuthorizationStatus authStatus = [AVCaptureDevice authorizationStatusForMediaType:AVMediaTypeVideo];if (authStatus == AVAuthorizationStatusNotDetermined) {[AVCaptureDevice requestAccessForMediaType:AVMediaTypeVideo completionHandler:^(BOOL granted) {dispatch_async(dispatch_get_main_queue(), ^{if (!granted) { // not openif (rejectBlock) {rejectBlock();}} else { // openif (agreeBlock) {agreeBlock();}}});}];} else if (authStatus == AVAuthorizationStatusDenied) {// not allowif (rejectBlock) {rejectBlock();}} else {// allowif (agreeBlock) {agreeBlock();}}}
该工具主要是获取手机设备的相机权限状态,如果未进行询问授权则进行申请权限并获得权限的状态;如果已询问则获得当前的权限状态,判断并使用对应的同意回调和拒绝回调,执行相应的代码块。
人脸坐标工具FacePoint
@interface FacePoint : NSObject@property (nonatomic, assign) float x;@property (nonatomic, assign) float y;- (instancetype)initWithX:(float)x y:(float)y;@end@implementation FacePoint- (instancetype)initWithX:(float)x y:(float)y {self = [super init];if (self) {self.x = x;self.y = y;}return self;}@end
该工具主要是定义了人脸关键点坐标X和Y,并提供了一个初始化人脸坐标的方法,用于处理识别结果返回的坐标点信息,后续辅助我们进行标记人脸点位信息和区域信息。
图像转换工具FaceImageTool
+ (unsigned char *)rgbaFromImage:(UIImage *)image {int width = image.size.width;int height = image.size.height;unsigned char *rgba = malloc(width * height * 4);CGColorSpaceRef colorSpace = CGImageGetColorSpace(image.CGImage);CGContextRef contextRef = CGBitmapContextCreate(rgba, width, height, 8, width * 4, colorSpace, kCGImageAlphaNoneSkipLast | kCGBitmapByteOrderDefault);CGContextDrawImage(contextRef, CGRectMake(0, 0, width, height), image.CGImage);CGContextRelease(contextRef);CGColorSpaceRelease(colorSpace);return rgba;}+ (unsigned char *)changeSampleBufferToRGB:(CMSampleBufferRef)sampleBuffer {CVImageBufferRef imageBuffer = CMSampleBufferGetImageBuffer(sampleBuffer);CVPixelBufferLockBaseAddress(imageBuffer, kCVPixelBufferLock_ReadOnly);void *baseAddress = CVPixelBufferGetBaseAddress(imageBuffer);size_t bytesPerRow = CVPixelBufferGetBytesPerRow(imageBuffer);size_t width = CVPixelBufferGetWidth(imageBuffer);size_t height = CVPixelBufferGetHeight(imageBuffer);CGColorSpaceRef colorSpace = CGColorSpaceCreateDeviceRGB();CFMutableDictionaryRef dictionary = CFDictionaryCreateMutable(NULL, 0, &kCFTypeDictionaryKeyCallBacks, &kCFTypeDictionaryValueCallBacks);CFDictionarySetValue(dictionary, kCVImageBufferCGColorSpaceKey, colorSpace);CVPixelBufferRef rgbPixelBuffer;CVPixelBufferCreateWithBytes(NULL, width, height, kCVPixelFormatType_32BGRA, baseAddress, bytesPerRow, NULL, NULL, dictionary, &rgbPixelBuffer);size_t bufferSize = bytesPerRow * height;unsigned char *buffer = malloc(bufferSize);memcpy(buffer, baseAddress, bufferSize);CVPixelBufferUnlockBaseAddress(imageBuffer, kCVPixelBufferLock_ReadOnly);CGColorSpaceRelease(colorSpace);CFRelease(dictionary);return buffer;}+ (UIImage *)imageFromSampleBuffer:(CMSampleBufferRef)sampleBuffer {CVImageBufferRef imageBuffer = CMSampleBufferGetImageBuffer(sampleBuffer);CVPixelBufferLockBaseAddress(imageBuffer, 0);void *baseAddress = CVPixelBufferGetBaseAddress(imageBuffer);size_t bytesPerRow = CVPixelBufferGetBytesPerRow(imageBuffer);size_t width = CVPixelBufferGetWidth(imageBuffer);size_t height = CVPixelBufferGetHeight(imageBuffer);CGColorSpaceRef colorSpace = CGColorSpaceCreateDeviceRGB();CGContextRef context = CGBitmapContextCreate(baseAddress, width, height, 8, bytesPerRow, colorSpace, kCGBitmapByteOrder32Little | kCGImageAlphaPremultipliedFirst);CGImageRef quartzImage = CGBitmapContextCreateImage(context);CVPixelBufferUnlockBaseAddress(imageBuffer,0);CGContextRelease(context); CGColorSpaceRelease(colorSpace);UIImage *image = [UIImage imageWithCGImage:quartzImage];CGImageRelease(quartzImage);return (image);}
该工具借助AVFoundation和UIKit框架,针对相机画面的数据进行了转换处理,并返回我们想要的数据类型和结果。
人脸识别工具FaceTool
#import <Foundation/Foundation.h>#import <UIKit/UIKit.h>#import <AVFoundation/AVFoundation.h>#import "FaceInterface.h"@interface FaceTool : NSObject@property (nonatomic, assign, readonly) BOOL modelFileLoadSuccess;- (instancetype)initWithDelegate:(id<FaceDelegate>)delegate;- (int)faceCheckFaceByBuffer:(CMSampleBufferRef)sampleBuffer centerPoint:(CGPoint)centerPoint radius:(CGFloat)radius;- (int)faceCheckFaceByImage:(UIImage *)image centerPoint:(CGPoint)centerPoint radius:(CGFloat)radius;- (void)facePreRelase;@end#import "face_jni.h"#import "global_listener.h"#import "FaceImageTool.h"@interface FaceTool ()@property (nonatomic, weak) id<FaceDelegate> delegate;@property (nonatomic, copy) DetectDrawPointsCallback drawPointsBlock;@property (nonatomic, copy) DetectClearPointsCallBack clearPointsBlock;@end@implementation FaceTool- (void)dealloc {printf("%s", __func__);SmartDetector_release();}- (instancetype)initWithDelegate:(id<FaceDelegate>)delegate {self = [super init];if (self) {_delegate = delegate;_modelFileLoadSuccess = NO;[self faceLoadLiteFile];[self bindListener];}return self;}- (void)faceLoadLiteFile {NSString *bundle = @"Model.bundle";NSString *modelBundlePath = [[NSBundle mainBundle] pathForResource:bundle ofType:NULL];if (modelBundlePath == NULL) {modelBundlePath = [[NSBundle bundleForClass:[self class]] pathForResource:bundle ofType:NULL];}if (modelBundlePath == nil || [modelBundlePath length] == 0) {_modelFileLoadSuccess = NO;return;}BOOL result = SmartDetector_loadModel([modelBundlePath UTF8String]);if (result) {_modelFileLoadSuccess = YES;} else {_modelFileLoadSuccess = NO;}}- (void)bindListener {__weak typeof(self) weakSelf = self;self.drawPointsBlock = ^(Face face) {NSLog(@"$$face point");[weakSelf runInMain:^{int count = (int)face.fs.size();if (count > 0) {NSMutableArray *faces_array = [[NSMutableArray alloc] init];NSMutableArray *face_areas_array = [[NSMutableArray alloc] init];for (int i = 0; i < count; i++) {FaceResult fs = face.fs[i];int faceCount = (int)fs.face.pts.size();if (faceCount > 0) {NSMutableArray *fivePoints = [[NSMutableArray alloc] init];for (int j = 0; j < faceCount; j++) {cv::Point2f point = fs.face.pts[j];FacePoint *p = [[FacePoint alloc] initWithX:point.x y:point.y];[fivePoints addObject:p];}NSArray *fives = fivePoints.copy;[faces_array addObject:fives];BoundingBox boundingBox = fs.face_area;NSArray *faceBoundPoints = @[[[FacePoint alloc] initWithX:boundingBox.left y:boundingBox.top],[[FacePoint alloc] initWithX:boundingBox.right y:boundingBox.top],[[FacePoint alloc] initWithX:boundingBox.right y:boundingBox.bottom],[[FacePoint alloc] initWithX:boundingBox.left y:boundingBox.bottom]];[face_areas_array addObject:faceBoundPoints];} else {[faces_array addObject:@[]];[face_areas_array addObject:@[]];}}[weakSelf.delegate faceDrawPoints:@[] fivePoints:faces_array faceBoundPoints:face_areas_array];} else {[weakSelf.delegate faceDrawPoints:@[] fivePoints:@[] faceBoundPoints:@[]];}// int count = (int)faceObject.pts.size();//// NSMutableArray *fivePoints = [[NSMutableArray alloc] init];//// for (int i = 0; i < count; i++) {// cv::Point2f point = faceObject.pts[i];// FacePoint *p = [[FacePoint alloc] initWithX:point.x y:point.y];// [fivePoints addObject:p];// }//// NSArray *faceBoundPoints = @[// [[FacePoint alloc] initWithX:boundingBox.left y:boundingBox.top],// [[FacePoint alloc] initWithX:boundingBox.right y:boundingBox.top],// [[FacePoint alloc] initWithX:boundingBox.right y:boundingBox.bottom],// [[FacePoint alloc] initWithX:boundingBox.left y:boundingBox.bottom]// ];//// [weakSelf.delegate faceDrawPoints:@[] fivePoints:fivePoints faceBoundPoints:faceBoundPoints];}];};self.clearPointsBlock = ^{[weakSelf runInMain:^{[weakSelf.delegate faceDrawPoints:@[] fivePoints:@[] faceBoundPoints:@[]];}];};// block copy stack to heap, relative by selfglobal_listener *listener = new global_listener();listener->bindDrawPointsCallback(self.drawPointsBlock);listener->bindClearPointsCallBack(self.clearPointsBlock);SmartDetector_bindListen(listener);}- (void)runInMain:(void(^)())block {if ([NSThread currentThread].isMainThread) {block();} else {dispatch_async(dispatch_get_main_queue(), ^{block();});}}- (int)faceCheckFaceByBuffer:(CMSampleBufferRef)sampleBuffer centerPoint:(CGPoint)centerPoint radius:(CGFloat)radius {CVImageBufferRef imageBuffer = CMSampleBufferGetImageBuffer(sampleBuffer);size_t width = CVPixelBufferGetWidth(imageBuffer);size_t height = CVPixelBufferGetHeight(imageBuffer);unsigned char *rgbData = [FaceImageTool changeSampleBufferToRGB:sampleBuffer];FaceDetectCppMaskPoint point {(float)centerPoint.x, (float)centerPoint.y, (float)radius};int result = SmartDetector_faceDetect(rgbData, (int)width, (int)height, point);if (result) {NSLog(@"face detect result is %d", result);}free(rgbData);return result;}- (int)faceCheckFaceByImage:(UIImage *)image centerPoint:(CGPoint)centerPoint radius:(CGFloat)radius {FaceDetectCppMaskPoint point {(float)centerPoint.x, (float)centerPoint.y, (float)radius};unsigned char *rgbData = [FaceImageTool rgbaFromImage:image];int result = SmartDetector_faceDetect(rgbData, (int)image.size.width, (int)image.size.height, point);free(rgbData);return result;}- (void)facePreRelase {}
人脸识别工具包含了对face_jni方法的调用,涉及到加载模型、人脸识别检测、处理识别检测结果等功能。这里我们将加载模型成功与否的状态给到了属性modelFileLoadSuccess,外部通过这个属性就可以获取模型的加载状态,用于进行对应的case处理。
(5)Interface
为了更方便处理人脸识别的任务,我们需要定义一个接口,用于定义一些协议和方法,供其他类遵守和实现对应的方法,具体代码如下:
#ifndef FaceInterface_h#define FaceInterface_h#import <UIKit/UIKit.h>#import "FacePoint.h"typedef NS_ENUM(NSInteger, FaceStatus) {FaceWaiting,FaceStart,FaceChecking,FaceFinish,FaceTimeOut};@protocol FaceResultDelegate <NSObject>- (void)faceCheckImage:(UIImage *)faceImage;- (void)faceFailWithErrorCode:(NSString *)errorCode errorMessage:(NSString *)message;@end@protocol FaceDelegate <NSObject>- (void)faceComplete;- (void)faceFailWithErrorCode:(NSString *)code message:(NSString *)message;- (void)faceHandleResult:(int)detectResult image:(UIImage *)image;- (void)faceDrawPoints:(NSArray *)facePoints fivePoints:(NSArray *)fivePoints faceBoundPoints:(NSArray *)faceBoundPoints;@end@protocol FaceIndicateInterface <NSObject>- (void)faceComplete;- (UIView *)faceGetPreview;- (CGPoint)faceGetMaskCenter;- (CGFloat)faceGetMaskRadius;- (void)faceChangeErrorTip:(NSString *)tip;@end#endif /* FaceInterface_h */
如代码所示,我们定义了一个枚举类型,用来标识人脸识别的过程状态:等待识别、开始识别、识别中、识别结束、识别超时。
人脸识别结果协议包含两个方法:传入人脸图像进行人脸识别检测、人脸识别检测失败的错误码及错误信息。
人脸识别协议包含四个方法:人脸识别完成、人脸识别检测失败的错误码和错误信息、处理人脸识别结果、人脸识别结果信息。
人脸画面显示协议包含五个方法:人脸识别完成、获得预览视图、获得人脸中心点位信息、获得人脸画面半径、人脸错误信息提示。
有了这个接口文件,我们就可以在其他模块和类文件中遵守该接口中的协议,并实现对应的方法,即可轻松处理人脸识别操作。
(6)视图
在本项目中,涉及到的视图主要有三个,一个是人脸识别画面视图,其中包含了第二个对象及采集区域的处理视图,最后一个视图是人脸识别画面的结果绘制视图。下面我们来一一介绍。
相机采集区域的处理视图FaceHollowView
@interface FaceHollowView : UIView@property (nonatomic, assign, readonly) CGPoint centerPoint;@property (nonatomic, assign, readonly) CGFloat radius;@end@interface FaceHollowView ()@property (nonatomic, strong) UIView *circleView;@end@implementation FaceHollowView- (instancetype)initWithFrame:(CGRect)frame {self = [super initWithFrame:frame];if (self) {self.backgroundColor = UIColor.whiteColor;_radius = 130;_centerPoint = CGPointMake(frame.size.width * 0.5, frame.size.height * 0.5);CAShapeLayer *layer = [CAShapeLayer layer];layer.frame = self.bounds;layer.path = [self getHollowPath];layer.fillRule = kCAFillRuleEvenOdd;self.layer.mask = layer;self.layer.masksToBounds = YES;}return self;}- (CGPathRef)getHollowPath {UIBezierPath *circlePath = [UIBezierPath bezierPath];[circlePath addArcWithCenter:self.centerPoint radius:self.radius startAngle:-M_PI_2 endAngle:M_PI_2*3 clockwise:YES];UIBezierPath *rectPath = [UIBezierPath bezierPathWithRoundedRect:self.bounds cornerRadius:0];rectPath.usesEvenOddFillRule = true;[rectPath appendPath:circlePath];return rectPath.CGPath;}@end
该视图利用贝塞尔曲线UIBezierPath绘制了一个圆形,利用CAShapeLayer制作了一个镂空的圆形空心蒙版。
人脸识别画面的结果绘制视图FacePointDrawView
根据人脸识别的结果,我们得到了一些点位信息,分别是:识别检测画面图像、人脸区域点位、关键位置点位、识别画面的圆形中心点坐标、识别画面的圆形半径,后两个信息是用于标注采集画面的区域在整个相机画面中所处的位置,更易于对照。
#import "UIView+Face.h"static FacePointDrawView *drawView;@interface FacePointDrawView ()@property (nonatomic, strong) UIView *pointBackView;@property (nonatomic, strong) UIImageView *imageView;@property (nonatomic, strong) UIView *backView;@end@implementation FacePointDrawView+ (FacePointDrawView *)shared {static dispatch_once_t onceToken;dispatch_once(&onceToken, ^{drawView = [[FacePointDrawView alloc] init];});return drawView;}- (UIImageView *)imageView {if (_imageView == nil) {_imageView = [[UIImageView alloc] initWithFrame:self.backView.bounds];}return _imageView;}- (UIView *)backView {if (_backView == nil) {_backView = [[UIView alloc] initWithFrame:self.bounds];}return _backView;}- (UIView *)pointBackView {if (_pointBackView == nil) {_pointBackView = [[UIView alloc] initWithFrame:self.backView.bounds];}return _pointBackView;}- (UIImage *)showImage:(UIImage *)image facePoints:(NSArray *)facePoints fivePoints:(NSArray *)fivePoints faceBoundPoints:(NSArray *)faceBoundPoints centerPoint:(CGPoint)centerPoint radius:(CGFloat)radius {UIImage *result = [self configImage:image facePoints:facePoints fivePoints:fivePoints faceBoundPoints:faceBoundPoints centerPoint:centerPoint radius:radius];return result;}- (UIImage *)configImage:(UIImage *)image facePoints:(NSArray *)facePoints fivePoints:(NSArray *)fivePoints faceBoundPoints:(NSArray *)faceBoundPoints centerPoint:(CGPoint)center radius:(CGFloat)radius {float scale = self.width / image.size.width;self.backView.size = image.size;[self.backView addSubview:self.imageView];self.imageView.image = image;[self.backView addSubview:self.pointBackView];self.backView.center = CGPointMake(self.width * 0.5, self.height * 0.5);self.backView.transform = CGAffineTransformMakeScale(scale, scale);for (NSArray *face in fivePoints) {if (face.count > 0) {[self drawPoints:face width:8];}}for (NSArray *area in faceBoundPoints) {if (area.count > 0) {[self drawRectangle:area];}}[self drawCircle:center radius:radius];UIGraphicsBeginImageContextWithOptions(self.backView.bounds.size, NO, 0.0);CGContextRef context = UIGraphicsGetCurrentContext();[self.backView.layer renderInContext:context];UIImage *handleImage = UIGraphicsGetImageFromCurrentImageContext();UIGraphicsEndImageContext();return handleImage;}- (void)drawPoints:(NSArray *)points width:(CGFloat)width {for (FacePoint *point in points) {CALayer *layer = [CALayer layer];layer.frame = CGRectMake(0, 0, width, width);layer.cornerRadius = width / 2;layer.masksToBounds = YES;layer.backgroundColor = UIColor.redColor.CGColor;layer.center = CGPointMake(point.x, point.y);[self.pointBackView.layer addSublayer:layer];}}- (void)drawRectangle:(NSArray *)points {if (points.count <= 1) {return;}UIBezierPath *path = [UIBezierPath bezierPath];for (int i = 0; i < points.count; i++) {FacePoint *point = points[i];if (i == 0) {[path moveToPoint:CGPointMake(point.x, point.y)];} else {[path addLineToPoint:CGPointMake(point.x, point.y)];}if (i == points.count - 1) {[path closePath];}}CAShapeLayer *layer = [CAShapeLayer layer];layer.frame = self.pointBackView.bounds;layer.path = path.CGPath;layer.fillColor = UIColor.clearColor.CGColor;layer.strokeColor = [UIColor cyanColor].CGColor;layer.lineWidth = 4;[self.pointBackView.layer addSublayer:layer];}- (void)drawCircle:(CGPoint)centerPoint radius:(CGFloat)radius {UIBezierPath *path = [UIBezierPath bezierPath];[path addArcWithCenter:centerPoint radius:radius startAngle:-M_PI_2 endAngle:M_PI_2*3 clockwise:YES];CAShapeLayer *layer = [CAShapeLayer layer];layer.frame = self.pointBackView.bounds;layer.path = path.CGPath;layer.fillColor = UIColor.clearColor.CGColor;layer.strokeColor = [UIColor redColor].CGColor;layer.lineWidth = 4;[self.pointBackView.layer addSublayer:layer];}@end
这样我们在外部就可以通过调用这个方法,传入识别检测结果信息,可以返回得到一个经过标注后的人脸识别检测图像,用于和相机采集画面进行对比。
人脸识别画面视图FaceIndicateView
#import "FaceInterface.h"@interface FaceIndicateView : UIView@property (nonatomic, strong) UIImage *resultImage;@end@interface FaceIndicateView (FaceIndicateInterface)<FaceIndicateInterface>@end#import "FaceIndicateView.h"#import "FaceHollowView.h"#import "FaceImageTool.h"#import "UIView+Face.h"@interface FaceIndicateView ()@property (nonatomic, strong) UIImageView *preView;@property (nonatomic, strong) FaceHollowView *hollowView;@property (nonatomic, strong) UILabel *tipLabel;@property (nonatomic, strong) UIImageView *actionView;@end@implementation FaceIndicateView- (void)setResultImage:(UIImage *)resultImage {_resultImage = resultImage;self.actionView.image = resultImage;}- (instancetype)initWithFrame:(CGRect)frame {self = [super initWithFrame:frame];if (self) {self.backgroundColor = UIColor.whiteColor;_tipLabel = [[UILabel alloc] initWithFrame:CGRectMake(20, UIApplication.sharedApplication.windows.firstObject.safeAreaInsets.top + 44 + 20, self.frame.size.width - 40, 40)];_tipLabel.backgroundColor = UIColor.yellowColor;_tipLabel.textColor = UIColor.orangeColor;_tipLabel.text = @"Please put your face into the frame";_tipLabel.font = [UIFont systemFontOfSize:14];_tipLabel.numberOfLines = 0;_tipLabel.textAlignment = NSTextAlignmentCenter;_preView = [[UIImageView alloc] initWithFrame:CGRectMake(0, 0, 220, 220)];_preView.backgroundColor = UIColor.blackColor;_preView.frame = self.bounds;_preView.center = CGPointMake(self.center.x, self.center.y - 100);_hollowView = [[FaceHollowView alloc] initWithFrame:_preView.frame];_actionView = [[UIImageView alloc] initWithFrame:CGRectMake(0, 0, 210, 280)];_actionView.center = CGPointMake(self.center.x, self.center.y + 200);[self addSubview:_preView];[self addSubview:_hollowView];[self addSubview:_tipLabel];[self addSubview:_actionView];}return self;}#pragma action@end@implementation FaceIndicateView (FaceIndicateInterface)- (void)faceComplete {}- (UIView *)faceGetPreview {return self.preView;}- (void)faceChangeErrorTip:(NSString *)tip {if ([tip length] == 0) {self.tipLabel.text = @"Please put your face into the frame";} else {self.tipLabel.text = tip;}}- (CGPoint)faceGetMaskCenter {// 480x640CGFloat width = UIScreen.mainScreen.bounds.size.width;CGFloat height = UIScreen.mainScreen.bounds.size.height;float imageW = 480;float imageH = 640;CGFloat currentX = self.hollowView.centerPoint.x / width * imageW;CGFloat currentY = self.hollowView.centerPoint.y - (height-imageH)/2.0;return CGPointMake(currentX, currentY);}- (CGFloat)faceGetMaskRadius {float imageW = 480;CGFloat width = UIScreen.mainScreen.bounds.size.width;return self.hollowView.radius * imageW/width;}@end
在这个视图中,我们创建了一个提示文字Label,用于向用户提醒一些信息;一个占位的图像视图,用于设置好frame并将frame传递给相机采集区域的处理视图,以及一个显示标注人脸识别检测结果处理的视图。我们将会把这个视图放在我们的人脸识别引擎FaceEngine中进行初始化和显示。
(7)Toast视图
为了更加方便地向用户即时提示信息,我们自定义了一个弹框吐司视图,大家可以很方便地用于各种需要向用户展示信息的地方,这里我们也做下简要介绍。
自定义吐司视图FaceToastView
+ (void)showMessageWithText:(NSString *)text{if (![text isKindOfClass:NSString.class] || text.length == 0) {return;}UIWindow *window = UIApplication.sharedApplication.windows.firstObject;if (window == nil) {return;}UIView *view = [window viewWithTag:2024];if (view != nil) {[view removeFromSuperview];view = nil;}UILabel *toastLabel = [[UILabel alloc] init];toastLabel.backgroundColor = UIColor.orangeColor;toastLabel.frame = CGRectMake(20, UIScreen.mainScreen.bounds.size.height - 100, UIScreen.mainScreen.bounds.size.width - 40, 40);toastLabel.textColor = UIColor.blackColor;toastLabel.textAlignment = NSTextAlignmentCenter;toastLabel.font = [UIFont systemFontOfSize:14];toastLabel.text = text;toastLabel.tag = 2024;[window addSubview:toastLabel];toastLabel.alpha = 0;[UIView animateWithDuration:0.2 animations:^{toastLabel.alpha = 1;} completion:^(BOOL finished) {dispatch_after(dispatch_time(DISPATCH_TIME_NOW, (int64_t)(2.0 * NSEC_PER_SEC)), dispatch_get_main_queue(), ^{[UIView animateWithDuration:0.2 animations:^{toastLabel.alpha = 0;} completion:^(BOOL finished) {[toastLabel removeFromSuperview];}];});}];}
借助该方法,我们可以进行调用[FaceToastView showMessageWithText:@"SHOW TEXT MESSAGE"]进行即时信息的提示。
这篇文章我们针对项目结构目录依次进行了代码说明,到目前为止,除了人脸识别引擎和相机采集画面之外,其他的准备工作都已完成,包括人脸识别SDK应用UI部分的代码。相信大家都有了一定的认识和了解,我们后续将继续针对人脸识别相机画面的采集进行介绍和开发。

DAMO开发者矩阵,由阿里巴巴达摩院和中国互联网协会联合发起,致力于探讨最前沿的技术趋势与应用成果,搭建高质量的交流与分享平台,推动技术创新与产业应用链接,围绕“人工智能与新型计算”构建开放共享的开发者生态。
更多推荐
 20
20 0
0- 0


 已为社区贡献3条内容

所有评论(0)