实现同态加密机器学习和计算的concrete-ml库和concrete-numpy库
zama的concrete-ml库和concrete-numpy库
安装
- 都只支持 linux 环境 不支持 windows 环境
在 WSL2 配置 python 虚拟环境

Pip concrete-ml 和 concrete-numpy

![[外链图片转存失败,源站可能有防盗链机制,建议将图片保存下来直接上传(img-T85UjyrW-1666710867242)(static/boxcnvSP6XLFE6ApkRFZitgZ3de.png)]](https://i-blog.csdnimg.cn/blog_migrate/dc82cca8e2ce9b85f08c864d0b06b835.png)
部署
测试 jupyter notebook
![[外链图片转存失败,源站可能有防盗链机制,建议将图片保存下来直接上传(img-CSuQziyw-1666710867242)(static/boxcn3U5BwUNzTNxGzKvzpagc4c.png)]](https://i-blog.csdnimg.cn/blog_migrate/2dcc08fd0652074d8c2784cc3d48046d.png)
import 成功
测试 Concrete-numpy 的 example(16.9s)
import concrete.numpy as cnp

def add(x, y):
    return x + y

compiler = cnp.Compiler(add, {"x": "encrypted", "y": "clear"})

inputset = [(2, 3), (0, 0), (1, 6), (7, 7), (7, 1)]
circuit = compiler.compile(inputset)

x = 4
y = 4

clear_evaluation = add(x, y)
homomorphic_evaluation = circuit.encrypt_run_decrypt(x, y)

print(x, "+", y, "=", clear_evaluation, "=", homomorphic_evaluation)
测试 Concrete-ml 的 example(43.4s)
import numpy
from sklearn.datasets import make_classification
from sklearn.model_selection import train_test_split
from concrete.ml.sklearn import LogisticRegression

# Lets create a synthetic dataset
N_EXAMPLE_TOTAL = 100
N_TEST = 20 if not 'N_TEST' in locals() else N_TEST
x, y = make_classification(n_samples=N_EXAMPLE_TOTAL,
    class_sep=2, n_features=4, random_state=42)
X_train, X_test, y_train, y_test = train_test_split(
    x, y, test_size=N_TEST / N_EXAMPLE_TOTAL, random_state=42
)

# Now we train in plaintext using quantization
model = LogisticRegression(n_bits=2)
model.fit(X_train, y_train)

y_pred_clear = model.predict(X_test)

# Finally we compile and run inference on encrypted inputs!
model.compile(x)
y_pred_fhe = model.predict(X_test, execute_in_fhe=True)

print("In clear  :", y_pred_clear)
print("In FHE    :", y_pred_fhe)
print("Comparison:", (y_pred_fhe == y_pred_clear))
# Output:
#   In clear  : [0 1 0 1 0 1 0 1 1 1 0 1 1 0 1 0 0 1 1 1]
#   In FHE    : [0 1 0 1 0 1 0 1 1 1 0 1 1 0 1 0 0 1 1 1]
#   Comparison: [ True  True  True  True  True  True  True  True  True  True  True  True
#   True  True  True  True  True  True  True  True]
- concrete-ml 因为只能够加密整数,所以采取了量化测量。我们测试原始数据和量化数据的对比,量化后也有 90% 的正确率
![[外链图片转存失败,源站可能有防盗链机制,建议将图片保存下来直接上传(img-JOxPWlja-1666710867242)(static/boxcnPhd4HhHABwEAXN39mCKl4c.png)]](https://i-blog.csdnimg.cn/blog_migrate/e77322605abb3e08ba672e3be84d9376.png)
Concrete-numpy
用法
- 定义函数
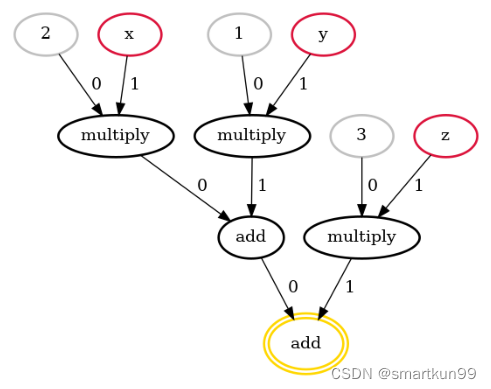
@cnp.compiler({"x": "encrypted","y": "encrypted", "z":"encrypted"})
def f(x,y,z):
    return 2*x + 1*y+ 3*z
- 输入几组测试集合,自动编译成合适的布尔电路
inputset = [(2,3,0),(1,3,0),(0,1,1),(0,0,1),(2,1,3)]
circuit = f.compile(inputset)
- 生成的电路详情
![[外链图片转存失败,源站可能有防盗链机制,建议将图片保存下来直接上传(img-HL03iWw3-1666710867243)(static/boxcnfZLB2Cw4goyTZz3z60RTzh.png)]](https://i-blog.csdnimg.cn/blog_migrate/667ee82d2faaf291ece5032d6029e399.png)
- 生成的布尔运算逻辑
![[外链图片转存失败,源站可能有防盗链机制,建议将图片保存下来直接上传(img-I2ka2VnN-1666710867243)(static/boxcnZzeAzv11lYdp7krC0r0GWd.png)]](https://i-blog.csdnimg.cn/blog_migrate/55d1c4a4ad05d796fe4ca1c63d54e2bd.png)
![[外链图片转存失败,源站可能有防盗链机制,建议将图片保存下来直接上传(img-d9lH4lHx-1666710867243)(static/boxcnFKPnDp2tn4RzonU8oHYRsb.png)]](https://i-blog.csdnimg.cn/blog_migrate/08819a14ea107e0a0731ff96def1f29d.png)
a = circuit.encrypt_run_decrypt(1,1,1)
print(a)
numpy 自定义函数(10.5s)
def complex_univariate_function(x):

    def per_element(element): //定义叠加
        result = 0
        for i in range(element):
            result += i
        return result

    return np.vectorize(per_element)(x)

@cnp.compiler({"x": "encrypted"})
def f(x):
    return cnp.univariate(complex_univariate_function)(x)

inputset = [np.random.randint(0, 5, size=(3, 2)) for _ in range(10)]
circuit = f.compile(inputset)

sample = np.array([
    [0, 4],
    [2, 1],
    [3, 0],
])
result = circuit.encrypt_run_decrypt(sample)
Look-up-table(真值表)(10.4s)
import concrete.numpy as cnp
import numpy as np

import concrete.numpy as cnp

table = cnp.LookupTable([2, -1, 3, 0])

@cnp.compiler({"x": "encrypted"})
def f(x):
    return table[x]

inputset = range(4)
circuit = f.compile(inputset)

print(circuit.encrypt_run_decrypt(0))  //2
print(circuit.encrypt_run_decrypt(3))  //0
卷积操作(17.5s)
import concrete.numpy as cnp
import concrete.onnx as connx
import numpy as np

weight = np.array([[2, 1], [3, 2]]).reshape(1, 1, 2, 2)

@cnp.compiler({"x": "encrypted"})
def f(x):
    return connx.conv(x, weight, strides=(1, 1), dilations=(1, 1), group=1)

inputset = [np.random.randint(0, 4, size=(1, 1, 4, 4)) for _ in range(10)]
circuit = f.compile(inputset)

sample = np.array(
    [
        [3, 2, 1, 0],
        [3, 2, 1, 0],
        [3, 2, 1, 0],
        [3, 2, 1, 0],
    ]
).reshape(1, 1, 4, 4)
assert np.array_equal(circuit.encrypt_run_decrypt(sample), f(sample))
![[外链图片转存失败,源站可能有防盗链机制,建议将图片保存下来直接上传(img-WBDhJy2y-1666710867244)(static/boxcnpIlewwCnSccLWggYOHsGch.png)]](https://i-blog.csdnimg.cn/blog_migrate/b79bbdaabacff0be07b7eb57ceefeecd.png)
![[外链图片转存失败,源站可能有防盗链机制,建议将图片保存下来直接上传(img-6EzMkRSg-1666710867244)(static/boxcnfDRCcVK7tMeV4uwlXPjCLe.png)]](https://i-blog.csdnimg.cn/blog_migrate/786498c61adae8dac75acd7ea9922f54.png)
局限
暂不支持两个密文的乘法,减法,但支持密文乘方
![[外链图片转存失败,源站可能有防盗链机制,建议将图片保存下来直接上传(img-5c1vYTs1-1666710867245)(static/boxcnElNjG2FI87NtROVYEQrABh.png)]](https://i-blog.csdnimg.cn/blog_migrate/5f907963204a124eeb3c0f2f3392dbe8.png)
( x + y ) 2 4 \frac{(x+y)^2}{4} 4(x+y)2---->(43min)
![[外链图片转存失败,源站可能有防盗链机制,建议将图片保存下来直接上传(img-ZXWdiYog-1666710867245)(static/boxcnOlJ0EJAn2UThcPGgEx3Orb.png)]](https://i-blog.csdnimg.cn/blog_migrate/22fcb486a55c72106961c6146bba0ae7.png)
- 支持大量密文和明文的运算
位数限制仅支持(目前最高支持 8bit)、不支持输入输出浮点数(中间过程可以有但是要取整)
操作语句
- If while 语句里面得是明文
一些 Python 控制流语句不被支持。例如,你不能有一个 if 语句或 while 语句,其条件取决于一个加密的值。然而,这样的语句在常量值下是被支持的 (例如,for i in range(SOME_CONSTANT), if os.environ.get(“SOME_FEATURE”) == “ON”)。
Client-Server 服务
Concrete-ml
基于 numpy 底层,实现明文训练密文预测
用法
- 训练
使用明文输入训练模型。
- 量化
然后使用量化将经过训练的模型转换为整数等价物,这可以在训练期间(量化感知训练)或训练后(训练后量化)发生。
- 编译
一旦模型被量化,它将使用 Concrete 的 FHE 编译器进行编译,产生一个等效的 FHE 电路。这个电路被表示为一个由低级加密操作组成的 MLIR 程序。
- 测试
然后可以将编译后的模型部署到服务器并用于对加密输入运行私有推理。
Sklearn
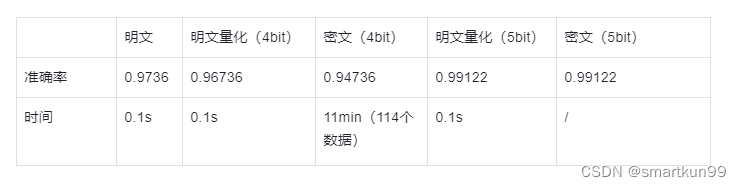
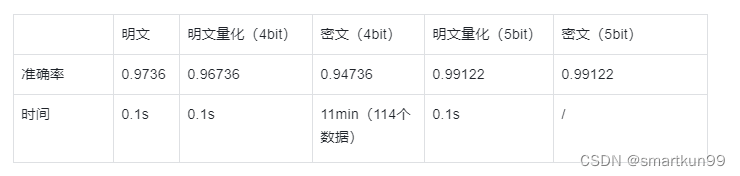
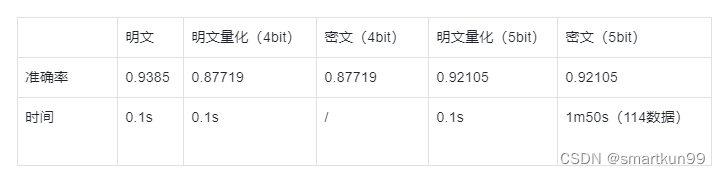
逻辑回归(乳腺癌数据集)(30.2s 单数据)
- 第一次在 breast 上做逻辑回归,没有数据预处理,导致需要量化到 8bit 的精度,才能够达到比较高的准确率,但是现在 concrete 不支持 8bit 的精度
- 因此对数据进行预处理(min-max 和 pca)后,只需要 4bit 精度,还能够有较好的检测效率
- 4bit 密钥生成加电路编译就要将近 65min
from sklearn.datasets import load_breast_cancer
from sklearn.decomposition import PCA
from sklearn.model_selection import GridSearchCV, train_test_split
from sklearn.preprocessing import StandardScaler
from sklearn.linear_model import LogisticRegression as sklearnLog
from concrete.ml.sklearn import LogisticRegression as concreteLog
X, y = load_breast_cancer(return_X_y=True)
X_train, X_test, y_train, y_test = train_test_split(X, y, test_size=0.2, random_state=8)
from sklearn.pipeline import Pipeline
model1 = sklearnLog()
model2 = concreteLog(n_bits=4)
pipeline1 = Pipeline([("standard_scaler", StandardScaler()), ("pca", PCA()), ("model", model1)])
pipeline2 = Pipeline([("standard_scaler", StandardScaler()), ("pca", PCA()), ("model", model2)])
pipeline1.fit(X_train,y_train)
pipeline1.score(X_test,y_test) #0.9824561
pipeline2.fit(X_train,y_train)
pipeline2.score(X_test,y_test)#0.9649122
data_transformation_pipeline = pipeline2[:-1]
model3 = pipeline2[-1]
X_train_transformed = data_transformation_pipeline.transform(X_train)
X_test_transformed = data_transformation_pipeline.transform(X_test)
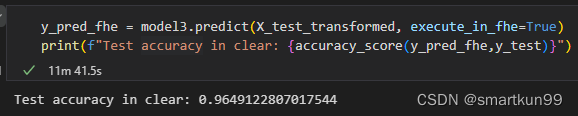
model3.compile(X_train_transformed)
model3.fit(X_train,y_train)
#0.9649122
![[外链图片转存失败,源站可能有防盗链机制,建议将图片保存下来直接上传(img-EjsewUWa-1666710867245)(static/boxcnf17ZsWpBFV8Pmf7O00u2id.png)]](https://i-blog.csdnimg.cn/blog_migrate/3ee3a26f287a1daf5a5774d9d4bd03b1.png)
- 密钥长度(8bit)
![[外链图片转存失败,源站可能有防盗链机制,建议将图片保存下来直接上传(img-tkWXjk47-1666710867246)(static/boxcnwL62wR6QaTh30QBVrDuh71.png)]](https://i-blog.csdnimg.cn/blog_migrate/7a07ca916da19a70e47c26783fa6a11d.png)
- 单个数据预测需要 30.2s
![[外链图片转存失败,源站可能有防盗链机制,建议将图片保存下来直接上传(img-xvRPPUO4-1666710867246)(static/boxcnCdIzZGkBnN6kr2CsnugVLb.png)]](https://i-blog.csdnimg.cn/blog_migrate/0232d7d3caf4157afe24f9861377ec17.png)
SVM(乳腺癌数据集)(6.17s 单数据)
from sklearn.datasets import load_breast_cancer
from sklearn.decomposition import PCA
from sklearn.model_selection import GridSearchCV, train_test_split
from sklearn.preprocessing import StandardScaler

from sklearn.svm import LinearSVC as sklearnsvm
from concrete.ml.sklearn import LinearSVC as concretesvm

X, y = load_breast_cancer(return_X_y=True)


X_train, X_test, y_train, y_test = train_test_split(X, y, test_size=0.2, random_state=8)
from sklearn.pipeline import Pipeline
model1 = sklearnsvm()

#设置操作位数
model2 = concretesvm(n_bits={"net_inputs": 4, "op_inputs": 4, "op_weights": 3, "net_outputs": 4},)

pipeline1 = Pipeline([("standard_scaler", StandardScaler()), ("pca", PCA()), ("model", model1)])
pipeline2 = Pipeline([("standard_scaler", StandardScaler()), ("pca", PCA()), ("model", model2)])
data_transformation_pipeline = pipeline2[:-1]
model3 = pipeline2[-1]
X_train_transformed = data_transformation_pipeline.transform(X_train)
X_test_transformed = data_transformation_pipeline.transform(X_test)
y_pred_clear = model3.predict(X_test_transformed)

import time
time_begin = time.time()
model3.fhe_circuit.graph.maximum_integer_bit_width()
print(f"Generating a key for an {model3.fhe_circuit.graph.maximum_integer_bit_width()}-bit circuit")
model3.fhe_circuit.keygen(force=False)
print(f"Key generation time: {time.time() - time_begin:.2f} seconds")
y_pred_fhe = model3.predict(X_test_transformed, execute_in_fhe=True)
print(f"Test accuracy in clear: {accuracy_score(y_pred_fhe,y_test)}")
- 生成密钥 10min(7bit)

- 预测 11min
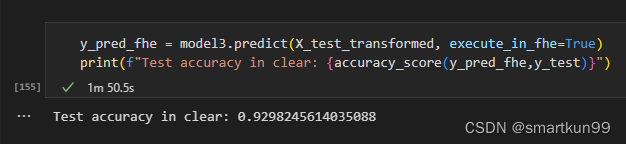
树状模型(乳腺癌数据集)(0.96s 单数据)
X, y = load_breast_cancer(return_X_y=True)
# Split the train and test set
X_train, X_test, y_train, y_test = train_test_split(X, y, test_size=0.2, random_state=8)
# Define our model
model = XGBClassifier(n_jobs=1, n_bits=3)
# Define the pipeline
# We will normalize the data and apply a PCA before fitting the model
pipeline = Pipeline([("standard_scaler", StandardScaler()), ("pca", PCA()), ("model", model)])
# Define the parameters to tune
param_grid = {
    "pca__n_components": [2, 5, 10, 15],
    "model__max_depth": [2, 3, 5],
    "model__n_estimators": [5, 10, 20],
}
# Instantiate the grid search with 5-fold cross validation on all available cores
grid = GridSearchCV(pipeline, param_grid, cv=5, n_jobs=-1, scoring="accuracy")
# Launch the grid search
grid.fit(X_train, y_train)
# Print the best parameters found
print(f"Best parameters found: {grid.best_params_}")
- 生成密钥(5bit 34.7s)
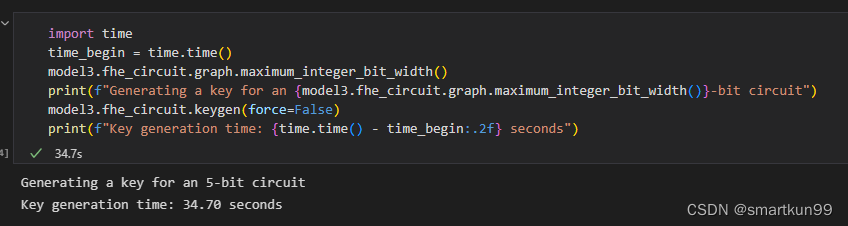
- 预测(1min50s)
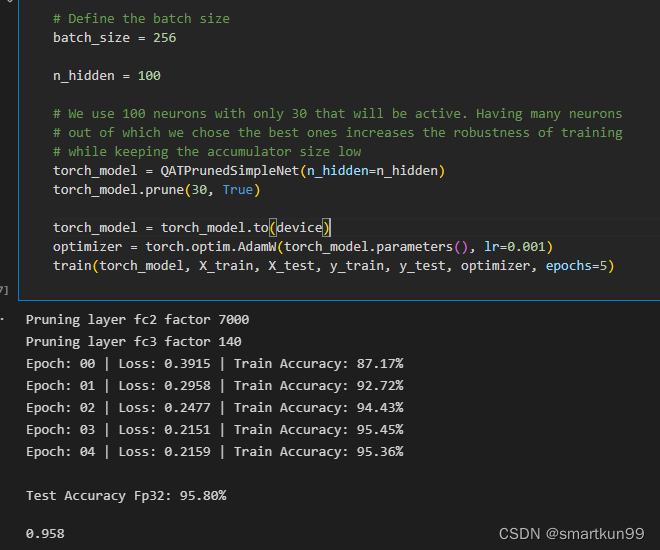
神经网络(乳腺癌数据集)(4.6s 单数数据)
- 三层网络,权重是 3bit,激活函数是 sigmoid,层数是 1000
![[外链图片转存失败,源站可能有防盗链机制,建议将图片保存下来直接上传(img-vVSeuhnF-1666710867248)(static/boxcnC7R81Er75lH1gjGTeYYAeh.png)]](https://i-blog.csdnimg.cn/blog_migrate/8d43acf8b7ecc571b42a3d67d7e10c1c.png)
- 准确率 0.8
![[外链图片转存失败,源站可能有防盗链机制,建议将图片保存下来直接上传(img-iTht6p8L-1666710867249)(static/boxcnQsjXLXeBiM5hE9u38LUs3g.png)]](https://i-blog.csdnimg.cn/blog_migrate/b2b2a76d84596065415ba6007503d433.png)
Examples
![[外链图片转存失败,源站可能有防盗链机制,建议将图片保存下来直接上传(img-LQ3hAVbp-1666710867249)(static/boxcn3oXioIroZBU77uSrYBJTZb.png)]](https://i-blog.csdnimg.cn/blog_migrate/ba9f1755a0c6dda641ea3aa371a1a7d2.png)
![[外链图片转存失败,源站可能有防盗链机制,建议将图片保存下来直接上传(img-eoVk48zc-1666710867249)(static/boxcnrcEQmMtZDuKFaZKdQwGHfc.png)]](https://i-blog.csdnimg.cn/blog_migrate/a42176031547f8edf5917799646a81d7.png)
pyTorch
全连接神经网络(iris 数据集)+ 可剪枝(8.77s 单数据)
- torch 定义模型
**class FCIris(torch.nn.Module):
    def __init__(self, input_size):
        super().__init__()
        self.linear1 = nn.Linear(input_size, 3)
        self.sigmoid1 = nn.Sigmoid()
        # Next, we add a one intermediate layer
        self.linear2 = nn.Linear(3, 3)
        self.sigmoid2 = nn.Sigmoid()
        self.decision = nn.Linear(3, 3)
    def forward(self, x):
        x = self.linear1(x)
        x = self.sigmoid1(x)
        x = self.linear2(x)
        x = self.sigmoid2(x)
        x = self.decision(x)
****        return x**
- 编译 torch 模型
from concrete.ml.torch.compile import compile_torch_model

print("Training a FHE friendly quantized network.")
for _ in range(10):
    try:
        train()
        print("Compiling the model to FHE.")
        quantized_compiled_module = compile_torch_model(
            model,
            X_train,
            n_bits={"net_inputs": 7, "op_inputs": 3, "op_weights": 4, "net_outputs": 8},
        )
        print("The network is trained and FHE friendly.")
        break
    )
- 密钥生成 8bit(65min)
![[外链图片转存失败,源站可能有防盗链机制,建议将图片保存下来直接上传(img-8egAIUkR-1666710867250)(static/boxcngI21aVPkJz6TQv3CTQfFec.png)]](https://i-blog.csdnimg.cn/blog_migrate/fdf0d693d5f39af33921843e653e55d8.png)
- 预测(每个样本 8.77s)准确率 85-90 浮动
![[外链图片转存失败,源站可能有防盗链机制,建议将图片保存下来直接上传(img-43gA4Pqp-1666710867250)(static/boxcnkkh03ckFKD8FkhM2fJxFuf.png)]](https://i-blog.csdnimg.cn/blog_migrate/6c82a58c0c2cc4f294cc7ca0f891e82f.png)
![[外链图片转存失败,源站可能有防盗链机制,建议将图片保存下来直接上传(img-WDPLQo8T-1666710867250)(static/boxcnMnRDbX7K245gKdAGRZ00Vf.png)]](https://i-blog.csdnimg.cn/blog_migrate/1268c405392e6e1e8898acefe1778892.png)
- 剪枝
![[外链图片转存失败,源站可能有防盗链机制,建议将图片保存下来直接上传(img-dj4SfLWG-1666710867250)(static/boxcnnDPnQW2AKCNF4419cIoJZC.png)]](https://i-blog.csdnimg.cn/blog_migrate/3d78e5987611b0cafbf0add0e2d0905e.png)
- 剪枝前
![[外链图片转存失败,源站可能有防盗链机制,建议将图片保存下来直接上传(img-xEsG3K6e-1666710867251)(static/boxcngVlxK6RlvTB4MxV96uus3e.png)]](https://i-blog.csdnimg.cn/blog_migrate/45a6fd3d64d846e62e5172621e09e72f.png)
- 剪枝后
![[外链图片转存失败,源站可能有防盗链机制,建议将图片保存下来直接上传(img-WOgz1GJt-1666710867251)(static/boxcna2OGJEmx2dw4A2TWQlg4Wh.png)]](https://i-blog.csdnimg.cn/blog_migrate/9f419ece0cf3e883e4d104381cbad981.png)
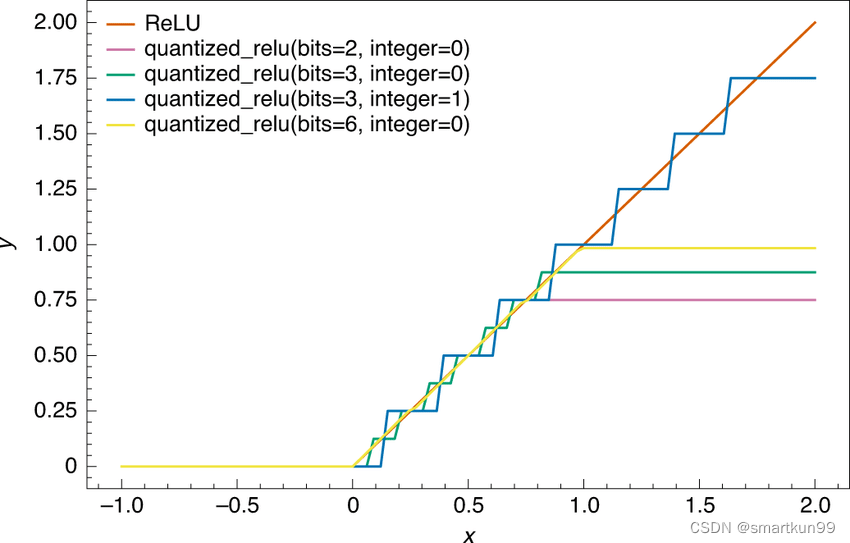
量化感知训练(提升准确率从 50%---->90%)
卷积神经网络(未实现)
ONNX(Open Neural Network Exchange)
ONNX 是一种针对机器学习所设计的开放式的文件格式,用于存储训练好的模型。它使得不同的人工智能框架(如 Pytorch, MXNet)可以采用相同格式存储模型数据并交互。 ONNX 的规范及代码主要由微软,亚马逊 ,Facebook 和 IBM 等公司共同开发,以开放源代码的方式托管在 Github 上。目前官方支持加载 ONNX 模型并进行推理的深度学习框架有: Caffe2, PyTorch, MXNet,ML.NET,TensorRT 和 Microsoft CNTK,并且 TensorFlow 也非官方的支持 ONNX。—维基百科
PPML(kaggle 泰坦尼克实战)
- 先进行数据预处理(略)
- 测试明文模型最好参数和 concrete 最好参数
![[外链图片转存失败,源站可能有防盗链机制,建议将图片保存下来直接上传(img-T20ppwu0-1666710867252)(static/boxcn21VtxGL3d4sW7346ZjDufe.png)]](https://i-blog.csdnimg.cn/blog_migrate/08946554c9ae6befcfc3d3912c265203.png)
密文多了个 n_bit
![[外链图片转存失败,源站可能有防盗链机制,建议将图片保存下来直接上传(img-ZvFAojRG-1666710867252)(static/boxcnX7AwHFLc5UONUmfezIHI5g.png)]](https://i-blog.csdnimg.cn/blog_migrate/fe7b56cea30b8059213fd12bafc1aac4.png)
- 生成密钥(4bit)并预测(一个 1.09s)
![[外链图片转存失败,源站可能有防盗链机制,建议将图片保存下来直接上传(img-7kojcsCm-1666710867253)(static/boxcnJqKUp3swjnPXMJdQ8qA61f.png)]](https://i-blog.csdnimg.cn/blog_migrate/ac7a1e826c8c582c3a9081fb20ec9db3.png)
- 密文模型和明文模型相似度 0.9832(418 个数据)
![[外链图片转存失败,源站可能有防盗链机制,建议将图片保存下来直接上传(img-PqQOUM6h-1666710867253)(static/boxcnSsSX6Yk6BseVazBiC8lxgf.png)]](https://i-blog.csdnimg.cn/blog_migrate/e1a8720d458acaf0442bf3ea5ba6b17f.png)
Client-server
- 三方模型
class OnDiskNetwork:
    """Simulate a network on disk."""

    def __init__(self):
        # Create 3 temporary folder for server, client and dev with tempfile
        self.server_dir = TemporaryDirectory()  # pylint: disable=consider-using-with
        self.client_dir = TemporaryDirectory()  # pylint: disable=consider-using-with
        self.dev_dir = TemporaryDirectory()  # pylint: disable=consider-using-with

    def client_send_evaluation_key_to_server(self, serialized_evaluation_keys):
        """Send the public key to the server."""
        with open(self.server_dir.name + "/serialized_evaluation_keys.ekl", "wb") as f:
            f.write(serialized_evaluation_keys)

    def client_send_input_to_server_for_prediction(self, encrypted_input):
        """Send the input to the server."""
        with open(self.server_dir.name + "/serialized_evaluation_keys.ekl", "rb") as f:
            serialized_evaluation_keys = f.read()
        encrypted_prediction = FHEModelServer(self.server_dir.name).run(
            encrypted_input, serialized_evaluation_keys
        )
        with open(self.server_dir.name + "/encrypted_prediction.enc", "wb") as f:
            f.write(encrypted_prediction)

    def dev_send_model_to_server(self):
        """Send the model to the server."""
        copyfile(self.dev_dir.name + "/server.zip", self.server_dir.name + "/server.zip")

    def server_send_encrypted_prediction_to_client(self):
        """Send the encrypted prediction to the client."""
        with open(self.server_dir.name + "/encrypted_prediction.enc", "rb") as f:
            encrypted_prediction = f.read()
        return encrypted_prediction

    def dev_send_clientspecs_and_modelspecs_to_client(self):
        """Send the clientspecs and evaluation key to the client."""
        copyfile(self.dev_dir.name + "/client.zip", self.client_dir.name + "/client.zip")
        copyfile(
            self.dev_dir.name + "/serialized_processing.json",
            self.client_dir.name + "/serialized_processing.json",
        )

    def cleanup(self):
        """Clean up the temporary folders."""
        self.server_dir.cleanup()
        self.client_dir.cleanup()
        self.dev_dir.cleanup()
生成过密钥——直接读取 0.6s

DAMO开发者矩阵,由阿里巴巴达摩院和中国互联网协会联合发起,致力于探讨最前沿的技术趋势与应用成果,搭建高质量的交流与分享平台,推动技术创新与产业应用链接,围绕“人工智能与新型计算”构建开放共享的开发者生态。
更多推荐
 2
2 0
0- 0


 已为社区贡献1条内容

所有评论(0)