bginfo 使用_使用BGInfo建立网络计算机的系统信息数据库
bginfo 使用One of the more popular tools of the Sysinternals suite among system administrators is BGInfo which tacks real-time system information to your desktop wallpaper when you first login. For obvi

bginfo 使用
One of the more popular tools of the Sysinternals suite among system administrators is BGInfo which tacks real-time system information to your desktop wallpaper when you first login. For obvious reasons, having information such as system memory, available hard drive space and system up time (among others) right in front of you is very convenient when you are managing several systems.
BGInfo是Sysinternals套件中较受系统管理员欢迎的工具之一,它可以在您首次登录时将实时系统信息附加到您的桌面墙纸上。 出于明显的原因,当您管理多个系统时,拥有诸如系统内存,可用硬盘空间和系统正常运行时间等信息非常方便。
A little known feature about this handy utility is the ability to have system information automatically saved to a SQL database or some other data file. With a few minutes of setup work you can easily configure BGInfo to record system information of all your network computers in a centralized storage location. You can then use this data to monitor or report on these systems however you see fit.
关于此实用程序的鲜为人知的功能是能够将系统信息自动保存到SQL数据库或某些其他数据文件中。 通过几分钟的设置工作,您可以轻松配置BGInfo以在集中存储位置记录所有网络计算机的系统信息。 然后,您可以根据需要使用此数据来监视或报告这些系统。
BGInfo设置 (BGInfo Setup)
If you are familiar with BGInfo, you can skip this section. However, if you have never used this tool, it takes just a few minutes to setup in order to capture the data you are looking for.
如果您熟悉BGInfo,则可以跳过此部分。 但是,如果您从未使用过此工具,则只需几分钟即可完成设置,以捕获所需的数据。
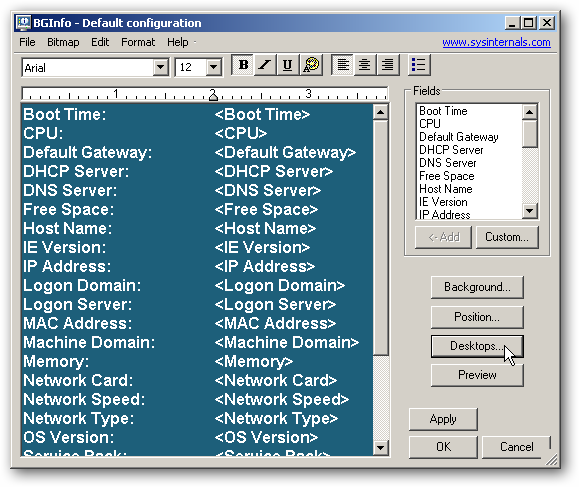
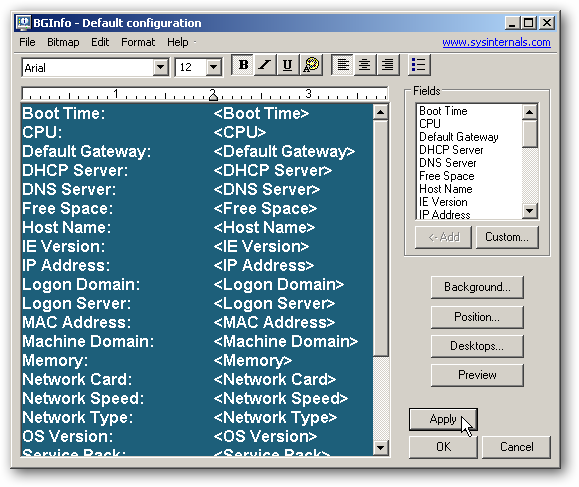
When you first open BGInfo, a timer will be counting down in the upper right corner. Click the countdown button to keep the interface up so we can edit the settings.
首次打开BGInfo时,计时器将在右上角递减计数。 点击倒计时按钮以保持界面打开,以便我们编辑设置。

Now edit the information you want to capture from the available fields on the right. Since all the output will be redirected to a central location, don’t worry about configuring the layout or formatting.
现在,从右侧的可用字段中编辑要捕获的信息。 由于所有输出都将重定向到中央位置,因此不必担心配置布局或格式。

配置存储数据库 (Configuring the Storage Database)
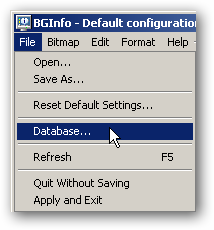
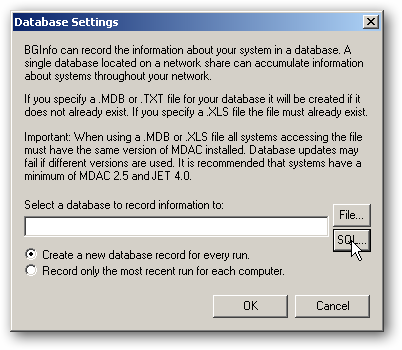
BGInfo supports the ability to store information in several database formats: SQL Server Database, Access Database, Excel and Text File. To configure this option, open File > Database.
BGInfo支持以多种数据库格式存储信息的功能:SQL Server数据库,Access数据库,Excel和文本文件。 要配置此选项,请打开文件>数据库。
使用文本文件 (Using a Text File)
The simplest, and perhaps most practical, option is to store the BGInfo data in a comma separated text file. This format allows for the file to be opened in Excel or imported into a database.
最简单,也许是最实用的选择是将BGInfo数据存储在逗号分隔的文本文件中。 这种格式允许在Excel中打开文件或将其导入数据库。
To use a text file or any other file system type (Excel or MS Access), simply provide the UNC to the respective file. The account running the task to write to this file will need read/write access to both the share and NTFS file permissions.
要使用文本文件或任何其他文件系统类型(Excel或MS Access),只需将UNC提供给相应的文件即可。 运行任务以写入此文件的帐户将需要对共享和NTFS文件权限都具有读/写访问权限。
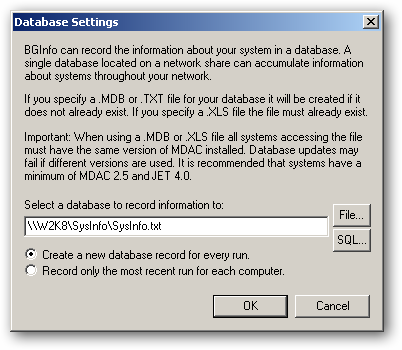
When using a text file, the only option is to have BGInfo create a new entry each time the capture process is run which will add a new line to the respective CSV text file.
使用文本文件时,唯一的选择是让BGInfo每次运行捕获过程都创建一个新条目,这将在相应的CSV文本文件中添加新行。
使用SQL数据库 (Using a SQL Database)
If you prefer to have the data dropped straight into a SQL Server database, BGInfo support this as well. This requires a bit of additional configuration, but overall it is very easy.
如果您希望将数据直接放入SQL Server数据库中,则BGInfo也支持此功能。 这需要一些额外的配置,但是总体来说这很容易。
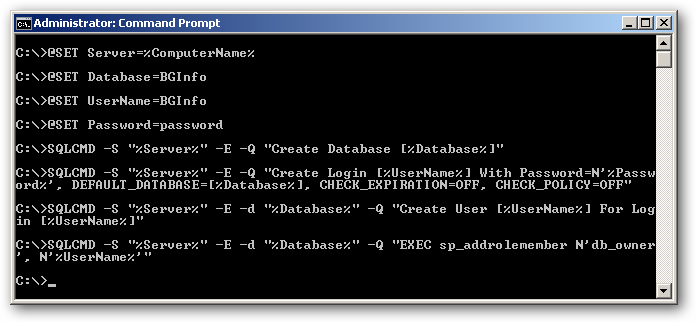
The first step is to create a database where the information will be stored. Additionally, you will want to create a user account to fill data into this table (and this table only). For your convenience, this script creates a new database and user account (run this as Administrator on your SQL Server machine):
第一步是创建一个存储信息的数据库。 此外,您将需要创建一个用户帐户,以将数据填充到该表中(仅此表)。 为了您的方便,此脚本创建一个新的数据库和用户帐户(在SQL Server计算机上以管理员身份运行):
@SET Server=%ComputerName%.@SET Database=BGInfo@SET UserName=BGInfo@SET Password=passwordSQLCMD -S “%Server%” -E -Q “Create Database [%Database%]”SQLCMD -S “%Server%” -E -Q “Create Login [%UserName%] With Password=N’%Password%’, DEFAULT_DATABASE=[%Database%], CHECK_EXPIRATION=OFF, CHECK_POLICY=OFF”SQLCMD -S “%Server%” -E -d “%Database%” -Q “Create User [%UserName%] For Login [%UserName%]”SQLCMD -S “%Server%” -E -d “%Database%” -Q “EXEC sp_addrolemember N’db_owner’, N’%UserName%'”
@SET服务器=%ComputerName%。@ SET数据库= BGInfo @ SET用户名= BGInfo @ SET密码=密码SQLCMD -S“%Server%” -E -Q“创建数据库[%Database%]” SQLCMD -S“%Server% ” -E -Q“使用密码= N'%Password%',DEFAULT_DATABASE = [%Database%],CHECK_EXPIRATION = OFF,CHECK_POLICY = OFF创建登录名[%UserName%]“ SQLCMD -S“%Server%” -E- d“%Database%” -Q“创建用于登录[%UserName%]的用户[%UserName%]”“ SQLCMD -S”%Server%“ -E -d”%Database%“ -Q” EXEC sp_addrolemember N'db_owner' ,N'%UserName%'”
Note the SQL user account must have ‘db_owner’ permissions on the database in order for BGInfo to work correctly. This is why you should have a SQL user account specifically for this database.
请注意,SQL用户帐户必须对数据库具有“ db_owner”权限,才能使BGInfo正常工作。 这就是为什么您应该为此数据库专门拥有一个SQL用户帐户的原因。
Next, configure BGInfo to connect to this database by clicking on the SQL button.
接下来,通过单击SQL按钮将BGInfo配置为连接到该数据库。
Fill out the connection properties according to your database settings.
根据您的数据库设置填写连接属性。
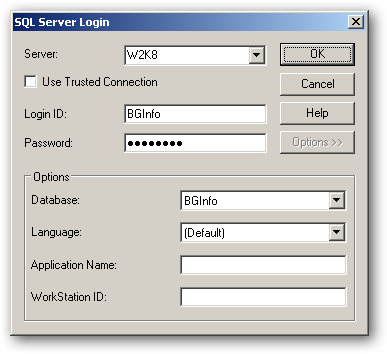
Select the option of whether or not to only have one entry per computer or keep a history of each system.
选择以下选项:每台计算机仅包含一个条目,还是保留每个系统的历史记录。

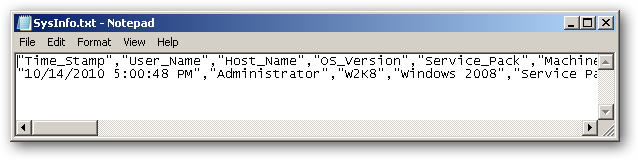
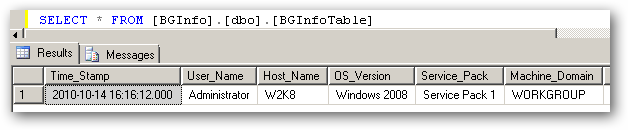
The data will then be dropped directly into a table named “BGInfoTable” in the respective database.
然后将数据直接放入相应数据库中名为“ BGInfoTable”的表中。
配置用户桌面选项 (Configure User Desktop Options)
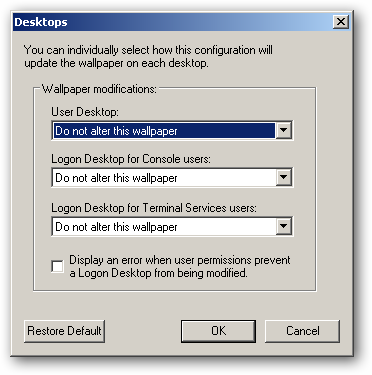
While the primary function of BGInfo is to alter the user’s desktop by adding system info as part of the wallpaper, for our use here we want to leave the user’s wallpaper alone so this process runs without altering any of the user’s settings.
尽管BGInfo的主要功能是通过将系统信息添加为墙纸的一部分来更改用户的桌面,但在这里我们希望不打扰用户的墙纸,以便我们在此使用它,而无需更改用户的任何设置。
Click the Desktops button.
单击桌面按钮。
Configure the Wallpaper modifications to not alter anything.
配置墙纸修改以不更改任何内容。
准备部署 (Preparing the Deployment)
Now we are all set for deploying the configuration to the individual machines so we can start capturing the system data.
现在,我们已经准备好将配置部署到各个计算机,以便我们可以开始捕获系统数据。
If you have not done so already, click the Apply button to create the first entry in your data repository. If all is configured correctly, you should be able to open your data file or database and see the entry for the respective machine.
如果尚未这样做,请单击“应用”按钮以在数据存储库中创建第一个条目。 如果所有配置均正确,则您应该能够打开数据文件或数据库,并查看相应计算机的条目。
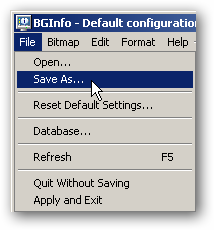
Now click the File > Save As menu option and save the configuration as “BGInfoCapture.bgi”.
现在,单击“文件”>“另存为”菜单选项,并将配置另存为“ BGInfoCapture.bgi”。
部署到客户端计算机 (Deploying to Client Machines)
Deployment to the respective client machines is pretty straightforward. No installation is required as you just need to copy the BGInfo.exe and the BGInfoCapture.bgi to each machine and place them in the same directory.
部署到各个客户端计算机非常简单。 无需安装,因为您只需要将BGInfo.exe和BGInfoCapture.bgi复制到每台计算机并将它们放置在同一目录中即可。
Once in place, just run the command:
放置到位后,只需运行以下命令:
BGInfo.exe BGInfoCapture.bgi /Timer:0 /Silent /NoLicPrompt
BGInfo.exe BGInfoCapture.bgi / Timer:0 / Silent / NoLicPrompt
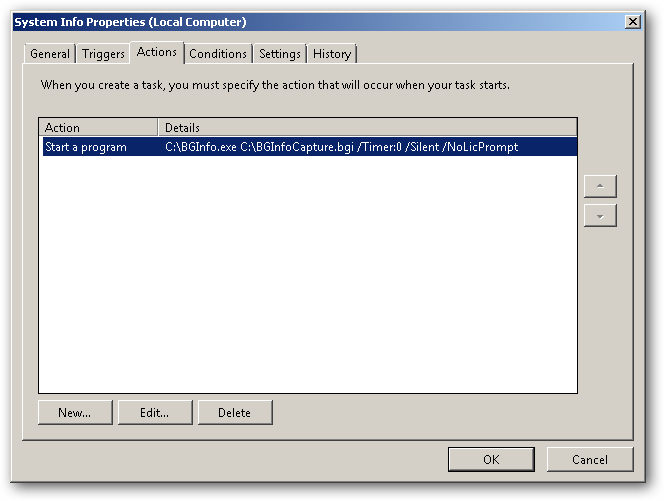
Of course, you probably want to schedule the capture process to run on a schedule. This command creates a Scheduled Task to run the capture process at 8 AM every morning and assumes you copied the required files to the root of your C drive:
当然,您可能希望安排捕获过程按计划运行。 此命令创建一个计划任务以在每天早上8点运行捕获过程,并假定您将所需文件复制到C驱动器的根目录:
SCHTASKS /Create /SC DAILY /ST 08:00 /TN “System Info” /TR “C:BGInfo.exe C:BGInfoCapture.bgi /Timer:0 /Silent /NoLicPrompt”
SCHTASKS /每天创建/ SC / ST 08:00 / TN“系统信息” / TR“ C:BGInfo.exe C:BGInfoCapture.bgi / Timer:0 / Silent / NoLicPrompt”
Adjust as needed, but the end result is the scheduled task command should look something like this:
根据需要进行调整,但最终结果是计划的任务命令应如下所示:
Download BGInfo from Sysinternals
bginfo 使用

DAMO开发者矩阵,由阿里巴巴达摩院和中国互联网协会联合发起,致力于探讨最前沿的技术趋势与应用成果,搭建高质量的交流与分享平台,推动技术创新与产业应用链接,围绕“人工智能与新型计算”构建开放共享的开发者生态。
更多推荐


 0
0 0
0- 0


 已为社区贡献5条内容

所有评论(0)