数据库版本管理工具之Liquibase
研发过程中经常涉及到数据库变更,对表结构的修复及对数据的修改,为了保证各环境都能正确的进行变更我们可能需要维护一个数据库升级文档来保存这些记录,有需要升级的环境按文档进行升级。无法保证每个环境都按要求执行遇到问题不一定有相对的回滚语句无法自动化为了解决这些问题,我们进行了一些调研,主要调研对象是Liquibase和Flyway,我们希望通过数据库版本管理工具实现以下几个目标:数据库升级数据库回滚版
一、liquibase介绍
研发过程中经常涉及到数据库变更,对表结构的修复及对数据的修改,为了保证各环境都能正确的进行变更我们可能需要维护一个数据库升级文档来保存这些记录,有需要升级的环境按文档进行升级。
这样手工维护有几个缺点:
- 无法保证每个环境都按要求执行
- 遇到问题不一定有相对的回滚语句
- 无法自动化
为了解决这些问题,我们进行了一些调研,主要调研对象是Liquibase和Flyway,我们希望通过数据库版本管理工具实现以下几个目标:
-
数据库升级
-
数据库回滚
-
版本标记
1.工作流程

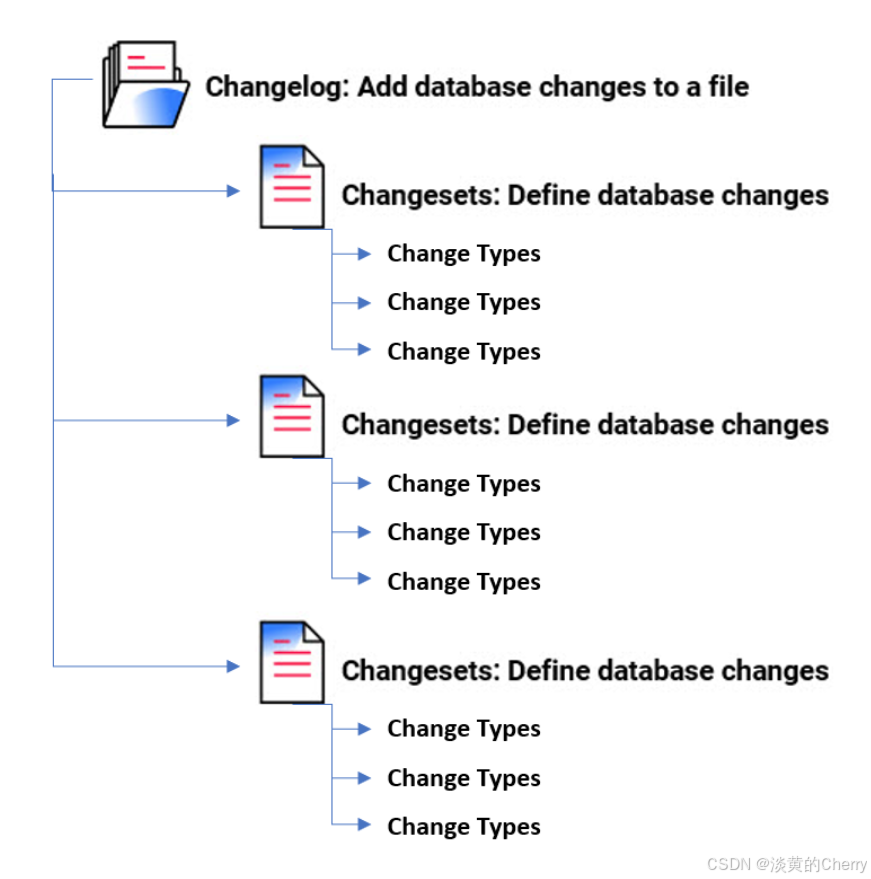
2.changeLog文件结构
管理的数据最小单元为 changeSet ,这个 changeSet 可以用 xml,yaml,json,sql 来编写
3.数据库变更日志和数据库变更日志锁
-
当您部署更改时,Liquibase会在数据库中创建两个表:DATABASECHANGELOG和DATABASECHANGELOGLOCK。
-
DATABASECHANGELOG表跟踪已部署的变更,以便您有记录。Liquibase将changelog文件中的变更集与DATABASECHANGELOG跟踪表进行比较,并仅部署新的变更集。
-
DATABASECHANGELOGLOCK可防止多个Liquibase实例同时更新数据库。该表在部署期间管理对DATABASECHANGELOG表的访问,并确保只有一个Liquibase实例正在更新数据库
二、liquibase部署
官方文档:https://docs.liquibase.com/concepts/introduction-to-liquibase.html
1.下载二进制包
https://www.liquibase.com/download
2.解压到指定目录
[root@node1.local liquibase]# pwd
/opt/liquibase

[root@node1.local liquibase]# tar xf liquibase-4.30.0.tar.gz

[root@node1.local liquibase]# ll
total 156868
drwxr-xr-x 6 root     root      4096 Dec 16 11:15 ./
drwxr-xr-x 5 root     root      4096 Dec 16 11:14 ../
-rw-r--r-- 1 ftpadmin  127        50 Nov  1 01:49 ABOUT.txt
-rw-r--r-- 1 ftpadmin  127    374611 Nov  1 01:49 changelog.txt
drwxr-xr-x 6 ftpadmin  127      4096 Nov  1 01:49 examples/
-rw-r--r-- 1 ftpadmin  127     10388 Nov  1 01:49 GETTING_STARTED.txt
drwxr-xr-x 4 ftpadmin  127      4096 Nov  1 01:51 internal/
drwxr-xr-x 2 ftpadmin  127      4096 Nov  1 01:49 lib/
drwxr-xr-x 4 ftpadmin  127      4096 Nov  1 01:49 licenses/
-rw-r--r-- 1 ftpadmin  127     11345 Nov  1 01:49 LICENSE.txt
-rwxr-xr-x 1 ftpadmin  127      1509 Nov  1 01:13 liquibase*
-rw-r--r-- 1 root     root 160180547 Dec 16 11:11 liquibase-4.30.0.tar.gz
-rw-r--r-- 1 ftpadmin  127      1134 Nov  1 01:13 liquibase.bat
-rw-r--r-- 1 ftpadmin  127      2721 Nov  1 01:49 README.txt
-rw-r--r-- 1 ftpadmin  127       766 Nov  1 01:49 UNINSTALL.txt


检查JRE
$ java -version
java version "1.8.0_231"
Java(TM) SE Runtime Environment (build 1.8.0_231-b11)
Java HotSpot(TM) 64-Bit Server VM (build 25.231-b11, mixed mode)
如果没有安装Java请自行安装
3.配置环境变量
[root@node1.local ~]# vim .bashrc
export LIQUIBASE_HOME=/opt/liquibase
export PATH=$PATH:$LIQUIBASE_HOME


[root@node1.local ~]# source .bashrc
4.下载数据库驱动包
[root@node1.local lib]# pwd
/opt/liquibase/lib

[root@node1.local lib]# wget https://downloads.mysql.com/archives/get/p/3/file/mysql-connector-j-8.0.33.tar.gz

解压
[root@node1.local lib]# tar xf mysql-connector-j-8.0.33.tar.gz
[root@node1.local lib]# mv /opt/liquibase/lib/mysql-connector-j-8.0.33/mysql-connector-j-8.0.33.jar .
5.修改编码为UTF8
如果您在文件中使用的是UTF8编码,那么请务必在liquibase.bat文件中添加一行:
[root@node1.local liquibase]# vim liquibase.bat
.....
IF NOT DEFINED JAVA_OPTS set JAVA_OPTS=-Dfile.encoding=UTF–8
6.创建默认配置文件
[root@node1.local liquibase]# liquibase update

初始化配置文件
[root@node1.local liquibase]# liquibase init project
####################################################
##   _     _             _ _                      ##
##  | |   (_)           (_) |                     ##
##  | |    _  __ _ _   _ _| |__   __ _ ___  ___   ##
##  | |   | |/ _` | | | | | '_ \ / _` / __|/ _ \  ##
##  | |___| | (_| | |_| | | |_) | (_| \__ \  __/  ##
##  \_____/_|\__, |\__,_|_|_.__/ \__,_|___/\___|  ##
##              | |                               ##
##              |_|                               ##
##                                                ##
##  Get documentation at docs.liquibase.com       ##
##  Get certified courses at learn.liquibase.com  ##
##                                                ##
####################################################
Starting Liquibase at 13:22:40 using Java 1.8.0_431 (version 4.30.0 #4943 built at 2024-10-31 17:00+0000)
Liquibase Version: 4.30.0
Liquibase Open Source 4.30.0 by Liquibase
Setup new liquibase.properties, flowfile, and sample changelog? Enter (Y)es with defaults, yes with (C)ustomization, or (N)o. [Y]:
y
Setting up new Liquibase project in '/opt/liquibase/.'...

Created example changelog file '/opt/liquibase/example-changelog.sql'
Created example defaults file '/opt/liquibase/liquibase.properties'
Created example flow file '/opt/liquibase/liquibase.advanced.flowfile.yaml'
Created example flow file '/opt/liquibase/liquibase.flowvariables.yaml'
Created example flow file '/opt/liquibase/liquibase.endstage.flow'
Created example flow file '/opt/liquibase/liquibase.flowfile.yaml'
Created example checks package '/opt/liquibase/liquibase.checks-package.yaml'

To use the new project files make sure your database is active and accessible by opening a new terminal window to run "liquibase init start-h2", and then return to this terminal window to run "liquibase update" command.
For more details, visit the Getting Started Guide at https://docs.liquibase.com/start/home.html
Liquibase command 'init project' was executed successfully.
7.编写change-log文件
[root@node1.local changelog]# pwd
/opt/liquibase/changelog

[root@node1.local changelog]# vim master.yml
databaseChangeLog:
  - preConditions:
    - runningAs:
        username: cien66

  - changeSet:
      id: 1
      author: nvoxland
      changes:
        - createTable:
            tableName: person
            columns:
              - column:
                  name: id
                  type: int
                  autoIncrement: true
                  constraints:
                    primaryKey: true
                    nullable: false
              - column:
                  name: firstname
                  type: varchar(50)
              - column:
                  name: lastname
                  type: varchar(50)
                  constraints:
                    nullable: false
              - column:
                  name: state
                  type: char(2)

  - changeSet:
      id: 2
      author: nvoxland
      changes:
        - addColumn:
            tableName: person
            columns:
              - column:
                  name: username
                  type: varchar(8)

  - changeSet:
      id: 3
      author: nvoxland
      changes:
        - addLookupTable:
            existingTableName: person
            existingColumnName: state
            newTableName: state
            newColumnName: id
            newColumnDataType: char(2)
8.编写数据库连接配置文件
[root@node1.local changelog]# vim liquibase.properties
changeLogFile=master.yml

#### Enter the Target database 'url' information  ####
#数据库地址
liquibase.command.url=jdbc:mysql://10.0.0.250:3306/zabbix

# Enter the username for your Target database.
#数据库用户名
liquibase.command.username: root

# Enter the password for your Target database.
#数据库密码
liquibase.command.password: IteSZOs#Em]uKUGEd4NRaR+OfD
三、liquibase使用
参考文档:https://www.cnblogs.com/sanri1993/p/12125280.html
1.更新
基于liquibase.properties属性里面定义的changeLogFile文件来更新、修改数据库
[root@node1.local changelog]# liquibase update
2.设置标签,方便回滚
[root@node1.local changelog]# liquibase tag v2
3.回滚
指定changeLogFile文件操作
# 按照 changeSet 次数回滚
liquibase  --changeLogFile="sqls/changeLogFiledevtest.postgresql.sql" rollbackCount 1

# 按照标签回滚
liquibase  --changeLogFile="sqls/changeLogFiledevtest.postgresql.sql" rollback v1.0
4.使用差异升级源库
liquibase --changeLogFile="sqls/changeLogFiledevtest.postgresql.sql" update
5.生成数据库脚本(新环境)
它会在你的目标数据库生成一张表 DATABASECHANGELOG 来管理版本 ,另一个 lock 的是防止多人同时操作数据库加的锁
liquibase --changeLogFile="sqls/create_table.mysql.sql" generateChangeLog
6.查看历史标签
[root@node1.local changelog]# liquibase history

DAMO开发者矩阵,由阿里巴巴达摩院和中国互联网协会联合发起,致力于探讨最前沿的技术趋势与应用成果,搭建高质量的交流与分享平台,推动技术创新与产业应用链接,围绕“人工智能与新型计算”构建开放共享的开发者生态。
更多推荐


 34
34 0
0- 0


 已为社区贡献1条内容

所有评论(0)