【开源】大量2D Shader来袭,请收好这份教程!
当 pattern 密集时,渲染会出现摩尔纹,有时对效果而言有益,而有时却有害,请酌情考虑使用,欢迎大家在评论区讨论其它实现方案。因此函数可以设计为两个圆的距离场叠加获得每个点位置的距离场之和,再通过使用此数值作为阈值来控制图像的显示即可。根据相机位置与平面中心点位置计算平面中心的观察向量,再根据平面上的法方向来求解当前的视差夹角。利用向量投影公式,容易求算出当前的大致观察位置,再根据观察位置来采
在游戏开发过程中,Shader 负责实现光照、材质、特效、后处理等核心视觉效果,是提升画面真实感和艺术表现力的关键技术。
本期小编为大家带来 9 个实用的 2D Shader 特效教程,包含波纹、故障艺术、马赛克等常用效果。
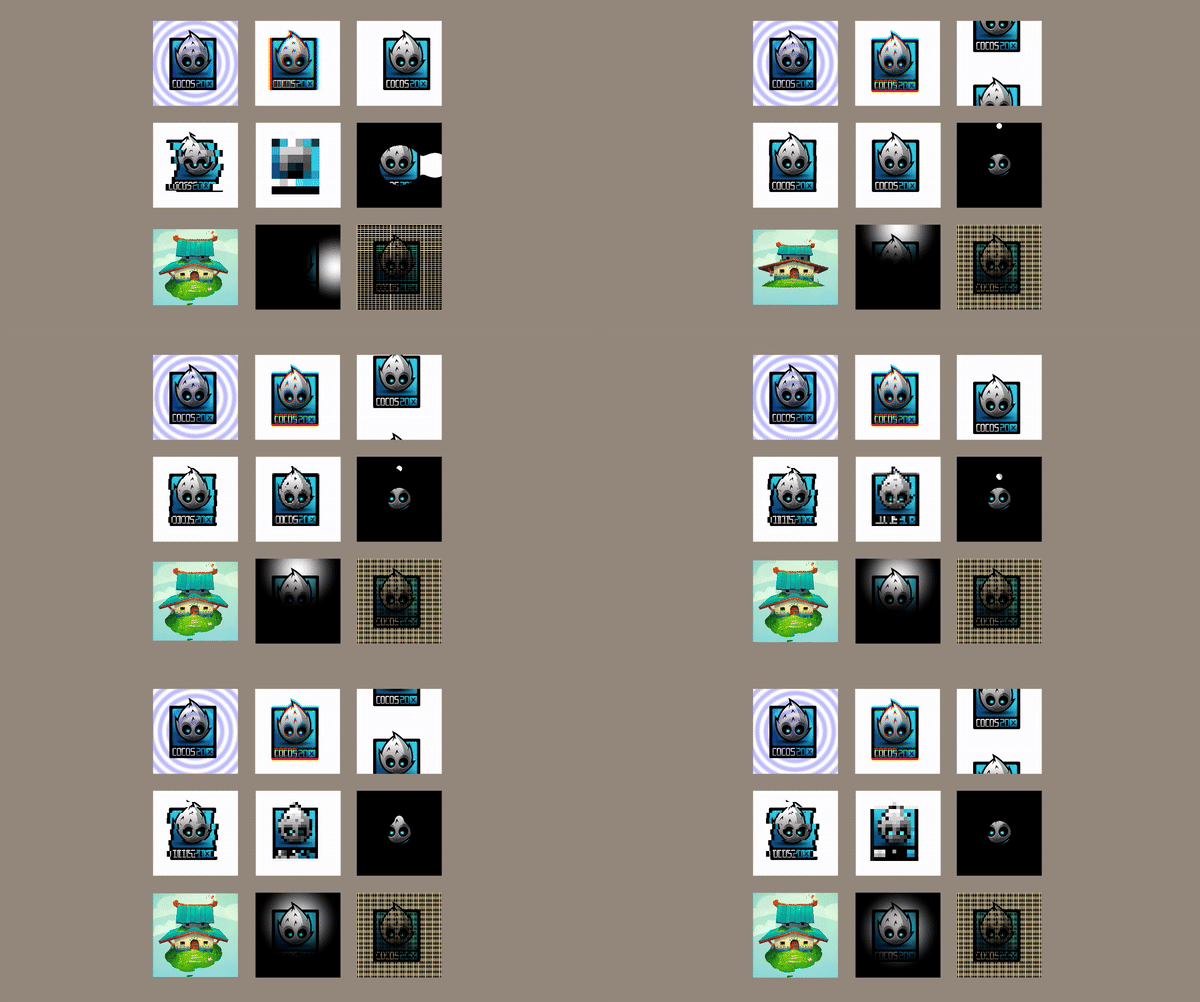
每个特效都配备详细的实现思路和核心代码,跟着小编一起来学习这些炫酷效果的制作方法吧!
三行代码实现动态波纹扩散
1. 功能描述:
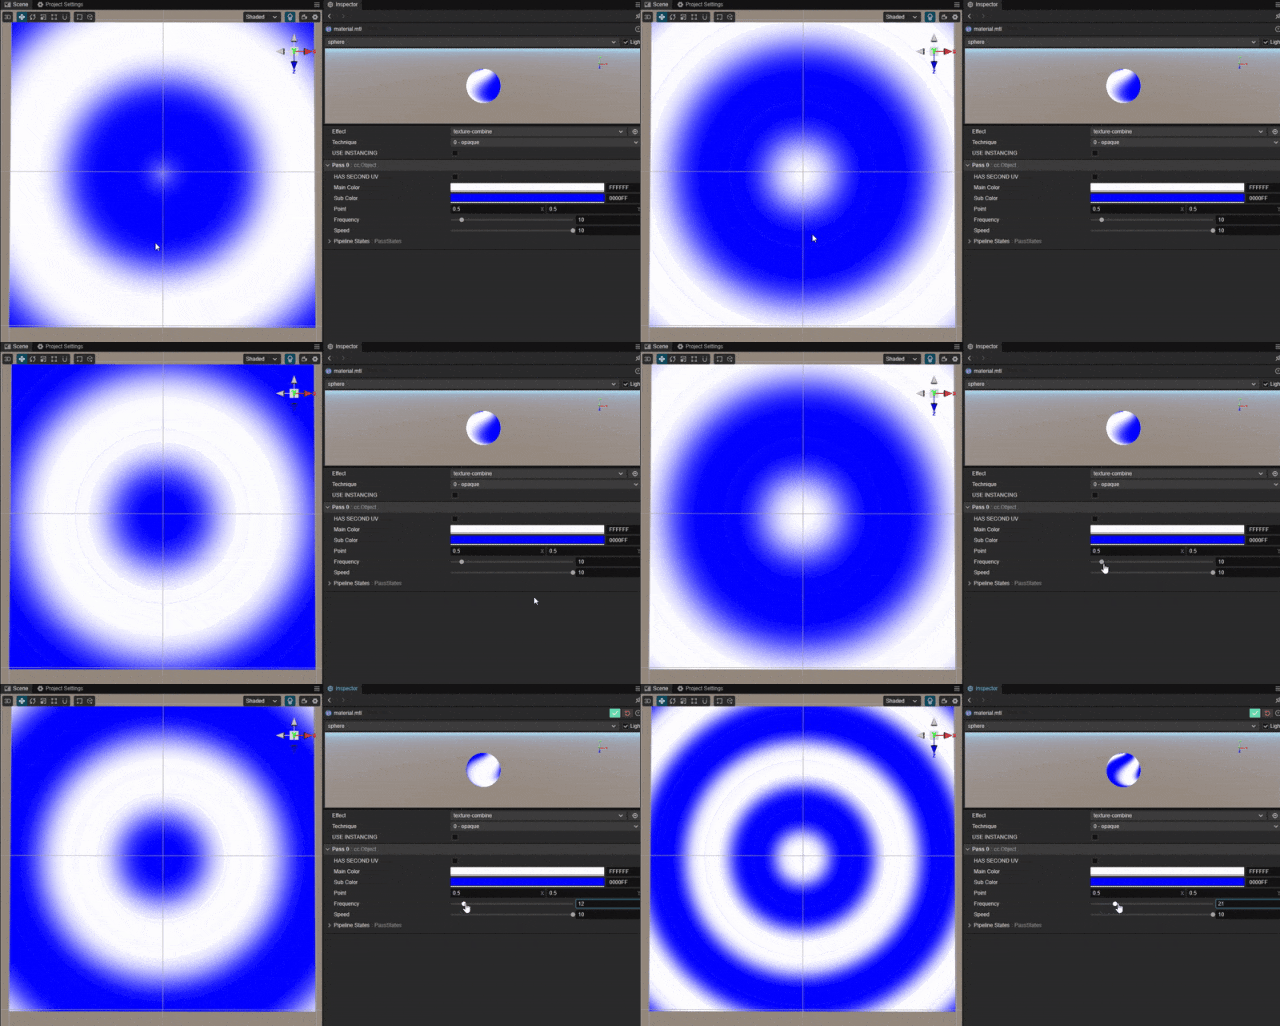
以平面上某一个点为中心,实现圆形波纹动态扩散的效果。
2. 核心思路:
根据像素距离中心点的位置,使用正弦函数绘制随时间波动的点的颜色。
3. Shader 代码:
-
参数:
//底色
mainColor:     { value: [1, 1, 1, 1], editor: { type: color } }
//波纹颜色
subColor:      { value: [0, 0, 1, 1], editor: { type: color } }
//点位置
point:         { value: [0, 0], range: [0, 1], editor: { type: range } }
//扩散频率(宽度)
frequency :    { value: 1, editor: { slide : true, range : [1,100], step: 1 } }
//扩散速度
speed : { value: 1, editor: { slide : true, range : [0,10], step: 0.1 } }-
核心实现:
vec4 frag () {
    //求距离
    float dist = distance(v_uv, point);
    //计算正弦波
    float sineWave = sin(dist * frequency - cc_time.x * speed) * 0.5 + 0.5;
    //平滑过渡混合
    vec4 col = mix(mainColor, subColor, smoothstep(0.0, 1.0, sineWave));

    return CCFragOutput(col);
}-
扩展:此 Pattern 可以应用于带有纹理的混合。
实现通道错位 Glitch Art
1. 功能描述:
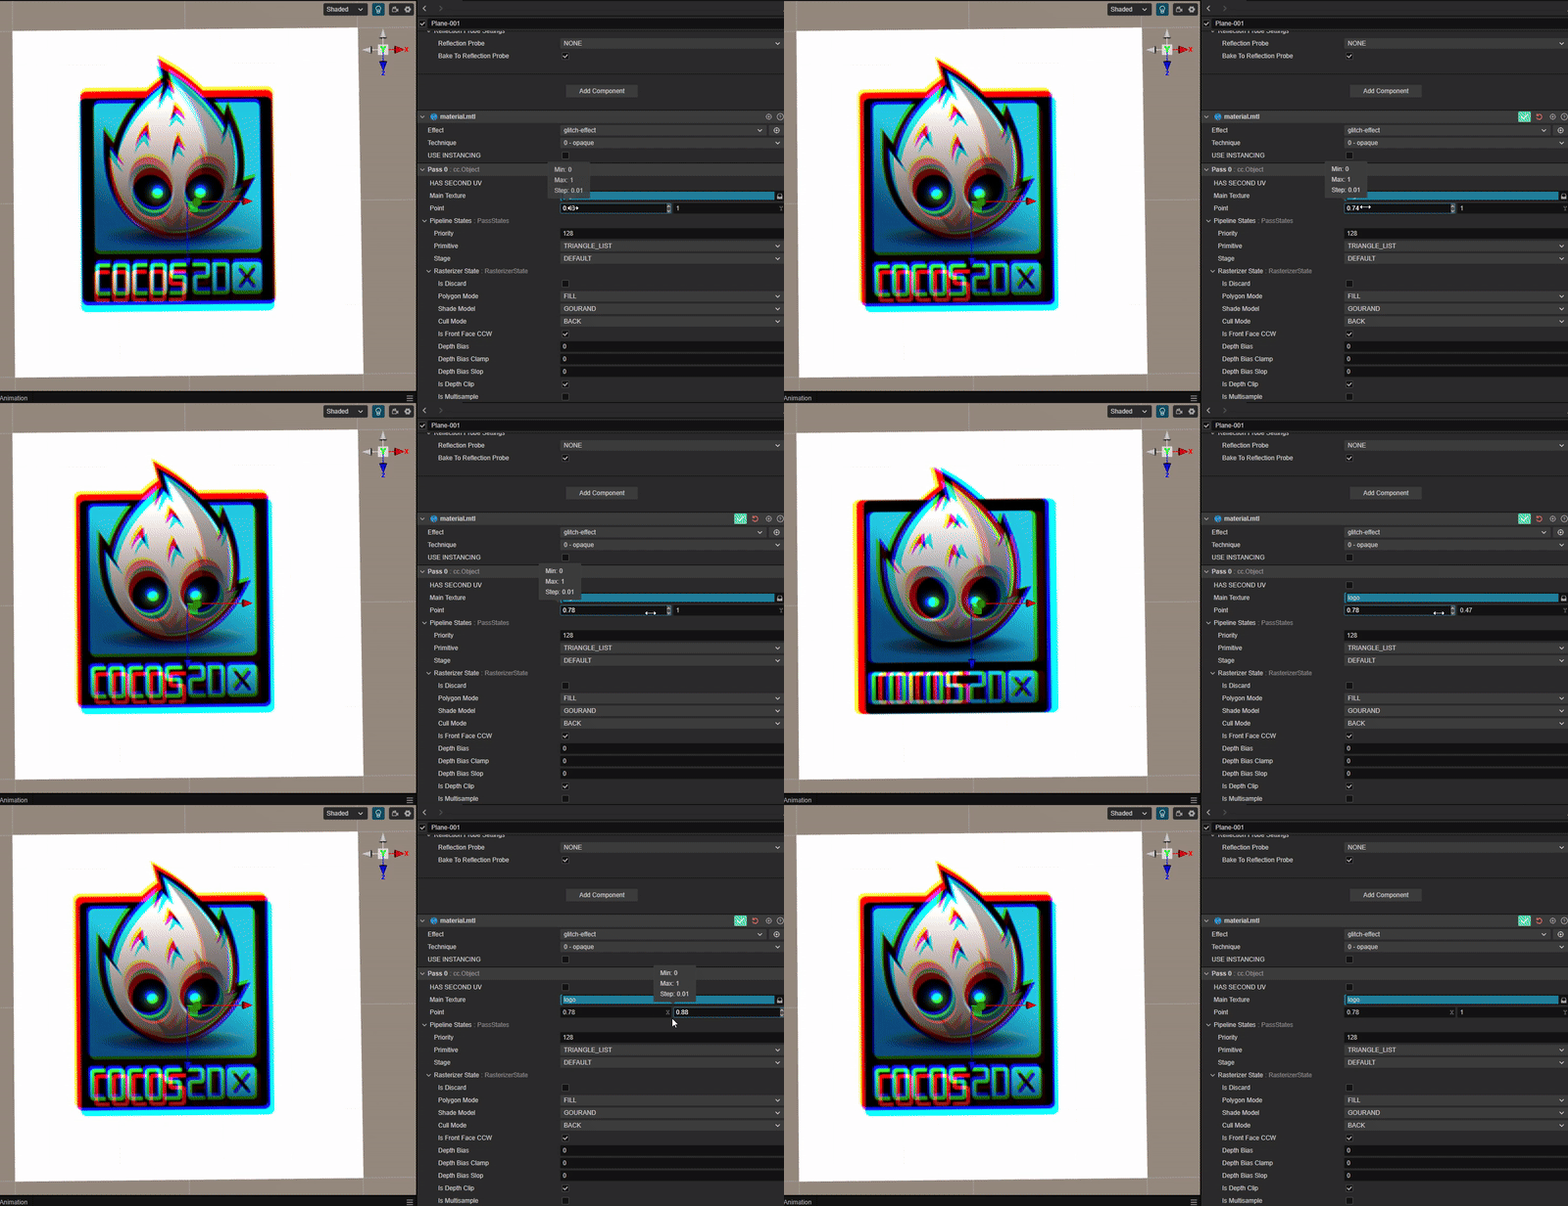
使用 RGB 通道错位实现类似 TikTok 图标的色彩溢出效果。
2. 核心思路:
根据 uv 通道的偏移距离,分别对 RGB 三个颜色通道进行采样并绘制。
3. Shader 代码:
-
参数:
mainTexture:    { value: white }
//色彩通道偏移方向x,y
point: {value: [0.5, 0.5], editor: { slide : true, range : [0,1], step: 0.01 } }-
核心实现:
vec4 frag () {
    //以中心为坐标基准点
    vec2 center = vec2(0.5, 0.5);
    //求取偏移方向向量
    vec2 normalDist = normalize(point - center);
    //计算uv偏移量
    vec2 v_uv_r = v_uv;
    vec2 v_uv_g = clamp(v_uv + normalDist * 0.02, 0.0, 1.0);
    vec2 v_uv_b = clamp(v_uv + normalDist * 0.03, 0.0, 1.0);
    //分别进行逐通道纹理采样
    float col_r = texture(mainTexture, v_uv_r).r;
    float col_g = texture(mainTexture, v_uv_g).g;
    float col_b = texture(mainTexture, v_uv_b).b;

    return CCFragOutput(vec4(col_r, col_g, col_b, 1.0));
  }
实现循环无缝滚动效果
1. 功能描述:
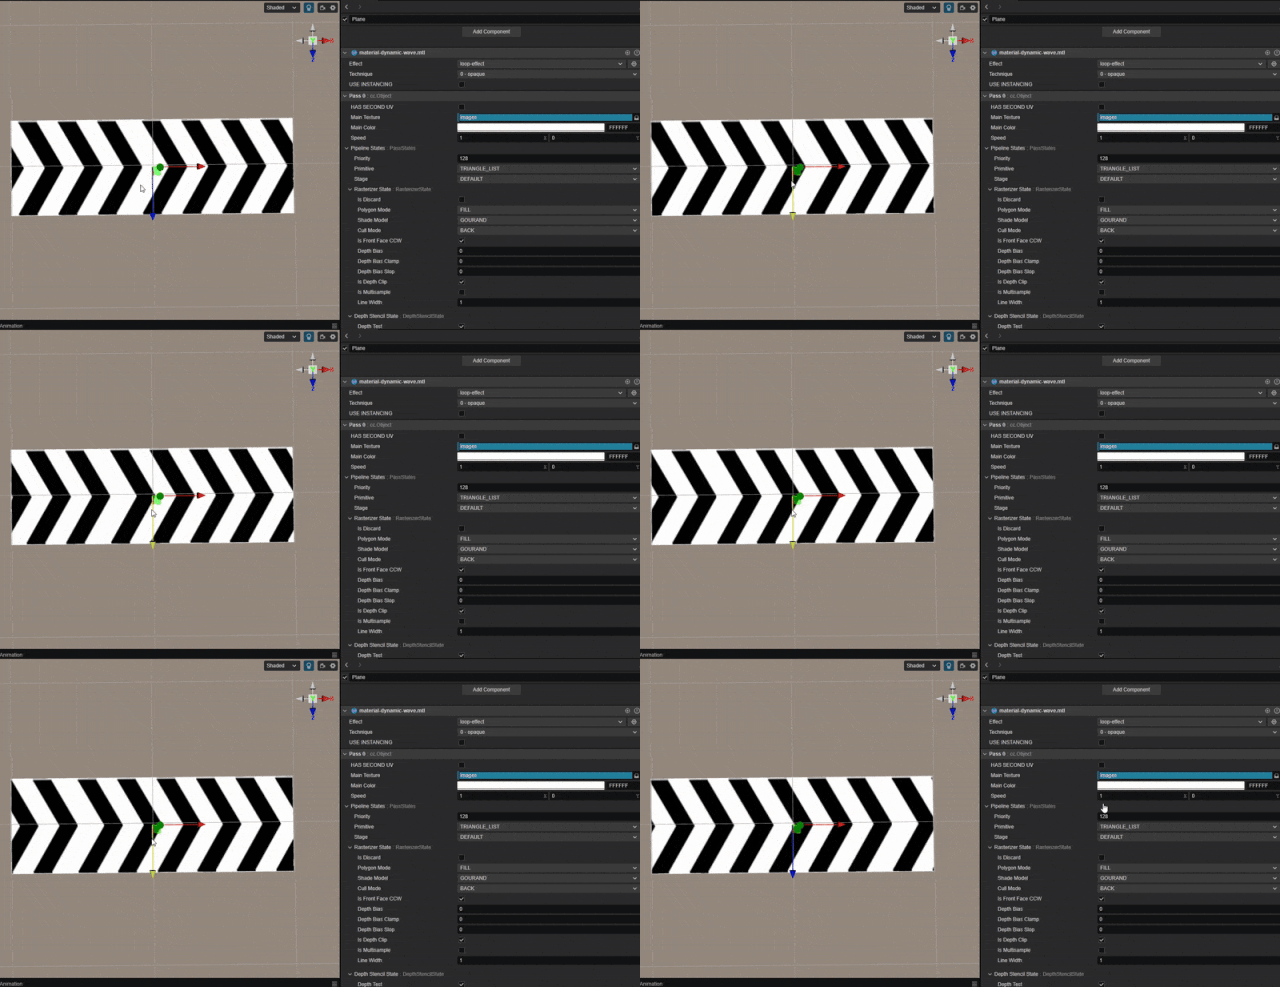
实现纹理连续循环滚动的效果。
2. 核心思路:
根据时间值,对 uv 值进行平移。
3. Shader 代码:
-
参数:
// 主材质(默认)
mainTexture:    { value: white }
// 主颜色(默认)
mainColor:      { value: [1, 1, 1, 1], editor: { type: color } }
// 速度方向的无级调节(水平,垂直) 可正向,反向;
speed: { value: [1,0], editor: { slide : true, range : [-10.0,10.0], step: 0.01 } }-
核心实现:
vec4 frag () {
    // 根据时间修改贴图偏移
    vec2 uv_offset = v_uv;
    uv_offset -= cc_time.x * speed;
    // 判断超出范围
    uv_offset.x = uv_offset.x > 1.0 ? uv_offset.x - 1.0 : uv_offset.x;
    uv_offset.y = uv_offset.y > 1.0 ? uv_offset.y - 1.0 : uv_offset.y;

    vec4 col = mainColor * texture(mainTexture, uv_offset);
    return CCFragOutput(col);
}-
扩展:可以应用于场景内路标指示,广告牌滚动等的效果。
实现像素条形错位的 Glitch Art
1. 功能描述:
使用 uv 位置偏移,实现像素条形错位的故障艺术效果。
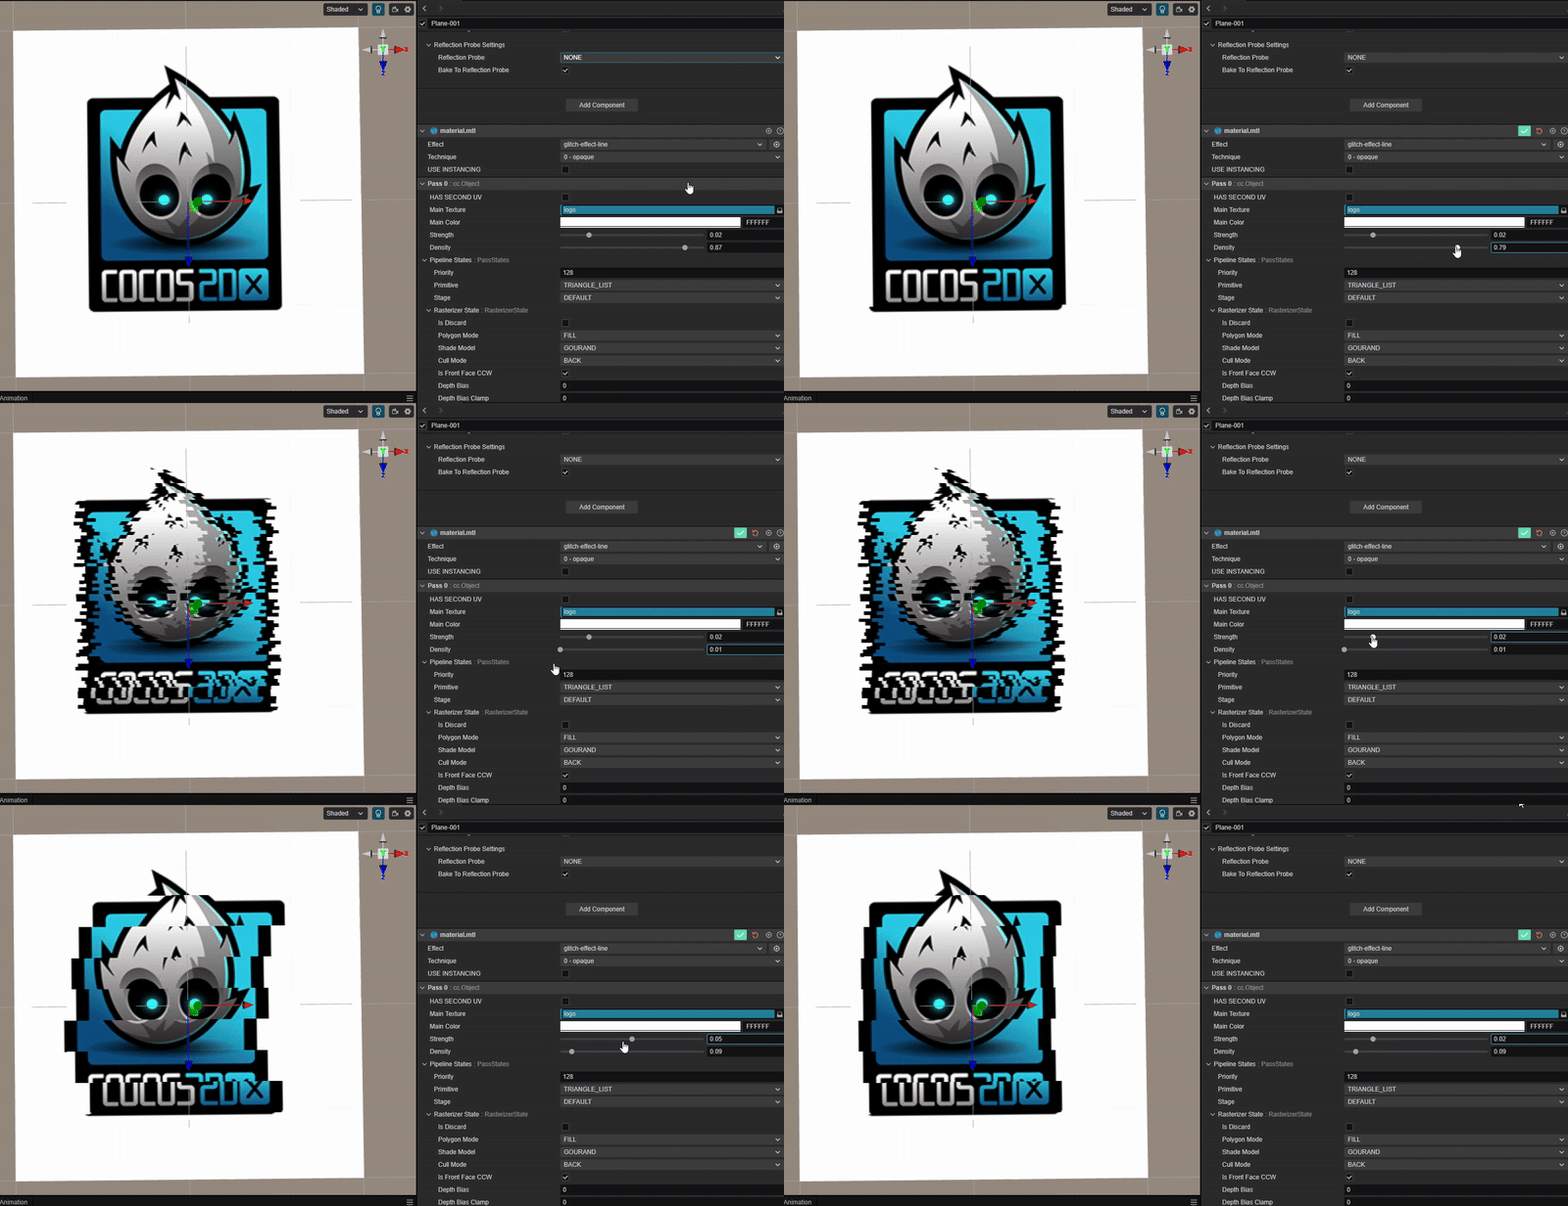
2. 核心思路:
根据 uv 按水平方向进行随机偏移。
3. Shader 代码:
-
参数:
//错位强度
strength:       { value: 0.02, editor: { slide : true, range : [0,0.1], step: 0.01 } }
//错位横条的宽度(密集程度)
density: { value: 0.01, editor: { slide : true, range : [0.01,1], step: 0.01 } }-
核心实现:
//随机数函数,可用其他实现等效替换
  float random(float coord) {
    // range [0, 1)
    float scaledValue = coord / density;
    float roundedValue = floor(scaledValue);
    float approxValue = roundedValue * density;
    return fract(sin(approxValue * 12.9898) * 43758.5453);
  }

  //可调范围的随机数函数,可用其他实现等效替换
  float randomRange(float coord, float minVal, float maxVal) {
    float rand = random(coord);
    return minVal + rand * (maxVal - minVal);
  }

  vec4 frag () {

    vec2 uv_offset = v_uv; // Offset for the UV coordinates
    // random horizontal glitch line
    uv_offset.x += randomRange(v_uv.y, -strength, strength); // Move the UV coordinates over time
    vec4 col = mainColor * texture(mainTexture, uv_offset);
    return CCFragOutput(col);
}-
扩展:可以与其他故障效果结合搭配使用。
实现马赛克图片效果
1. 功能描述:
将图片渲染成低像素下的马赛克图片(给图片打码效果)。
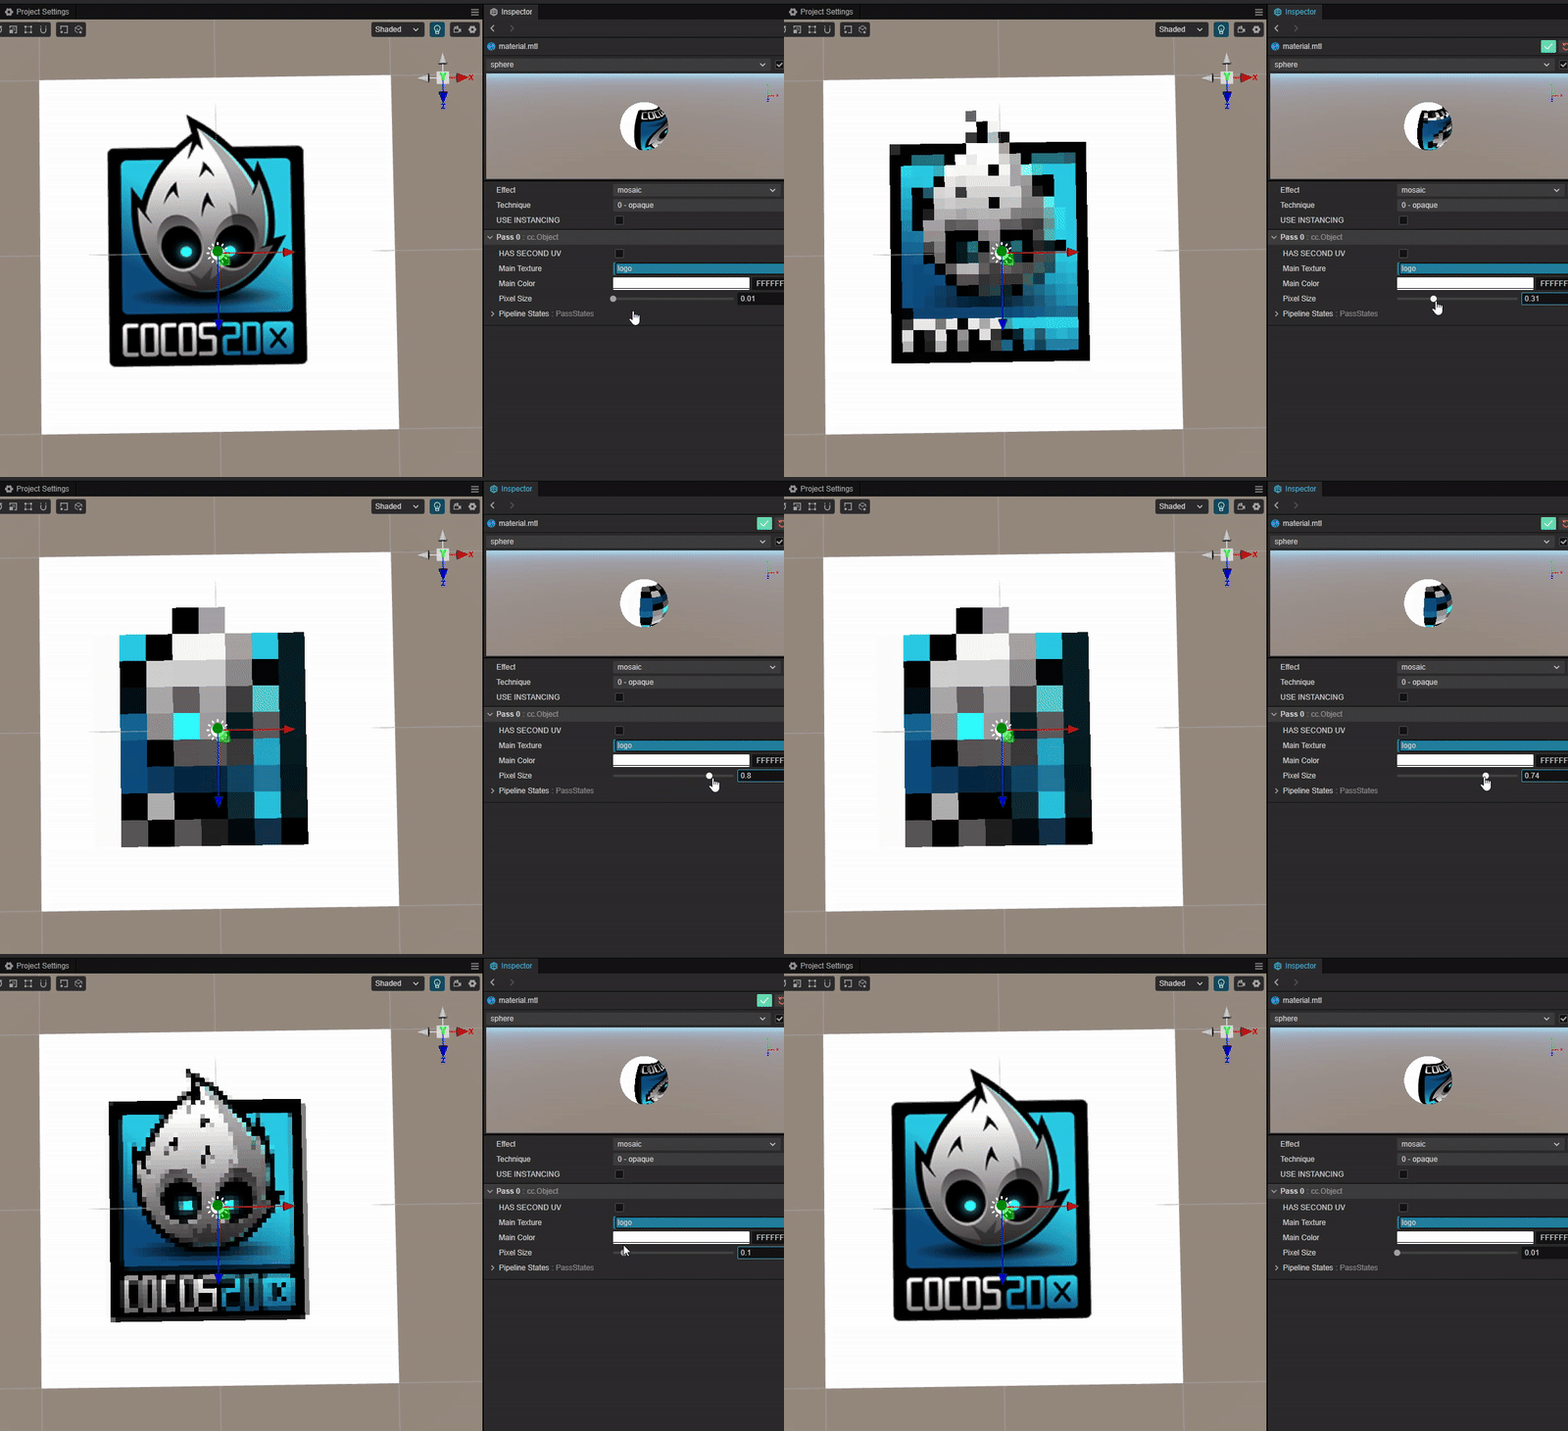
2. 核心思路:
将 uv 按照某个特定步长,进行取整操作以模拟对贴图的降采样过程。
3. Shader 代码:
-
参数:
//像素块的尺寸(越小越清晰)
pixelSize: { value: 0.5, editor: { slide : true, range : [0.01,1], step: 0.01 } }-
核心实现:
vec2 downsampling(vec2 v_uv) {

    float block_size = 0.1 * pixelSize;
    float block_x_idx = floor(v_uv.x / block_size);
    float block_y_idx = floor(v_uv.y / block_size);

    return vec2(block_size * (block_x_idx + 0.5), block_size * (block_y_idx + 0.5));
  }

  vec4 frag () {
    vec2 down_uv = downsampling(v_uv);
    vec4 col = mainColor * texture(mainTexture, down_uv);

    return CCFragOutput(col);
  }
实现吸引并融合的动态效果
1. 功能描述:
实现一个圆形与中心圆形之间相互融合吸引的动态效果。
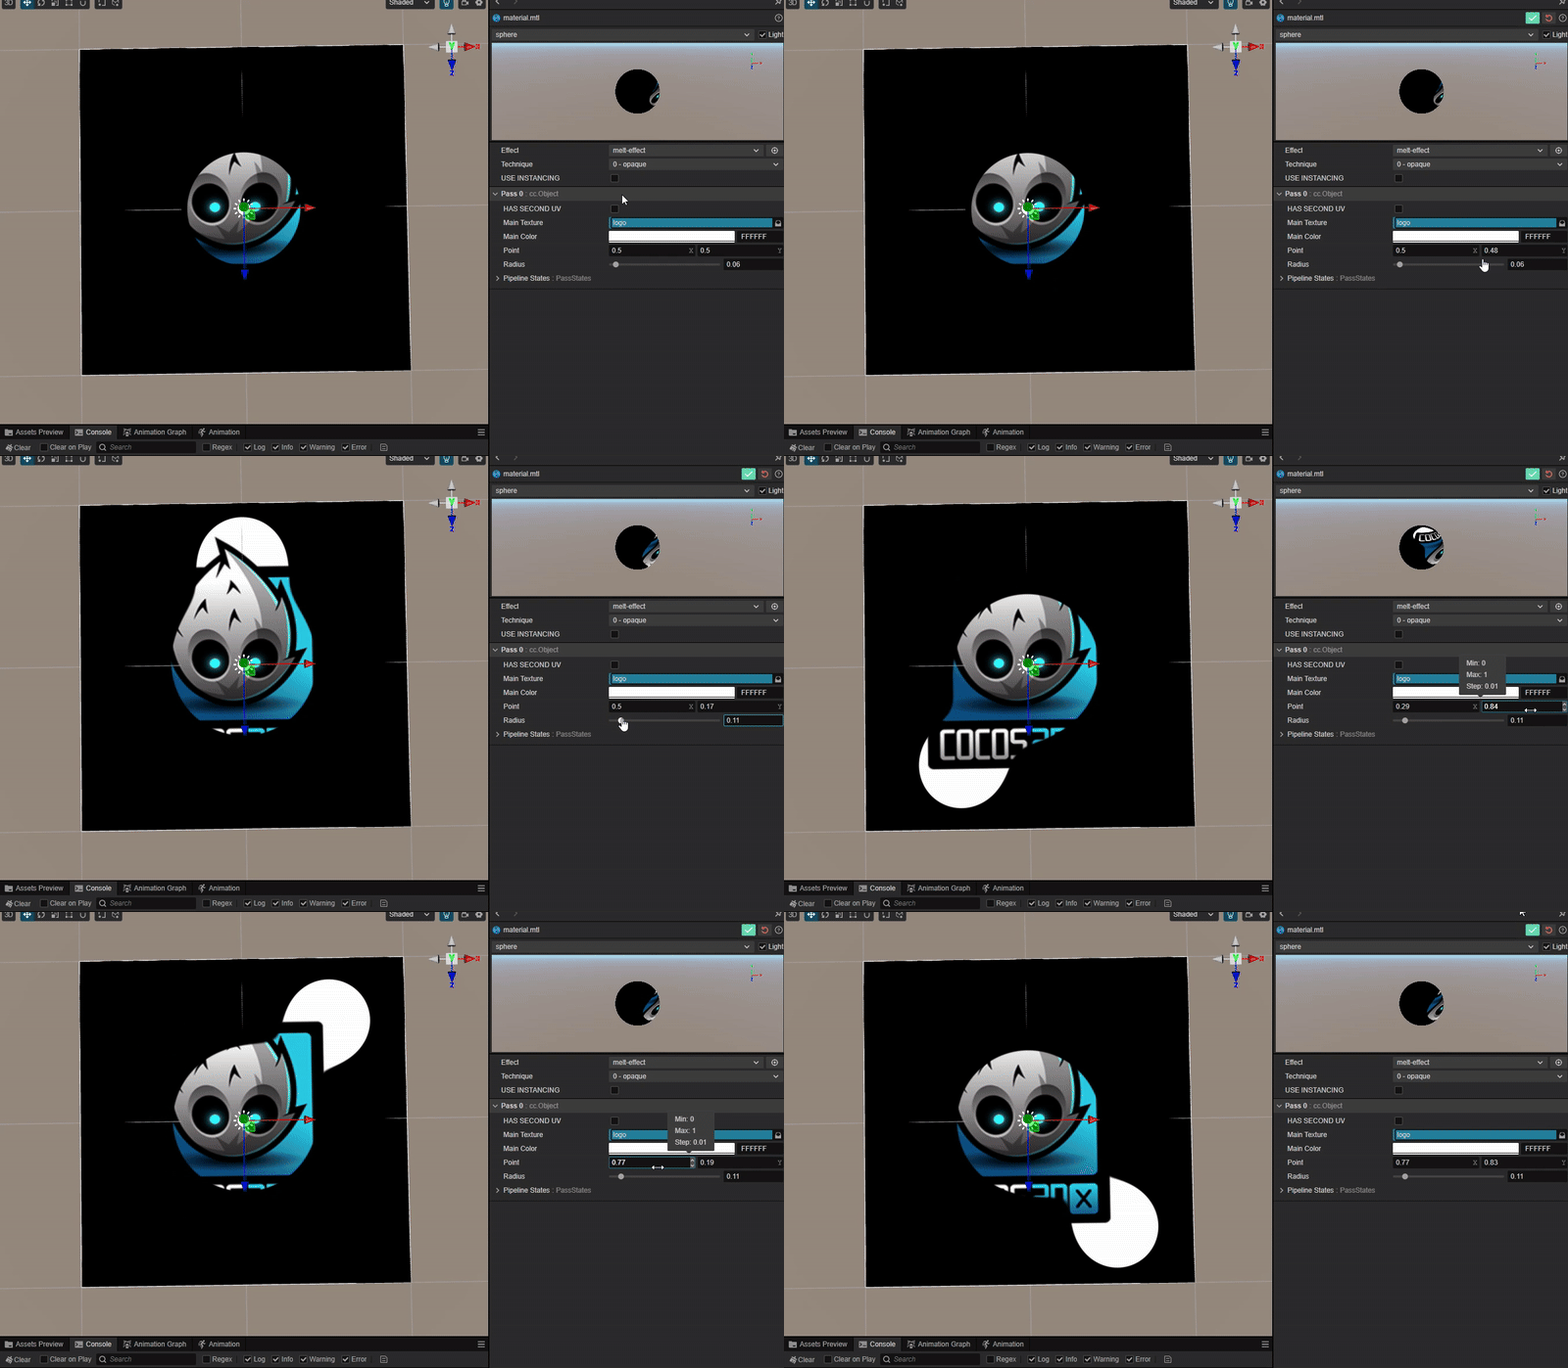
2. 核心思路:
实现效果的核心是需要设计一个函数,使得在两个圆形接近的范围内实现平滑过渡。
因此函数的参数与两个圆形的位置和半径有关。
而根据 uv 坐标可以计算每个圆围绕其圆心衰减的距离场。
因此函数可以设计为两个圆的距离场叠加获得每个点位置的距离场之和,再通过使用此数值作为阈值来控制图像的显示即可。
3. Shader 代码:
-
参数:
//移动
point:          { value: [ 0.5, 0.5 ], editor: { slide : true, range : [0,1], step: 0.01 } }
radius: { value: 0.1, editor: { slide : true, range : [0,1], step: 0.01 } }-
核心实现:
float energy(float r, vec2 p1, vec2 p2) {
    return (r * r) / ((p1.x - p2.x) * (p1.x - p2.x) + (p1.y - p2.y) * (p1.y - p2.y));
  }

  vec4 frag () {
    vec4 col = mainColor * texture(mainTexture, v_uv);
    float fragEnergy = energy(radius + 0.1, v_uv.xy, vec2(0.5)) + energy(radius, v_uv.xy, point);
    col.rgb = mix(vec3(0.0),col.rgb,smoothstep(0.95, 1.0, fragEnergy));
    return CCFragOutput(col);
}-
扩展:类似于动态计算 SDF,还可以设计出其他更有趣的效果。
实现根据视差切换贴图效果
1. 功能描述:
根据相机看向平面的视差,来显示不同的贴图。
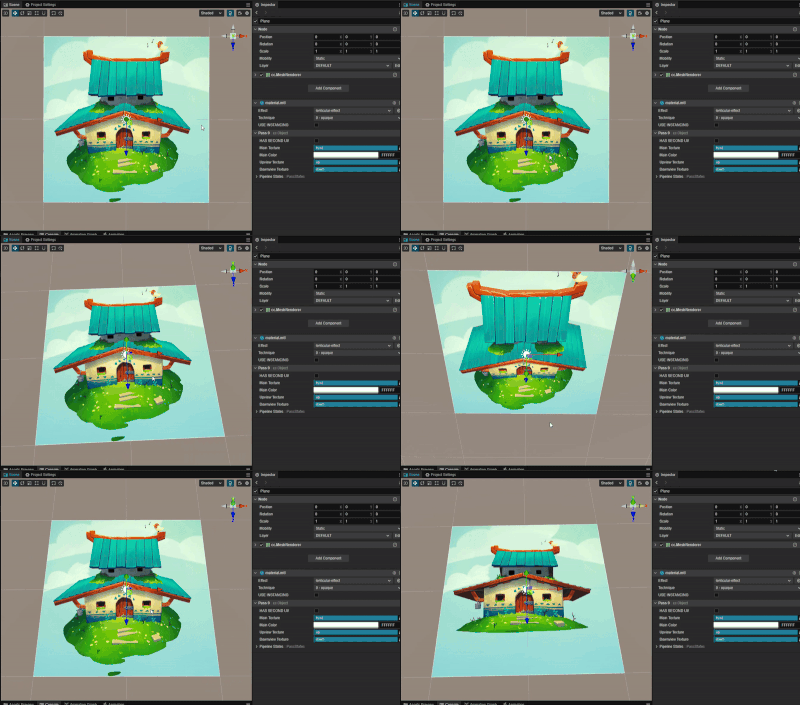
2. 核心思路:
根据相机位置与平面中心点位置计算平面中心的观察向量,再根据平面上的法方向来求解当前的视差夹角。
利用向量投影公式,容易求算出当前的大致观察位置,再根据观察位置来采样不同的贴图。
3. Shader 代码:
-
参数:
//主视角贴图
mainTexture:    { value: white }
//俯视视角贴图
upviewTexture: { value: white }
//仰视视角贴图
downviewTexture: { value: white }
mainColor: { value: [1, 1, 1, 1], editor: { type: color } }-
核心实现:
vec4 frag () {
    //获取视点到平面中心的向量
    vec3 viewDir = -normalize(vec3(0) - cc_cameraPos.xyz);
    float dotPrd = dot(viewDir, v_normal);

    //计算视点到平面中心的向量与法线的投影
    vec3 viewPrj = normalize(viewDir - v_normal * dotPrd);
    vec4 col = mainColor;

    //根据投影的方向选择不同的纹理进行采样
    if(dotPrd < 0.9){
      col *= viewPrj.z < 0.0 ? texture(upviewTexture, v_uv) : texture(downviewTexture, v_uv);
    }else{
      col *= texture(mainTexture, v_uv);
    }
    return CCFragOutput(col);
}-
扩展:可以根据此原理制作 3D 卡片效果,以及简单的空间视差效果。
实现动态蒙版效果
1. 功能描述:
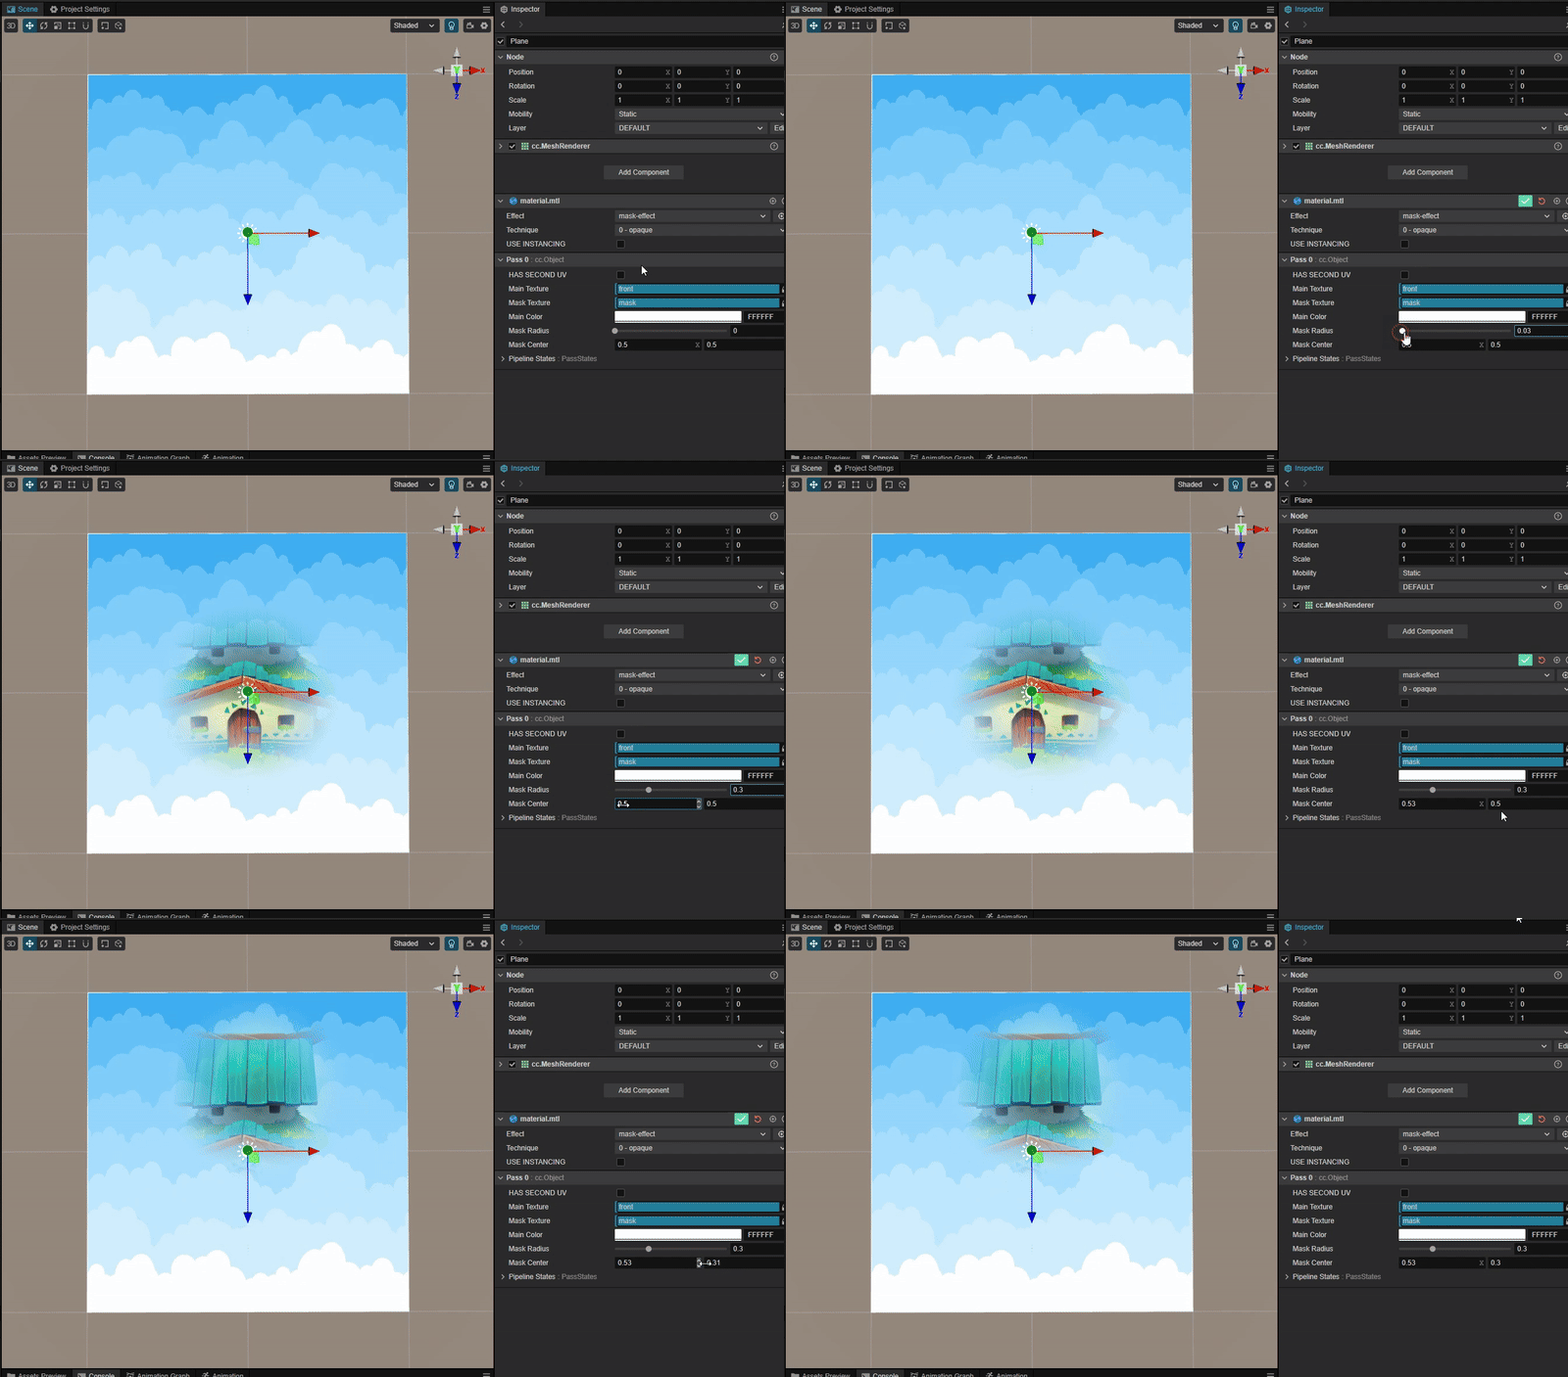
将指定位置的蒙版区域显示为图层像素。在手电筒,地图探索等功能中比较常见。效果:
2. 核心思路:
使用 mix 函数与 smooth 函数混合主贴图与蒙版贴图,实现平滑过渡的效果。
3. Shader 代码:
-
参数:
//主贴图
mainTexture:    { value: white }
//蒙版贴图
maskTexture:   { value: black }
mainColor:       { value: [1, 1, 1, 1], editor: { type: color } }
//蒙版半径
maskRadius:    { value: 0.1, editor: { slide : true, range : [0,1], step: 0.01 } }
//蒙版中心位置
maskCenter: { value: [ 0.5, 0.5 ], editor: { slide : true, range : [0,1], step: 0.01 } }-
核心实现:
vec4 frag () {
    //分别采样主纹理和遮罩纹理
    vec4 col = mainColor * texture(mainTexture, v_uv);
    vec4 maskCol = texture(maskTexture, v_uv);
    //计算遮罩纹理的颜色值
    col.rgb = mix(col.rgb,maskCol.rgb,smoothstep(0.0, 1.0, distance(v_uv.xy, maskCenter)/maskRadius));
    return CCFragOutput(col);
  }
实现动态屏幕像素点
1. 功能描述:
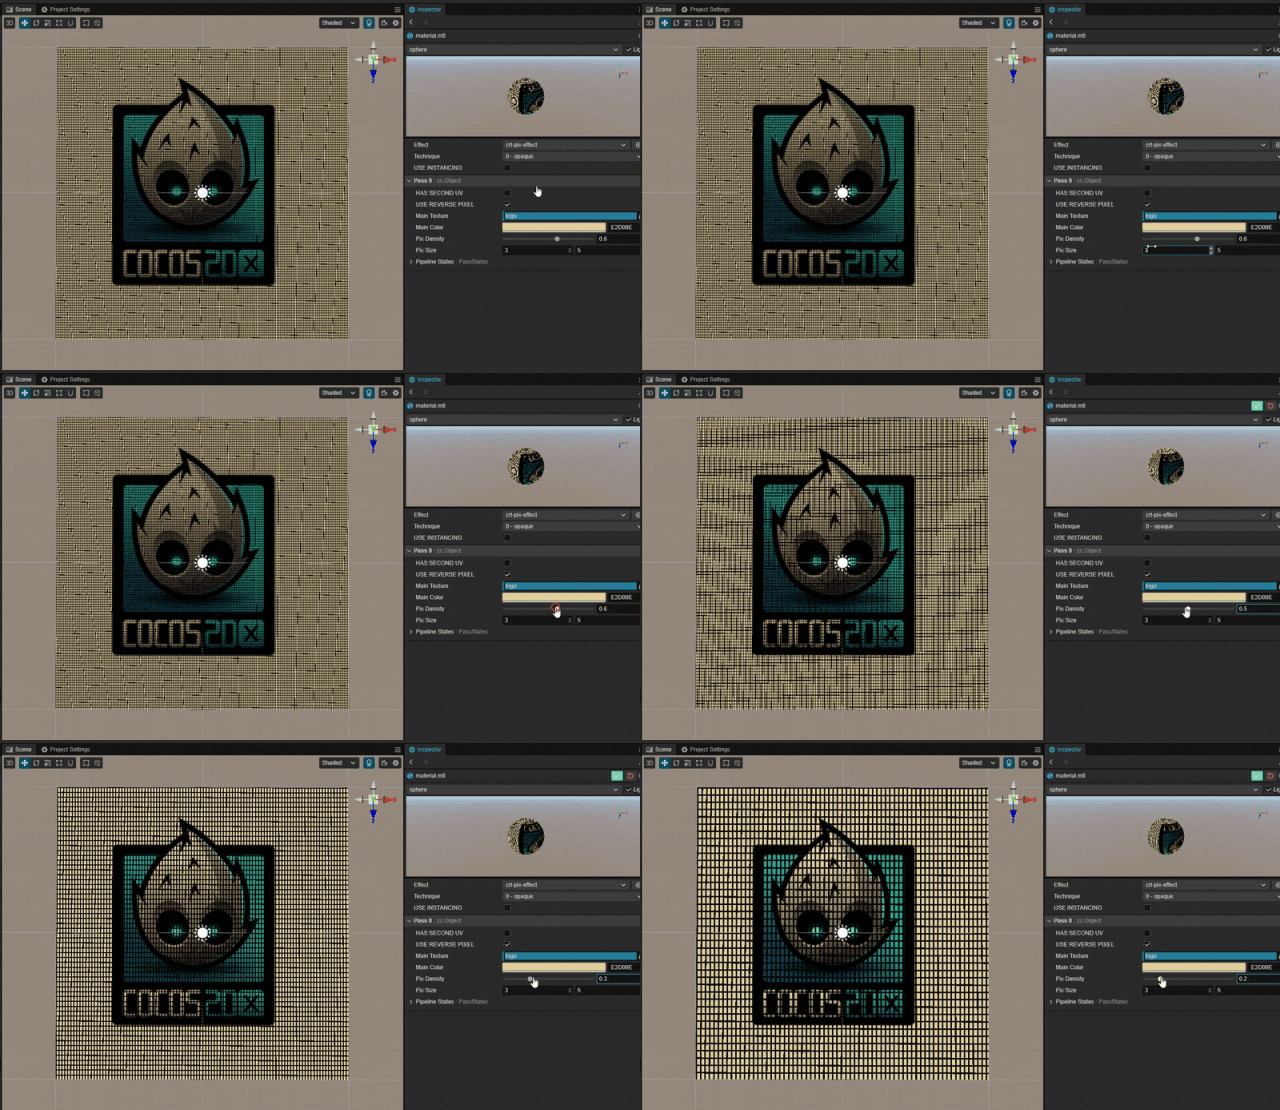
在游戏中有时会需要模拟类似老式 CRT 电视机像素点的效果。
可以利用噪声贴图直接添加像素点,但这里并未使用噪声贴图,而采用直接在 Shader 中周期绘制像素点的方法实现。
2. 核心思路:
利用周期函数,绘制网格或者点状 pattern 呈现像素噪点的效果。
3. Shader 代码:
-
参数:
mainTexture:    { value: white }
mainColor:      { value: [1, 1, 1, 1], editor: { type: color } }
//像素密度
pixDensity:     { value: 0.1, editor: { slide : true, range : [0,1], step: 0.1 } }
//像素尺寸,可以分别调节宽高
pixSize: { value: [3.0,5.0], editor: { slide : true, range : [2.0,10.0], step: 1.0 } }-
核心实现:
int modInt(float x, float repetitve, float factor) {
    float scalex = factor * x * 1000.0;
    return int(scalex) - int(repetitve * floor(scalex / repetitve));
  }

  vec4 frag () {
    //通过放缩取模的方式获取周期性,当然也可以使用更高效的周期函数
    int modx = modInt(v_uv.x, pixSize.x, pixDensity);
    int mody = modInt(v_uv.y, pixSize.y, pixDensity);

//使用宏控制是绘制网格还是绘制点
#if USE_REVERSE_PIXEL
    vec4 col = mody == 0 || modx == 0 ? vec4(0.0,0.0,0.0,1.0) : mainColor * texture(mainTexture, v_uv);
#else
    vec4 col = mody == 0 || modx == 0 ? mainColor * texture(mainTexture, v_uv) : vec4(0.0,0.0,0.0,1.0);
#endif

    return CCFragOutput(col);
}-
问题:
当 pattern 密集时,渲染会出现摩尔纹,有时对效果而言有益,而有时却有害,请酌情考虑使用,欢迎大家在评论区讨论其它实现方案。
写在最后
感谢 raven 带来的 2D Shader 教程合集,需要源码的朋友,可以点击【阅读原文】。
如果你觉得这些内容对你有帮助,别忘了点赞、评论、转发。
最后,欢迎关注 Cocos 公众号,获取更多干货和教程!

DAMO开发者矩阵,由阿里巴巴达摩院和中国互联网协会联合发起,致力于探讨最前沿的技术趋势与应用成果,搭建高质量的交流与分享平台,推动技术创新与产业应用链接,围绕“人工智能与新型计算”构建开放共享的开发者生态。
更多推荐
 已为社区贡献4条内容


所有评论(0)