ROS个人学习记录(跟随教程【Autolabor初级教程】ROS机器人入门:https://www.bilibili.com/video/BV1Ci4y1L7ZZ?p=1)
参考文档:http://www.autolabor.com.cn/book/ROSTutorials/index.html
1.5 ROS架构
1.5.1ROS文件系统
ROS文件系统级指的是在硬盘上ROS源代码的组织形式,其结构大致可以如下图所示:
WorkSpace --- 自定义的工作空间

|--- build:编译空间,用于存放CMake和catkin的缓存信息、配置信息和其他中间文件。

|--- devel:开发空间,用于存放编译后生成的目标文件,包括头文件、动态&静态链接库、可执行文件等。

|--- src: 源码

    |-- package:功能包(ROS基本单元)包含多个节点、库与配置文件,包名所有字母小写,只能由字母、数字与下划线组成

        |-- CMakeLists.txt 配置编译规则,比如源文件、依赖项、目标文件

        |-- package.xml 包信息,比如:包名、版本、作者、依赖项...(以前版本是 manifest.xml)

        |-- scripts 存储python文件

        |-- src 存储C++源文件

        |-- include 头文件

        |-- msg 消息通信格式文件

        |-- srv 服务通信格式文件

        |-- action 动作格式文件

        |-- launch 可一次性运行多个节点

        |-- config 配置信息

    |-- CMakeLists.txt: 编译的基本配置
1.package.xml
该文件定义有关软件包的属性,例如软件包名称,版本号,作者,维护者以及对其他catkin软件包的依赖性。请注意,该概念类似于旧版 rosbuild 构建系统中使用的manifest.xml文件。
下面是我之前包名里的package.xml
<?xml version="1.0"?>
<package format="2">
  <name>hello_vscode</name>		//包名
  <version>0.0.0</version>		//版本
  <description>The hello_vscode package</description>

  <!-- One maintainer tag required, multiple allowed, one person per tag -->
  <!-- Example:  -->
  <!-- <maintainer email="jane.doe@example.com">Jane Doe</maintainer> -->
  <maintainer email="ether@todo.todo">ether</maintainer>	//作者


  <!-- One license tag required, multiple allowed, one license per tag -->
  <!-- Commonly used license strings: -->
  <!--   BSD, MIT, Boost Software License, GPLv2, GPLv3, LGPLv2.1, LGPLv3 -->
  <license>TODO</license>


  <!-- Url tags are optional, but multiple are allowed, one per tag -->
  <!-- Optional attribute type can be: website, bugtracker, or repository -->
  <!-- Example: -->
  <!-- <url type="website">http://wiki.ros.org/hello_vscode</url> -->


  <!-- Author tags are optional, multiple are allowed, one per tag -->
  <!-- Authors do not have to be maintainers, but could be -->
  <!-- Example: -->
  <!-- <author email="jane.doe@example.com">Jane Doe</author> -->


  <!-- The *depend tags are used to specify dependencies -->
  <!-- Dependencies can be catkin packages or system dependencies -->
  <!-- Examples: -->
  <!-- Use depend as a shortcut for packages that are both build and exec dependencies -->
  <!--   <depend>roscpp</depend> -->
  <!--   Note that this is equivalent to the following: -->
  <!--   <build_depend>roscpp</build_depend> -->
  <!--   <exec_depend>roscpp</exec_depend> -->
  <!-- Use build_depend for packages you need at compile time: -->
  <!--   <build_depend>message_generation</build_depend> -->
  <!-- Use build_export_depend for packages you need in order to build against this package: -->
  <!--   <build_export_depend>message_generation</build_export_depend> -->
  <!-- Use buildtool_depend for build tool packages: -->
  <!--   <buildtool_depend>catkin</buildtool_depend> -->
  <!-- Use exec_depend for packages you need at runtime: -->
  <!--   <exec_depend>message_runtime</exec_depend> -->
  <!-- Use test_depend for packages you need only for testing: -->
  <!--   <test_depend>gtest</test_depend> -->
  <!-- Use doc_depend for packages you need only for building documentation: -->
  <!--   <doc_depend>doxygen</doc_depend> -->
  <buildtool_depend>catkin</buildtool_depend>	//用catkin编译
  <build_depend>roscpp</build_depend>			//建立依赖,创建工作包时的三个依赖项
  <build_depend>rospy</build_depend>
  <build_depend>std_msgs</build_depend>
  <build_export_depend>roscpp</build_export_depend>	//导出依赖
  <build_export_depend>rospy</build_export_depend>
  <build_export_depend>std_msgs</build_export_depend>
  <exec_depend>roscpp</exec_depend>					//执行依赖
  <exec_depend>rospy</exec_depend>
  <exec_depend>std_msgs</exec_depend>


  <!-- The export tag contains other, unspecified, tags -->
  <export>
    <!-- Other tools can request additional information be placed here -->

  </export>
</package>
2.CMakelists.txt
文件CMakeLists.txt是CMake构建系统的输入,用于构建软件包。任何兼容CMake的软件包都包含一个或多个CMakeLists.txt文件,这些文件描述了如何构建代码以及将代码安装到何处。
cmake_minimum_required(VERSION 3.0.2)
project(hello_vscode)	//工作包名

## Compile as C++11, supported in ROS Kinetic and newer
# add_compile_options(-std=c++11)

## Find catkin macros and libraries
## if COMPONENTS list like find_package(catkin REQUIRED COMPONENTS xyz)
## is used, also find other catkin packages
find_package(catkin REQUIRED COMPONENTS
  roscpp  //编译时依赖这三个外部包实现
  rospy
  std_msgs
)

## System dependencies are found with CMake's conventions
# find_package(Boost REQUIRED COMPONENTS system)


## Uncomment this if the package has a setup.py. This macro ensures
## modules and global scripts declared therein get installed
## See http://ros.org/doc/api/catkin/html/user_guide/setup_dot_py.html
# catkin_python_setup()

################################################
## Declare ROS messages, services and actions ##
################################################

## To declare and build messages, services or actions from within this
## package, follow these steps:
## * Let MSG_DEP_SET be the set of packages whose message types you use in
##   your messages/services/actions (e.g. std_msgs, actionlib_msgs, ...).
## * In the file package.xml:
##   * add a build_depend tag for "message_generation"
##   * add a build_depend and a exec_depend tag for each package in MSG_DEP_SET
##   * If MSG_DEP_SET isn't empty the following dependency has been pulled in
##     but can be declared for certainty nonetheless:
##     * add a exec_depend tag for "message_runtime"
## * In this file (CMakeLists.txt):
##   * add "message_generation" and every package in MSG_DEP_SET to
##     find_package(catkin REQUIRED COMPONENTS ...)
##   * add "message_runtime" and every package in MSG_DEP_SET to
##     catkin_package(CATKIN_DEPENDS ...)
##   * uncomment the add_*_files sections below as needed
##     and list every .msg/.srv/.action file to be processed
##   * uncomment the generate_messages entry below
##   * add every package in MSG_DEP_SET to generate_messages(DEPENDENCIES ...)

## Generate messages in the 'msg' folder
# add_message_files(
#   FILES
#   Message1.msg
#   Message2.msg
# )

## Generate services in the 'srv' folder
# add_service_files(
#   FILES
#   Service1.srv
#   Service2.srv
# )

## Generate actions in the 'action' folder
# add_action_files(
#   FILES
#   Action1.action
#   Action2.action
# )

## Generate added messages and services with any dependencies listed here
# generate_messages(
#   DEPENDENCIES
#   std_msgs
# )

################################################
## Declare ROS dynamic reconfigure parameters ##
################################################

## To declare and build dynamic reconfigure parameters within this
## package, follow these steps:
## * In the file package.xml:
##   * add a build_depend and a exec_depend tag for "dynamic_reconfigure"
## * In this file (CMakeLists.txt):
##   * add "dynamic_reconfigure" to
##     find_package(catkin REQUIRED COMPONENTS ...)
##   * uncomment the "generate_dynamic_reconfigure_options" section below
##     and list every .cfg file to be processed

## Generate dynamic reconfigure parameters in the 'cfg' folder
# generate_dynamic_reconfigure_options(
#   cfg/DynReconf1.cfg
#   cfg/DynReconf2.cfg
# )

###################################
## catkin specific configuration ##
###################################
## The catkin_package macro generates cmake config files for your package
## Declare things to be passed to dependent projects
## INCLUDE_DIRS: uncomment this if your package contains header files
## LIBRARIES: libraries you create in this project that dependent projects also need
## CATKIN_DEPENDS: catkin_packages dependent projects also need
## DEPENDS: system dependencies of this project that dependent projects also need
catkin_package(
#  INCLUDE_DIRS include
#  LIBRARIES hello_vscode
#  CATKIN_DEPENDS roscpp rospy std_msgs
#  DEPENDS system_lib
)

###########
## Build ##
###########

## Specify additional locations of header files
## Your package locations should be listed before other locations
include_directories(
# include
  ${catkin_INCLUDE_DIRS}
)

## Declare a C++ library
# add_library(${PROJECT_NAME}
#   src/${PROJECT_NAME}/hello_vscode.cpp
# )

## Add cmake target dependencies of the library
## as an example, code may need to be generated before libraries
## either from message generation or dynamic reconfigure
# add_dependencies(${PROJECT_NAME} ${${PROJECT_NAME}_EXPORTED_TARGETS} ${catkin_EXPORTED_TARGETS})

## Declare a C++ executable
## With catkin_make all packages are built within a single CMake context
## The recommended prefix ensures that target names across packages don't collide
add_executable(hello_vscode_c src/hello_vscode_c.cpp)	//添加可执行的c++文件

## Rename C++ executable without prefix
## The above recommended prefix causes long target names, the following renames the
## target back to the shorter version for ease of user use
## e.g. "rosrun someones_pkg node" instead of "rosrun someones_pkg someones_pkg_node"
# set_target_properties(${PROJECT_NAME}_node PROPERTIES OUTPUT_NAME node PREFIX "")

## Add cmake target dependencies of the executable
## same as for the library above
# add_dependencies(${PROJECT_NAME}_node ${${PROJECT_NAME}_EXPORTED_TARGETS} ${catkin_EXPORTED_TARGETS})

## Specify libraries to link a library or executable target against
target_link_libraries(hello_vscode_c //为C++文件映射的名称
  ${catkin_LIBRARIES}
)

#############
## Install ##
#############

# all install targets should use catkin DESTINATION variables
# See http://ros.org/doc/api/catkin/html/adv_user_guide/variables.html

## Mark executable scripts (Python etc.) for installation
## in contrast to setup.py, you can choose the destination
catkin_install_python(PROGRAMS
  scripts/hello_vscode_p.py		//配置scripts目录下的python文件
  DESTINATION ${CATKIN_PACKAGE_BIN_DESTINATION}
)

## Mark executables for installation
## See http://docs.ros.org/melodic/api/catkin/html/howto/format1/building_executables.html
# install(TARGETS ${PROJECT_NAME}_node
#   RUNTIME DESTINATION ${CATKIN_PACKAGE_BIN_DESTINATION}
# )

## Mark libraries for installation
## See http://docs.ros.org/melodic/api/catkin/html/howto/format1/building_libraries.html
# install(TARGETS ${PROJECT_NAME}
#   ARCHIVE DESTINATION ${CATKIN_PACKAGE_LIB_DESTINATION}
#   LIBRARY DESTINATION ${CATKIN_PACKAGE_LIB_DESTINATION}
#   RUNTIME DESTINATION ${CATKIN_GLOBAL_BIN_DESTINATION}
# )

## Mark cpp header files for installation
# install(DIRECTORY include/${PROJECT_NAME}/
#   DESTINATION ${CATKIN_PACKAGE_INCLUDE_DESTINATION}
#   FILES_MATCHING PATTERN "*.h"
#   PATTERN ".svn" EXCLUDE
# )

## Mark other files for installation (e.g. launch and bag files, etc.)
# install(FILES
#   # myfile1
#   # myfile2
#   DESTINATION ${CATKIN_PACKAGE_SHARE_DESTINATION}
# )

#############
## Testing ##
#############

## Add gtest based cpp test target and link libraries
# catkin_add_gtest(${PROJECT_NAME}-test test/test_hello_vscode.cpp)
# if(TARGET ${PROJECT_NAME}-test)
#   target_link_libraries(${PROJECT_NAME}-test ${PROJECT_NAME})
# endif()

## Add folders to be run by python nosetests
# catkin_add_nosetests(test)
1.5.2 ROS文件系统相关命令
ROS 的文件系统本质上都还是操作系统文件,我们可以使用Linux命令来操作这些文件,不过,在ROS中为了更好的用户体验,ROS专门提供了一些类似于Linux的命令,这些命令较之于Linux原生命令,更为简介、高效。文件操作,无外乎就是增删改查与执行等操作,接下来,我们就从这五个维度,来介绍ROS文件系统的一些常用命令。
1.增(添加)
catkin_create_pkg 自定义包名 依赖包 === 创建新的ROS功能包

sudo apt install xxx === 安装 ROS功能包  (后期会频繁用到)
2.删(删除)
sudo apt purge xxx ==== 删除某个功能包 (与增相反)
3.查
rospack list === 列出所有功能包

rospack find 包名 === 查找某个功能包是否存在,如果存在返回安装路径

roscd 包名 === 进入某个功能包

rosls 包名 === 列出某个包下的文件

apt search xxx === 搜索某个功能包
4.改
rosed 包名 文件名 === 修改功能包文件<font color="red">
需要先安装 vim 在终端输入 sudo apt install vim
示例:
输入 rosed turtlesim Color.msg后出现下面页面

5.执行
5.1 roscore
roscore === 是 ROS 的系统先决条件节点和程序的集合, 必须运行 roscore 才能使 ROS 节点进行通信。
roscore 将启动:

--ros master

--ros 参数服务器

--rosout 日志节点
用法:
roscore
或(指端口号)
roscore -p xxxx
5.2rosrun
rosrun 包名 可执行文件名 === 运行指定的ROS节点
示例:
rosrun turtlesim turtlesim_node 启动小乌龟
5.3roslaunch
roslaunch 包名 launch文件名 === 执行某个包下的 launch 文件
1.5.3ROS计算图
1.计算图简介
文件运行时之前的关系
使用工具ros_graph查看节点运行情况
2.计算图安装
在终端中输入(注意替换distro,替换名为当前ROS版本,比如:kinetic、melodic、Noetic等)
$ sudo apt install ros-<distro>-rqt
示例:$ sudo apt install ros-noetic-rqt
$ sudo apt install ros-<distro>-rqt-common-plugins
示例:  $ sudo apt install ros-noetic-rqt-common-plugins
安装完后再终端中输入rosrun rqt_graph rqt_graph前面一个rqt是包,后一个是节点
只rqt_graph 也可以启动计算图
3.计算图演示
以启动小乌龟为例
在vscode环境中启动小乌龟:在先前的建立的start_turtle.launch下,在终端依次中输入
source ./devel/setuo.bash	//建立环境变量
roslaunch hello_vscode start_turtle.launch  //包名+建立的启动文件名
启动完小乌龟后在外部终端中输入
rosrun rqt_graph rqt_graph或rqt_graph

2.1 话题通信
话题通信是ROS中使用频率最高的一种通信模式,话题通信是基于发布订阅模式的,也即:一个节点发布消息,另一个节点订阅该消息。
应用场景:雷达、摄像头、GPS等传感器的采集
组成:发布方、订阅方、话题
2.1 .1 话题通信理论模型
模型包含三个角色:
ROS Master (管理者)	--管理匹配话题
Talker (发布者)
Listener (订阅者)
流程图:

按以下步骤实现:
0.Talker注册
1.Listener注册
2.ROS Master 实现信息匹配
3.Listener 向 Talker 发送请求
4.Talker 确认请求
5.Listener 与 Talker 件里连接
6.Talker 向 Listener发送消息
注意:
1.使用的协议由 RPC 和 TCP ;
2.步骤0和步骤1没有顺序关系;
3.talker 和 listener 都可以存在多个;
4.talker 和 listener 建立连接后, master 就可以关闭了;
5.上述流程已经封装了,以后直接调用即可。
话题通信应用时的关注点:
0.大部分实现已经被封装了
1.话题设置
2.关注发布者实现
3.关注订阅者实现
4.关注消息载体
2.1 .2 话题通信基本操作A(C++)
需求:
编写发布订阅实现,要求发布方以10HZ(每秒10次)的频率
发布文本消息,订阅方订阅消息并将消息内容打印输出。
分析:
在模型实现中,ROS master 不需要实现,而连接的建立也已经被封装了,需要关注的关键点有三个:
发布方
接收方
数据(此处为普通文本)
流程:
1.编写发布方实现;
2.编写订阅方实现;
3.编辑配置文件;
4.编译并执行。
新建一个工作空间demo03_ws

输入code .进入vscode,在src目录新建一个功能包,点击Create Catkin Package

建立包名

导入依赖包

在scr目录上新 建一个C++文件

1、发布方实现
代码示例:
#include "ros/ros.h"
#include "std_msgs/String.h"
/*
    发布方实现:
        1.包含头文件;
          ROS中文本类型 ---> std_msgs/String.h
        2.初始化 ROS 节点;
        3.创建节点句柄;
        4.创建发布者对象;
        5.编写发布逻辑并发布数据;
*/

int main(int argc, char *argv[])
{
    // 2.初始化 ROS 节点
    ros::init(argc,argv,"erGouZi");
    // 3.创建节点句柄;
    ros::NodeHandle nh;
    // 4.创建发布者对象;
    ros::Publisher pub = nh.advertise<std_msgs::String>("fang",10); //缓存个数为10
    // 5.编写发布逻辑并发布数据;
    //先创建被发布的消息
    std_msgs::String msg;
    //编写循环,循环中发布数据
    while (ros::ok())
    {
        msg.data = "hello";
        pub.publish(msg);
    }

    return 0;
}
编写完代码后修改CmakeLists.txt文件中的映射名和源文件名

在修改指向文件名为映射文件名

修改完后编译运行一下

编译完成后打开终端

水平分割另起一个终端输入rostopic echo +建立的话题名称
打印发布者发布的话题数据:rostopic echo 话题名称

回车后输出结果为:

hello为fang这个话题下发布者发出的消息
代码修改(输出结果从1开始)
#include "ros/ros.h"
#include "std_msgs/String.h"
#include <sstream>
/*
    发布方实现:
        1.包含头文件;
          ROS中文本类型 ---> std_msgs/String.h
        2.初始化 ROS 节点;
        3.创建节点句柄;
        4.创建发布者对象;
        5.编写发布逻辑并发布数据;
*/

int main(int argc, char *argv[])
{
    setlocale(LC_ALL,"");   //防止中文乱码
    // 2.初始化 ROS 节点
    ros::init(argc,argv,"erGouZi");
    // 3.创建节点句柄;
    ros::NodeHandle nh;
    // 4.创建发布者对象;
    ros::Publisher pub = nh.advertise<std_msgs::String>("fang",10); //缓存个数为10
    // 5.编写发布逻辑并发布数据;
    //先创建被发布的消息
    std_msgs::String msg;
    //发布频率
    ros::Rate rate(10);
    //设置编号
    int count = 0;
    //编写循环,循环中发布数据
    while (ros::ok())
    {
        count++;
        //实现字符串拼接数字
        std::stringstream ss;
        ss << "hello ---> " << count;   //发布的数据内容
        //msg.data = "hello";
        msg.data = ss.str();    //订阅发布的数据内容
        pub.publish(msg);
        //添加日志:
        ROS_INFO("发布的数据是:%S",ss.str().c_str());
        rate.sleep();
    }

    return 0;
}
运行结果:

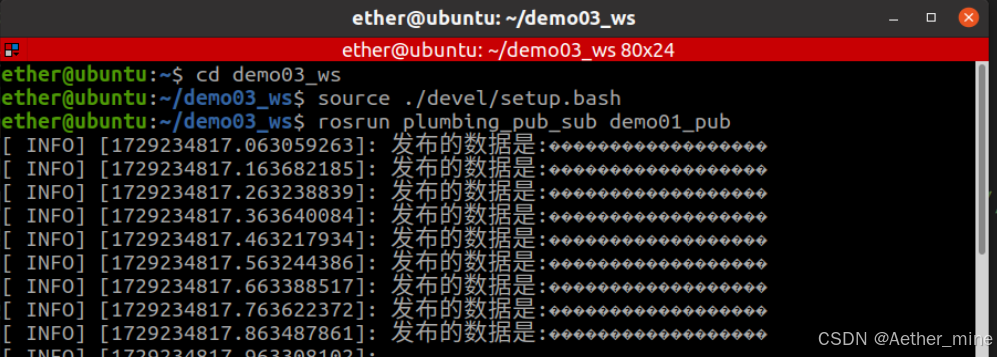
乱码了(发布的数据后面应该是从1开始一直加的数字)
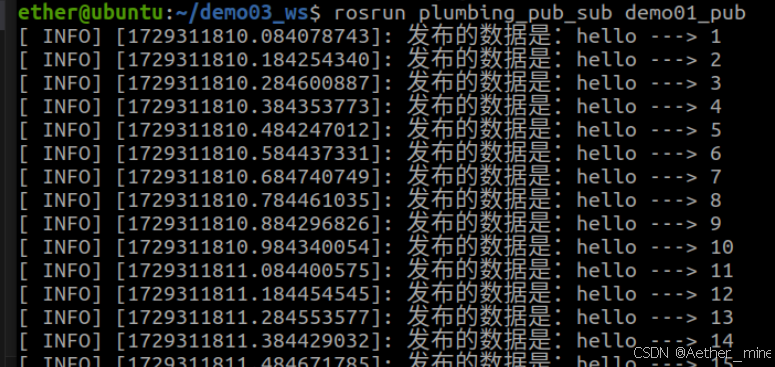
问题解决:%后面的是小写的s
// ROS_INFO("发布的数据是:%S",ss.str().c_str());
        ROS_INFO("发布的数据是:%s",ss.str().c_str());
订阅发布的数据:
rostopic echo +话题名称
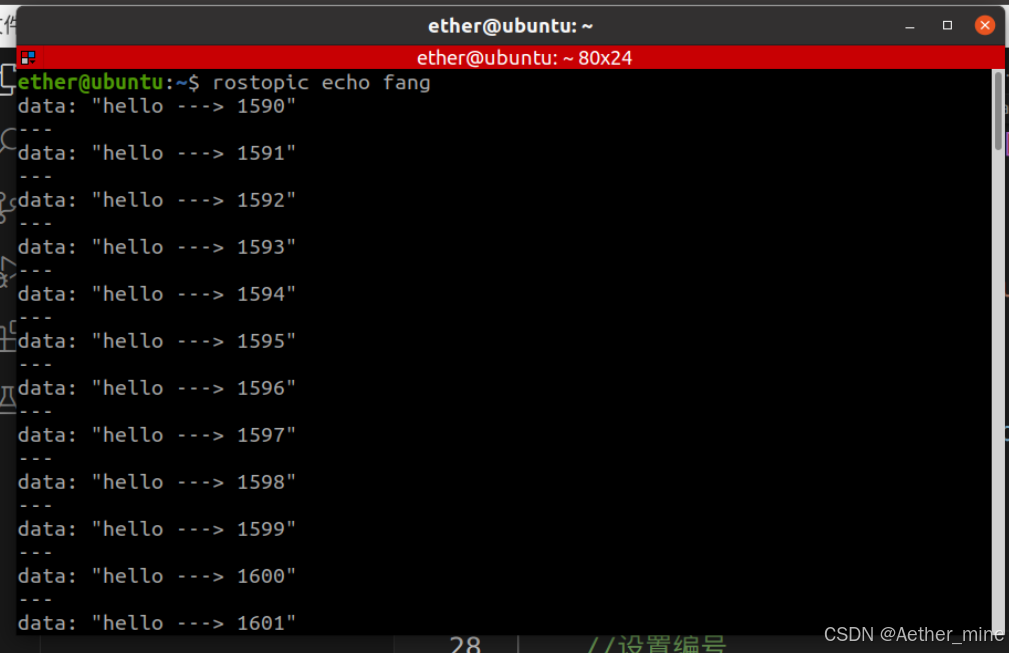
tips:在同一个终端中运行后,再次运行同一个命令,可以按键盘方向键上键,自动输入上一个命令
2、订阅方实现
在src文件下新建一个demo02_sub.cpp
新建程序demo02_sub.cpp
代码示例:
#include "ros/ros.h"
#include "std_msgs/String.h"

/*
    订阅方实现:
        1.包含头文件;
          ROS中文本类型 ---> std_msgs/String.h
        2.初始化 ROS 节点;
        3.创建节点句柄;
        4.创建订阅者对象;
        5.处理订阅到的数据;
*/


void doMsg(const std_msgs::String::ConstPtr &msg){
    //通过msg获取并操作订阅的数据
    ROS_INFO("翠花订阅的数据:%s",msg->data.c_str());
}

int main(int argc, char *argv[])
{
    // 2.初始化 ROS 节点;
    ros::init(argc,argv,"cuiHua");  //节点名称必须具有唯一性
    //     3.创建节点句柄;
    ros::NodeHandle nh;
    //     4.创建订阅者对象;
    ros::Subscriber sub = nh.subscribe("fang",10,doMsg);
    //     5.处理订阅到的数据;

    ros::spin();


    return 0;
}
CMakeLists.txt文件增加执行包名、添加映射文件名

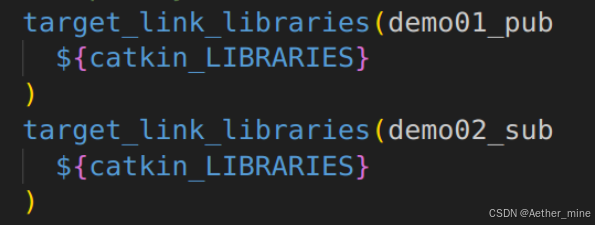
新建外部终端启动roscore
再另起两个终端:
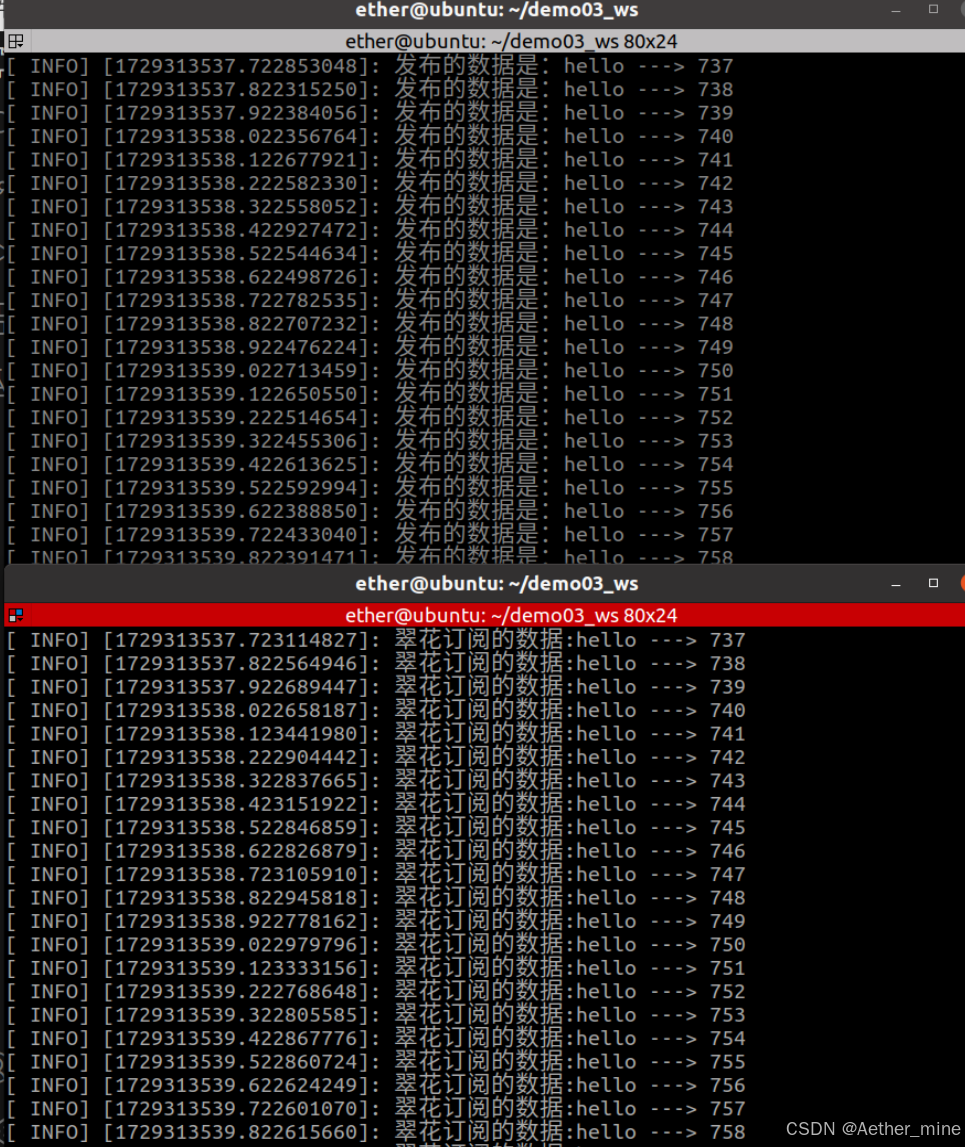
先启动节点一(pub):rosrun plumbing_pub_sub demo01_pub
在启动节点二(sub):rosrun plumbing_pub_sub demo02_sub
启动节点前不要忘记环境变量
运行结果:
3、注意事项:
1.vscode 中的 main 函数 声明 int main(int argc, char const *argv[]){},
默认生成 argv 被 const 修饰,需要去除该修饰符
2.ros/ros.h No such file or directory .....
检查 CMakeList.txt find_package 出现重复,删除重复的即可
3.find_package 不添加一些包,也可以运行
(之前创建的工程包已经添加过依 赖了)
创建Create Catkin Package 时缺少添加依赖
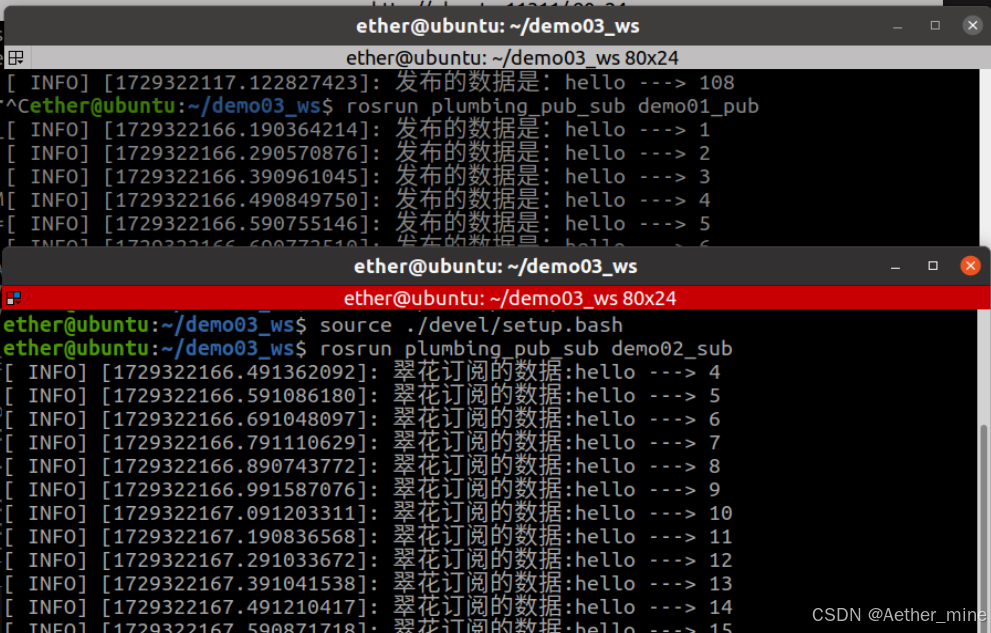
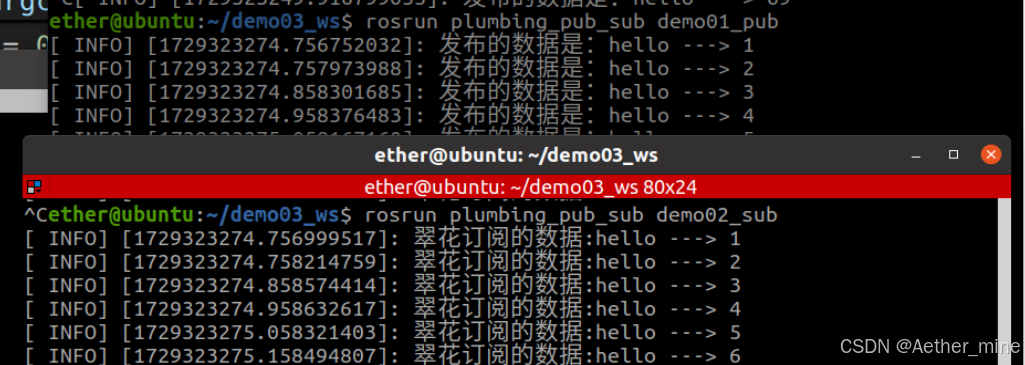
4.订阅时,第一条数据丢失(先订阅,再发布)
原因: 发送第一条数据时, publisher 还未在 roscore 注册完毕
解决: 注册后,加入休眠 ros::Duration(3.0).sleep(); 延迟第一条数据的发送
    	ros::Duration(3).sleep();
回调函数(类似单片机的中断服务函数)
等待外部信息过来后再执行
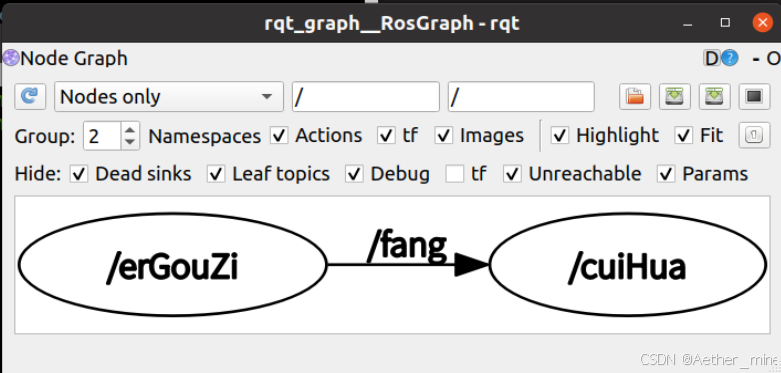
4、计算图查看C++发布订阅模型
rosrun rqt_graph rqt_graph或rqt_graph
2.1 .3 话题通信基本操作B(Python)
在功能包下新建scripts文件夹,然后再新建的文件夹下建立python文件,demo01_pub_p.py
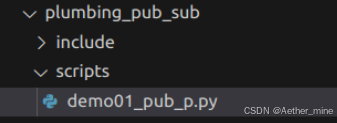
python实现消息发布时不需要创建句柄
1、发布方实现
代码示例:
#! /usr/bin python

import rospy
from std_msgs.msg import String #发布的消息类型

"""
    使用 python 实现消息发布
        1.导包;
        2.初始化 ros 节点;
        3.创建发布者对象;
        4.代表发布逻辑并发布数据;
"""


if __name__ == "__main__":

    # 2.初始化 ros 节点;
    rospy.init_node("sanDai")   #传入节点名称
    # 3.创建发布者对象;
    pub = rospy.Publisher("che",String,queue_size=10)   #话题名、发布消息的类型、堆叠程度
    # 4.代表发布逻辑并发布数据;
    # 创建数据
    msg = String()
    # 使用循环发布数据
    while not rospy.is_shutdown():
        msg.data = "hello"
    # 发布数据
        pub.publish(msg)
    pass
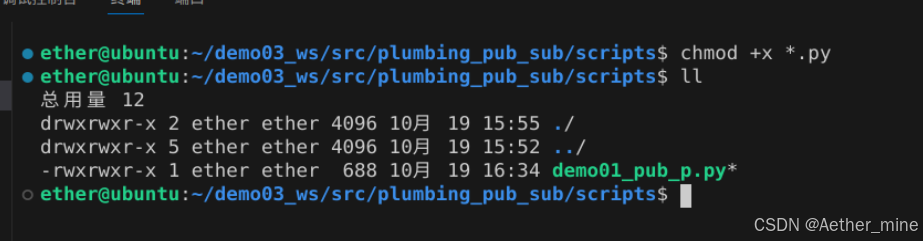
为python文件添加可执行权限
在scripts文件鼠标光标右键点击在集成终端中打开
在终端中输入:
chmod +x *.py
ll
修改CMakeLists.txt文件中的节点名称

编译运行
输入以下命令运行

在另外一个终端输入
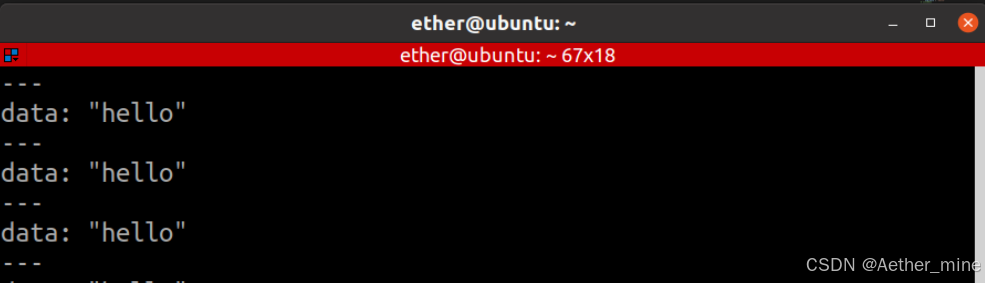
rostopic echo +话题名
查看发布方发布的数据
rostopic echo che
代码完善要求:以固定频率发布、发布消息增加一个编号
#! /usr/bin python

import rospy
from std_msgs.msg import String #发布的消息类型

"""
    使用 python 实现消息发布
        1.导包;
        2.初始化 ros 节点;
        3.创建发布者对象;
        4.代表发布逻辑并发布数据;
"""


if __name__ == "__main__":

    # 2.初始化 ros 节点;
    rospy.init_node("sanDai")   #传入节点名称
    # 3.创建发布者对象;
    pub = rospy.Publisher("che",String,queue_size=10)   #话题名、发布消息的类型、堆叠程度
    # 4.代表发布逻辑并发布数据;
    # 创建数据
    msg = String()
    #指定发布频率
    rate = rospy.Rate(1)
    #设置计数器
    count = 0
    # 使用循环发布数据
    while not rospy.is_shutdown():
        count += 1
        msg.data = "hello" + str(count)
    # 发布数据
        pub.publish(msg)
        rospy.loginfo("发布的数据:%s",msg.data)
        rate.sleep()

    pass
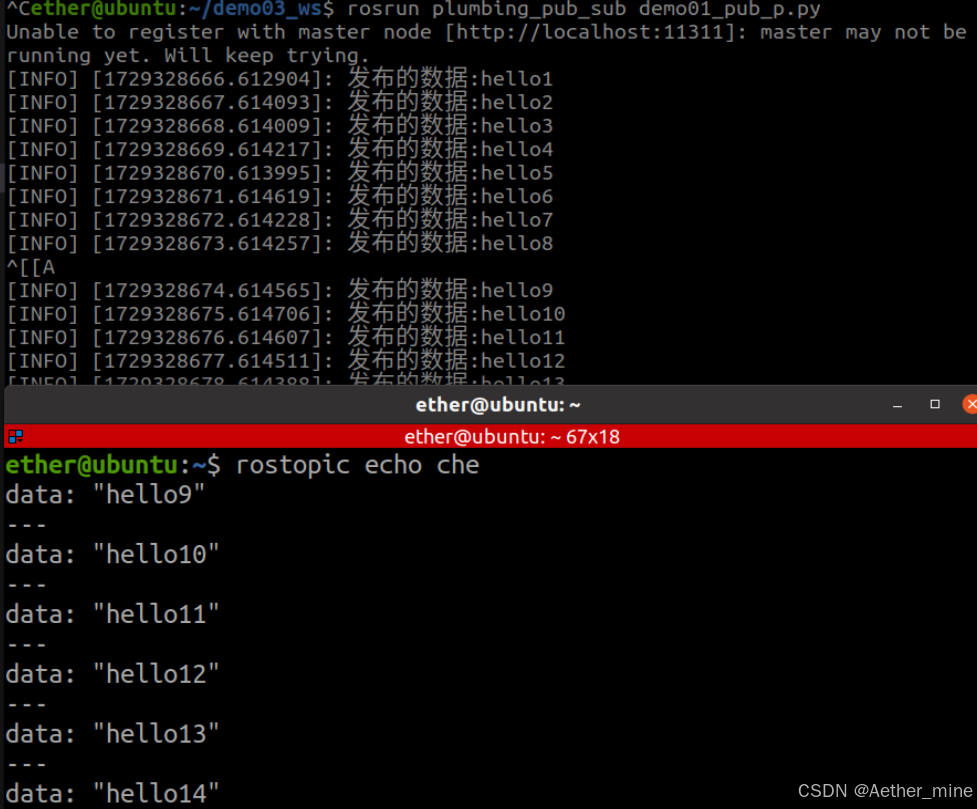
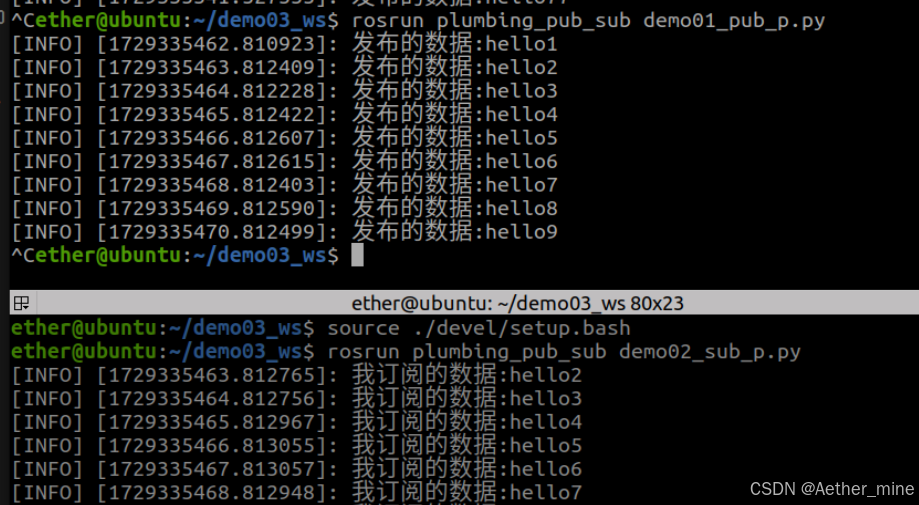
运行结果:
2、订阅方实现
创建demo02_sub_p.py编写程序
代码示例:
#! /usr/bin/env python
import rospy
from std_msgs.msg import String

"""
    订阅实现流程
        1.导包
        2.初始化ROS节点;
        3.创建订阅者对象;
        4.回调函数处理数据
        5.spin()
"""
def doMsg(msg):
     rospy.loginfo("我订阅的数据:%s",msg.data)

if __name__ == "__main__":
     # 2.初始化ROS节点;
     rospy.init_node("huahua")
     # 3.创建订阅者对象;
     sub = rospy.Subscriber("che",String,doMsg,queue_size=10)
     # 4.回调函数处理数据
     # 5.spin()
     rospy.spin()
pass
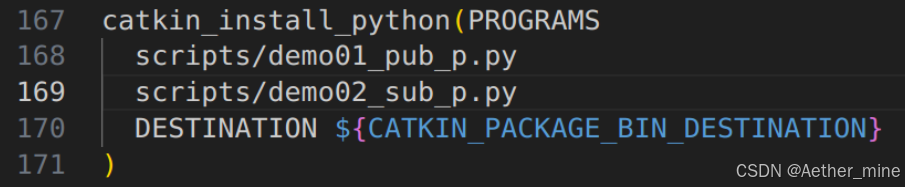
CMakeLists.txt文件增加配置文件
编译一下,然后再终端运行
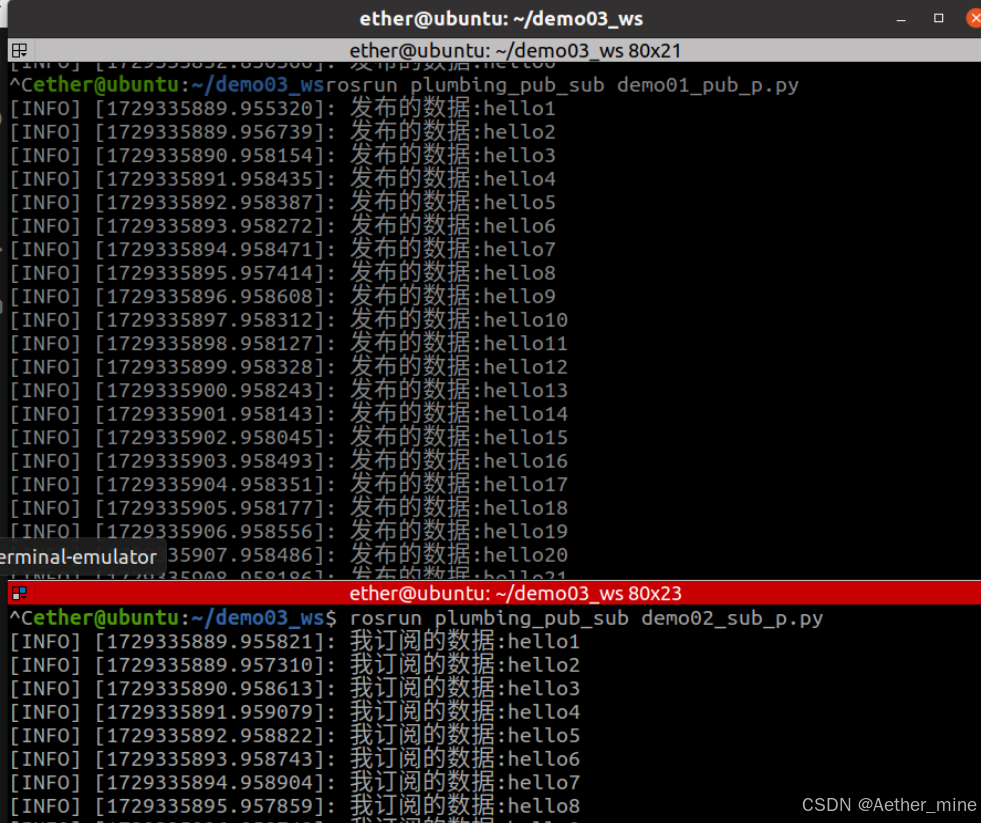
python实现订阅时,也会存在数据丢失(先订阅,再发布)
解决方法:
在发布方程序循环函数前加入
rospy.sleep(3)

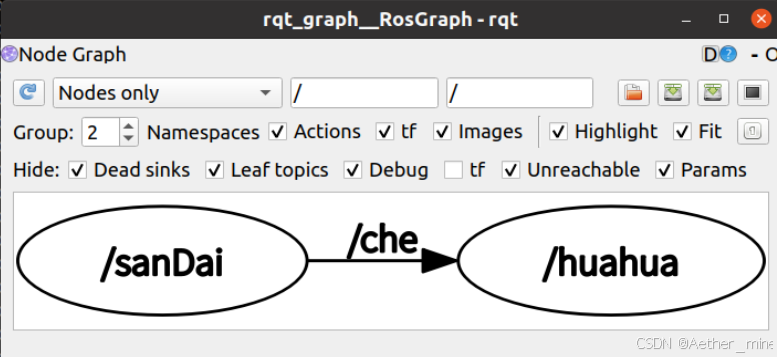
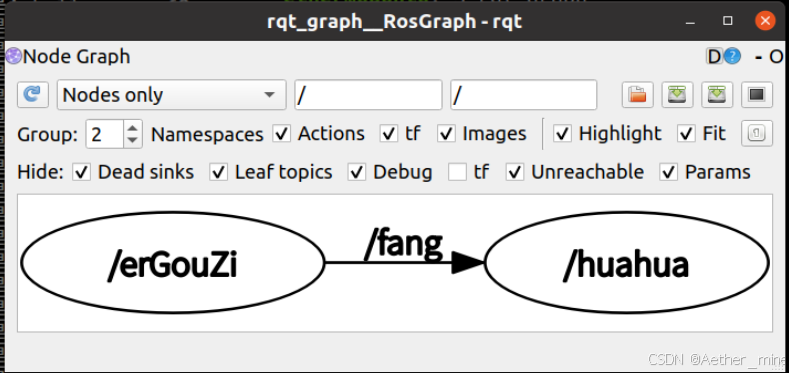
3、计算图查看python发布订阅模型
运行订阅和发布节点
再输入rqt_graph
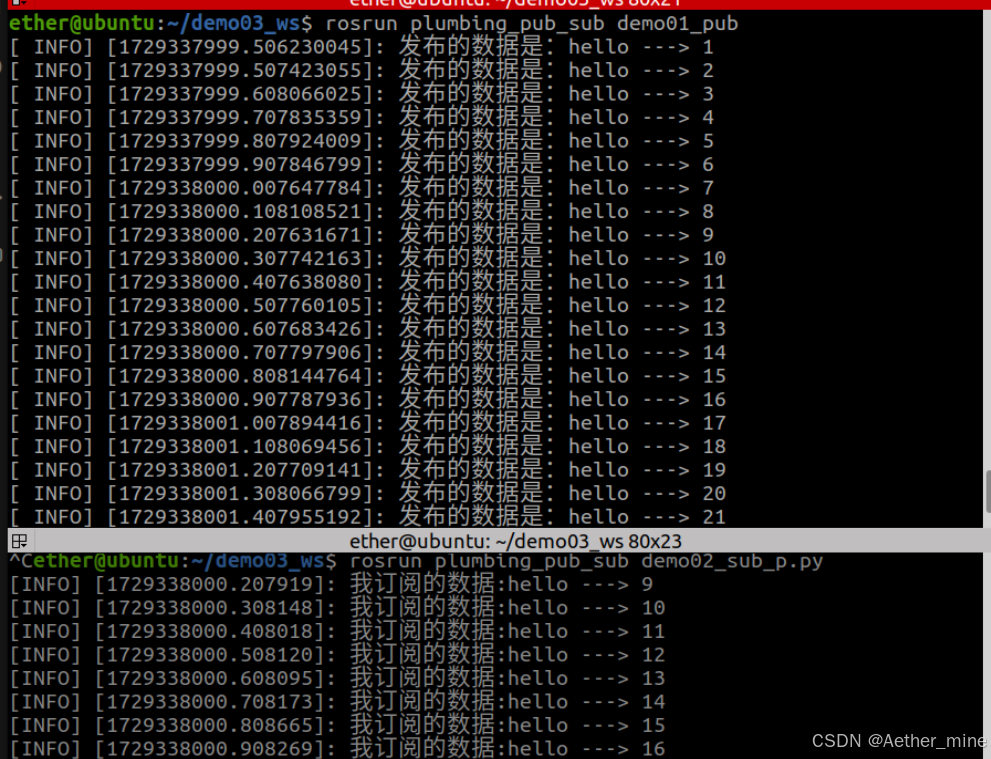
4、C++与python节点通信
想要C++和python之间实现数据交换,必须保证它们具有相同的话题
例:把python订阅程序的话题改为和C++发布程序话题相同
以C++程序来发布数据,python程序来订阅数据
计算图:
2.1 .4 话题通信自定义msg
msgs只是简单的文本文件(相当于C++里的结构体),每行具有字段类型和字段名称,可以使用的字段类型有:
int8, int16, int32, int64 (或者无符号类型: uint*)

float32, float64

string

time, duration

other msg files

variable-length array[] and fixed-length array[C]
使用场景:处理复杂数据的时候,例如激光雷达的信息,包括雷达的扫描角度、测距距离等。
**需求:**创建自定义消息,该消息包含人的信息:姓名、身高、年龄等。
流程:
按照固定格式创建 msg 文件
编辑配置文件
编译生成可以被 Python 或 C++ 调用的中间文件
1、定义msg文件
在自己创建的功能包下右键新建一个msg文件夹,再此文件夹下建立一个msg的文件
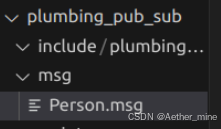
内容如下:
string namme
int32 age
float height
2、编辑配置文件
package.xml中添加编译依赖与执行依赖
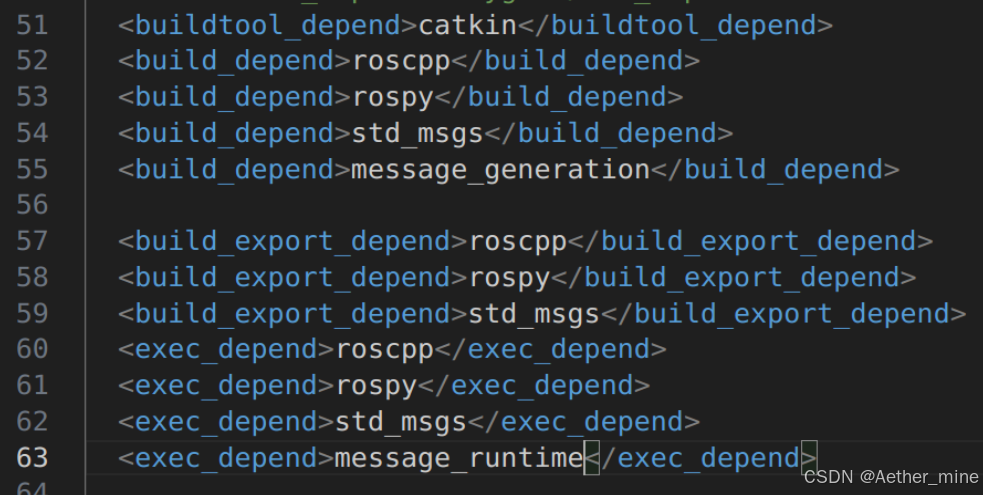
上图中的message_generation和message_runtime及为添加的编译和执行的依赖
CMakeLists.txt编辑 msg 相关配置
编译时依赖
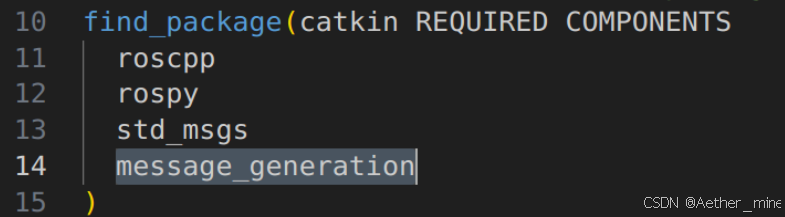
配置 msg 源文件
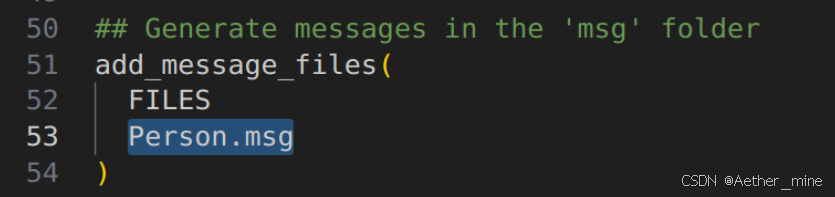
生成消息时依赖于 std_msgs
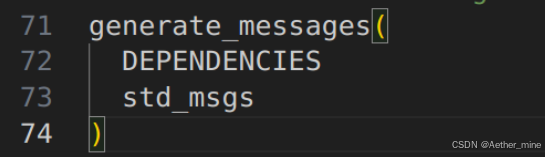
执行时依赖

3、编译
编译后的中间文件查看:
C++ 需要调用的中间文件(.../工作空间/devel/include/包名/xxx.h)


Python 需要调用的中间文件(.../工作空间/devel/lib/python3/
dist-packages/包	  名/msg)
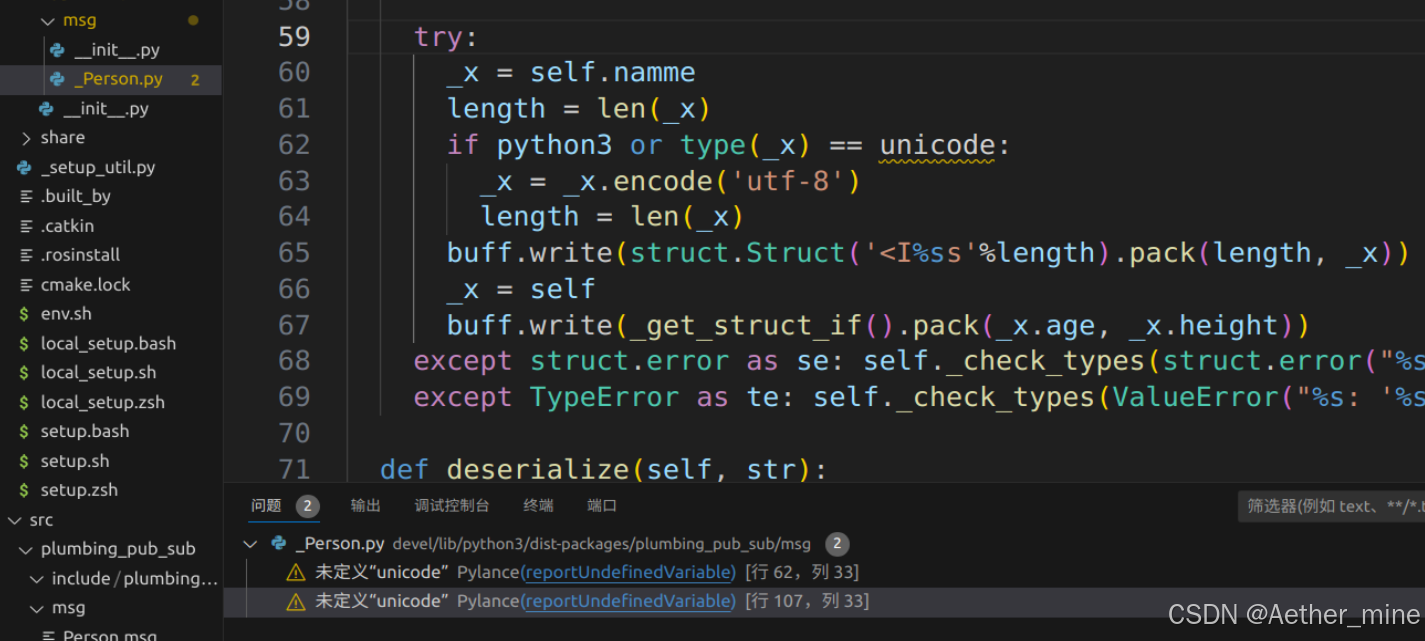
2.1 .5 话题通信自定义msg调用A(C++)
需求:
编写发布订阅实现,要求发布方以10HZ(每秒10次)的频率发布自定义消息,订阅方订阅自定义消息并将消息内容打印输出。
分析:
在模型实现中,ROS master 不需要实现,而连接的建立也已经被封装了,需要关注的关键点有三个:
1.发布方
2.接收方
3.数据(此处为自定义消息)
流程:
1.编写发布方实现;
2.编写订阅方实现;
3.编辑配置文件;
4.编译并执行。
0、vscode配置
1、发布方
2、订阅方
3、配置 CMakeLists.txt
2.1 .6 话题通信自定义msg调用B(Python)

DAMO开发者矩阵,由阿里巴巴达摩院和中国互联网协会联合发起,致力于探讨最前沿的技术趋势与应用成果,搭建高质量的交流与分享平台,推动技术创新与产业应用链接,围绕“人工智能与新型计算”构建开放共享的开发者生态。
更多推荐



 36
36 0
0- 0


 已为社区贡献1条内容

所有评论(0)