YOLOv8 目标检测技术文档
·
YOLOv8 目标检测技术文档
目录
1. 项目概述
本项目基于Ultralytics的YOLOv8系列模型,实现了目标检测、实例分割和图像分类功能。项目采用模块化设计,支持多种YOLOv8变体模型,包括:
- 检测模型:YOLOv8n, YOLOv8s, YOLOv8m, YOLOv8l, YOLOv8x
- 分割模型:YOLOv8n-seg
- 分类模型:YOLOv8n-cls
项目结构清晰,支持模型缓存、结果可视化和保存功能,适用于各种计算机视觉应用场景。
2. 环境配置
2.1 系统要求
- Python 3.8+
- Windows/Linux/macOS
- CUDA 11.x (GPU加速推荐)
2.2 依赖安装
pip install ultralytics opencv-python matplotlib numpy
2.3 可选依赖
- PyTorch (通常随ultralytics自动安装)
- TensorBoard (用于训练监控)
3. 代码结构解析
项目目录结构如下:
YOLO/
├── model_cache/       # 模型缓存目录
│   └── yolov8l.pt     # 预训练模型
├── picture/           # 待识别图像目录
├── save/              # 可视化结果保存目录
└── yolo1.py           # 主程序文件
3.1 核心类设计
YOLOv8Detector: 基础类,提供模型加载、推理和可视化功能- 具体模型类(如
YOLOv8nDetector): 继承基础类,指定特定模型
3.2 主要方法
_load_model(): 加载模型(优先从缓存加载)detect(): 目标检测segment(): 实例分割classify(): 图像分类_visualize_and_save(): 结果可视化与保存
4. 模型使用指南
4.1 检测模型
初始化检测器
from yolo1 import YOLOv8nDetector, YOLOv8sDetector, YOLOv8mDetector, YOLOv8lDetector, YOLOv8xDetector

# 初始化不同规模的检测器
detector_nano = YOLOv8nDetector()   # 最快,精度最低
detector_small = YOLOv8sDetector()  # 平衡速度与精度
detector_medium = YOLOv8mDetector() # 较高精度
detector_large = YOLOv8lDetector()  # 高精度
detector_xlarge = YOLOv8xDetector() # 最高精度
执行检测
image_path = "picture/人香蕉苹果.png"
save_path = "save/detections.jpg"

# 使用YOLOv8n进行检测
results = detector_nano.detect(image_path, conf_threshold=0.5, save_path=save_path)
print("检测结果:", results)
参数说明
conf_threshold: 置信度阈值(0-1),过滤低置信度预测save_path: 结果图像保存路径
4.2 分割模型
初始化分割器
from yolo1 import YOLOv8nSegmentor

segmentor = YOLOv8nSegmentor()
执行分割
image_path = "picture/人香蕉苹果.png"
save_path = "save/segments.jpg"

results = segmentor.segment(image_path, conf_threshold=0.5, save_path=save_path)
print("分割结果:", results)
分割结果格式
每个检测结果包含:
[x1, y1, x2, y2, confidence, class_id, class_name, mask]
4.3 分类模型
初始化分类器
from yolo1 import YOLOv8nClassifier

classifier = YOLOv8nClassifier()
执行分类
image_path = "picture/人香蕉苹果.png"
save_path = "save/classifications.jpg"

results = classifier.classify(image_path, save_path=save_path)
print("分类结果:", results)
分类结果格式
[[class_id, class_name, confidence]]
5. 可视化结果展示
5.1 检测结果可视化
项目自动生成带有检测框和标签的可视化结果,并显示在matplotlib窗口中,同时保存到指定路径。
示例可视化
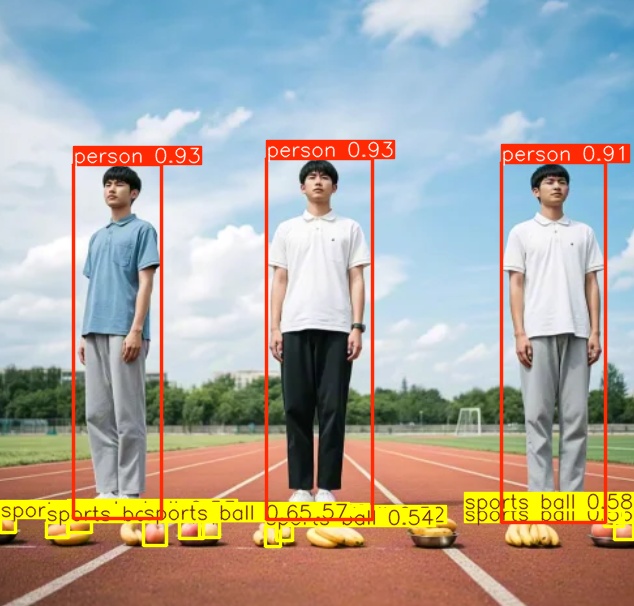
图1: YOLOv8n检测结果 - 识别出人、香蕉和苹果
可视化特点
- 不同类别使用不同颜色边框
- 显示类别名称和置信度
- 保留原始图像比例
5.2 分割结果可视化
分割结果不仅显示边界框,还包含实例掩码(mask)的可视化。
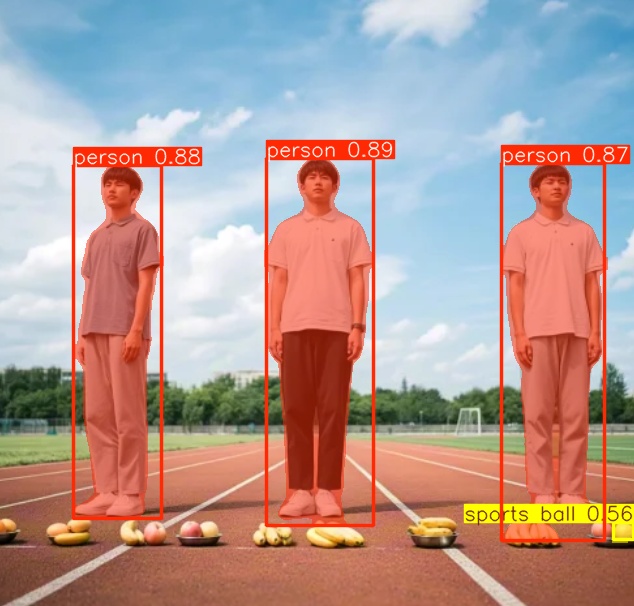
图2: YOLOv8n-seg分割结果 - 精确识别物体轮廓
可视化特点
- 半透明掩码覆盖在原始图像上
- 不同类别使用不同颜色
- 边界框与掩码双重标注
5.3 分类结果可视化
分类结果以条形图形式展示各类别的概率分布。
示例可视化
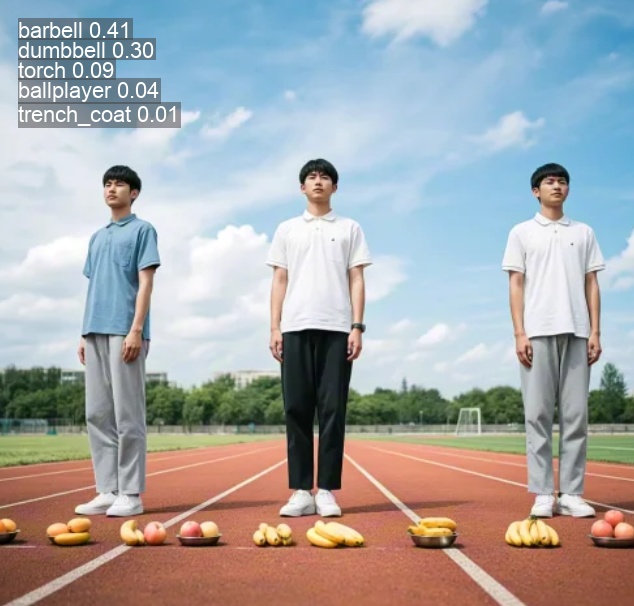
图3: YOLOv8n-cls分类结果 - 显示各类别概率
可视化特点
- 水平条形图展示概率
- 按概率从高到低排序
- 显示具体概率值
6. 应用场景与案例
6.1 实时监控系统
使用YOLOv8x进行高精度人员和物体检测,适用于:
- 公共场所安全监控
- 交通流量分析
- 工业设备状态监测
6.2 医疗影像分析
使用YOLOv8-seg进行医学图像分割:
- 肿瘤边界识别
- 器官结构分割
- 病变区域定位
6.3 农业自动化
使用YOLOv8m进行作物和病虫害检测:
- 果实成熟度识别
- 病虫害分类
- 作物产量估算
7. 性能优化建议
7.1 硬件加速
- 使用GPU进行推理(CUDA)
- 对于嵌入式设备,考虑使用TensorRT优化
- 使用多GPU进行批量处理
7.2 模型优化
- 根据应用场景选择合适规模的模型
- 对固定场景进行模型微调(fine-tune)
- 使用量化技术减少模型大小
7.3 代码优化
- 批量处理多张图像
- 使用异步处理提高吞吐量
- 优化图像预处理和后处理步骤
8. 常见问题解答
8.1 如何解决模型加载失败问题?
- 检查模型文件是否存在于
model_cache/目录 - 确保有足够的磁盘空间
- 检查网络连接(首次运行需要下载模型)
- 尝试删除缓存文件重新下载
8.2 如何提高检测速度?
- 使用更小的模型(如YOLOv8n)
- 降低输入图像分辨率
- 减少
conf_threshold以减少后处理 - 使用GPU加速
8.3 如何处理多类别检测?
- 确保模型支持多类别(所有YOLOv8检测模型都支持)
- 调整
conf_threshold以平衡召回率和精确率 - 使用非极大值抑制(NMS)参数控制结果数量
8.4 如何自定义训练模型?
- 准备标注好的数据集(YOLO格式)
- 使用Ultralytics提供的训练脚本
- 调整训练参数(批次大小、学习率等)
- 训练完成后导出为.pt格式供本项目使用
附录:完整代码示例
# yolo1.py 完整代码
import cv2
import matplotlib.pyplot as plt
from ultralytics import YOLO
import os
import time
from pathlib import Path

class YOLOv8Detector:
    def __init__(self, model_name, cache_dir="model_cache/", task="detect"):
        """初始化YOLOv8模型"""
        self.model_name = model_name
        self.cache_dir = cache_dir
        self.task = task
        self.cache_path = os.path.join(cache_dir, model_name)
        self.model = self._load_model()

    def _load_model(self):
        """加载模型(优先从缓存加载)"""
        os.makedirs(self.cache_dir, exist_ok=True)

        if os.path.exists(self.cache_path):
            print(f"从本地缓存加载模型: {self.cache_path}")
            return YOLO(self.cache_path)
        else:
            print(f"首次运行,下载模型: {self.model_name}")
            model = YOLO(self.model_name)
            print(f"保存模型到本地缓存: {self.cache_path}")
            model.save(self.cache_path)
            return YOLO(self.cache_path)

    def detect(self, image_path, conf_threshold=0.5, save_path=None):
        """执行目标检测"""
        assert self.task == "detect", f"当前模型不支持检测任务"

        img = self._read_image(image_path)
        results = self.model(img, conf=conf_threshold)
        detections = []

        for result in results:
            boxes = result.boxes.xyxy.cpu().numpy()
            confs = result.boxes.conf.cpu().numpy()
            clss = result.boxes.cls.cpu().numpy()

            for i in range(len(boxes)):
                x1, y1, x2, y2 = boxes[i].astype(int)
                confidence = float(confs[i])
                class_id = int(clss[i])
                class_name = self.model.names[class_id]
                detections.append([x1, y1, x2, y2, confidence, class_id, class_name])

        self._visualize_and_save(results[0], save_path)
        return detections

    def segment(self, image_path, conf_threshold=0.5, save_path=None):
        """执行实例分割"""
        assert self.task == "segment", f"当前模型不支持分割任务"

        img = self._read_image(image_path)
        results = self.model(img, conf=conf_threshold)
        detections = []

        for result in results:
            boxes = result.boxes.xyxy.cpu().numpy()
            confs = result.boxes.conf.cpu().numpy()
            clss = result.boxes.cls.cpu().numpy()
            masks = result.masks.data.cpu().numpy()

            for i in range(len(boxes)):
                x1, y1, x2, y2 = boxes[i].astype(int)
                confidence = float(confs[i])
                class_id = int(clss[i])
                class_name = self.model.names[class_id]
                detections.append([x1, y1, x2, y2, confidence, class_id, class_name, masks[i]])

        self._visualize_and_save(results[0], save_path)
        return detections

    def classify(self, image_path, save_path=None):
        """执行图像分类"""
        assert self.task == "classify", f"当前模型不支持分类任务"

        img = self._read_image(image_path)
        results = self.model(img)
        probs = results[0].probs.data.cpu().numpy()

        class_id = int(probs.argmax())
        class_name = self.model.names[class_id]
        confidence = float(probs[class_id])

        detections = [[class_id, class_name, confidence]]
        self._visualize_and_save(results[0], save_path)
        return detections

    def _read_image(self, image_path):
        """读取图像"""
        img = cv2.imread(image_path)
        if img is None:
            raise FileNotFoundError(f"无法加载图像: {image_path}")
        return cv2.cvtColor(img, cv2.COLOR_BGR2RGB)

    def _visualize_and_save(self, result, save_path):
        """可视化并保存结果"""
        annotated_img = result.plot()

        if save_path:
            cv2.imwrite(save_path, cv2.cvtColor(annotated_img, cv2.COLOR_RGB2BGR))

        plt.figure(figsize=(10, 8))
        plt.imshow(cv2.cvtColor(annotated_img, cv2.COLOR_BGR2RGB))
        plt.axis('off')
        plt.show()

# 具体模型类
class YOLOv8nDetector(YOLOv8Detector):
    def __init__(self, cache_dir="model_cache/"):
        super().__init__(model_name="yolov8n.pt", cache_dir=cache_dir, task="detect")

class YOLOv8sDetector(YOLOv8Detector):
    def __init__(self, cache_dir="model_cache/"):
        super().__init__(model_name="yolov8s.pt", cache_dir=cache_dir, task="detect")

# 其他模型类定义...

if __name__ == "__main__":
    SCRIPT_DIR = Path(__file__).parent.resolve()
    os.chdir(SCRIPT_DIR)

    # 初始化模型
    detector_nano = YOLOv8nDetector()
    detector_small = YOLOv8sDetector()
    # 其他模型初始化...

    # 测试检测
    image_path = "picture/人香蕉苹果.png"
    try:
        current_time = time.strftime("%Y%m%d_%H%M%S", time.localtime())
        detections = detector_nano.detect(image_path, conf_threshold=0.5,
                                         save_path=f"save/detections_{current_time}.jpg")
        print("YOLOv8n检测结果:", detections)
    except AssertionError as e:
        print(f"检测错误: {e}")
结论
本项目提供了一个完整、易用的YOLOv8实现框架,支持多种计算机视觉任务。通过模块化设计和清晰的接口,用户可以轻松地将其集成到自己的应用中。可视化章节专门展示了模型的检测、分割和分类效果,便于用户直观地评估模型性能。

DAMO开发者矩阵,由阿里巴巴达摩院和中国互联网协会联合发起,致力于探讨最前沿的技术趋势与应用成果,搭建高质量的交流与分享平台,推动技术创新与产业应用链接,围绕“人工智能与新型计算”构建开放共享的开发者生态。
更多推荐

 28
28 0
0- 0


 已为社区贡献7条内容

所有评论(0)