Windows 10+CUDA10.1+dlib19.17安装人脸识别模块face_recognition,并做初步功能验证
我们已经在Windows 10+Anaconda3+CUDA10.1环境中成功安装了dlib19.17开发环境,具体过程请参考:
https://blog.csdn.net/weixin_41943311/article/details/91866987
并且在目标检测这个方向上,对YOLO v3和dlib19.17做了对比测试,发现YOLO v3更快,具体过程请参考:
https://blog.csdn.net/weixin_41943311/article/details/92793426
同时,对YOLO v3的工作原理进行了简单的剖析:
Keras YOLOv3代码详解(一):darknet53网络结构分析+Netron工具
Keras YOLOv3代码详解(三):目标检测的流程图和源代码+中文注释
当然,目标检测只是AI应用的一个方向,我个人更感兴趣的是对具体目标的识别、跟踪和行为分析,作为一个最常见的识别目标,我先选定了人脸。
查了一些资料,发现基于dlib的face_recognition是一个比较容易上手的方案,今天就安装一下试试。
(1)使用anaconda安装失败,说找不到“package”。
(2)用pip来安装:
pip install face_recognition
运行时报错:

报错信息:
(2.1)WARNING: pip is configured with locations that require TLS/SSL, however the ssl module in Python is not available.
(2.2)Could not fetch URL https://pypi.org/simple/face-recognition/: There was a problem confirming the ssl certificate: HTTPSConnectionPool(host='pypi.org', port=443): Max retries exceeded with url: /simple/face-recognition/ (Caused by SSLError("Can't connect to HTTPS URL because the SSL module is not available."))
看起来似乎是缺少TLS/SSL环境,但其实不是。
★解决方法:
使用国内的镜像网站,方法如下:
在Windows 10的“C:\Users\你的用户名\”目录下创建“pip”目录,“pip”目录下创建“pip.ini”文件(注意:以UTF-8 无BOM格式编码);
“pip.ini”文件内容:
[global]
index-url=http://mirrors.aliyun.com/pypi/simple/
[install]
trusted-host=mirrors.aliyun.com
重新运行:
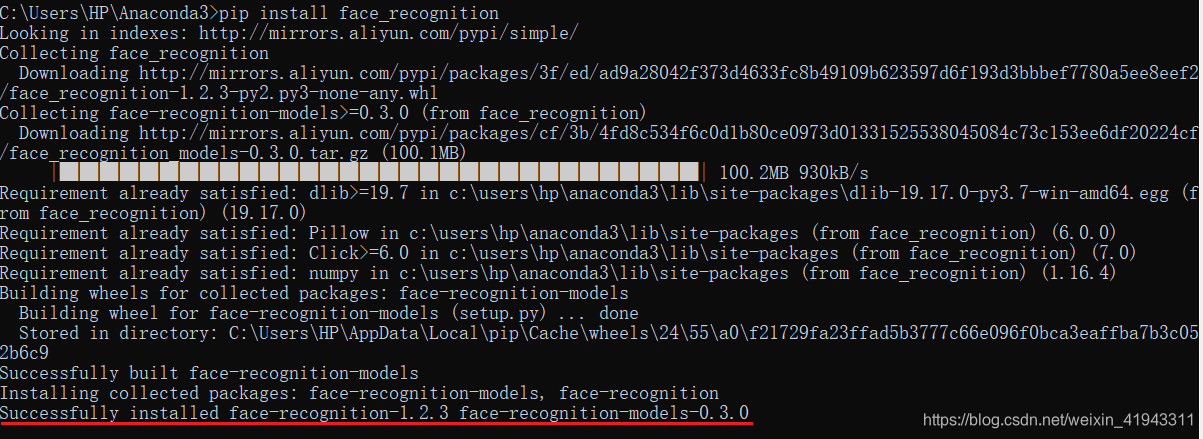
pip install face_recognition
安装成功:
补充一下,国内镜像的地址有多个:
http://pypi.douban.com/simple/ 豆瓣
http://mirrors.aliyun.com/pypi/simple/ 阿里
http://pypi.hustunique.com/simple/ 华中理工大学
http://pypi.sdutlinux.org/simple/ 山东理工大学
http://pypi.mirrors.ustc.edu.cn/simple/ 中国科学技术大学
https://pypi.tuna.tsinghua.edu.cn/simple 清华
(3)验证face_recognition的功能
(3.1)先运行一段只有4行的小程序(读图片信息,识别图片中的人脸并打印anchor_box的坐标):
import face_recognition
image = face_recognition.load_image_file("f:\images\jinmao2.jpg")
face_locations = face_recognition.face_locations(image)
print(face_locations)
运行成功,说明face_recognition已经安装成功了:

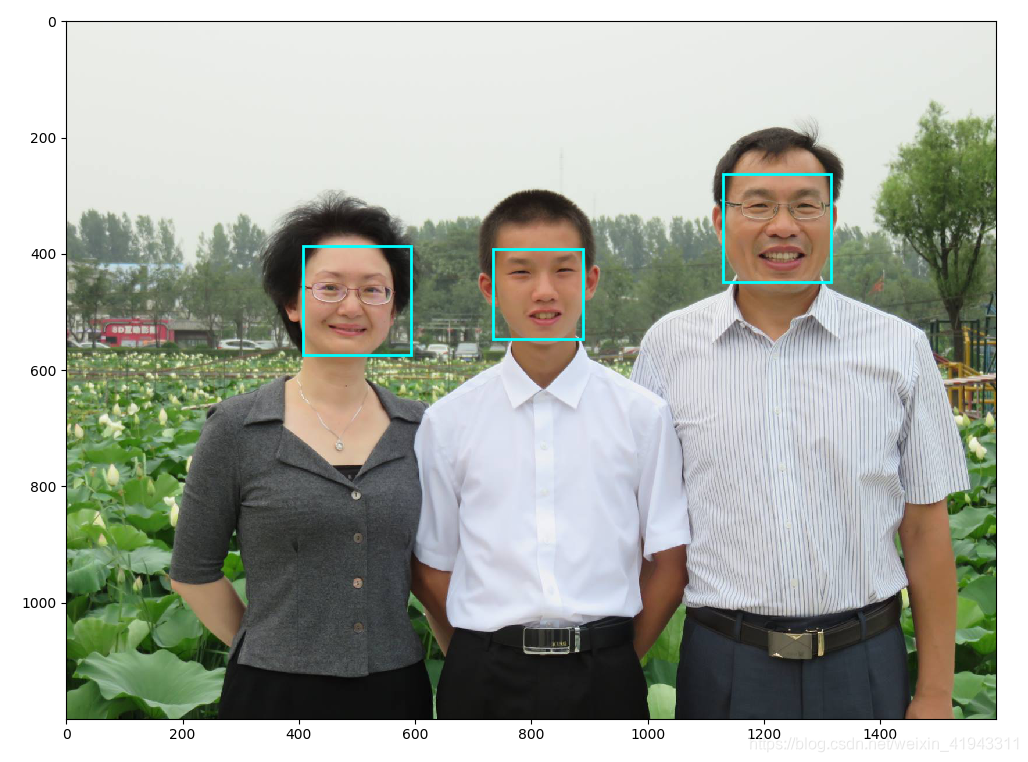
(3.2)为了更直觉的感受一下,用matplotlib作图,展示标记人脸后的图像:
import face_recognition
import matplotlib.pyplot as plt
import matplotlib.image as mpimg
import numpy as np
from matplotlib.path import Path
import matplotlib.patches as patches

# 需要识别的图像路径
image_path = "f:\images\jinmao2.jpg"
# 将图片加载为数组形式
image = face_recognition.load_image_file(image_path)
# 定位图中人脸的位置
face_locations = face_recognition.face_locations(image)

#因为我们已经安装了支持nVidia CUDA库,所以也可以使用dlib的GPU选项,face_recognition官网中的注释如下:
# Find all the faces in the image using a pre-trained convolutional neural network.
# This method is more accurate than the default HOG model, but it's slower
# unless you have an nvidia GPU and dlib compiled with CUDA extensions. But if you do,
# this will use GPU acceleration and perform well.

#face_locations = face_recognition.face_locations(unknown_image, number_of_times_to_upsample=0, model="cnn")

print("图中共有{}张人脸。".format(len(face_locations)))

# 使用matplotlib作图,展示原图
img = mpimg.imread(image_path)
fig, ax = plt.subplots(figsize=(img.shape[0]/100,img.shape[1]/100))
imgplot = ax.imshow(img)

# 遍历识别到的人脸位置信息
for face_location in face_locations:
    # 获得上、右、下、左人脸边界像素值
    top, right, bottom, left = face_location

    # 使用matplotlib在原图中用矩形框出人脸
    verts = [
       (left, bottom),  # left, bottom
       (left, top),  # left, top
       (right, top),  # right, top
       (right, bottom),  # right, bottom
       (left, bottom),  # ignored
    ]
    codes = [
        Path.MOVETO,
        Path.LINETO,
        Path.LINETO,
        Path.LINETO,
        Path.CLOSEPOLY,
    ]
    path = Path(verts, codes)
    patch = patches.PathPatch(path, facecolor='none', edgecolor='cyan', ls='-', lw=2)
    ax.add_patch(patch)

# 展示图像
plt.show()
看到代码中的这一行注释:
# unless you have an nvidia GPU and dlib compiled with CUDA extensions.
因为我们之前已经完成了对支持CUDA10.1的dlib19.17库的编译工作(C++库和Python库),所以可以直接运行:
face_locations = face_recognition.face_locations(unknown_image, number_of_times_to_upsample=0, model="cnn")
运行效果如下图所示:
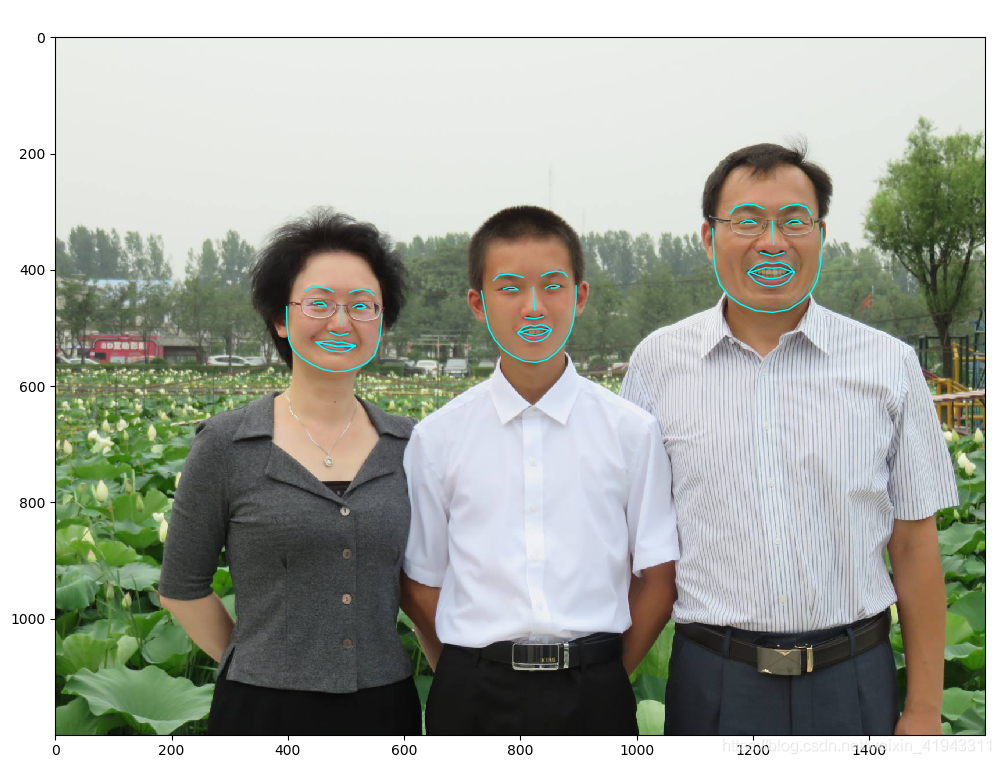
(3.3)标记人脸面部特征:
import face_recognition
import matplotlib.pyplot as plt
import matplotlib.image as mpimg
import numpy as np
from matplotlib.path import Path
import matplotlib.patches as patches

# 需要识别的图像路径
image_path = "f:\images\jinmao2.jpg"
# 将图片加载为数组形式
image = face_recognition.load_image_file(image_path)
# 定位图片中所有人脸的面部特征位置
face_landmarks_list = face_recognition.face_landmarks(image)

print("图中共有{}张人脸。".format(len(face_landmarks_list)))

# 使用matplotlib作图,展示原图
img = mpimg.imread(image_path)
fig, ax = plt.subplots(figsize=(img.shape[0]/100,img.shape[1]/100))
imgplot = ax.imshow(img)

# 遍历识别到每个人脸
for face_landmarks in face_landmarks_list:

    # 面部特征map中的key
    facial_features = [
        'chin',
        'left_eyebrow',
        'right_eyebrow',
        'nose_bridge',
        'nose_tip',
        'left_eye',
        'right_eye',
        'top_lip',
        'bottom_lip'
    ]

    # 遍历每一个面部特征
    for facial_feature in facial_features:
        # 使用matplotlib在原图中用线框出面部特征
        verts = face_landmarks[facial_feature]
        # 出开始结尾的点,共有点的个数
        middle_point_num = len(verts)-2
        # 定义path中的起始点
        codes = [Path.MOVETO]
        # 定义path中的中间点
        for i in range(middle_point_num):
            codes.append(Path.LINETO)
        # 定义path中的结尾点
        if(verts[0]==verts[-1]):
            codes.append(Path.CLOSEPOLY)
        else:
            codes.append(Path.LINETO)

        path = Path(verts, codes)
        patch = patches.PathPatch(path, facecolor='none', edgecolor='cyan', ls='-', lw=1)
        ax.add_patch(patch)

plt.show()
运行效果如下图所示:
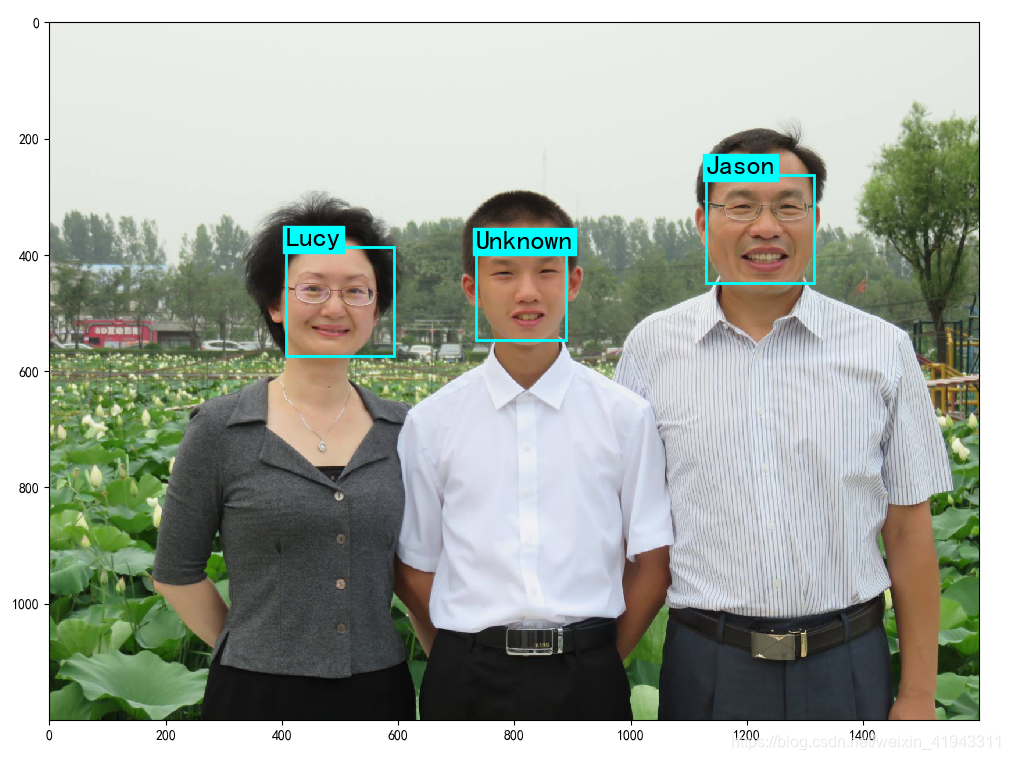
(3.4)识别人脸是谁
先提供需要识别的人脸图片(Jason & Lucy):


然后与发现的人脸进行对比,并标识上对应的名字:
import face_recognition
import matplotlib.pyplot as plt
import matplotlib.image as mpimg
import numpy as np
from matplotlib.path import Path
import matplotlib.patches as patches

# 从照片中加载已知的两个人脸
jason_image = face_recognition.load_image_file("f:\images\jason.jpg")
jason_face_encoding = face_recognition.face_encodings(jason_image)[0]

lucy_image = face_recognition.load_image_file("f:\images\lucy.jpg")
lucy_face_encoding = face_recognition.face_encodings(lucy_image)[0]

known_face_encodings = [
    jason_face_encoding,
    lucy_face_encoding,
]
known_face_names = [
    "Jason",
    "Lucy",
]

# 加载需要识别的图片
image_path = "f:\images\jinmao2.jpg"
unknown_image = face_recognition.load_image_file(image_path)

# matplotlib作图
img = mpimg.imread(image_path)
fig, ax = plt.subplots(figsize=(img.shape[0]/100,img.shape[1]/100))
imgplot = ax.imshow(img)

# 找到图中所有人脸的位置
face_locations = face_recognition.face_locations(unknown_image)
# 根据位置加载人脸编码的列表
face_encodings = face_recognition.face_encodings(unknown_image, face_locations)

# 遍历所有人脸编码,与已知人脸对比
for (top, right, bottom, left), face_encoding in zip(face_locations, face_encodings):

    # 获得对比结果
    matches = face_recognition.compare_faces(known_face_encodings, face_encoding, tolerance=0.4)
    # 获得姓名
    name = "Unknown"
    if True in matches:
        first_match_index = matches.index(True)
        name = known_face_names[first_match_index]
    # matplotlib构造框图
    verts = [
       (left, bottom),  # left, bottom
       (left, top),  # left, top
       (right, top),  # right, top
       (right, bottom),  # right, bottom
       (left, bottom),  # ignored
    ]
    codes = [
        Path.MOVETO,
        Path.LINETO,
        Path.LINETO,
        Path.LINETO,
        Path.CLOSEPOLY,
    ]
    path = Path(verts, codes)
    patch = patches.PathPatch(path, facecolor='none', edgecolor='cyan', ls='-', lw=2)
    ax.add_patch(patch)
    # matplotlib 标记人名
    ax.text(left, top, name, style='italic',fontsize=20,
        bbox={'facecolor': 'cyan', 'edgecolor':'cyan','alpha': 1, 'pad': 2})

# 如果你的人名包含中文,可以加上这句,用于正常显示中文
plt.rcParams['font.sans-serif']=['SimHei']

plt.show()
运行效果如下图所示:
是不是很简单?真的是很简单。
参考:
https://www.jianshu.com/p/670dc03ed081
(完)

DAMO开发者矩阵,由阿里巴巴达摩院和中国互联网协会联合发起,致力于探讨最前沿的技术趋势与应用成果,搭建高质量的交流与分享平台,推动技术创新与产业应用链接,围绕“人工智能与新型计算”构建开放共享的开发者生态。
更多推荐

 2
2 0
0- 0


 已为社区贡献4条内容

所有评论(0)