Vllm进行Qwen2-vl部署(包含单卡多卡部署及爬虫请求)
1.简介----阿里云于今年9月宣布开源第二代视觉语言模型Qwen2-VL,包括 2B、7B、72B三个尺寸及其量化版本模型。Qwen2-VL具备完整图像、多语言的理解能力,性能强劲。相比上代模型,Qwen2-VL 的基础性能全面提升,可以读懂不同分辨率和不同长宽比的图片,在 DocVQA、RealWorldQA、MTVQA 等基准测试创下全球领先的表现;可以理解 20 分钟以上长视频,支持基于视频的问答、对话和内容创作等应用;具备强大的视觉智能体能力,可自主操作手机和机器人,借助复杂推理和决策的能力,Qwen2-VL 可以集成到手机、机器人等设备,根据视觉环境和文字指令进行自动操作;能理解图像视频中的多语言文本,包括中文、英文,大多数欧洲语言,日语、韩语、阿拉伯语、越南语等。 本篇博客将详细介绍如何实现Qwen2-VL-7B的单卡部署和多卡部署,以及如何使用requests库发送请求。GitHub:https://github.com/QwenLM/Qwen2-VLHuggingFace:https://huggingface.co/collections/Qwen/qwen2-vl-66cee7455501d7126940800d魔搭 ModelScope:https://modelscope.cn/organization/qwen?tab=model模型体验:https://huggingface.co/spaces/Qwen/Qwen2-VL官方文档:Qwen2-VL、Qwen-VL如何使用_大模型服务平台百炼(Model Studio)-阿里云帮助中心vllm官方文档:Engine Arguments — vLLM2.部署----### 环境安装我使用的是Python3.10的虚拟环境,注意下载好权重,不需要下载github代码。首先安装qwen-vl-utils,内含torch2.4 pip install qwen-vl-utils接着安装transformers pip install transformers接着安装 pip install accelerate 最后安装vllm框架,我这里的vllm版本是0.6.3,之前使用0.6.2会报keyerror的错误,如果出现了这个错误,可以提高vllm的版本,也可以按照下文的办法解决(详看报错解决部分) pip install vllm ### 直接使用通过以下代码检验模型环境有没有安装好,注意模型权重文件的相对位置。 from transformers import Qwen2VLForConditionalGeneration, AutoTokenizer, AutoProcessor from qwen_vl_utils import process_vision_info # default: Load the model on the available device(s) model = Qwen2VLForConditionalGeneration.from_pretrained( “Qwen2-VL-7B”, torch_dtype=“auto”, device_map=“auto” ) # We recommend enabling flash_attention_2 for better acceleration and memory saving, especially in multi-image and video scenarios. # model = Qwen2VLForConditionalGeneration.from_pretrained( # “Qwen/Qwen2-VL-7B-Instruct”, # torch_dtype=torch.bfloat16, # attn_implementation=“flash_attention_2”, # device_map=“auto”, # ) # default processer processor = AutoProcessor.from_pretrained(“Qwen/Qwen2-VL-7B-Instruct”) # The default range for the number of visual tokens per image in the model is 4-16384. You can set min_pixels and max_pixels according to your needs, such as a token count range of 256-1280, to balance speed and memory usage. # min_pixels = 2562828 # max_pixels = 12802828 # processor = AutoProcessor.from_pretrained(“Qwen/Qwen2-VL-7B-Instruct”, min_pixels=min_pixels, max_pixels=max_pixels) messages = [ { “role”: “user”, “content”: [ { “type”: “image”, “image”: “https://qianwen-res.oss-cn-beijing.aliyuncs.com/Qwen-VL/assets/demo.jpeg”, }, {“type”: “text”, “text”: “Describe this image.”}, ], } ] # Preparation for inference text = processor.apply_chat_template( messages, tokenize=False, add_generation_prompt=True ) image_inputs, video_inputs = process_vision_info(messages) inputs = processor( text=[text], images=image_inputs, videos=video_inputs, padding=True, return_tensors=“pt”, ) inputs = inputs.to(“cuda”) # Inference: Generation of the output generated_ids = model.generate(inputs, max_new_tokens=128) generated_ids_trimmed = [ out_ids[len(in_ids) :] for in_ids, out_ids in zip(inputs.input_ids, generated_ids) ] output_text = processor.batch_decode( generated_ids_trimmed, skip_special_tokens=True, clean_up_tokenization_spaces=False ) print(output_text)如果返回结果,表示安装成功。我的3090 24g单卡可以完整运行Qwen2-VL-7B,如果爆显存可以试试2b版本的。### 单卡部署我的单卡是3090 24g,直接部署不能跑起来,需要适当调整一下参数。文件位置如下:
 在命令行中输入: vllm serve Qwen2-VL-7B --dtype auto --port 8000 --limit_mm_per_prompt image=4 --max_model_len 8784 --gpu_memory_utilization 0.8 参数解释: Qwen2-VL-7B:模型权重位置 dtype:数据类型,一般直接auto就可以了,低版本的显卡可能需要自己设置,如2080要设置为half* port:端口号* limit_mm_per_prompt image=4,默认是1,这样每次请求可以输入多张图片* max_model_len:每次全球最大的token长度,爆显存了就改小* gpu_memory_utilization:GPU最大利用率,爆显存了就改小,我现在一般设置为0.7-0.8其他参数的文档:Engine Arguments — vLLM见到下面的就说明模型启动了,可以开始调用了:
 ### 多卡部署我的多卡设备是8张2080,分别是12g文件位置如下:
 在命令行中输入: vllm serve Qwen2-VL-7B --dtype half --port 8000 --tensor-parallel-size 4 --pipeline-parallel-size 2 --gpu-memory-utilization 0.7 --limit_mm_per_prompt image=4 --max_model_len 8784 参数解释:* tensor-parallel-size:模型的权重将被分割成n部分分布在GPU上。* pipeline-parallel-size:设置流水线并行的大小为k,意味着模型的不同层将被分布到k个GPU上。* 保证n*k=8,正好等于您拥有的GPU数量。### requests调用首先你要知道模型部署端的IP地址,Linux通过ifconfig查看,如下红框中的就是你的IP地址
 然后你需要安装requests库 pip install requests#### 整体逻辑这个代码其实是利用爬虫向我们的服务器发送请求,整体框架我已经写好,基本只需要改动data里面的东西就可以了。
 官方文档:Qwen2-VL、Qwen-VL如何使用_大模型服务平台百炼(Model Studio)-阿里云帮助中心#### 纯文本调用
 import requests import json from PIL import Image import base64 # 1.url url = ‘http://XX.XX.XX.XX:8000/v1/chat/completions’ # 你的IP # 2.data data = {“model”: “Qwen2-VL-7B”, “messages”: [{“role”: “system”, “content”: “You are Qwen, created by Alibaba Cloud. You are a helpful assistant.”}, # 系统命令,一般不要改 {“role”: “user”, “content”: “什么是大语言模型”}], # 用户命令,一般改这里 “temperature”: 0.7,“top_p”: 0.8,“repetition_penalty”: 1.05,“max_tokens”: 1024} # 3.将字典转换为 JSON 字符串 json_payload = json.dumps(data) # 4.发送 POST 请求 headers = {‘Content-Type’: ‘application/json’} response = requests.post(url, data=json_payload, headers=headers) # 5.打印响应内容 print(response.json().get(“choices”, [])[0].get(“message”, []).get(“content”, [])) # 命令行启动,用这个打印 # print(response.json())#### 网络图片理解
 import requests import json from PIL import Image import base64 # 1.url url = ‘http://XX.XX.XX.XX:8000/v1/chat/completions’ # 2.data data = {“model”: “Qwen2-VL-7B”, “messages”: [{“role”: “system”, “content”: “You are Qwen, created by Alibaba Cloud. You are a helpful assistant.”}, {“role”: “user”, “content”: [ {“type”: “image_url”, “image_url”: {“url”: “https://dashscope.oss-cn-beijing.aliyuncs.com/images/dog_and_girl.jpeg”}}, {“type”: “text”, “text”: “Describe this image.”},],}], “temperature”: 0.7,“top_p”: 0.8,“repetition_penalty”: 1.05,“max_tokens”: 512} # 3.将字典转换为 JSON 字符串 json_payload = json.dumps(data) # 4.发送 POST 请求 headers = {‘Content-Type’: ‘application/json’} response = requests.post(url, data=json_payload, headers=headers) # 5.打印响应内容 print(response.json().get(“choices”, [])[0].get(“message”, []).get(“content”, [])) # 命令行启动,用这个打印 # print(response.json())#### 本地图片理解
 import requests import json from PIL import Image import base64 def encode_image(image_path): # 编码本地图片的函数 with open(image_path, “rb”) as image_file: return base64.b64encode(image_file.read()).decode(‘utf-8’) # 1.url url = ‘http://XX.XX.XX.XX:8000/v1/chat/completions’ # 2.data image_path = “1.jpg” base64_image = encode_image(image_path) # 编码本地图片 data = {“model”: “Qwen2-VL-7B”, “messages”: [{“role”: “system”, “content”: “You are Qwen, created by Alibaba Cloud. You are a helpful assistant.”}, {“role”: “user”, “content”: [ {“type”: “image_url”,“image_url”: {“url”: f"data:image/jpeg;base64,{base64_image}“}}, {“type”: “text”, “text”: “这是什么”},],}], “temperature”: 0.7,“top_p”: 0.8,“repetition_penalty”: 1.05,“max_tokens”: 1024} # 3.将字典转换为 JSON 字符串 json_payload = json.dumps(data) # 4.发送 POST 请求 headers = {‘Content-Type’: ‘application/json’} response = requests.post(url, data=json_payload, headers=headers) # 5.打印响应内容 print(response.json().get(“choices”, [])[0].get(“message”, []).get(“content”, [])) # 命令行启动,用这个打印 # print(response.json())#### 多张图片理解
 import requests import json from PIL import Image import base64 def encode_image(image_path): # 编码本地图片的函数 with open(image_path, “rb”) as image_file: return base64.b64encode(image_file.read()).decode(‘utf-8’) # 1.url url = ‘http://XX.XX.XX.XX:8000/v1/chat/completions’ # 2.data ## 2.4使用本地图片,多张照片理解 image_path1 = “1.jpg” image_path2 = “2.jpg” base64_image1 = encode_image(image_path1) base64_image2 = encode_image(image_path2) data = {“model”: “Qwen2-VL-7B”, “messages”:[ { “role”: “user”, “content”: [ { “type”: “image_url”, “image_url”: { “url”: f"data:image/jpeg;base64,{base64_image1}” }, }, { “type”: “image_url”, “image_url”: { “url”: f"data:image/jpeg;base64,{base64_image2}" }, }, {“type”: “text”, “text”: “这些是什么”}, ],} ], “temperature”: 0.7,“top_p”: 0.8,“repetition_penalty”: 1.05,“max_tokens”: 4096} # 3.将字典转换为 JSON 字符串 json_payload = json.dumps(data) # 4.发送 POST 请求 headers = {‘Content-Type’: ‘application/json’} response = requests.post(url, data=json_payload, headers=headers) # 5.打印响应内容 print(response.json().get(“choices”, [])[0].get(“message”, []).get(“content”, [])) # 命令行启动,用这个打印 # print(response.json())#### 多轮对话
 import requests import json from PIL import Image import base64 def encode_image(image_path): # 编码本地图片的函数 with open(image_path, “rb”) as image_file: return base64.b64encode(image_file.read()).decode(‘utf-8’) # 1.url url = ‘http://XX.XX.XX.XX:8000/v1/chat/completions’ # 2.data data = {“model”: “Qwen2-VL-7B”, # 初始化data “messages”: [{“role”: “system”, “content”: “You are Qwen, created by Alibaba Cloud. You are a helpful assistant.”},], “temperature”: 0.7,“top_p”: 0.8,“repetition_penalty”: 1.05,“max_tokens”: 1024} # 纯语言的多轮对话 text_ls = [“什么是大语言模型”, “都有哪些”, “写一首诗赞美一下他们”] for text in text_ls: # 循环text_ls里面的所有问题 data[“messages”].append({“role”: “user”, “content”: [ # {“type”: “image_url”,“image_url”: {“url”: f"data:image/jpeg;base64,{base64_image}“}}, {“type”: “text”, “text”: text},],}) # 将用户问题输入大模型的prompt # 3.将字典转换为 JSON 字符串 json_payload = json.dumps(data) # 4.发送 POST 请求 headers = {‘Content-Type’: ‘application/json’} response = requests.post(url, data=json_payload, headers=headers) data[“messages”].append({“role”: “assistant”, # 将大模型的输出加入到data(prompt),用于下一次输入 “content”: [ {“type”: “text”, “text”: response.json().get(“choices”, [])[0].get(“message”, []).get(“content”, [])}, ], }) print(“User: “, text) print(“Answer: “, response.json().get(“choices”, [])[0].get(“message”, []).get(“content”, [])) print(”-”*50) # print(response.json()) #### 全部 import requests import json from PIL import Image import base64 import time def encode_image(image_path): # 编码本地图片的函数 with open(image_path, “rb”) as image_file: return base64.b64encode(image_file.read()).decode(‘utf-8’) start = time.time() # 1.url url = ‘http://XX.XX.XX.XX:8000/v1/chat/completions’ # 2.data ## 2.1如果server.py启动,用这个data data = {“model”: “Qwen2-VL-7B”, “messages”: [{“role”: “system”, “content”: “You are Qwen, created by Alibaba Cloud. You are a helpful assistant.”}, # 系统命令,一般不要改 {“role”: “user”, “content”: “Tell me something about large language models.”}], # 用户命令,一般改这里 “temperature”: 0.7,“top_p”: 0.8,“repetition_penalty”: 1.05,“max_tokens”: 1024} ## 2.2使用网络图片(url网址),用这个data # data = {“model”: “Qwen2-VL-7B”, # “messages”: [{“role”: “system”, “content”: “You are Qwen, created by Alibaba Cloud. You are a helpful assistant.”}, # {“role”: “user”, # “content”: [ # {“type”: “image_url”,“image_url”: {“url”: “https://dashscope.oss-cn-beijing.aliyuncs.com/images/dog_and_girl.jpeg”}}, # {“type”: “text”, “text”: “Describe this image.”},],}], # “temperature”: 0.7,“top_p”: 0.8,“repetition_penalty”: 1.05,“max_tokens”: 512} ## 2.3使用本地图片,用这个data ## 只支持一张图片,可以进行OCR、翻译、计算题目、编写前端代码等 # image_path = “jieti.jpg” # base64_image = encode_image(image_path) # data = {“model”: “Qwen2-VL-7B”, # “messages”: [{“role”: “system”, “content”: “You are Qwen, created by Alibaba Cloud. You are a helpful assistant.”}, # {“role”: “user”, # “content”: [ # {“type”: “image_url”,“image_url”: {“url”: f"data:image/jpeg;base64,{base64_image}”}}, # {“type”: “text”, “text”: “解一下这道题”},],}], # “temperature”: 0.7,“top_p”: 0.8,“repetition_penalty”: 1.05,“max_tokens”: 1024} ## 2.4使用本地图片,多张照片理解 # image_path1 = “1.jpg” # image_path2 = “2.jpg” # base64_image1 = encode_image(image_path1) # base64_image2 = encode_image(image_path2) # data = {“model”: “Qwen2-VL-7B”, # “messages”:[ # { # “role”: “user”, # “content”: [ # { # “type”: “image_url”, # “image_url”: { # “url”: f"data:image/jpeg;base64,{base64_image1}” # }, # }, # { # “type”: “image_url”, # “image_url”: { # “url”: f"data:image/jpeg;base64,{base64_image2}” # }, # }, # {“type”: “text”, “text”: “这些是什么”}, # ],} # ], # “temperature”: 0.7,“top_p”: 0.8,“repetition_penalty”: 1.05,“max_tokens”: 4096} # 3.将字典转换为 JSON 字符串 json_payload = json.dumps(data) # 4.发送 POST 请求 headers = {‘Content-Type’: ‘application/json’} response = requests.post(url, data=json_payload, headers=headers) # 5.打印响应内容 print(response.json().get(“choices”, [])[0].get(“message”, []).get(“content”, [])) # print(response.json()) # 调试用 print(" 总时间:", time.time()-start, “秒”) ### 注意事项阿里云文档(可以自己开个账号体验72b的模型):https://help.aliyun.com/zh/model-studio/developer-reference/use-qwen-by-calling-api**注意:我们的模型和官方API的调用在一些细节上不一样!模型调用方面:1. 不要问新闻,模型的知识库不够新2. 多图推理最多4张图,当然你可以自己设置3. 单图推理时,图片分辨率不建议超过8000*10000的,否则会有下面的警告。当然运行还是能正常运行。 DecompressionBombWarning: Image size (100444051 pixels) exceeds limit of 89478485 pixels, could be decompression bomb DOS attack. 3.功能演示------#### OCR
 user:提取上面的文字。 回答: 1一份燕麦片35克 2沸水210毫升 3沸水烧煮或微波炉加热2分钟,搅拌均匀即可食用。 #### 翻译
 user:翻译一下。 回答: 阿里巴巴云,成立于2009年,是全球领先的云计算提供商。我们致力于为全球数百万企业、开发者和政府机构提供全面的云计算服务,帮助他们实现数字化转型。我们的目标是成为全球领先的企业级云计算服务提供商。 #### 写前端代码
 user:看图写前端代码 回答: 根据提供的图片,以下是一个简单的前端代码示例,使用HTML和CSS来创建一个类似于图片中展示的页面布局。这个示例包括一个输入框用于提问、两个按钮(模型调用和应用创建)以及一些文本说明。
 html <!DOCTYPE html> <html lang="zh"> <head> <meta charset="UTF-8"> <meta name="viewport" content="width=device-width, initial-scale=1.0"> <title>阿里云百炼</title> <style> body { font-family: Arial, sans-serif; background-color: #f0f2f5; } .container { max-width: 1200px; margin: 0 auto; padding: 20px; } .header { text-align: center; margin-bottom: 20px; } .input-container { display: flex; justify-content: space-between; align-items: center; margin-bottom: 20px; } .input-box { width: calc(100% - 150px); height: 40px; border: 1px solid #ccc; padding: 10px; } .submit-button { width: 150px; height: 40px; background-color: #4CAF50; color: white; border: none; cursor: pointer; } .button-container { display: flex; justify-content: space-between; align-items: center; margin-top: 20px; } .button-container button { width: 200px; height: 40px; background-color: #007BFF; color: white; border: none; cursor: pointer; } .button-container button:hover { background-color: #0056b3; } </style> </head> <body> <div class="container"> <div class="header"> 你好,欢迎使用阿里云百炼 </div> <div class="input-container"> <div class="input-box"> 请输入您想问的问题 </div> <button class="submit-button">提交</button> </div> <div class="button-container"> <button>立即调用</button> <button>查看教程</button> </div> <div class="button-container"> <button>立即创建</button> <button>查看教程</button> </div> </div> </body> </html> 这个代码示例仅提供了基本的结构和样式,你可以根据需要添加更多的功能和样式。例如,你可以添加JavaScript来处理表单提交和按钮点击事件。 进程已结束,退出代码为 0 #### 提取表格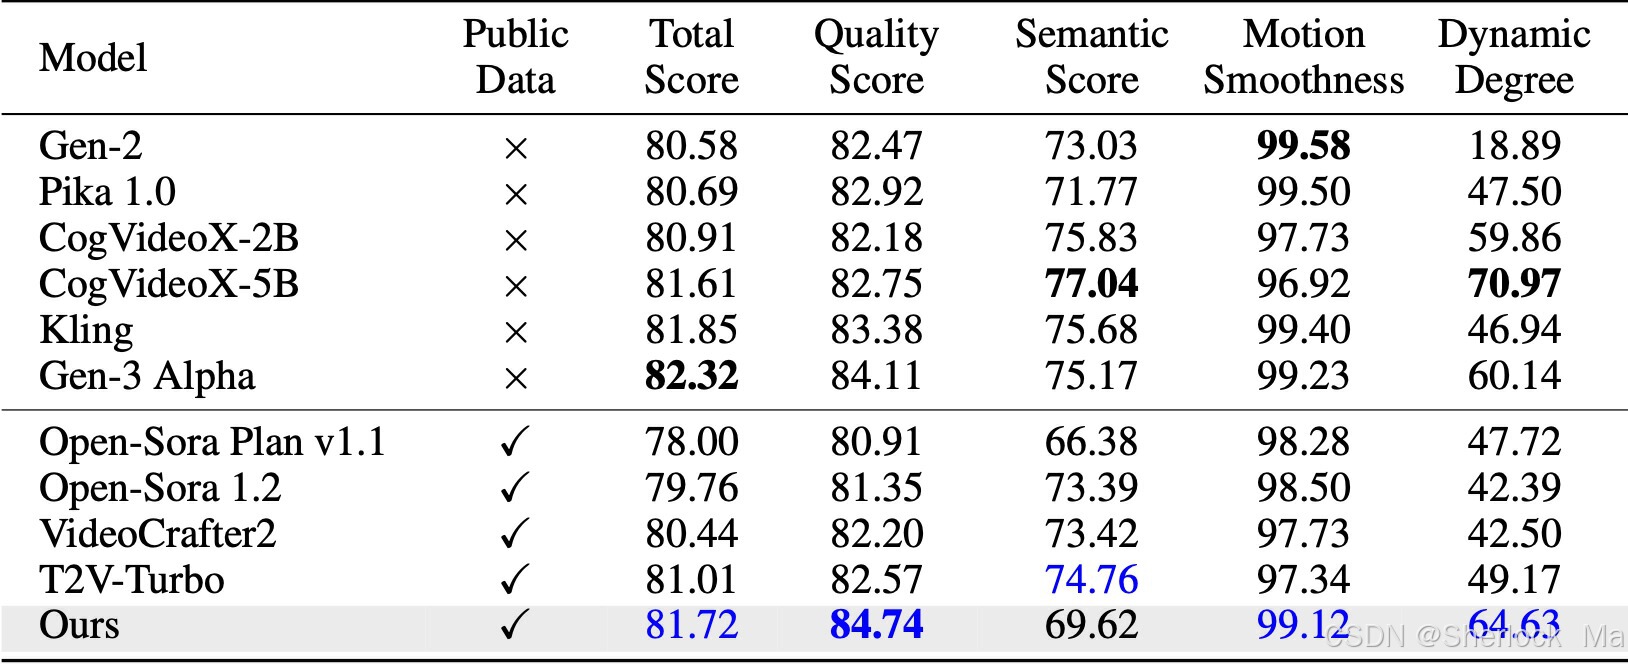 user:提取表格 回答: 以下是表格内容的文本形式: | Model | Public Data | Total Score | Quality Score | Semantic Score | Motion Smoothness | Dynamic Degree | |-------|-------------|-------------|---------------|----------------|--------------------|----------------| | Gen-2 | × | 80.58 | 82.47 | 73.03 | 99.58 | 18.89 | | Pika 1.0 | × | 80.69 | 82.92 | 71.77 | 99.50 | 47.50 | | CogVideoX-2B | × | 80.91 | 82.18 | 75.83 | 97.73 | 59.86 | | CogVideoX-5B | × | 81.61 | 82.75 | 77.04 | 96.92 | 70.97 | | Kling | × | 81.85 | 83.38 | 75.68 | 99.40 | 46.94 | | Gen-3 Alpha | × | 82.32 | 84.11 | 75.17 | 99.23 | 60.14 | | Open-Sora Plan v1.1 | √ | 78.00 | 80.91 | 66.38 | 98.28 | 47.72 | | Open-Sora 1.2 | √ | 79.76 | 81.35 | 73.39 | 98.50 | 42.39 | | VideoCrafter2 | √ | 80.44 | 82.20 | 73.42 | 97.73 | 42.50 | | T2V-Turbo | √ | 81.01 | 82.57 | 74.76 | 97.34 | 49.17 | | Ours | √ | 81.72 | 84.74 | 69.62 | 99.12 | 64.63 | #### 解答数学题
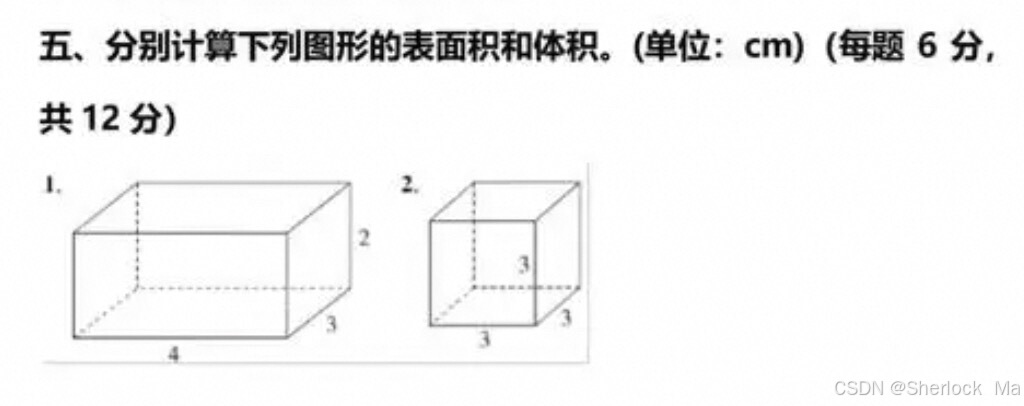 user:解一下这道题 回答: 好的,我们来分别计算两个图形的表面积和体积。 ### 图形1 这是一个长方体,长为4cm,宽为3cm,高为2cm。 #### 表面积 长方体的表面积公式是: [ A = 2lw + 2lh + 2wh ] 其中,( l ) 是长,( w ) 是宽,( h ) 是高。 代入数值: [ A = 2 imes 4 imes 3 + 2 imes 4 imes 2 + 2 imes 3 imes 2 ] [ A = 24 + 16 + 12 ] [ A = 52 ext{ cm}^2 ] #### 体积 长方体的体积公式是: [ V = lwh ] 代入数值: [ V = 4 imes 3 imes 2 ] [ V = 24 ext{ cm}^3 ] ### 图形2 这是一个正方体,边长为3cm。 #### 表面积 正方体的表面积公式是: [ A = 6a^2 ] 其中,( a ) 是边长。 代入数值: [ A = 6 imes 3^2 ] [ A = 6 imes 9 ] [ A = 54 ext{ cm}^2 ] #### 体积 正方体的体积公式是: [ V = a^3 ] 代入数值: [ V = 3^3 ] [ V = 27 ext{ cm}^3 ] 综上所述,图形1的表面积为52 cm2,体积为24 cm3;图形2的表面积为54 cm2,体积为27 cm3。 #### 其他同济子豪兄基于Qwen2-VL做的机器人:直播4.报错解决------IndexError: list index out of range
 assert “factor” in rope_scaling将config.json里面的"type": “mrope"改为"rope_type”: "mrope"原因:vllm版本不兼容,0.6.3新版本不需要如果多轮对话超了怎么办?****我们部署时对输入长度做了限制。**如果多轮对话很多次后,很有可能超出大模型支持的长度。一个解决方法:让大模型对历史信息做摘要。 给大模型一个提示词,让他总结上下文, 然后删除data[“message”]里面的上下文(user和assistant), 把大模型总结的部分输入进去(“assistant”)。因此,我们存储的不再是整个对话,而是其摘要版本。这有助于管理标记数量,并允许LLM有效地处理对话。感兴趣的同学可以了解一下LangChain的ConversationSummaryMemory。拓展阅读:大模型——如何实现超长多轮对话_大语言模型多轮对话-CSDN博客5.总结----Qwen2-VL是由阿里云推出的一款多模态大型视觉语言模型,它在前代Qwen-VL的基础上进行了重大更新,具有以下特点:1. 图像理解能力增强:Qwen2-VL在视觉理解基准测试中实现了最先进的性能,包括MathVista、DocVQA、RealWorldQA、MTVQA等,能够理解不同分辨率和比例的图像。2. 视频理解能力:Qwen2-VL能够理解超过20分钟的视频,通过在线流媒体能力,可以用于视频问答、对话、内容创作等。3. 代理操作能力:Qwen2-VL具备复杂推理和决策能力,可以集成到手机、机器人等设备中,基于视觉环境和文本指令自动操作。4. 多语言支持:除了支持英语和中文,Qwen2-VL现在还支持图像中不同语言文本的理解,包括大多数欧洲语言、日语、韩语、阿拉伯语、越南语等。5. 模型架构更新:Qwen2-VL引入了动态分辨率处理和多模态旋转位置嵌入(M-ROPE),增强了其多模态处理能力。6. 开源和API:Qwen2-VL的Qwen2-VL-2B和Qwen2-VL-7B模型已开源,并发布了Qwen2-VL-72B的API,方便开发者和研究人员使用。Qwen2-VL的这些特性使其在多模态场景中的表现与顶尖模型如GPT-4o和Claude3.5-Sonnet相匹配,超越了所有其他开放权重的LVLM模型。如果您在阅读这篇关于Qwen2-VL模型的总结后,觉得内容对您有所启发或者帮助,我非常希望您能够给予积极的反馈。请不吝您的赞美,通过点赞、收藏、关注来表达您对这篇文章的认可;最后,如果您对大模型或者深度学习技术话题感兴趣,欢迎关注我,这样您就可以第一时间获取到最新的信息和深入的分析。您的每一个点赞、每一次收藏和每一个关注,都是对我工作的最大支持和鼓励。

DAMO开发者矩阵,由阿里巴巴达摩院和中国互联网协会联合发起,致力于探讨最前沿的技术趋势与应用成果,搭建高质量的交流与分享平台,推动技术创新与产业应用链接,围绕“人工智能与新型计算”构建开放共享的开发者生态。
更多推荐
 4
4 0
0- 0


 已为社区贡献1条内容

所有评论(0)