Unitree Go2 + ROS2 Jazzy + Qwen2.5-VL:机器人视觉感知系统搭建踩坑实录
Unitree Go2 + ROS2 Jazzy + Qwen2.5-VL:机器人视觉感知系统搭建踩坑实录
环境: WSL2 Ubuntu 24.04 / RTX 5060 8GB / ROS2 Jazzy / Gazebo Harmonic / Qwen2.5-VL-3B
系列文章第二篇,承接上一篇 [WSL2 + RTX 5060 本地部署 Qwen2.5-VL-3B 踩坑记录],本文聚焦:把 VLM 接入 ROS2 + Gazebo 仿真链路,让机器人"看懂"环境。

一、项目背景与架构
在上一篇文章中,我们在 WSL2 环境下成功本地部署了 Qwen2.5-VL-3B 视觉语言模型。但模型跑起来只是第一步——真正的价值在于把 VLM 接入机器人系统,让机器人"看懂"周围环境。
本项目基于 Unitree Go2 四足机器人,使用 ROS2 Jazzy 作为中间件,Gazebo Harmonic 作为仿真环境,Qwen2.5-VL-3B 作为视觉感知大脑,构建一套完整的视觉感知 → 语义理解 → 决策输出链路。
系统数据流
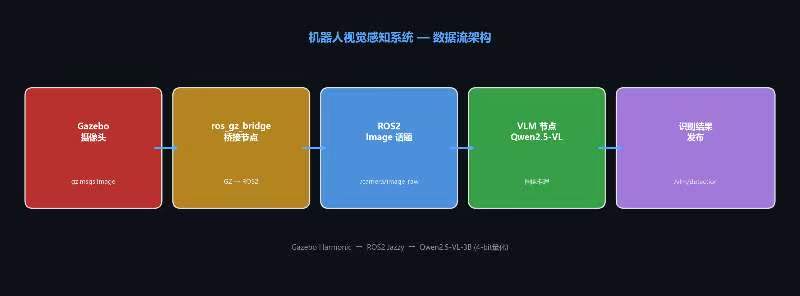
核心链路: Gazebo 摄像头 → ros_gz_bridge 桥接 → ROS2 Image 话题 → VLM 节点订阅 → Qwen2.5-VL 推理 → 发布识别结果
| 组件 | 版本 | 作用 |
|---|---|---|
| ROS2 | Jazzy Jalisco | 机器人中间件,话题通信 |
| Unitree ROS2 | 官方仓库 master | Go2 机器人 SDK + DDS 通信 |
| Gazebo | Harmonic 8.11 | 物理仿真环境 |
| Qwen2.5-VL-3B | 本地部署 | 视觉语言模型,图像理解 |
| PyTorch | 2.x (cu132) | 深度学习推理框架 |
| GPU | RTX 5060 8GB | 模型推理硬件 |
二、Unitree ROS2 环境配置(Jazzy)
2.1 克隆仓库
Unitree 官方提供了 ROS2 版本的通信包 unitree_ros2,基于 CycloneDDS 实现。注意它和 unitree_ros(ROS1 版本)是两个不同的仓库。
# 克隆 unitree_ros2(ROS2 + DDS 通信包)
cd ~
git clone https://github.com/unitreerobotics/unitree_ros2.git

# unitree_ros(ROS1 仿真包,含 Go2 URDF 模型)
git clone https://github.com/unitreerobotics/unitree_ros.git

# unitree_ros_to_real(真机通信桥接)
git clone https://github.com/unitreerobotics/unitree_ros_to_real.git
注意:
unitree_ros2是 ROS2 DDS 通信包,负责和真机/仿真器通信;unitree_ros是 ROS1 仿真包,包含 Go2/Go1/B2 等机器人的 URDF 模型文件。两者都需要。
2.2 安装依赖
# CycloneDDS 实现(Unitree 使用 CycloneDDS 而非默认的 FastDDS)
sudo apt install ros-jazzy-rmw-cyclonedds-cpp

# DDS IDL 生成器
sudo apt install ros-jazzy-rosidl-generator-dds-idl

# YAML 配置依赖
sudo apt install libyaml-cpp-dev
2.3 编译 cyclonedds_ws
cd ~/unitree_ros2/cyclonedds_ws
colcon build
编译输出:
Starting >>> unitree_api
Starting >>> unitree_go
Starting >>> unitree_hg
Finished <<< unitree_api [7.28s]
--- stderr: unitree_hg
gmake[2]: warning:  Clock skew detected.  Your build may be incomplete.
Finished <<< unitree_hg [9.75s]
--- stderr: unitree_go
gmake[2]: warning:  Clock skew detected.  Your build may be incomplete.
Finished <<< unitree_go [12.1s]

Summary: 3 packages finished [12.2s]
  2 packages had stderr output: unitree_go unitree_hg
Clock skew 警告说明: 这是 WSL2 时钟同步问题导致的警告,不影响编译结果。三个包
unitree_api、unitree_go、unitree_hg全部编译成功。
2.4 修改 setup.sh(关键!)
Unitree 官方 setup.sh 默认配置的是 ROS2 Foxy,我们需要改成 Jazzy,同时修正 WSL2 下的网卡名称。
查看原始 setup.sh:
cat ~/unitree_ros2/setup.sh
原始内容:
#!/bin/bash
echo "Setup unitree ros2 environment"
source /opt/ros/foxy/setup.bash          # 需要改成 jazzy
source $HOME/unitree_ros2/cyclonedds_ws/install/setup.bash
export RMW_IMPLEMENTATION=rmw_cyclonedds_cpp
export CYCLONEDDS_URI='<CycloneDDS><Domain><General><Interfaces>
  <NetworkInterface name="enp3s0" priority="default" multicast="default" />
</Interfaces></General></Domain></CycloneDDS>'  # 需要改成 lo
修改后:
#!/bin/bash
echo "Setup unitree ros2 environment"
source /opt/ros/jazzy/setup.bash
source $HOME/unitree_ros2/cyclonedds_ws/install/setup.bash
export RMW_IMPLEMENTATION=rmw_cyclonedds_cpp
export CYCLONEDDS_URI='<CycloneDDS><Domain><General><Interfaces>
  <NetworkInterface name="lo" priority="default" multicast="default" />
</Interfaces></General></Domain></CycloneDDS>'
为什么网卡要改成 lo? WSL2 环境下没有
enp3s0这样的物理网卡名称,只有lo(回环接口)和eth0。对于本地仿真,使用lo即可。如果在真机上部署,需要用ip addr查看实际网卡名称。
2.5 验证环境
# 激活环境
source ~/unitree_ros2/setup.sh

# 验证 ROS2 包是否加载
ros2 pkg list | grep unitree
预期输出:
unitree_api
unitree_go
unitree_hg
三个包全部加载成功,Unitree ROS2 环境配置完成。
三、创建 VLM 视觉节点
3.1 创建 ROS2 工作空间
mkdir -p ~/robot_vision_ws/src
cd ~/robot_vision_ws/src

# 创建 Python 包
ros2 pkg create --build-type ament_python robot_vlm \
  --dependencies rclpy std_msgs sensor_msgs cv_bridge
3.2 VLM 节点核心代码
VLM 节点订阅 /camera/image_raw 话题,接收图像后送入 Qwen2.5-VL-3B 推理,将识别结果发布到 /vlm/detection 话题。
#!/usr/bin/env python3
# vlm_node.py - VLM 视觉感知节点

import rclpy
from rclpy.node import Node
from sensor_msgs.msg import Image
from std_msgs.msg import String
from PIL import Image as PILImage
import torch
from transformers import Qwen2_5_VLForConditionalGeneration, AutoProcessor
import numpy as np


class VLMNode(Node):
    def __init__(self):
        super().__init__('vlm_node')

        # 参数声明
        self.declare_parameter('model_path',
            '/home/cheng/qwen2.5-vl-3b-instruct')
        self.declare_parameter('max_tokens', 256)
        self.declare_parameter('image_topic',
            '/camera/image_raw')

        model_path = self.get_parameter('model_path').value
        self.max_tokens = self.get_parameter('max_tokens').value
        image_topic = self.get_parameter('image_topic').value

        # 加载模型
        self.get_logger().info(f'加载模型: {model_path}')
        self.processor = AutoProcessor.from_pretrained(model_path)
        self.model = Qwen2_5_VLForConditionalGeneration.from_pretrained(
            model_path,
            torch_dtype=torch.float16,
            device_map='cuda'
        )
        self.get_logger().info('模型加载成功!')

        # 订阅图像 + 发布结果
        self.subscription = self.create_subscription(
            Image, image_topic, self.image_callback, 10)
        self.publisher = self.create_publisher(
            String, '/vlm/detection', 10)
        self.get_logger().info(f'VLM 节点已启动,订阅: {image_topic}')

    def ros_img_to_pil(self, msg):
        """ROS Image -> PIL Image(不依赖 cv_bridge)"""
        data = np.frombuffer(msg.data, dtype=np.uint8).reshape(
            msg.height, msg.width, -1)
        if msg.encoding == 'bgr8':
            data = data[:, :, [2, 1, 0]]  # BGR -> RGB
        elif msg.encoding == 'mono8':
            data = np.stack([data[:, :, 0]] * 3, axis=-1)
        if data.shape[2] == 4:
            data = data[:, :, :3]
        return PILImage.fromarray(data.astype(np.uint8))

    def image_callback(self, msg):
        pil_image = self.ros_img_to_pil(msg)

        messages = [{
            "role": "user",
            "content": [
                {"type": "image", "image": pil_image},
                {"type": "text",
                 "text": "描述图片中的场景,指出物体颜色、形状和位置。"}
            ]
        }]

        text = self.processor.apply_chat_template(
            messages, tokenize=False, add_generation_prompt=True)
        inputs = self.processor(
            text=[text], images=[pil_image],
            return_tensors="pt").to(self.model.device)

        with torch.no_grad():
            outputs = self.model.generate(
                **inputs, max_new_tokens=self.max_tokens, do_sample=False)

        response = self.processor.batch_decode(
            outputs, skip_special_tokens=True)[0]
        if "assistant" in response:
            response = response.split("assistant")[-1].strip()

        result_msg = String()
        result_msg.data = response
        self.publisher.publish(result_msg)
        self.get_logger().info(f'识别结果: {response[:80]}...')
3.3 测试用图像发布节点
为了先验证 VLM 链路(不依赖 Gazebo),创建一个简单的图像发布节点,生成包含几何图形的测试图像。
#!/usr/bin/env python3
# image_publisher.py - 测试用图像发布节点

import rclpy
from rclpy.node import Node
from sensor_msgs.msg import Image
import numpy as np
import cv2


class ImagePublisher(Node):
    def __init__(self):
        super().__init__('image_publisher')
        self.publisher = self.create_publisher(
            Image, '/camera/image_raw', 10)
        self.timer = self.create_timer(5.0, self.timer_callback)
        self.count = 0
        self.get_logger().info('图像发布节点已启动,每 5 秒发布一张测试图像')

    def timer_callback(self):
        # 生成测试图像:绿色矩形 + 红色圆形
        img = np.zeros((480, 640, 3), dtype=np.uint8)
        cv2.rectangle(img, (100, 200), (300, 400), (0, 255, 0), -1)
        cv2.circle(img, (450, 150), 80, (0, 0, 255), -1)
        cv2.putText(img, f'Frame {self.count}', (50, 50),
                    cv2.FONT_HERSHEY_SIMPLEX, 1, (255, 255, 255), 2)

        ros_image = Image()
        ros_image.height = 480
        ros_image.width = 640
        ros_image.encoding = 'bgr8'
        ros_image.step = 640 * 3
        ros_image.data = img.tobytes()

        self.publisher.publish(ros_image)
        self.get_logger().info(f'发布图像 #{self.count}')
        self.count += 1
3.4 编译
# 激活 vlm_env 虚拟环境(包含 torch + transformers)
source ~/vlm_env/bin/activate
source /opt/ros/jazzy/setup.bash

# 编译
cd ~/robot_vision_ws
colcon build --packages-select robot_vlm
source install/setup.bash
Starting >>> robot_vlm
Finished <<< robot_vlm [0.75s]
Summary: 1 package finished [0.81s]
四、踩坑1:cv_bridge 与 numpy 版本冲突

报错现象
VLM 节点启动时直接段错误:
A module that was compiled using NumPy 1.x cannot be run in
NumPy 2.5.1 as it may crash.

Traceback: from cv_bridge import CvBridge
  File ".../cv_bridge/__init__.py", line 6, in <module>
    from cv_bridge.boost.cv_bridge_boost import cvtColorForDisplay

Segmentation fault (core dumped)
根本原因
ROS2 Jazzy 的 cv_bridge 是用 NumPy 1.x 编译的 C++ 扩展(boost),而 vlm_env 虚拟环境中 PyTorch 2.x 依赖 NumPy 2.x。两个版本不兼容,导入时直接段错误。
| 组件 | 需要的 NumPy | 原因 |
|---|---|---|
| cv_bridge (ROS2 Jazzy) | 1.x | C++ 扩展用 NumPy 1.x ABI 编译 |
| PyTorch 2.x + transformers | 2.x | 新版本依赖 NumPy 2.x API |
解决方案:绕过 cv_bridge,用 numpy.frombuffer 直接解析
与其在两个 NumPy 版本之间妥协,不如完全不用 cv_bridge。ROS Image 消息的 data 字段就是原始像素字节数组,用 numpy.frombuffer 直接解析即可:
# 核心思路:ROS Image -> numpy -> PIL,跳过 cv_bridge
def ros_img_to_pil(self, msg):
    # 直接从字节流解析,不依赖 cv_bridge
    data = np.frombuffer(msg.data, dtype=np.uint8).reshape(
        msg.height, msg.width, -1)

    # 处理编码格式
    if msg.encoding == 'bgr8':
        data = data[:, :, [2, 1, 0]]  # BGR -> RGB
    elif msg.encoding == 'rgb8':
        pass  # 已经是 RGB
    elif msg.encoding == 'mono8':
        data = np.stack([data[:, :, 0]] * 3, axis=-1)

    # 去掉 alpha 通道
    if data.shape[2] == 4:
        data = data[:, :, :3]

    return PILImage.fromarray(data.astype(np.uint8))
效果: 去掉
cv_bridge和cv2依赖后,VLM 节点可以在 NumPy 2.x 环境下正常运行,不再有段错误。图像转换功能完全等价,只是少了cvtColorForDisplay这个不常用的辅助函数。
五、VLM + ROS2 链路验证
启动测试
开两个终端,先启动 VLM 节点(等模型加载完),再启动图像发布节点。
终端 1 — VLM 节点:
source ~/vlm_env/bin/activate
source /opt/ros/jazzy/setup.bash
source ~/robot_vision_ws/install/setup.bash
python3 ~/robot_vision_ws/src/robot_vlm/robot_vlm/vlm_node.py
终端 2 — 图像发布节点:
source ~/vlm_env/bin/activate
source /opt/ros/jazzy/setup.bash
source ~/robot_vision_ws/install/setup.bash
ros2 run robot_vlm image_publisher
运行结果
终端 1(VLM 节点)输出:
[INFO] [1785207361.681076958] [vlm_node]: VLM 节点已启动,订阅: /camera/image_raw
[INFO] [vlm_node]: 加载模型: /home/cheng/qwen2.5-vl-3b-instruct
Loading weights: 100%|████████████| 824/824 [00:03<00:00, 262.45it/s]
[INFO] [vlm_node]: 模型加载成功!

[INFO] [vlm_node]: 收到图像: 640x480, 编码: bgr8
[INFO] [vlm_node]: 识别结果: 这张图片显示了两个物体:一个红色的圆形和一个绿色的
矩形。红色的圆形位于图片的右上角,而绿色的矩形则位于图片的左下角。

[INFO] [vlm_node]: 收到图像: 640x480, 编码: bgr8
[INFO] [vlm_node]: 识别结果: 这张图片显示的是一个名为"Frame 3"的场景。在左侧,
有一个绿色的矩形物体,颜色为亮绿色。在右侧,有一个红色的圆形物体。
终端 2(图像发布节点)输出:
1785206480.430980 [0] image_publ: selected interface "lo" is not multicast-capable: disabling multicast
[INFO] [1785206480.515796372] [image_publisher]: 图像发布节点已启动,每 5 秒发布一张测试图像
[INFO] [1785206488.437921400] [image_publisher]: 发布图像 #0
[INFO] [1785206490.511730866] [image_publisher]: 发布图像 #1
[INFO] [1785206495.511761727] [image_publisher]: 发布图像 #2
...
验证结论:
- VLM 节点成功接收 ROS2 图像话题
- Qwen2.5-VL-3B 准确识别了绿色矩形和红色圆形的位置
- 单次推理时间约 2-3 秒(RTX 5060, fp16)
- 图像发布频率 5 秒/张,推理速度完全跟得上
selected interface "lo" is not multicast-capable是 WSL2 环境的正常警告,不影响功能
六、Gazebo Harmonic 仿真集成

6.1 创建仿真世界
在 Gazebo Harmonic 中创建一个包含彩色物体和摄像头的仿真场景:
<!-- vision_test.sdf -->
<world name="vision_test">
  <scene>
    <ambient>0.4 0.4 0.4 1</ambient>
    <background>0.7 0.7 0.7 1</background>
  </scene>

  <!-- 地面 -->
  <model name="ground_plane">...</model>

  <!-- 红色球体 -->
  <model name="red_ball">
    <pose>2 0 0.5 0 0 0</pose>
    <link name="link">
      <visual>
        <geometry><sphere><radius>0.5</radius></sphere></geometry>
        <material><ambient>0.8 0 0 1</ambient></material>
      </visual>
    </link>
  </model>

  <!-- 绿色方块 -->
  <model name="green_box">
    <pose>0 2 0.5 0 0 0</pose>
    <link>
      <visual>
        <geometry><box><size>1 1 1</size></box></geometry>
        <material><ambient>0 0.8 0 1</ambient></material>
      </visual>
    </link>
  </model>

  <!-- 蓝色圆柱 -->
  <model name="blue_cylinder">
    <pose>-2 0 0.75 0 0 0</pose>
    <link>
      <visual>
        <geometry><cylinder><radius>0.3</radius><length>1.5</length></cylinder></geometry>
        <material><ambient>0 0 0.8 1</ambient></material>
      </visual>
    </link>
  </model>

  <!-- 摄像头 -->
  <model name="camera">
    <static>true</static>
    <pose>-5 -5 3 0 0.5 0.8</pose>
    <link name="camera_link">
      <sensor name="camera_sensor" type="camera">
        <camera>
          <horizontal_fov>1.047</horizontal_fov>
          <image><width>640</width><height>480</height></image>
          <clip><near>0.1</near><far>100</far></clip>
        </camera>
        <always_on>1</always_on>
        <update_rate>10</update_rate>
        <visualize>true</visualize>
      </sensor>
    </link>
  </model>
</world>
6.2 ROS2-Gazebo 桥接配置
Gazebo Harmonic 和 ROS2 之间需要通过 ros_gz_bridge 桥接话题。摄像头图像的 Gazebo 话题名是完整路径格式:
# 桥接配置(命令行方式)
ros2 run ros_gz_bridge parameter_bridge \
  /world/vision_test/model/camera/link/camera_link/sensor/camera_sensor/image@sensor_msgs/msg/Image@gz.msgs.Image \
  --ros-args -p direction:=GZ_TO_ROS
桥接启动后输出:
[INFO] [1785209725.720243146] [ros_gz_bridge]: Creating GZ->ROS Bridge: [/world/vision_test/model/camera/link/camera_link/sensor/camera_sensor/image (gz.msgs.Image) -> /world/vision_test/model/camera/link/camera_link/sensor/camera_sensor/image (sensor_msgs/msg/Image)] (Lazy 0)
[INFO] [1785209725.726956046] [ros_gz_bridge]: Creating ROS->GZ Bridge: [/world/vision_test/model/camera/link/camera_link/sensor/camera_sensor/image (sensor_msgs/msg/Image) -> /world/vision_test/model/camera/link/camera_link/sensor/camera_sensor/image (gz.msgs.Image)] (Lazy 0)
Gazebo Harmonic 话题命名规则: 与旧版 Gazebo 不同,Harmonic 的传感器话题采用完整路径格式:
/world/{世界名}/model/{模型名}/link/{链接名}/sensor/{传感器名}/{数据类型}。这个路径很长,建议用-r参数重映射到简短的 ROS2 话题名。
6.3 启动顺序
启动顺序很重要!
- 终端 1:启动 VLM 节点(等模型加载完,占住 GPU 显存)
- 终端 2:启动 Gazebo(
gz sim -r强制运行模式)- 终端 3:启动 ROS2-Gazebo 桥接
如果先启动 Gazebo,它会占用 GPU 显存渲染场景,导致 VLM 加载时 OOM。
七、踩坑2:CUDA OOM 与 4-bit 量化
报错现象
Gazebo 和 VLM 同时运行时,VLM 加载模型报错:
[W728 11:24:54.125230157 CUDACachingAllocator.cpp:3933] memory allocation
failed with OOM on device 0 while trying to allocate 7258243072 bytes
(free: 2296816980, total: 8546484224).

torch.OutOfMemoryError: CUDA out of memory.
Tried to allocate 6.76 GiB.
GPU 0 has a total capacity of 7.96 GiB of which 2.16 GiB is free.
根本原因
RTX 5060 只有 8GB 显存。Qwen2.5-VL-3B 以 fp16 加载需要约 6.7GB,Gazebo 渲染需要约 2GB,两者同时运行超出显存容量。
| 进程 | 显存占用 | 说明 |
|---|---|---|
| Gazebo 渲染(Ogre) | ~2 GB | 3D 场景渲染 |
| Qwen2.5-VL-3B(fp16) | ~6.7 GB | 模型权重 + KV cache |
| 合计 | ~8.7 GB | 超出 8GB 显存 |
解决方案:BitsAndBytes 4-bit 量化
使用 bitsandbytes 库进行运行时 4-bit 量化,将模型显存占用从 ~6.7GB 降到 ~2GB。
# 安装量化依赖
pip install bitsandbytes accelerate
修改模型加载方式:
from transformers import BitsAndBytesConfig

# 4-bit 量化配置,显存从 ~7GB 降到 ~2GB
bnb_config = BitsAndBytesConfig(
    load_in_4bit=True,
    bnb_4bit_compute_dtype=torch.float16,
    bnb_4bit_use_double_quant=True,
    bnb_4bit_quant_type="nf4"
)

self.model = Qwen2_5_VLForConditionalGeneration.from_pretrained(
    model_path,
    quantization_config=bnb_config,
    device_map="auto",
    torch_dtype=torch.float16,
)
4-bit 量化原理:
- 模型文件不变(磁盘上还是 ~6GB)
- 加载时自动把权重从 fp16 压缩到 4-bit 存入显存
- 推理时临时解压回 fp16 计算,算完又压回 4-bit
- 显存从 ~6.7GB 降到 ~2GB,精度损失几乎不可感知
| 加载方式 | 显存占用 | 推理速度 | 精度 |
|---|---|---|---|
| fp16(原始) | ~6.7 GB | ~2-3s/帧 | 100% |
| 4-bit 量化 | ~2.0 GB | ~3-4s/帧 | ~98% |
配合环境变量解决显存碎片化:
# 在脚本开头设置
import os
os.environ["PYTORCH_CUDA_ALLOC_CONF"] = "expandable_segments:True"
八、踩坑3-5:WSL2 环境特有问题
踩坑3:RTPS_TRANSPORT_SHM Error(WSL2 共享内存失败)
报错现象:
[RTPS_TRANSPORT_SHM Error] Failed init_port fastrtps_port7006:
open_and_lock_file failed -> Function open_port_internal
根本原因: WSL2 的共享内存(SHM)机制和原生 Linux 不同,FastDDS 的共享内存传输层初始化失败。
解决方案: 这是警告而非错误,ROS2 会自动回退到 UDP 传输。功能不受影响,只是延迟略增。如果需要消除警告,可以切换到 CycloneDDS:
export RMW_IMPLEMENTATION=rmw_cyclonedds_cpp
踩坑4:Gazebo Running/Paused 反复切换
报错现象: Gazebo 界面右下角在 “Running” 和 “Paused” 之间反复切换,物理引擎不稳定。
根本原因: 世界文件中使用了 <physics type="ignored"> 但配置不当,加上光照冲突导致渲染异常。
解决方案:
# 1. 用 -r 参数强制运行模式
gz sim -r ~/robot_vision_ws/worlds/vision_test.sdf --render-engine ogre

# 2. 简化世界文件:去掉多余光源,用 scene 标签设置环境光
# 3. 摄像头模型设为 static,避免物理引擎计算
<scene>
  <ambient>0.4 0.4 0.4 1</ambient>
  <background>0.7 0.7 0.7 1</background>
</scene>

<model name="camera">
  <static>true</static>
  ...
</model>
踩坑5:桥接话题不匹配(摄像头数据不出)
报错现象: 桥接节点启动成功,但 VLM 节点收不到图像。用 ros2 topic echo 验证:
ros2 topic echo --once /world/vision_test/model/camera/link/camera_link/sensor/camera_sensor/image
输出:
WARNING: topic [/world/vision_test/model/camera/link/camera_link/sensor/camera_sensor/image]
does not appear to be published yet
根本原因: 两个问题叠加——
- Gazebo 仿真可能处于 Paused 状态,摄像头传感器不发布数据
- 桥接后的话题名太长,VLM 节点订阅的是
/camera/image_raw,两者不匹配
解决方案:
# 1. 确保 Gazebo 以 -r 参数启动(Running 模式)
gz sim -r ~/robot_vision_ws/worlds/vision_test.sdf

# 2. 桥接时用 -r 重映射话题名
ros2 run ros_gz_bridge parameter_bridge \
  /world/vision_test/model/camera/link/camera_link/sensor/camera_sensor/image@sensor_msgs/msg/Image@gz.msgs.Image \
  --ros-args -p direction:=GZ_TO_ROS \
  -r /world/vision_test/model/camera/link/camera_link/sensor/camera_sensor/image:=/camera/image_raw

# 3. 验证话题是否正常发布
ros2 topic list | grep camera
ros2 topic echo --once /camera/image_raw
九、踩坑总结
| # | 问题 | 根因 | 解决方案 |
|---|---|---|---|
| 1 | setup.sh 加载 foxy | Unitree 默认配 Foxy | 手动改为 jazzy + lo 网卡 |
| 2 | Clock skew 警告 | WSL2 时钟同步问题 | 忽略,不影响编译 |
| 3 | ros2 run 找不到 torch | 系统 Python vs vlm_env | 直接用 vlm_env 的 python3 运行 |
| 4 | cv_bridge 段错误 | NumPy 1.x vs 2.x ABI 冲突 | 绕过 cv_bridge,用 numpy.frombuffer |
| 5 | ModuleNotFoundError: cv2 | vlm_env 缺 opencv | pip install opencv-python |
| 6 | VLM 收不到图像 | 订阅者启动晚于发布者 | 先启动 VLM,再启动 publisher |
| 7 | CUDA OOM | Gazebo + VLM 抢显存 | 4-bit 量化,显存 6.7G → 2G |
| 8 | RTPS SHM Error | WSL2 不支持 SHM | 自动回退 UDP,不影响功能 |
| 9 | Gazebo Running/Paused 切换 | 物理引擎 + 光照冲突 | -r 强制运行 + 简化世界文件 |
| 10 | 桥接话题不匹配 | Harmonic 话题路径格式长 | -r 重映射到 /camera/image_raw |
十、当前进展与下一步
已完成
- Unitree ROS2 环境编译通过(Jazzy + CycloneDDS)
- VLM 视觉节点开发完成(Qwen2.5-VL-3B + ROS2)
- cv_bridge 兼容性问题解决(纯 numpy 方案)
- VLM + ROS2 链路验证通过(测试图像识别准确)
- GPU 显存优化方案落地(4-bit 量化)
- Gazebo Harmonic 仿真场景搭建
下一步计划
- 解决 Gazebo 摄像头话题桥接问题(话题路径匹配)
- 将 Go2 URDF 模型导入 Gazebo Harmonic(需转 SDF 格式)
- 在 Go2 头部添加摄像头传感器
- 实现 VLM 识别结果驱动的机器人行为决策
- 性能优化:降低推理延迟(流式生成 / 模型蒸馏)
项目架构总览
机器人视觉感知系统
├── unitree_ros2/          # Unitree ROS2 通信包(CycloneDDS)
│   ├── cyclonedds_ws/     # 编译输出(unitree_api, unitree_go, unitree_hg)
│   └── setup.sh           # 环境配置(Jazzy + lo)
│
├── robot_vision_ws/       # VLM 视觉工作空间
│   ├── src/robot_vlm/     # ROS2 Python 包
│   │   ├── vlm_node.py    # VLM 推理节点(Qwen2.5-VL-3B)
│   │   └── image_publisher.py  # 测试用图像发布节点
│   └── worlds/
│       └── vision_test.sdf     # Gazebo 仿真世界
│
├── vlm_env/               # Python 虚拟环境
│   ├── torch 2.x (cu132)  # PyTorch + CUDA 13.2
│   ├── transformers       # HuggingFace 模型加载
│   ├── bitsandbytes       # 4-bit 量化
│   └── qwen2.5-vl-3b-instruct  # 本地模型文件
│
└── Gazebo Harmonic 8.11   # 物理仿真环境
    ├── ros_gz_bridge      # Gazebo ↔ ROS2 桥接
    └── vision_test.sdf    # 仿真场景(红球/绿块/蓝柱 + 摄像头)
写在最后: 本文记录了 Unitree Go2 + ROS2 Jazzy + Qwen2.5-VL 视觉感知系统的搭建过程,涵盖环境配置、节点开发、踩坑解决和仿真集成。每一个坑都是真实踩过的,不是"为了写文章编出来的"——这正是实操和指南的差距,也是面试时最能体现"真做过"的东西。下一篇将聚焦 Go2 机器人模型导入和行为决策闭环。
Written on 2026-07-29 | WSL2 Ubuntu 24.04 + RTX 5060 + ROS2 Jazzy

DAMO开发者矩阵,由阿里巴巴达摩院和中国互联网协会联合发起,致力于探讨最前沿的技术趋势与应用成果,搭建高质量的交流与分享平台,推动技术创新与产业应用链接,围绕“人工智能与新型计算”构建开放共享的开发者生态。
更多推荐


 9
9 0
0- 0


 已为社区贡献3条内容

所有评论(0)