YOLOV8多模态目标检测(RGB-D)(first change)
本文主要记录了博主在针对网球拾取小车项目中运用到的多模态检测
额,那个先跟大家道个歉,后来在项目中调用的时候发现best.pt还是RGB模型,
不过现在已经改好了┭┮﹏┭┮。
如果大家还有什么不懂的,可以去我的仓库看看README.md,留言和私信我不一定看到
地址:M-Sir-zhou/yolov8-rgbd-detection
进不去的话,用Steam++,最近发现还蛮好用,就是这个——
修改说明!!!
模型和配置都是4通道,但训练权重还是3通道,基本有6个原因,下面是对应解决步骤。
1、修改数据加载器 | `ultralytics/data/dataset.py`
2、创建4通道预训练权重 | `scripts/prepare_4ch_weights.py`
3、禁用不兼容的数据增强 | `train_rgbd_direct.py`
4、修复Windows多进程 | `train_rgbd_direct.py`
5、禁用AMP检查 | `train_rgbd_direct.py`
6、 验证模型通道数 | `train_rgbd_direct.py`
排名分先后,重要程度不同
步骤 1: 修改数据加载器(文件位置 `ultralytics/data/dataset.py` (第 92-191 行))
修改了 `load_image()` 方法,使之能够:
1. 读取4通道PNG图像
2. 正确转换颜色空间(BGRA → RGBA)
3. 返回正确数量的值(3个)
完整代码:
def load_image(self, i):
    """Loads 1 image from dataset index 'i', returns (im, original hw, resized hw)."""
    # 检查是否为RGB-D模式
    if hasattr(self, "rgbd_mode") and self.rgbd_mode:
        im_path = str(self.im_files[i])

        # 首先尝试读取为4通道图像(已融合的RGBD PNG)
        im = cv2.imread(im_path, cv2.IMREAD_UNCHANGED)  # 🔑 关键:读取所有通道
        if im is None:
            raise FileNotFoundError(f"Image not found: {im_path}")

        # 如果图像已经是4通道,直接使用
        if im.ndim == 3 and im.shape[2] == 4:
            # BGRA -> RGBA (转换颜色空间,保持4通道)
            b, g, r, a = cv2.split(im)
            im = cv2.merge([r, g, b, a])  # RGBA格式
            h, w = im.shape[:2]

            # 缩放到 imgsz(保持4通道)
            max_dim = max(h, w)
            ratio = self.imgsz / max_dim
            if ratio != 1:
                new_h, new_w = int(h * ratio), int(w * ratio)
                im = cv2.resize(im, (new_w, new_h), interpolation=cv2.INTER_LINEAR)
                return im, (h, w), im.shape[:2]  # 🔑 返回3个值

            return im, (h, w), (h, w)  # 没有缩放,两个尺寸相同

        # 如果不是4通道,尝试分离加载RGB和Depth
        else:
            # ... (分离加载逻辑,见完整代码)
            pass
    else:
        # 原有的3通道图像加载逻辑(保持不变)
        im = cv2.imread(self.im_files[i])
        if im is None:
            raise FileNotFoundError(f"Image '{self.im_files[i]}' does not exist.")
        im = cv2.cvtColor(im, cv2.COLOR_BGR2RGB)
        h, w = im.shape[:2]
        r = self.imgsz / max(h, w)
        if r != 1:
            im = cv2.resize(im, (int(w * r), int(h * r)), interpolation=cv2.INTER_LINEAR)
            return im, (h, w), im.shape[:2]
        return im, (h, w), (h, w)
步骤 2: 创建4通道预训练权重:(创建位置 scripts/prepare_4ch_weights.py)
完整代码:
import torch
import sys
from pathlib import Path

# 添加项目根目录到路径
sys.path.insert(0, str(Path(__file__).parent.parent))

from ultralytics import YOLO

def create_4ch_pretrained_weights():
    print("=" * 60)
    print("创建4通道RGBD预训练权重")
    print("=" * 60)

    # 1. 加载原始3通道模型
    print("\n步骤1: 加载3通道YOLOv8n模型...")
    model_3ch = YOLO('yolov8n.pt')

    # 2. 创建4通道模型架构
    print("\n步骤2: 创建4通道模型架构...")
    model_4ch = YOLO('ultralytics/cfg/models/v8/yolov8-rgbd.yaml')

    # 3. 获取权重
    state_dict_3ch = model_3ch.model.state_dict()
    state_dict_4ch = model_4ch.model.state_dict()

    print("\n步骤3: 转换权重...")
    print(f"  3通道第一层: {state_dict_3ch['model.0.conv.weight'].shape}")
    print(f"  4通道第一层: {state_dict_4ch['model.0.conv.weight'].shape}")

    # 4. 复制除第一层外的所有权重
    new_state_dict = {}
    for key, value in state_dict_3ch.items():
        if key == 'model.0.conv.weight':
            # 🔑 关键:扩展第一层权重从3通道到4通道
            weight_3ch = value  # [16, 3, 3, 3]
            weight_4ch = torch.zeros(16, 4, 3, 3)  # [16, 4, 3, 3]

            # 复制RGB三个通道
            weight_4ch[:, :3, :, :] = weight_3ch

            # 初始化第4通道(深度)使用小随机值
            weight_4ch[:, 3, :, :] = torch.randn(16, 3, 3) * 0.01

            new_state_dict[key] = weight_4ch
            print(f"  ✓ 转换第一层: {weight_3ch.shape} → {weight_4ch.shape}")
        else:
            new_state_dict[key] = value

    # 5. 加载新权重到4通道模型
    model_4ch.model.load_state_dict(new_state_dict, strict=False)

    # 6. 保存为新的预训练权重
    output_path = 'yolov8_4ch_direct.pt'
    torch.save({
        'model': model_4ch.model,
        'optimizer': None,
        'epoch': 0,
        'updates': 0,
    }, output_path)

    print(f"\n✅ 成功!4通道预训练权重已保存到: {output_path}")

    # 7. 验证
    print("\n步骤4: 验证新模型...")
    model_verify = YOLO(output_path)
    first_layer = model_verify.model.model[0].conv
    print(f"  第一层卷积: {first_layer}")
    print(f"  输入通道数: {first_layer.weight.shape[1]}")

    if first_layer.weight.shape[1] == 4:
        print("  ✓ 验证成功:模型是4通道输入")
    else:
        print(f"  ✗ 验证失败:模型是{first_layer.weight.shape[1]}通道输入")

    print("\n" + "=" * 60)

if __name__ == '__main__':
    create_4ch_pretrained_weights()
运行说明:
conda activate yolov8
python scripts/prepare_4ch_weights.py
预期输出:
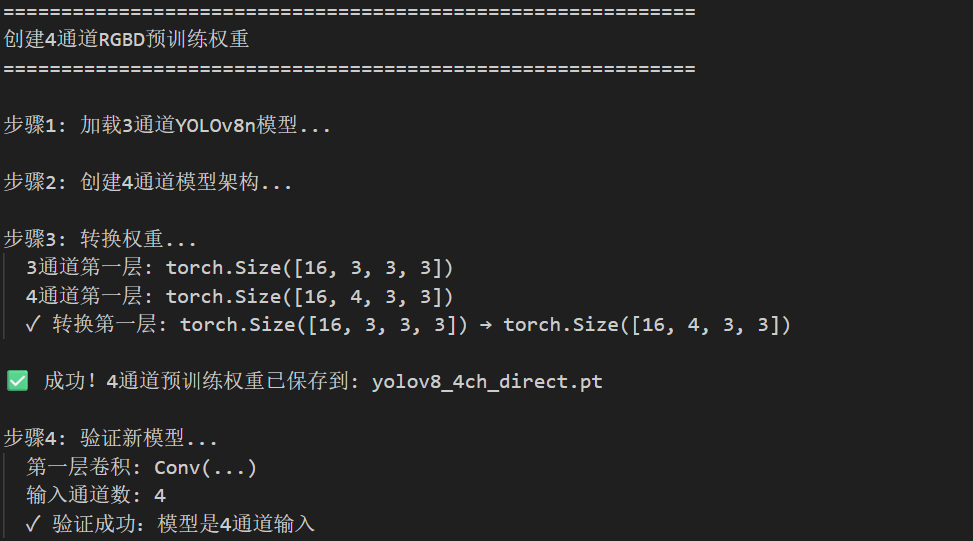
步骤 3: 创建训练脚本(根目录下即可)
完整代码:
from ultralytics import YOLO
import torch
from pathlib import Path

def main():
    print("=" * 60)
    print("开始训练RGBD 4通道模型")
    print("=" * 60)

    # 1. 加载4通道模型
    print("\n1. 加载模型...")
    model = YOLO('yolov8_4ch_direct.pt')

    # 验证模型是4通道
    first_layer = model.model.model[0].conv
    print(f"第一层卷积输入通道: {first_layer.weight.shape[1]}")
    assert first_layer.weight.shape[1] == 4, "模型不是4通道!"
    print("✓ 模型确认为4通道")

    # 2. 开始训练
    print("\n2. 开始训练...")
    print("配置:")
    print("  - 数据集: datasets/tennis-yolo/tennis-yolo.yaml")
    print("  - Epochs: 100")
    print("  - Batch size: 4")
    print("  - Image size: 640")
    print("  - Device: cuda:0")

    try:
        results = model.train(
            data='datasets/tennis-yolo/tennis-yolo.yaml',
            epochs=100,
            imgsz=640,
            batch=4,
            device='cuda:0' if torch.cuda.is_available() else 'cpu',
            name='train_rgbd_python_api',
            project='runs/detect',
            patience=50,
            save=True,
            plots=True,
            verbose=True,
            workers=0,  # 🔑 Windows需要设置为0避免多进程问题
            cache=False,
            amp=False,  # 🔑 禁用AMP以避免检查3通道模型
            # 🔑 禁用所有可能导致buffer问题的数据增强
            mosaic=0.0,
            copy_paste=0.0,
            mixup=0.0,
        )

        print(f"\n训练设备: {'CUDA' if torch.cuda.is_available() else 'CPU'}")

        print("\n" + "=" * 60)
        print("✅ 训练完成!")
        print("=" * 60)

        # 🔑 使用训练器返回的实际保存路径
        save_dir = Path(model.trainer.save_dir)
        best_pt = save_dir / 'weights' / 'best.pt'
        last_pt = save_dir / 'weights' / 'last.pt'

        print(f"保存目录: {save_dir}")
        print(f"最佳模型: {best_pt}")
        print(f"最后模型: {last_pt}")

        # 验证训练后的模型
        model_to_check = best_pt if best_pt.exists() else last_pt

        if model_to_check.exists():
            best_model = torch.load(str(model_to_check), weights_only=False)
            channels = best_model['model'].model[0].conv.weight.shape[1]
            print(f"\n训练后模型通道数: {channels}")

            if channels == 4:
                print("✓ 训练后模型仍然是4通道 ✓")
            else:
                print(f"✗ 警告: 训练后模型变成了{channels}通道")
        else:
            print(f"\n⚠️ 警告: 找不到模型文件 {model_to_check}")

    except Exception as e:
        print(f"\n❌ 训练失败: {e}")
        import traceback
        traceback.print_exc()

if __name__ == '__main__':  # 🔑 Windows多进程必需
    main()
步骤 4: 配置数据集YAML:(文件位置 datasets/tennis-yolo/tennis-yolo.yaml)
path: D:/ProjectCode/PyCharm/ultralytics-main/datasets/tennis-yolo
train: images/train
val: images/val

# Classes
nc: 1
names:
  0: tennis_ball

# 🔑 RGBD配置(关键)
rgbd: true        # 启用RGBD模式
channels: 4       # 输入通道数
1.首先,关于YOLOv8,Pytorch配置相关问题
主要看文章中Pytorch部分即可
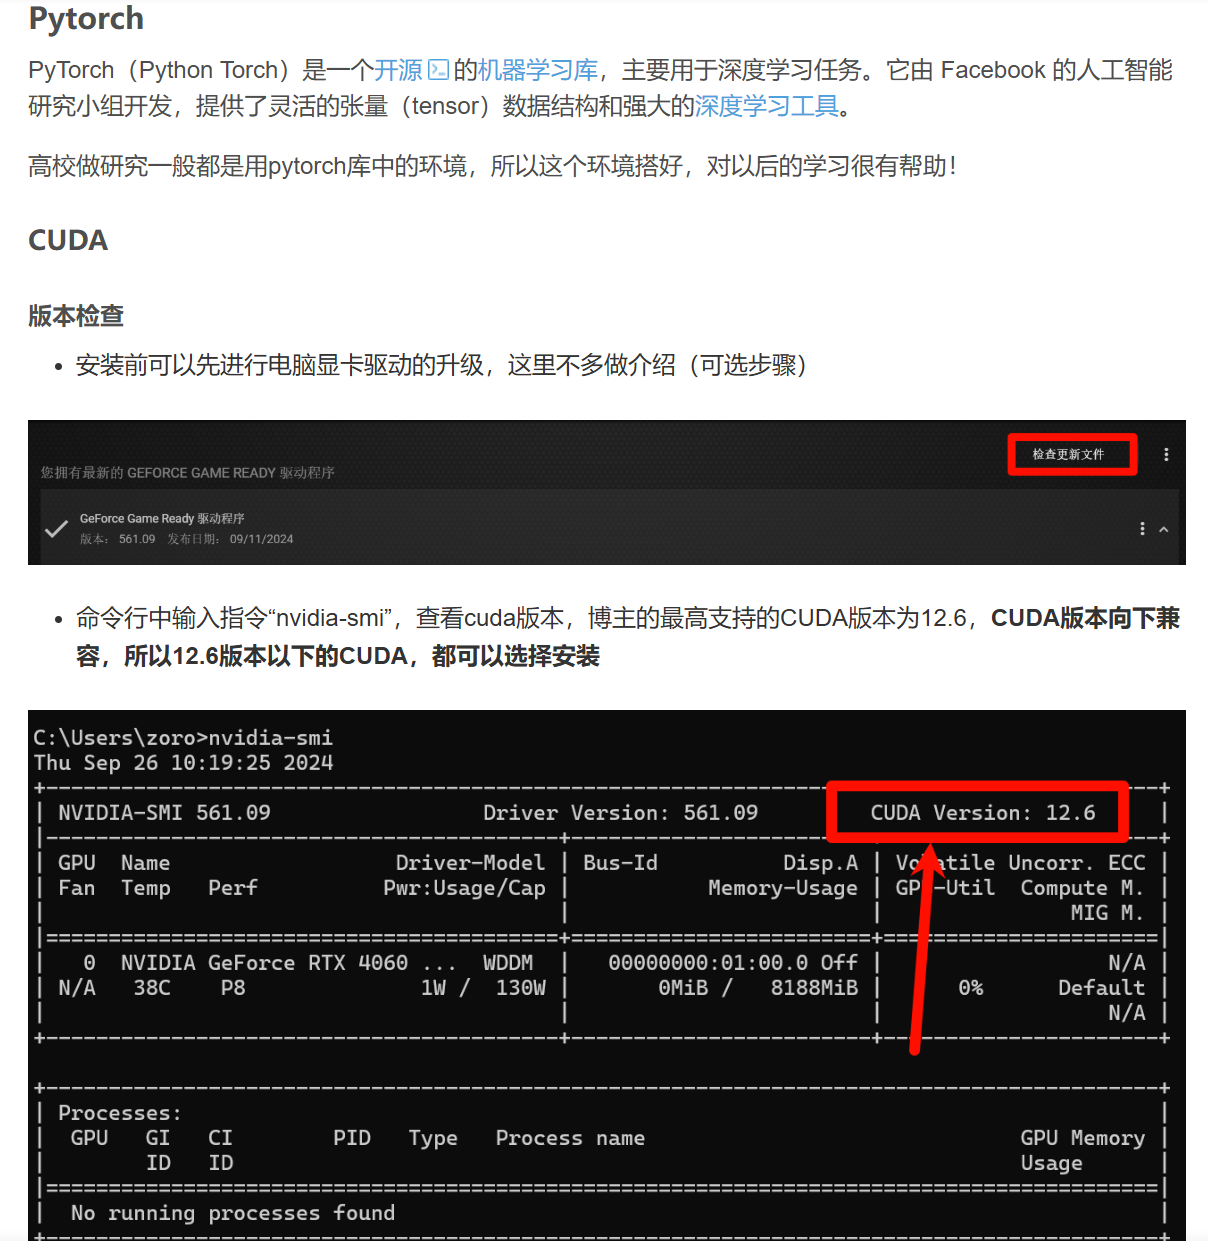
选择对应的版本进行安装。
安装后,判断CUDA是否安装成功脚本如下:
import torch

print(f"PyTorch版本: {torch.__version__}")
print(f"CUDA可用: {torch.cuda.is_available()}")
print(f"CUDA版本: {torch.version.cuda}")
print(f"设备数量: {torch.cuda.device_count()}")
if torch.cuda.is_available():
    print(f"当前设备: {torch.cuda.current_device()}")
    print(f"设备名称: {torch.cuda.get_device_name(0)}")
else:
    print("警告: CUDA不可用!")
成功会显示类似以下输出:
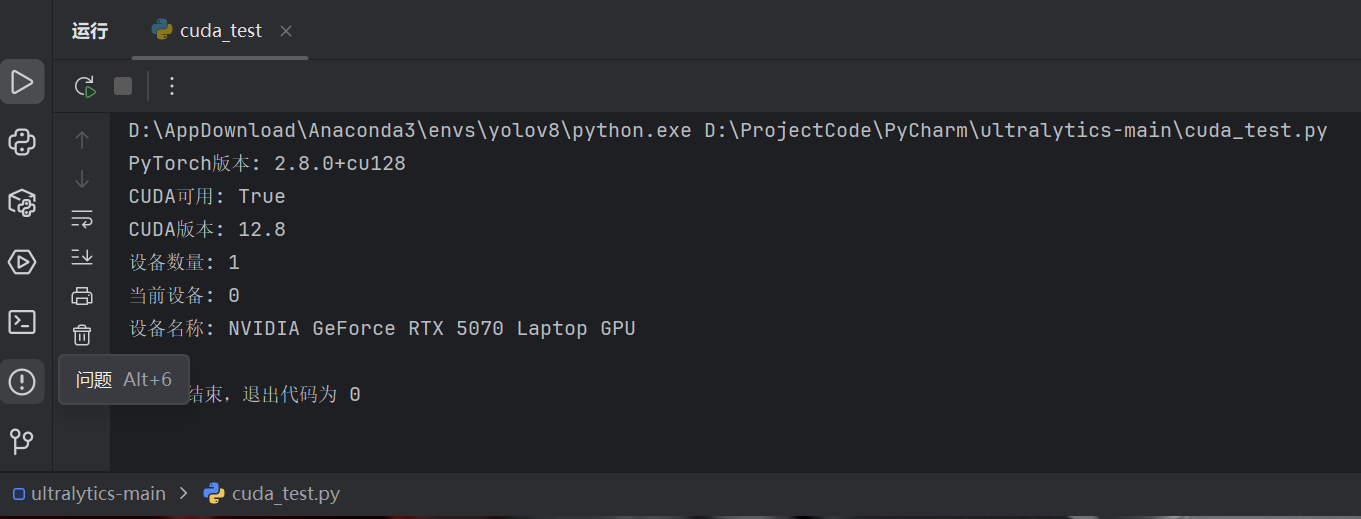
2.关于多模态融合
2.1关于多模态融合的简单介绍
同时使用可见光图像和红外图像进行训练,需要修改 YOLO 模型的网络结构,进行图像融合。目前,多模态数据融合主要有三种方式:前端融合(early-fusion)或数据端融合(data-level fusion)、后端融合(late-fusion)或决策端融合(decision-level fusion)和中间融合(intermediate-fusion)。
前端融合,是指将多个独立的数据集融合成一个单一的特征向量,然后输入到机器学习模型进行分类。
前端融合在本质上没有改变模型结构,方法简单易行。但往往无法充分利用多个模态数据间的互补性,且原始数据通常包含大量的冗余信息。因此,多模态前端融合方法常常与特征提取方法相结合以剔除冗余信息,如主成分分析(PCA)、最大相关最小冗余算法(mRMR)、自动解码器(Autoencoders)等。
后端融合,则是用不同模态数据分别训练得到各自的分类器,再对各个分类器的输出进行融合。
由于融合模型的错误来自不同的分类器,而来自不同分类器的错误往往互不相关、互不影响,不会造成错误的进一步累加,因此可能获得更好的结果。常见的后端融合方式包括最大值融合(max-fusion)、平均值融合(averaged-fusion)、 贝叶斯规则融合(Bayes’rule based)和集成学习(ensemble learning)等。
中间融合,是指将不同的模态数据先转化为高维特征表达,再于模型的中间层进行融合。
中间融合首先利用神经网络将原始数据转化成高维 特征表达,然后获取不同模态数据在高维空间上的共性。其优势是可以灵活的选择融合位置。
本文也是采用了第一种融合方式——前端融合(对于新手友好,操作简便)
2.2前端融合的具体操作
2.2.1数据集的准备
首先我们需要准备标注好的数据集(RGB,与之对应的深度图以及labels标签)
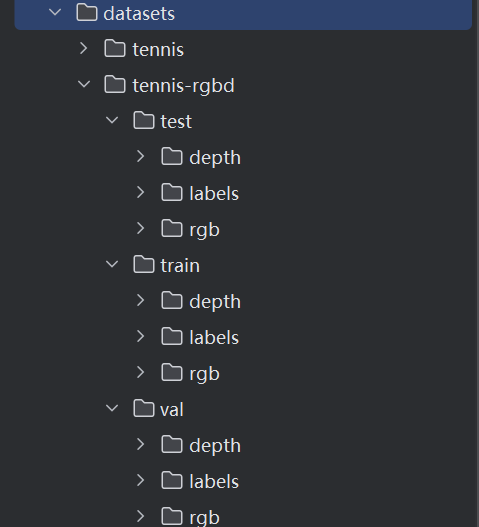
如文件夹tennis-rgbd所示
推荐使用labelme标注,在训练过程中精度会有所提升
2.2.2将RGB和深度图进行融合,生成4通道的数据集(3+1)
注:融合时需要注意所融合的深度图的通道数,博主所用的为单通道,常见的深度图为单通道和三通道,注意区别,以免融合失败。
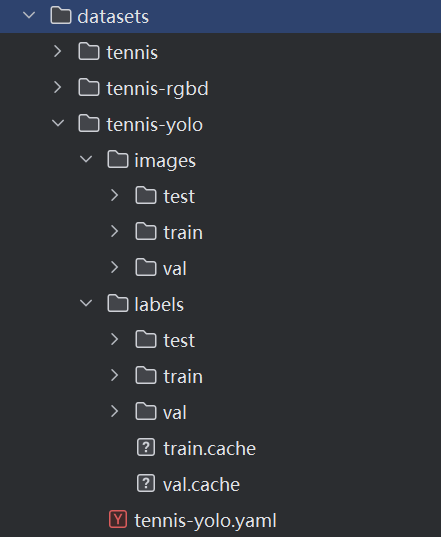
所展开的文件夹即为最终用来训练的数据集(tennis-yolo)
以下为融合
# preprocess_rgbd.py
#融合RGB-D
import cv2
import numpy as np
import os
import shutil
import re
from pathlib import Path

# 在文件开头定义全局深度范围(需要预先计算)
GLOBAL_DEPTH_MIN = 0   # 替换为实际最小值
GLOBAL_DEPTH_MAX = 10000 # 替换为实际最大值


def combine_rgb_depth(rgb_path, depth_path, output_path):
    """将 RGB 和深度图像合并为 4 通道图像 (RGB + Depth),使用全局归一化"""
    try:
        # 读取 RGB 图像
        rgb_image = cv2.imread(rgb_path)
        if rgb_image is None:
            print(f"无法读取 RGB 图像: {rgb_path}")
            return False
        rgb_image = cv2.cvtColor(rgb_image, cv2.COLOR_BGR2RGB)

        # 读取深度图像
        depth_image = cv2.imread(depth_path, cv2.IMREAD_UNCHANGED)
        if depth_image is None:
            print(f"无法读取深度图像: {depth_path}")
            return False

        # 确保深度图像是单通道
        if len(depth_image.shape) == 3:
            depth_image = cv2.cvtColor(depth_image, cv2.COLOR_BGR2GRAY)

        # 调整图像尺寸使其匹配
        if rgb_image.shape[:2] != depth_image.shape[:2]:
            print(f"调整图像尺寸: RGB {rgb_image.shape[:2]} -> 深度 {depth_image.shape[:2]}")
            depth_image = cv2.resize(depth_image, (rgb_image.shape[1], rgb_image.shape[0]))

        # 使用全局深度范围归一化
        if GLOBAL_DEPTH_MAX > GLOBAL_DEPTH_MIN:
            # 将深度值裁剪到全局范围后再归一化
            depth_image = np.clip(depth_image, GLOBAL_DEPTH_MIN, GLOBAL_DEPTH_MAX)
            depth_image = ((depth_image - GLOBAL_DEPTH_MIN) / (GLOBAL_DEPTH_MAX - GLOBAL_DEPTH_MIN) * 255).astype(np.uint8)
        else:
            depth_image = np.zeros_like(depth_image, dtype=np.uint8)

        # 合并 RGB 和深度图像为4通道 (R, G, B, Depth)
        rgba_image = np.concatenate([rgb_image, depth_image[:, :, np.newaxis]], axis=-1)

        # 保存为PNG格式
        cv2.imwrite(output_path, rgba_image)
        print(f"成功合并并保存: {output_path}")
        return True

    except Exception as e:
        print(f"处理图像时出错: {e}")
        return False


def find_matching_depth_file(rgb_file, depth_dir):
    """查找与 RGB 图像匹配的深度图像文件"""
    # 提取 RGB 图像的基本名称(不带扩展名)
    base_name = os.path.splitext(rgb_file)[0]

    # 尝试直接匹配(相同的文件名)
    depth_path = os.path.join(depth_dir, f"{base_name}_depth.png")
    if os.path.exists(depth_path):
        return depth_path

    # 尝试其他可能的命名模式
    patterns = [
        f"{base_name}_depth.png",
        f"{base_name}_d.png",
        f"{base_name}_depth.jpg",
        f"{base_name}_d.jpg",
        f"depth_{base_name}.png",
        f"d_{base_name}.png",
    ]

    for pattern in patterns:
        depth_path = os.path.join(depth_dir, pattern)
        if os.path.exists(depth_path):
            return depth_path

    # 如果以上模式都不匹配,尝试查找包含相同数字的任何文件
    number_match = re.search(r'\d+', base_name)
    if number_match:
        number = number_match.group()
        for depth_file in os.listdir(depth_dir):
            if number in depth_file and depth_file.endswith(('.png', '.jpg', '.jpeg')):
                return os.path.join(depth_dir, depth_file)

    print(f"找不到与 {rgb_file} 匹配的深度图像")
    return None


def preprocess_dataset():
    """预处理整个数据集"""
    # 原始数据集路径
    base_path = "D:/ProjectCode/PyCharm/ultralytics-main/datasets/tennis-rgbd"

    # 新数据集路径
    output_base = "D:/ProjectCode/PyCharm/ultralytics-main/datasets/tennis-yolo"

    # 创建输出目录
    for split in ['train', 'val', 'test']:
        os.makedirs(os.path.join(output_base, 'images', split), exist_ok=True)
        os.makedirs(os.path.join(output_base, 'labels', split), exist_ok=True)

    # 处理每个分割(训练集、验证集、测试集)
    for split in ['train', 'val', 'test']:
        rgb_dir = os.path.join(base_path, split, 'rgb')
        depth_dir = os.path.join(base_path, split, 'depth')
        labels_dir = os.path.join(base_path, split, 'labels')

        output_image_dir = os.path.join(output_base, 'images', split)
        output_label_dir = os.path.join(output_base, 'labels', split)

        print(f"\n处理 {split} 数据集...")
        print(f"RGB 目录: {rgb_dir}")
        print(f"深度目录: {depth_dir}")
        print(f"标签目录: {labels_dir}")

        # 检查目录是否存在
        if not os.path.exists(rgb_dir):
            print(f"RGB 目录不存在: {rgb_dir}")
            continue

        if not os.path.exists(depth_dir):
            print(f"深度目录不存在: {depth_dir}")
            continue

        if not os.path.exists(labels_dir):
            print(f"标签目录不存在: {labels_dir}")
            continue

        # 处理每个图像
        processed_count = 0
        for rgb_file in os.listdir(rgb_dir):
            if rgb_file.endswith(('.png', '.jpg', '.jpeg')):
                # 构建 RGB 图像路径
                rgb_path = os.path.join(rgb_dir, rgb_file)

                # 查找匹配的深度图像
                depth_path = find_matching_depth_file(rgb_file, depth_dir)

                if depth_path is None:
                    print(f"找不到对应的深度图像: {rgb_file}")
                    continue

                # 构建标签文件路径
                label_file = os.path.splitext(rgb_file)[0] + '.txt'
                label_path = os.path.join(labels_dir, label_file)

                # 合并 RGB 和深度图像
                output_image_path = os.path.join(output_image_dir, os.path.splitext(rgb_file)[0] + '.png')
                success = combine_rgb_depth(rgb_path, depth_path, output_image_path)

                if success:
                    # 复制标签文件
                    if os.path.exists(label_path):
                        output_label_path = os.path.join(output_label_dir, label_file)
                        shutil.copy2(label_path, output_label_path)
                        print(f"复制标签: {label_path} -> {output_label_path}")
                    else:
                        print(f"警告: 找不到标签文件 {label_path}")

                    processed_count += 1

        print(f"{split} 数据集处理完成: {processed_count} 个图像")


if __name__ == '__main__':
    preprocess_dataset()
    print("数据集预处理完成!")
以上目录需要替换成自己项目的实际目录
最后生成的结果即为tennis-yolo文件夹
2.2.3对于新生成的4通道图进行验证(可选)
check.py代码如下:
# check.py
import cv2
import numpy as np
import os


def verify_image(image_path):
    """验证图像格式"""
    img = cv2.imread(image_path, cv2.IMREAD_UNCHANGED)
    if img is None:
        print(f"无法读取图像: {image_path}")
        return False

    print(f"图像路径: {image_path}")
    print(f"图像形状: {img.shape}")
    print(f"图像数据类型: {img.dtype}")
    print(f"最小值: {np.min(img)}, 最大值: {np.max(img)}")
    print("-" * 50)

    # 检查是否为4通道
    if len(img.shape) == 3 and img.shape[2] == 4:
        print("✓ 图像是4通道的")
        return True
    else:
        print("✗ 图像不是4通道的")
        return False


# 验证几张图像
image_dir = "D:/ProjectCode/PyCharm/ultralytics-main/datasets/tennis-yolo/images/train"
image_files = [f for f in os.listdir(image_dir) if f.endswith('.png')][:5]  # 检查前5张图像

for image_file in image_files:
    image_path = os.path.join(image_dir, image_file)
    verify_image(image_path)
输出结果类似:

3.模型配置文件的修改以及数据集文件的创建
3.1模型配置文件修改
模型配置文件地址(用上文链接配置yolo的朋友可以用):D:\ProjectCode\PyCharm\ultralytics-main\ultralytics\cfg\models\v8\yolov8-rgbd.yaml
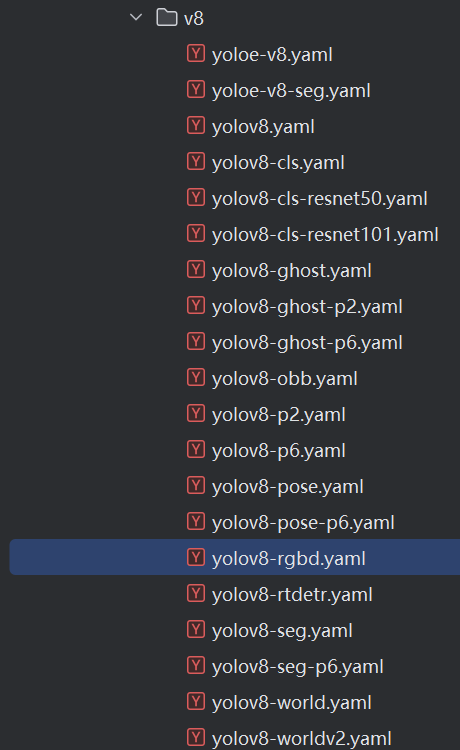
创建一个新的.yaml文件
# yolov8-rgbd.yaml
# Parameters
nc: 1  # number of classes (tennis ball)
depth_multiple: 0.33  # 模型深度倍数
width_multiple: 0.25  # 层通道倍数
ch: 4  # 输入通道数设置为4 (RGB + Depth)

# YOLOv8.0n backbone
backbone:
  # [from, number, module, args]
  - [-1, 1, Conv, [64, 3, 2]]  # 0-P1/2, 输入通道数由 ch 参数控制
  - [-1, 1, Conv, [128, 3, 2]]  # 1-P2/4
  - [-1, 3, C2f, [128, True]]
  - [-1, 1, Conv, [256, 3, 2]]  # 3-P3/8
  - [-1, 6, C2f, [256, True]]
  - [-1, 1, Conv, [512, 3, 2]]  # 5-P4/16
  - [-1, 6, C2f, [512, True]]
  - [-1, 1, Conv, [1024, 3, 2]]  # 7-P5/32
  - [-1, 3, C2f, [1024, True]]
  - [-1, 1, SPPF, [1024, 5]]  # 9

# YOLOv8.0n head
head:
  - [-1, 1, nn.Upsample, [None, 2, 'nearest']]
  - [[-1, 6], 1, Concat, [1]]  # cat backbone P4
  - [-1, 3, C2f, [512]]  # 12
  - [-1, 1, nn.Upsample, [None, 2, 'nearest']]
  - [[-1, 4], 1, Concat, [1]]  # cat backbone P3
  - [-1, 3, C2f, [256]]  # 15 (P3/8-small)
  - [-1, 1, Conv, [256, 3, 2]]
  - [[-1, 12], 1, Concat, [1]]  # cat head P4
  - [-1, 3, C2f, [512]]  # 18 (P4/16-medium)
  - [-1, 1, Conv, [512, 3, 2]]
  - [[-1, 9], 1, Concat, [1]]  # cat head P5
  - [-1, 3, C2f, [1024]]  # 21 (P5/32-large)
  - [[15, 18, 21], 1, Detect, [nc]]  # Detect(P3, P4, P5)
3.2数据集文件的配置
目录地址:D:\ProjectCode\PyCharm\ultralytics-main\datasets\tennis-yolo\tennis-yolo.yaml
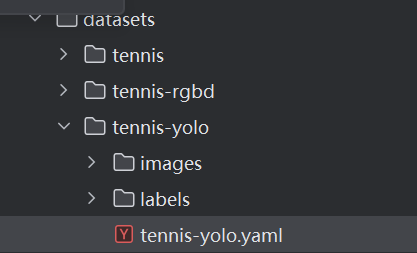
# tennis-yolo.yaml
path: D:/ProjectCode/PyCharm/ultralytics-main/datasets/tennis-yolo
train: images/train
val: images/val
test: images/test

# 类别数量
nc: 1
# 类别名称
names:
- '0'

# 输入通道数(RGB-D = 6通道)
ch: 4
目录地址的话,绝对/相对地址均可,绝对地址的话不容易出错,自行选择即可。
4.训练,验证,预测/检测
训练:
yolo detect train data=D:/ProjectCode/PyCharm/ultralytics-main/datasets/tennis-yolo/tennis-yolo.yaml model=D:/ProjectCode/PyCharm/ultralytics-main/ultralytics/cfg/models/v8/yolov8-rgbd.yaml epochs=100 batch=4 lr0=0.001 imgsz=640

验证:
yolo val model=D:\ProjectCode\PyCharm\ultralytics-main\runs\detect\train16\weights\best.pt data=D:\ProjectCode\PyCharm\ultralytics-main\datasets\tennis-yolo\tennis-yolo.yaml plots=True

检测:
yolo predict model="D:\ProjectCode\PyCharm\ultralytics-main\runs\detect\train16\weights\best.pt" source="D:\ProjectCode\PyCharm\ultralytics-main\datasets\tennis-yolo\images\test\tennis (1).png"
结果展示:
训练:

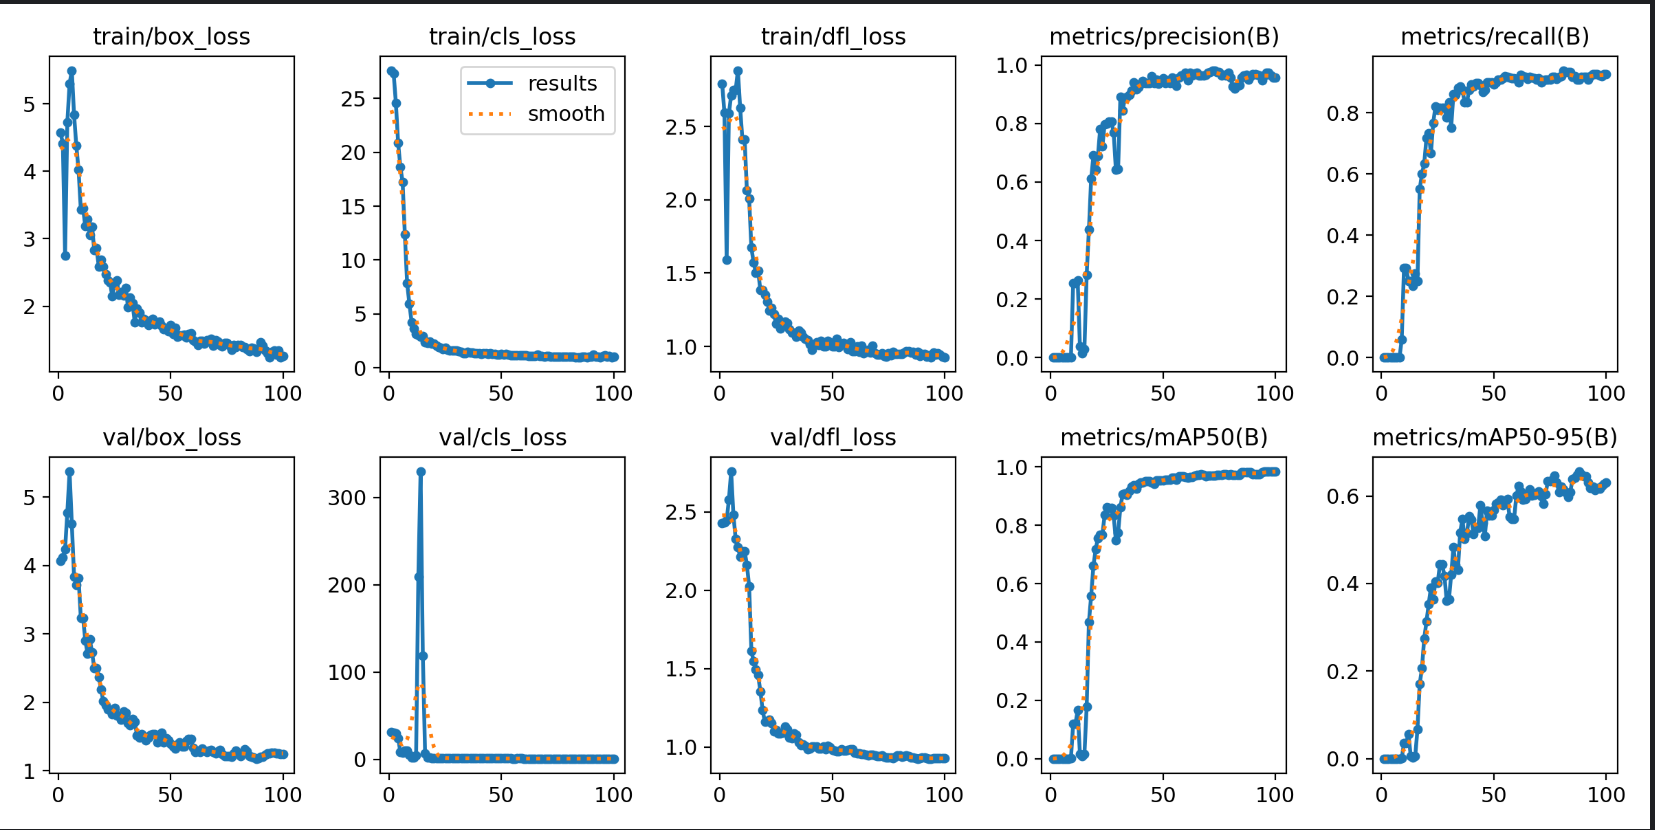
验证:
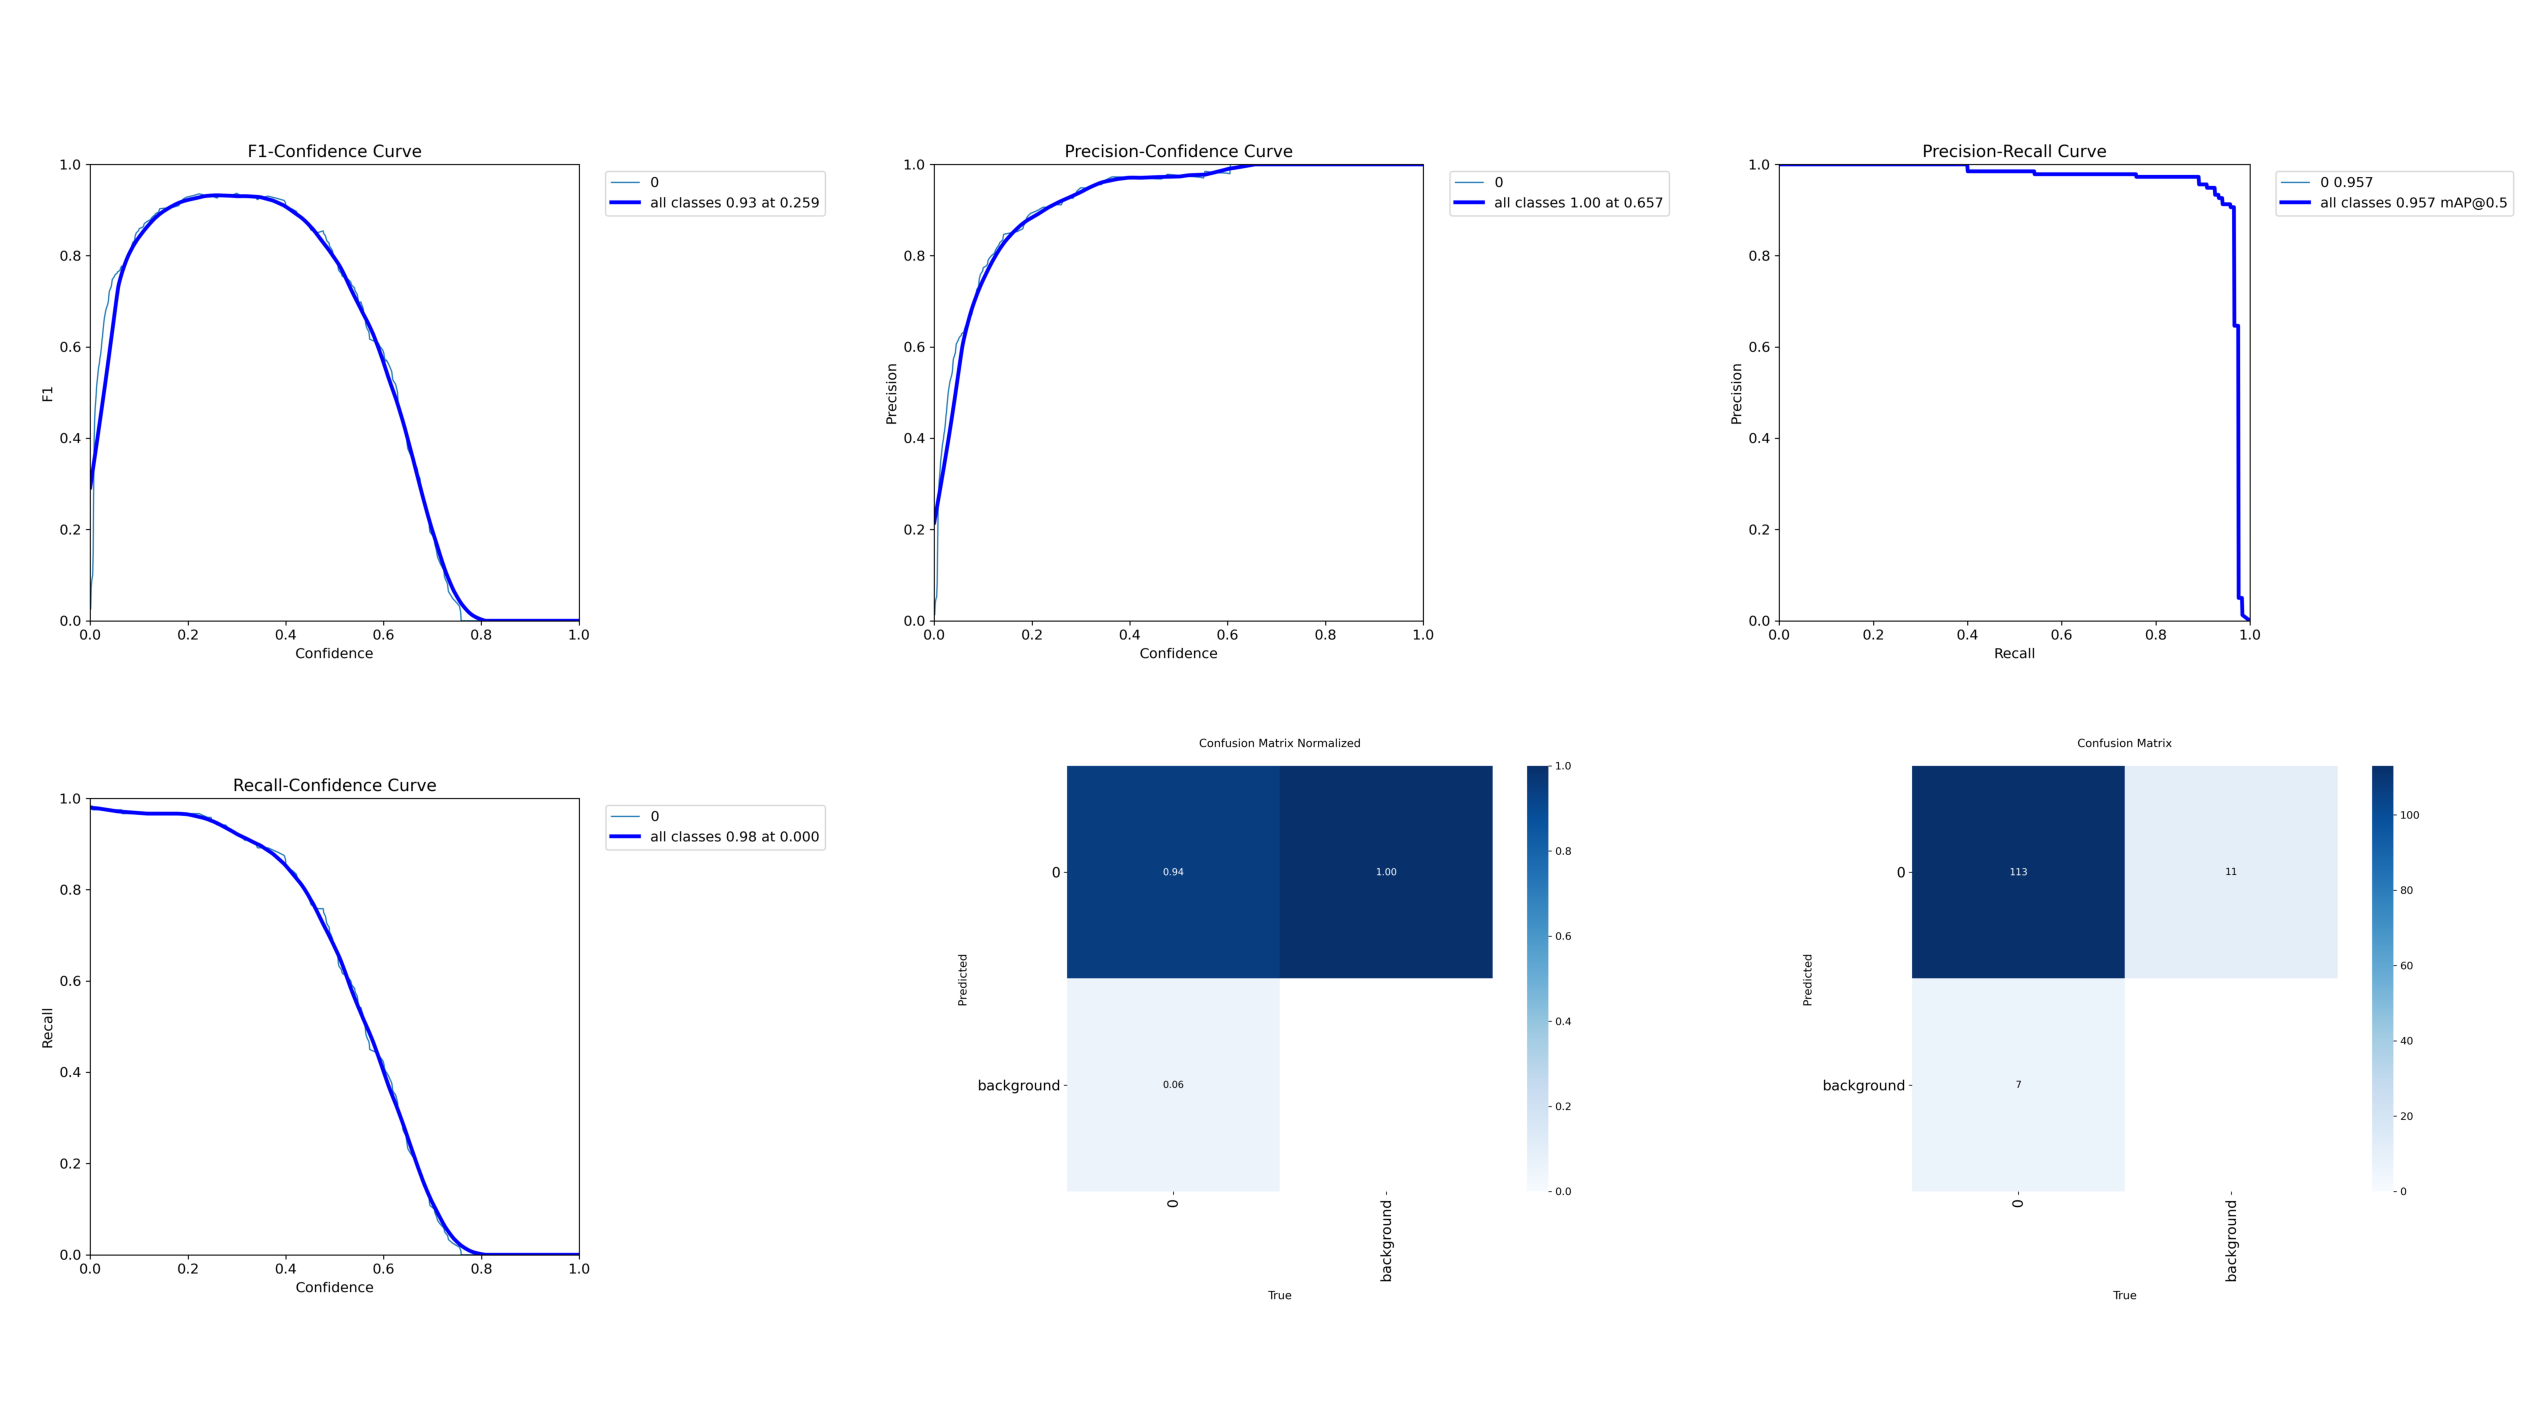
预测:
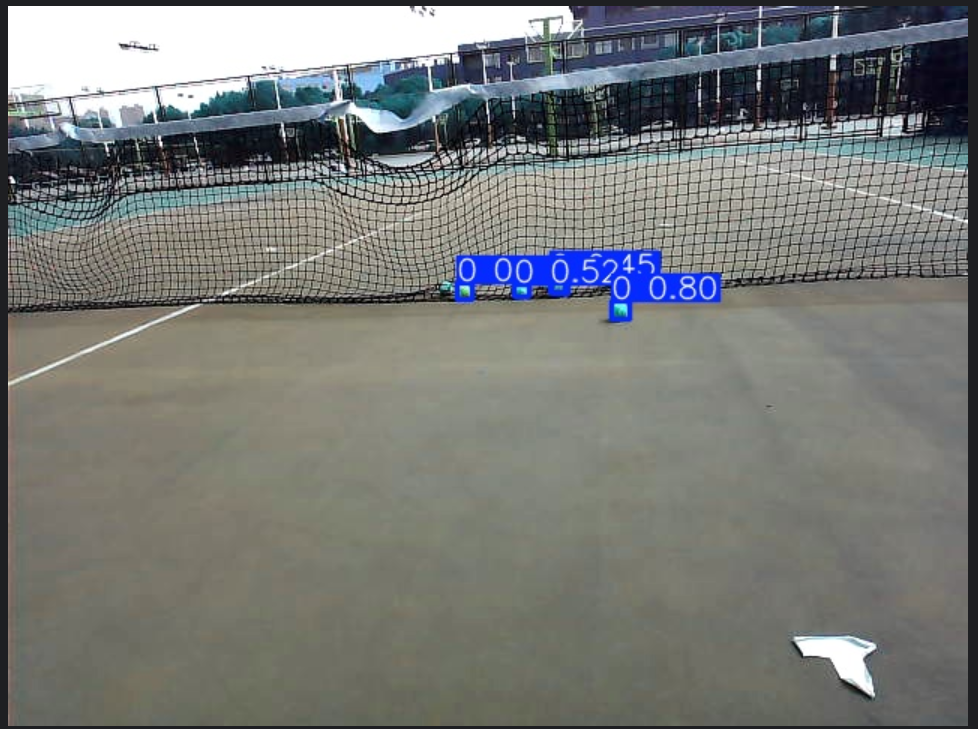

DAMO开发者矩阵,由阿里巴巴达摩院和中国互联网协会联合发起,致力于探讨最前沿的技术趋势与应用成果,搭建高质量的交流与分享平台,推动技术创新与产业应用链接,围绕“人工智能与新型计算”构建开放共享的开发者生态。
更多推荐
 47
47 0
0- 0


 已为社区贡献3条内容

所有评论(0)