基于opencv-python的深度学习模块案例
目录
一、图像分类
图像分类是基于深度学习的计算机视觉任务中最简单、也是最基础的一类,它其中用到的CNN特征提取技术也是目标检测、目标分割等视觉任务的基础。
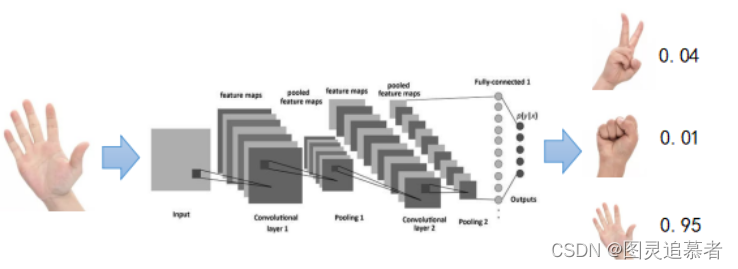
具体到图像分类任务而言,其具体流程如下:
- 输入指定大小RGB图像,1/3通道,宽高一般相等
- 通过卷积神经网络进行多尺度特征提取,生成高维特征值
- 利用全连接网络、或其他结构对高维特征进行分类,输出各目标分类的概率值(概率和为1)
- 选择概率值最高的作为图像分类结果
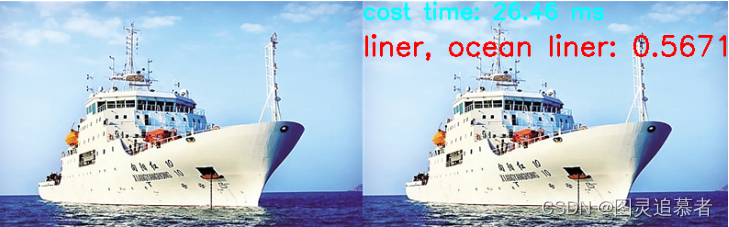
opencv.dnn模块可以直接加载深度学习模型,并进行推理输出运行结果。下面是opencv.dnn模块加载googlenet caffe模型进行图片分类的代码。代码中LABEL_MAP是图像分类名称字典,给定索引得到具体分类名称(string)。
import cv2
import numpy as np
from labels import LABEL_MAP # 1000 labels in imagenet dataset

if __name__=='__main__':
    # caffe model, googlenet aglo
    weights = "bvlc_googlenet.caffemodel"
    protxt = "bvlc_googlenet.prototxt"

    # read caffe model from disk
    net = cv2.dnn.readNetFromCaffe(protxt, weights)

    # create input
    image = cv2.imread("ocean-liner.jpg")
    blob = cv2.dnn.blobFromImage(image, 1.0, (224, 224), (104, 117, 123), False, crop=False)
    result = np.copy(image)

    # run!
    net.setInput(blob)
    out = net.forward()

    # TODO(You): 请在此实现代码
    # output probability, find the right index
    out = out.flatten()
    classId = np.argmax(out)
    confidence = out[classId]


    # time cost
    t, _ = net.getPerfProfile()
    label = 'cost time: %.2f ms' % (t * 1000.0 / cv2.getTickFrequency())
    cv2.putText(result, label, (0, 20), cv2.FONT_HERSHEY_SIMPLEX, 0.8, (255, 255, 0), 2)

    # render on image
    label = '%s: %.4f' % (LABEL_MAP[classId] if LABEL_MAP else 'Class #%d' % classId, confidence)
    cv2.putText(result, label, (0, 60), cv2.FONT_HERSHEY_SIMPLEX, 1, (0, 0, 255), 2)

    show_img = np.hstack((image, result))

    # normal codes in opencv
    cv2.imshow("Image", show_img)
    cv2.waitKey(0)
二、目标检测
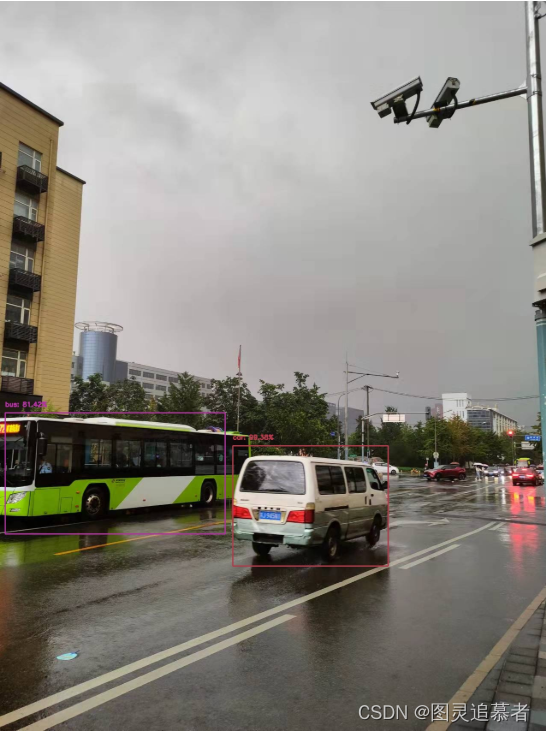
早在 2017 年 8 月,OpenCV 3.3 正式发布,带来了高度改进的“深度神经网络”(dnn)模块。 该模块支持多种深度学习框架,包括 Caffe、TensorFlow 和 Torch/PyTorch。这次我们使用Opencv深度学习的功能实现目标检测的功能,模型选用MobileNetSSD_deploy.caffemodel。我已经实现了模型加载和预测的代码,但是如何将结果取出来并绘制到图片上呢?如下图:
import numpy as np
import cv2

if __name__=="__main__":
    image_name = '11.jpg'
    prototxt = 'MobileNetSSD_deploy.prototxt.txt'
    model_path = 'MobileNetSSD_deploy.caffemodel'
    confidence_ta = 0.2

    # 初始化MobileNet SSD训练的类标签列表
    # 检测,然后为每个类生成一组边界框颜色
    CLASSES = ["background", "aeroplane", "bicycle", "bird", "boat",
               "bottle", "bus", "car", "cat", "chair", "cow", "diningtable",
               "dog", "horse", "motorbike", "person", "pottedplant", "sheep",
               "sofa", "train", "tvmonitor"]
    COLORS = np.random.uniform(0, 255, size=(len(CLASSES), 3))

    # load our serialized model from disk
    print("[INFO] loading model...")
    net = cv2.dnn.readNetFromCaffe(prototxt, model_path)

    # 加载输入图像并为图像构造一个输入blob
    # 将大小调整为固定的300x300像素。
    # (注意:SSD模型的输入是300x300像素)
    image = cv2.imread(image_name)
    (h, w) = image.shape[:2]
    blob = cv2.dnn.blobFromImage(cv2.resize(image, (300, 300)), 0.007843,
                                 (300, 300), 127.5)

    # 通过网络传递blob并获得检测结果和
    # 预测
    print("[INFO] computing object detections...")
    net.setInput(blob)
    detections = net.forward()

    # TODO(You): 请在此编写循环检测结果
    for i in np.arange(0, detections.shape[2]):
    # 提取与数据相关的置信度(即概率)
    # 预测
    confidence = detections[0, 0, i, 2]

    # 通过确保“置信度”来过滤掉弱检测
    # 大于最小置信度
    if confidence > confidence_ta:
        # 从`detections`中提取类标签的索引,
        # 然后计算物体边界框的 (x, y) 坐标
        idx = int(detections[0, 0, i, 1])
        box = detections[0, 0, i, 3:7] * np.array([w, h, w, h])
        (startX, startY, endX, endY) = box.astype("int")

        # 显示预测
        label = "{}: {:.2f}%".format(CLASSES[idx], confidence * 100)
        print("[INFO] {}".format(label))
        cv2.rectangle(image, (startX, startY), (endX, endY),
                        COLORS[idx], 2)
        y = startY - 15 if startY - 15 > 15 else startY + 15
        cv2.putText(image, label, (startX, y),
                    cv2.FONT_HERSHEY_SIMPLEX, 0.5, COLORS[idx], 2)

    # show the output image
    cv2.imshow("Output", image)
    cv2.imwrite("output.jpg", image)
    cv2.waitKey(0)
三、人脸检测
早在 2017 年 8 月,OpenCV 3.3 正式发布,带来了高度改进的“深度神经网络”(dnn)模块。 该模块支持多种深度学习框架,包括 Caffe、TensorFlow 和 Torch/PyTorch。OpenCV 的官方版本中包含了一个更准确、基于深度学习的人脸检测器,链接:https://github.com/opencv/opencv/tree/4.x/samples/dnn/face_detector。 我已经实现了模型加载和预测的代码,但是如何将结果取出来并绘制到图片上呢?如下图:
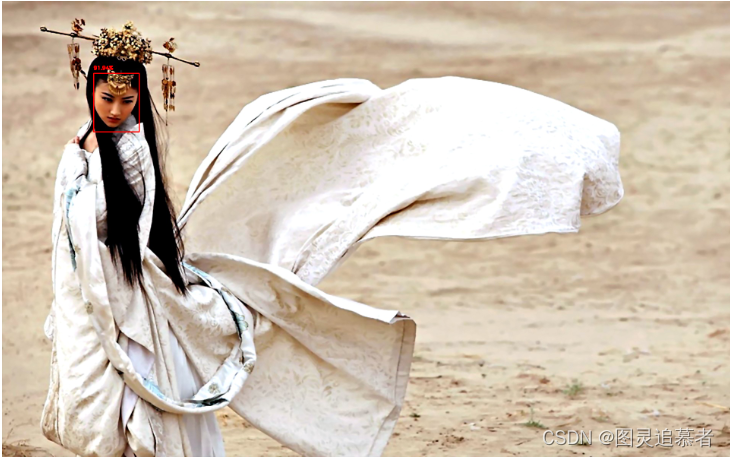
遍历代码的逻辑如下:
- 遍历检测结果。
- 然后,我们提取置信度并将其与置信度阈值进行比较。 我们执行此检查以过滤掉弱检测。 如果置信度满足最小阈值,我们继续绘制一个矩形以及检测概率。
- 为此,我们首先计算边界框的 (x, y) 坐标。 然后我们构建包含检测概率的置信文本字符串。 如果我们的文本偏离图像(例如当面部检测发生在图像的最顶部时),我们将其向下移动 10 个像素。 我们的面部矩形和置信文本绘制在图像上。
- 然后,我们再次循环执行该过程后的其他检测。 如果没有检测到,我们准备在屏幕上显示我们的输出图像)。
代码实现框架如下:
import numpy as np
import cv2

if __name__=='__main__':
    low_confidence=0.5
    image_path='2.jpg'
    proto_txt='deploy.proto.txt'
    model_path='res10_300x300_ssd_iter_140000_fp16.caffemodel'

    # 加载模型
    print("[INFO] loading model...")
    net = cv2.dnn.readNetFromCaffe(proto_txt, model_path)

    # 加载输入图像并为图像构建一个输入 blob
    # 将大小调整为固定的 300x300 像素,然后对其进行标准化
    image = cv2.imread(image_path)
    (h, w) = image.shape[:2]
    blob = cv2.dnn.blobFromImage(cv2.resize(image, (300, 300)), 1.0,
        (300, 300), (104.0, 177.0, 123.0))

    # 通过网络传递blob并获得检测和预测
    print("[INFO] computing object detections...")
    net.setInput(blob)
    detections = net.forward()

    # 循环检测
    # TODO(You):请实现循环检测的代码。
    # 循环检测
    for i in range(0, detections.shape[2]):
        # 提取与相关的置信度(即概率)
        # 预测
        confidence = detections[0, 0, i, 2]
        # 通过确保“置信度”来过滤掉弱检测
        # 大于最小置信度
        if confidence > low_confidence:
            # 计算边界框的 (x, y) 坐标
            box = detections[0, 0, i, 3:7] * np.array([w, h, w, h])
            (startX, startY, endX, endY) = box.astype("int")
            # 绘制人脸的边界框以及概率
            text = "{:.2f}%".format(confidence * 100)
            y = startY - 10 if startY - 10 > 10 else startY + 10
            cv2.rectangle(image, (startX, startY), (endX, endY),
                          (0, 0, 255), 2)
            cv2.putText(image, text, (startX, y),
                        cv2.FONT_HERSHEY_SIMPLEX, 0.45, (0, 0, 255), 2)

    # 展示图片并保存
    cv2.imshow("Output", image)
    cv2.imwrite("01.jpg",image)
    cv2.waitKey(0)
四、姿态估计
姿态估计使用Opencv+Mediapipe来时实现
什么是Mediapipe?
Mediapipe是主要用于构建多模式音频,视频或任何时间序列数据的框架。借助MediaPipe框架,可以构建令人印象深刻的ML管道,例如TensorFlow,TFLite等推理模型以及媒体处理功能。
安装命令:
pip install mediapipe如果没有安装需要安装,请执行这个命令。
通过视频或实时馈送进行人体姿态估计在诸如全身手势控制,量化体育锻炼和手语识别等各个领域中发挥着至关重要的作用。
例如,它可用作健身,瑜伽和舞蹈应用程序的基本模型。它在增强现实中找到了自己的主要作用。
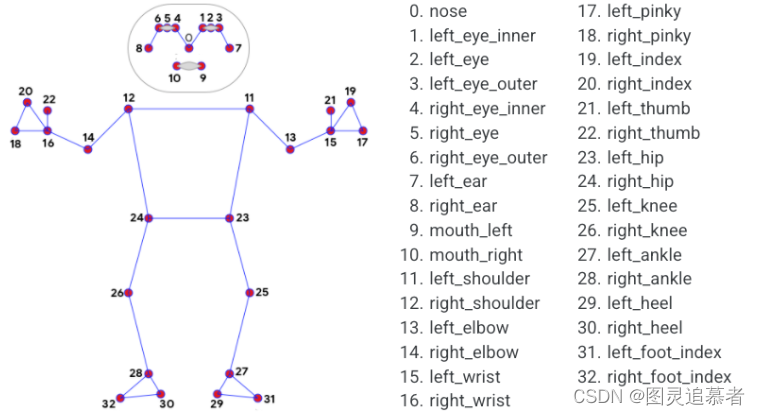
Media Pipe Pose是用于高保真人体姿势跟踪的框架,该框架从RGB视频帧获取输入并推断出整个人类的33个3D界标。当前最先进的方法主要依靠强大的桌面环境进行推理,而此方法优于其他方法,并且可以实时获得很好的结果。
模型可以预测33个关键点,如下图:
代码实现如下:
import cv2
import mediapipe as mp
import time

mpPose = mp.solutions.pose
pose = mpPose.Pose()
mpDraw = mp.solutions.drawing_utils
cap = cv2.VideoCapture('1.mp4')
pTime = 0

#TODO(You): 请在此实现并输出检测结果
while True:
    success, img = cap.read()
    if success is False:
        break
    imgRGB = cv2.cvtColor(img, cv2.COLOR_BGR2RGB)
    results = pose.process(imgRGB)
    if results is None:
        continue
    print(results.pose_landmarks)
    if results.pose_landmarks:
        mpDraw.draw_landmarks(img, results.pose_landmarks, mpPose.POSE_CONNECTIONS)
    for id, lm in enumerate(results.pose_landmarks.landmark):
        h, w, c = img.shape
    print(id, lm)
    cx, cy = int(lm.x * w), int(lm.y * h)
    cv2.circle(img, (cx, cy), 5, (255, 0, 0), cv2.FILLED)
    cTime = time.time()
    fps = 1 / (cTime - pTime)
    pTime = cTime
    cv2.putText(img, str(int(fps)), (50, 50), cv2.FONT_HERSHEY_SIMPLEX, 1, (255, 0, 0), 3)
    cv2.imshow("Image", img)
    key = cv2.waitKey(1) & 0xFF

# do a bit of cleanup
cv2.destroyAllWindows()
cap.release()
5.车辆检测
opencv.dnn模块已经支持大部分格式的深度学习模型推理,该模块可以直接加载tensorflow、darknet、pytorch等常见深度学习框架训练出来的模型,并运行推理得到模型输出结果。opecnv.dnn模块已经作为一种模型部署方式,应用在工业落地实际场景中。
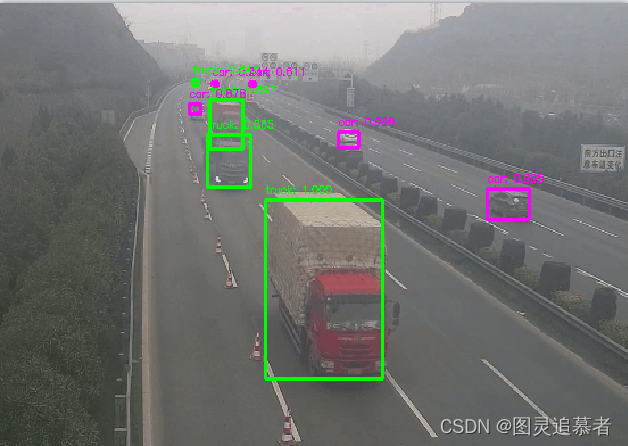
模型具体加载和使用流程如下:
- 加载网络,读取模型、网络结构配置等文件
- 创建输入,
opencv.dnn模块对图片输入有特殊格式要求 - 运行推理
- 解析输出
- 应用输出、显示输出
代码实现如下:
import numpy as np
import cv2
import os
import time
from numpy import array

# some variables
weightsPath = './yolov3-tiny.weights'
configPath = './yolov3-tiny.cfg'
labelsPath = './obj.names'

LABELS = open(labelsPath).read().strip().split("\n")
colors = [(255, 255, 0), (255, 0, 255), (0, 255, 255), (0, 255, 0), (255, 0, 255)]
min_score = 0.3

# read darknet weights using opencv.dnn module
net = cv2.dnn.readNetFromDarknet(configPath, weightsPath)

# read video using opencv
cap = cv2.VideoCapture('./MY_TEST/8.h264')

# loop for inference
while True:
    boxes = []
    confidences = []
    classIDs = []
    start = time.time()

    ret, frame = cap.read()
    frame = cv2.resize(frame, (744, 416), interpolation=cv2.INTER_CUBIC)
    image = frame
    (H, W) = image.shape[0: 2]


    # get output layer names
    ln = net.getLayerNames()
    out = net.getUnconnectedOutLayers()
    x = []
    for i in out:
        x.append(ln[i[0]-1])
    ln = x

    # create input data package with current frame
    blob = cv2.dnn.blobFromImage(image, 1 / 255.0, (416, 416), swapRB=True, crop=False)
    # set as input
    net.setInput(blob)

    # run!
    layerOutputs = net.forward(ln)

    # post-process
    # parsing the output and run nms

    # TODO(You):  请在此实现代码
    for output in layerOutputs:
        for detection in output:
            scores = detection[5:]
            # class id
            classID = np.argmax(scores)
            # get score by classid
            score = scores[classID]

            # ignore if score is too low
            if score >= min_score:
                box = detection[0:4] * np.array([W, H, W, H])

                (centerX, centerY, width, height)= box.astype("int")

                x = int(centerX - (width / 2))
                y = int(centerY - (height / 2))

                boxes.append([x, y, int(width), int(height)])
                confidences.append(float(score))
                classIDs.append(classID)

    # run nms using opencv.dnn module
    idxs = cv2.dnn.NMSBoxes(boxes, confidences, 0.2, 0.3)

    # render on image
    idxs = array(idxs)
    box_seq = idxs.flatten()
    if len(idxs) > 0:
        for seq in box_seq:
            (x, y) = (boxes[seq][0], boxes[seq][1])
            (w, h) = (boxes[seq][2], boxes[seq][3])

            # draw what you want
            color = colors[classIDs[seq]]
            cv2.rectangle(image, (x, y), (x + w, y + h), color, 2)
            text = "{}: {:.3f}".format(LABELS[classIDs[seq]], confidences[seq])
            cv2.putText(image, text, (x, y - 5), cv2.FONT_HERSHEY_SIMPLEX, 0.3, color, 1)

    cv2.namedWindow('Image', cv2.WINDOW_NORMAL)
    cv2.imshow("Image", image)

    # print fps
    stop = time.time()
    fps = 1/(stop - start)
    print('fps>>> :', fps)

    # normal codes when displaying video
    c = cv2.waitKey(1) & 0xff
    if c == 27:
        cap.release()
        break

cv2.destroyAllWindows()
DAMO开发者矩阵,由阿里巴巴达摩院和中国互联网协会联合发起,致力于探讨最前沿的技术趋势与应用成果,搭建高质量的交流与分享平台,推动技术创新与产业应用链接,围绕“人工智能与新型计算”构建开放共享的开发者生态。
更多推荐
 0
0 0
0- 0


 已为社区贡献13条内容

所有评论(0)