PyTorch深度学习实战 |手算SegNet
🌞欢迎来到PyTorch深度学习实战的世界
🌈博客主页:卿云阁💌欢迎关注🎉点赞👍收藏⭐️留言📝
📆首发时间:🌹2026年4月9日🌹
✉️希望可以和大家一起完成进阶之路!
🙏作者水平很有限,如果发现错误,请留言轰炸哦!万分感谢!
目录

背景介绍
如果说 FCN(全卷积网络)和 U-Net 是为了解决通用图像和医学切片的分割而生,那么几
乎与它们同时期诞生的 SegNet,则是带着极强的工程使命下凡的——专攻自动驾驶与增强现实
(AR)。虽然 FCN 开启了深度学习语义分割的先河,但它在自动驾驶的严苛要求面前却显得力不
从心, FCN 在上采样(放大图像)时,过度依赖转置卷积(反卷积)和粗糙的跳跃连接。这导致
它在恢复图像尺寸时,丢失了极其重要的“高频空间位置信息”,预测出来的物体边缘往往是糊成一
团的。在 U-Net 中,为了让解码器(Decoder)能完美复原图像细节,我们把编码器(Encoder)
的每一层特征图都存进了“备忘录”,在跳跃连接时与深层特征进行通道拼接(Concat)。致命缺
点: 一张 [1, 512, 224, 224] 的 Float32 特征图极其庞大。U-Net 存了整整四五层这样的“高清原
图”,导致显存极易爆炸,模型非常臃肿。
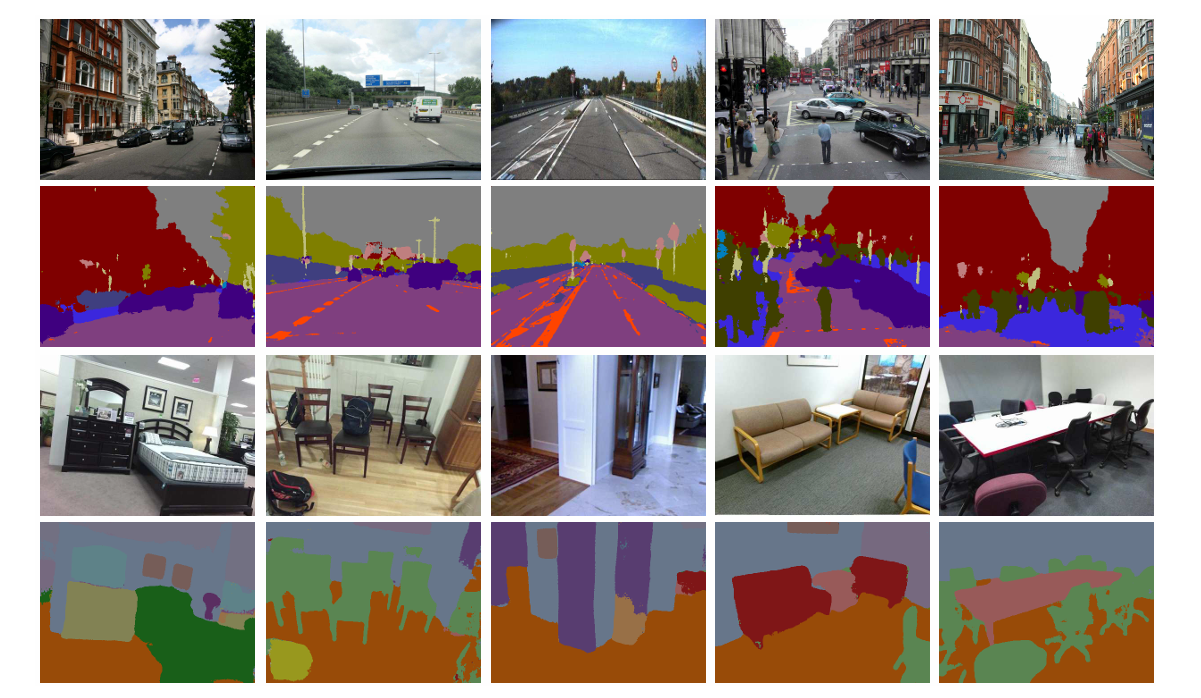
Segnet核心剖析
池化索引(pooling Indices)
其实我认为Segnet最核心的创新部分就是采用了池化索引(pooling Indices)的方法了。什么意
思呢,看下图,我们来详细讲解一下。
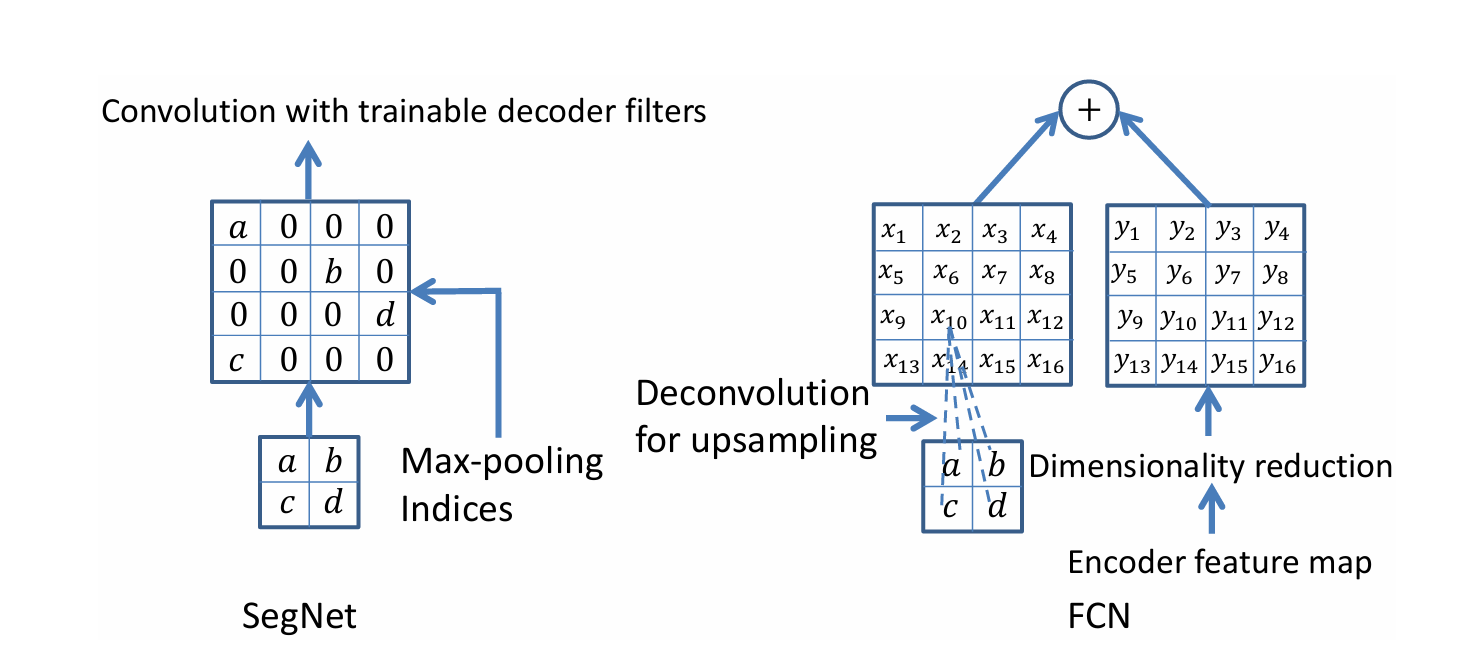
Segnet同样的也是使用了编码器-解码器的结构。Segnet的上采样方式与FCN不同,FCN采用的是
反卷积的方式,而Segnet每次池化操作时,它不仅保留了池化后的特征图,还记录了每个池化区
域中最大值的位置(即池化索引)。在解码器部分,它将这些池化索引传递过来,用于指导上采样
过程。通过这样的方式,编码器在低分辨率下检测到的语义信息(通过卷积特征)和原始图像中的
精确空间位置信息(通过池化索引)得以结合,显著提高了分割边界的定位精度。并且非常重要的
一点,SegNet通过使用池化索引进行指导的上采样,避免了使用计算量大的反卷积操作。这使得
SegNet模型参数量少,计算复杂度低,非常适合需要实时处理的场景,就像无人驾驶或者AR场
景。通过pooling Indices获得的上采样feature map是稀疏的,其实从图中就能看出,所以在解码
器部分会有对应的卷积结构,将稀疏的feature map通过卷积变成稠密的feature map。当然其弊
端也会非常明显,在上采样的过程中缺少了学习的过程,所以其在精度上是无法与当时的FCN进行
比较的,但是综合精度、实时性、轻便性来说,Segnet则是更好的考量。
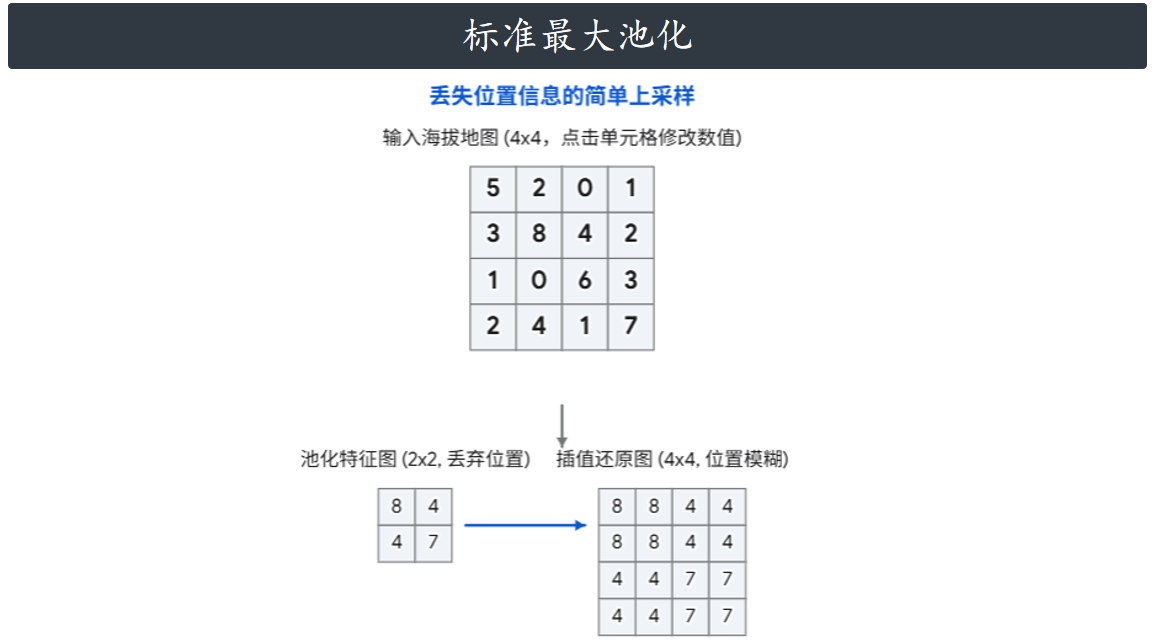
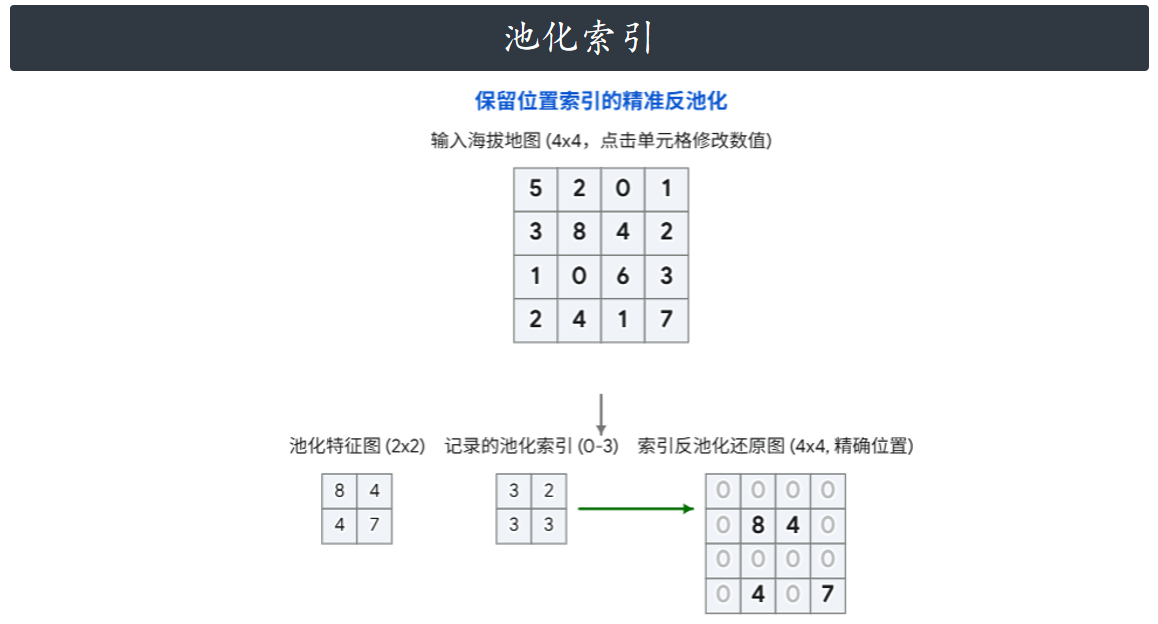
网络结构和代码实现
保存多个尺度上提取到的特征和全局的上下文信息,为上采样时提供更多的可用信息,从而保留
更多高频细节,实现精细的分割。
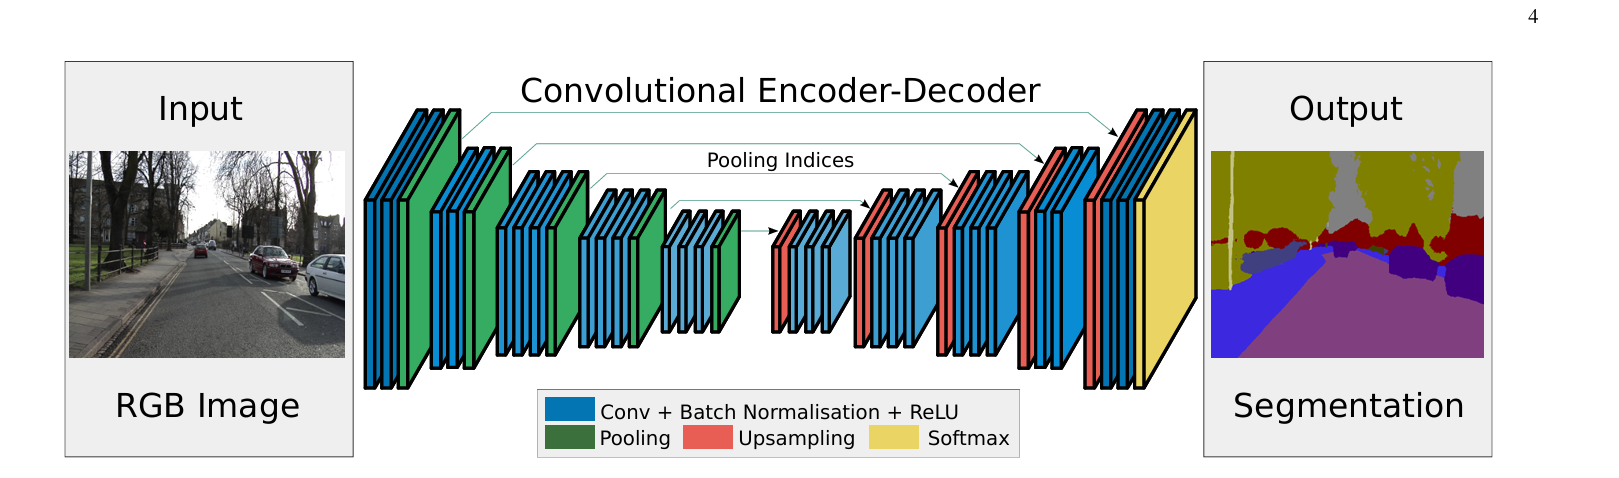
带索引的池化和反池化
nn.MaxPool2d
import torch
import torch.nn as nn

# 构造一个 1个Batch, 1个通道, 4x4大小 的输入张量
x = torch.tensor([[[
    [10.,  2.,   3., 14.],
    [ 5.,  6.,   7.,  8.],
    [ 9., 20.,  11., 12.],
    [13., 14.,  15.,  1.]
]]])
# 定义池化层,极其重要的一步:开启 return_indices=True
max_pool = nn.MaxPool2d(kernel_size=2, stride=2, return_indices=True)
# 执行池化
pooled_features, indices = max_pool(x)
print("Pooled features:\n", pooled_features)
print("Indices of max values:\n", indices)
Pooled features:
tensor([[[[10., 14.],
[20., 15.]]]])
Indices of max values:
tensor([[[[ 0, 3],
[ 9, 14]]]])# 执行反池化:必须同时传入 特征 + 索引
unpooled_features = max_unpool(pooled_features, indices)
print("Unpooled features:\n", unpooled_features)Unpooled features:
tensor([[[[10., 0., 0., 14.],
[ 0., 0., 0., 0.],
[ 0., 20., 0., 0.],
[ 0., 0., 15., 0.]]]])完整代码
import torch
import torch.nn as nn
import torch.nn.functional as F

class SegNet(nn.Module):
    def __init__(self, num_classes=12):
        super(SegNet, self).__init__()

        # ==========================================
        # 1. 编码器 (Encoder) - 完全照搬 VGG16 前5层
        # ==========================================
        # 优化提示:在 BatchNorm 前的 Conv2d 设置 bias=False 可以节省显存
        self.encoder1 = nn.Sequential(
            nn.Conv2d(3, 64, kernel_size=3, stride=1, padding=1, bias=False),
            nn.BatchNorm2d(64),
            nn.ReLU(inplace=True),
            nn.Conv2d(64, 64, kernel_size=3, stride=1, padding=1, bias=False),
            nn.BatchNorm2d(64),
            nn.ReLU(inplace=True),
        )
        self.encoder2 = nn.Sequential(
            nn.Conv2d(64, 128, kernel_size=3, stride=1, padding=1, bias=False),
            nn.BatchNorm2d(128),
            nn.ReLU(inplace=True),
            nn.Conv2d(128, 128, kernel_size=3, stride=1, padding=1, bias=False),
            nn.BatchNorm2d(128),
            nn.ReLU(inplace=True),
        )
        self.encoder3 = nn.Sequential(
            nn.Conv2d(128, 256, kernel_size=3, stride=1, padding=1, bias=False),
            nn.BatchNorm2d(256),
            nn.ReLU(inplace=True),
            nn.Conv2d(256, 256, kernel_size=3, stride=1, padding=1, bias=False),
            nn.BatchNorm2d(256),
            nn.ReLU(inplace=True),
            nn.Conv2d(256, 256, kernel_size=3, stride=1, padding=1, bias=False),
            nn.BatchNorm2d(256),
            nn.ReLU(inplace=True),
        )
        self.encoder4 = nn.Sequential(
            nn.Conv2d(256, 512, kernel_size=3, stride=1, padding=1, bias=False),
            nn.BatchNorm2d(512),
            nn.ReLU(inplace=True),
            nn.Conv2d(512, 512, kernel_size=3, stride=1, padding=1, bias=False),
            nn.BatchNorm2d(512),
            nn.ReLU(inplace=True),
            nn.Conv2d(512, 512, kernel_size=3, stride=1, padding=1, bias=False),
            nn.BatchNorm2d(512),
            nn.ReLU(inplace=True),
        )
        self.encoder5 = nn.Sequential(
            nn.Conv2d(512, 512, kernel_size=3, stride=1, padding=1, bias=False),
            nn.BatchNorm2d(512),
            nn.ReLU(inplace=True),
            nn.Conv2d(512, 512, kernel_size=3, stride=1, padding=1, bias=False),
            nn.BatchNorm2d(512),
            nn.ReLU(inplace=True),
            nn.Conv2d(512, 512, kernel_size=3, stride=1, padding=1, bias=False),
            nn.BatchNorm2d(512),
            nn.ReLU(inplace=True),
        )

        # ==========================================
        # 2. 解码器 (Decoder) - 完美的对称结构
        # ==========================================
        self.decoder1 = nn.Sequential(
            nn.Conv2d(512, 512, kernel_size=3, stride=1, padding=1, bias=False),
            nn.BatchNorm2d(512),
            nn.ReLU(inplace=True),
            nn.Conv2d(512, 512, kernel_size=3, stride=1, padding=1, bias=False),
            nn.BatchNorm2d(512),
            nn.ReLU(inplace=True),
            nn.Conv2d(512, 512, kernel_size=3, stride=1, padding=1, bias=False),
            nn.BatchNorm2d(512),
            nn.ReLU(inplace=True),
        )
        self.decoder2 = nn.Sequential(
            nn.Conv2d(512, 512, kernel_size=3, stride=1, padding=1, bias=False),
            nn.BatchNorm2d(512),
            nn.ReLU(inplace=True),
            nn.Conv2d(512, 512, kernel_size=3, stride=1, padding=1, bias=False),
            nn.BatchNorm2d(512),
            nn.ReLU(inplace=True),
            nn.Conv2d(512, 256, kernel_size=3, stride=1, padding=1, bias=False),
            nn.BatchNorm2d(256),
            nn.ReLU(inplace=True),
        )
        self.decoder3 = nn.Sequential(
            nn.Conv2d(256, 256, kernel_size=3, stride=1, padding=1, bias=False),
            nn.BatchNorm2d(256),
            nn.ReLU(inplace=True),
            nn.Conv2d(256, 256, kernel_size=3, stride=1, padding=1, bias=False),
            nn.BatchNorm2d(256),
            nn.ReLU(inplace=True),
            nn.Conv2d(256, 128, kernel_size=3, stride=1, padding=1, bias=False),
            nn.BatchNorm2d(128),
            nn.ReLU(inplace=True),
        )
        self.decoder4 = nn.Sequential(
            nn.Conv2d(128, 128, kernel_size=3, stride=1, padding=1, bias=False),
            nn.BatchNorm2d(128),
            nn.ReLU(inplace=True),
            nn.Conv2d(128, 64, kernel_size=3, stride=1, padding=1, bias=False),
            nn.BatchNorm2d(64),
            nn.ReLU(inplace=True),
        )
        self.decoder5 = nn.Sequential(
            nn.Conv2d(64, 64, kernel_size=3, stride=1, padding=1, bias=False),
            nn.BatchNorm2d(64),
            nn.ReLU(inplace=True),
            # 最后一层:输出维度为类别数,无 BN,无 ReLU,直接输出 Logits
            nn.Conv2d(64, num_classes, kernel_size=3, stride=1, padding=1)
        )

        # ==========================================
        # 3. 核心机制:带索引的池化与反池化
        # ==========================================
        self.max_pool = nn.MaxPool2d(2, 2, return_indices=True)
        self.max_unpool = nn.MaxUnpool2d(2, 2)

        # 初始化参数
        self.initialize_weights()

    def initialize_weights(self):
        """Kaiming 初始化,保证网络在训练初期的稳定性"""
        for m in self.modules():
            if isinstance(m, nn.Conv2d):
                nn.init.kaiming_normal_(m.weight, mode='fan_out', nonlinearity='relu')
                if m.bias is not None:
                    nn.init.constant_(m.bias, 0)
            elif isinstance(m, nn.BatchNorm2d):
                nn.init.constant_(m.weight, 1)
                nn.init.constant_(m.bias, 0)

    def forward(self, x):
        # ---------- 编码阶段 (记录索引) ----------
        dim1 = self.encoder1(x)
        x, indices1 = self.max_pool(dim1)

        dim2 = self.encoder2(x)
        x, indices2 = self.max_pool(dim2)

        dim3 = self.encoder3(x)
        x, indices3 = self.max_pool(dim3)

        dim4 = self.encoder4(x)
        x, indices4 = self.max_pool(dim4)

        dim5 = self.encoder5(x)
        x, indices5 = self.max_pool(dim5)

        # ---------- 解码阶段 (使用索引还原) ----------
        # 神级操作:直接传入 output_size=dim5.size(),PyTorch 会自动对齐奇数分辨率造成的尺寸差异!
        x = self.max_unpool(x, indices5, output_size=dim5.size())
        x = self.decoder1(x)

        x = self.max_unpool(x, indices4, output_size=dim4.size())
        x = self.decoder2(x)

        x = self.max_unpool(x, indices3, output_size=dim3.size())
        x = self.decoder3(x)

        x = self.max_unpool(x, indices2, output_size=dim2.size())
        x = self.decoder4(x)

        x = self.max_unpool(x, indices1, output_size=dim1.size())
        x = self.decoder5(x)

        return x

# === 验证尺寸是否一致 ===
if __name__ == "__main__":
    # 模拟输入一张 475x475 的奇数图片,如果不加 output_size,普通网络极易崩溃
    dummy_input = torch.randn(1, 3, 475, 475)
    model = SegNet(num_classes=12)
    output = model(dummy_input)
    print(f"输入尺寸: {dummy_input.shape}")
    print(f"输出尺寸: {output.shape}")
    # 完美输出: torch.Size([1, 12, 475, 475])
=== 🚀 开始前向传播 ===
0. 初始输入图像尺寸: torch.Size([1, 3, 475, 475])
Encoder 1: 卷积后 torch.Size([1, 64, 475, 475]) -> 池化后 torch.Size([1, 64, 237, 237])
Encoder 2: 卷积后 torch.Size([1, 128, 237, 237]) -> 池化后 torch.Size([1, 128, 118, 118])
Encoder 3: 卷积后 torch.Size([1, 256, 118, 118]) -> 池化后 torch.Size([1, 256, 59, 59])
Encoder 4: 卷积后 torch.Size([1, 512, 59, 59]) -> 池化后 torch.Size([1, 512, 29, 29])
Encoder 5 (谷底): 卷积后 torch.Size([1, 512, 29, 29]) -> 池化后 torch.Size([1, 512, 14, 14])
Decoder 1: 反池化还原 torch.Size([1, 512, 29, 29]) -> 卷积后 torch.Size([1, 512, 29, 29])
Decoder 2: 反池化还原 torch.Size([1, 512, 59, 59]) -> 卷积后 torch.Size([1, 256, 59, 59])
Decoder 3: 反池化还原 torch.Size([1, 256, 118, 118]) -> 卷积后 torch.Size([1, 128, 118, 118])
Decoder 4: 反池化还原 torch.Size([1, 128, 237, 237]) -> 卷积后 torch.Size([1, 64, 237, 237])
Decoder 5: 反池化还原 torch.Size([1, 64, 475, 475]) -> 最终输出 torch.Size([1, 12, 475, 475])
=== 🏁 前向传播结束 ===
输入尺寸: torch.Size([1, 3, 475, 475])
输出尺寸: torch.Size([1, 12, 475, 475])


DAMO开发者矩阵,由阿里巴巴达摩院和中国互联网协会联合发起,致力于探讨最前沿的技术趋势与应用成果,搭建高质量的交流与分享平台,推动技术创新与产业应用链接,围绕“人工智能与新型计算”构建开放共享的开发者生态。
更多推荐

 8
8 0
0- 0


 已为社区贡献9条内容

所有评论(0)