崖山数据库系统YashanDB安装部署准备(过程记录)
warning:
host 127.0.0.1 memory limit is 3016M, but host available memory is 2074M
it may cause database deployment failure
Generate config completed
[root@localhost install]# ./bin/yasboot package install -t hosts.toml
127.0.0.1
ip:127.0.0.1 memory is less than 4096MB
config check failed
内存一定要超过4G,不然无法部署YaShan数据库
0x00 描述
官方课程:https://www.yashandb.com/Learning
官方下载:https://download.yashandb.com/download
操作手册:https://doc.yashandb.com/yashandb/23.4/zh/All-Manuals/Product-Overview/About-YashanDB.html
0x01 版本
CentOS 7.6 2C/4GB/40GB
(建议不划分Swap Space,并且内存改成5G,避免不够用无法使用yashanSQL)
YashanDB 23.4.1
运行依赖
OpenSSL 1.1.1
lz4		1.8.3
zlib	1.2.7
zstd	1.4.4
gmssl	3.1.1
bitshuffle	0.5.1
git 	 2.31.1
#zstd没装
运维依赖
monit			5.28.0
fio	 			3.34
iperf	   	2.0.13
mpathpersist	0.4.9及以上
sshpass  		1.0及以上
#除了sshpass都没装
0x02 修复建议
……
0x03 环境搭建
一、服务器安装
centos下载:https://mirror.nsc.liu.se/centos-store/7.6.1810/isos/x86_64/CentOS-7-x86_64-DVD-1810.iso
二、依赖项安装
openssl:https://openssl-library.org/source/old/1.1.1/
lz4:https://github.com/lz4/lz4
CentOS 7 已经停止支持,官方镜像源已经下线。需要替换为可用的镜像源。
cat > /etc/yum.repos.d/CentOS-Base.repo << 'EOF'
[base]
name=CentOS-7 - Base
baseurl=https://mirrors.aliyun.com/centos-vault/7.9.2009/os/x86_64/
gpgcheck=1
gpgkey=https://mirrors.aliyun.com/centos-vault/RPM-GPG-KEY-CentOS-7

[updates]
name=CentOS-7 - Updates
baseurl=https://mirrors.aliyun.com/centos-vault/7.9.2009/updates/x86_64/
gpgcheck=1
gpgkey=https://mirrors.aliyun.com/centos-vault/RPM-GPG-KEY-CentOS-7

[extras]
name=CentOS-7 - Extras
baseurl=https://mirrors.aliyun.com/centos-vault/7.9.2009/extras/x86_64/
gpgcheck=1
gpgkey=https://mirrors.aliyun.com/centos-vault/RPM-GPG-KEY-CentOS-7
EOF

yum clean all
yum makecache
# 修复 SCL 仓库
cat > /etc/yum.repos.d/CentOS-SCLo-scl.repo << 'EOF'
[centos-sclo-sclo]
name=CentOS-7 - SCLo sclo
baseurl=https://mirrors.aliyun.com/centos-vault/7.9.2009/sclo/x86_64/sclo/
gpgcheck=1
enabled=1
gpgkey=https://mirrors.aliyun.com/centos-vault/RPM-GPG-KEY-CentOS-SIG-SCLo
EOF

cat > /etc/yum.repos.d/CentOS-SCLo-rh.repo << 'EOF'
[centos-sclo-rh]
name=CentOS-7 - SCLo rh
baseurl=https://mirrors.aliyun.com/centos-vault/7.9.2009/sclo/x86_64/rh/
gpgcheck=1
enabled=1
gpgkey=https://mirrors.aliyun.com/centos-vault/RPM-GPG-KEY-CentOS-SIG-SCLo
EOF

# 清理缓存并重建
yum clean all
yum makecache

# 安装 devtoolset-9
yum install -y devtoolset-9

# 配置自动启用
echo 'source /opt/rh/devtoolset-9/enable' >> ~/.bashrc
source ~/.bashrc

# 重新运行 vcpkg
cd /home/ya/vcpkg
./vcpkg install lz4
vcpkg 的要求(需要 git 2.7.4+)
# 安装编译依赖
yum install -y curl-devel expat-devel gettext-devel openssl-devel zlib-devel gcc perl-ExtUtils-MakeMaker
## Could not retrieve mirrorlist http://mirrorlist.centos.org/?release=7&arch=x86_64&repo=os&infra=stock error was 14: curl#6 - "Could not resolve host: mirrorlist.centos.org; 未知的错误"
## 出现此报错,是因为centos7的镜像下线

# 下载并编译安装 git 2.31+
cd /usr/local/src
wget https://github.com/git/git/archive/refs/tags/v2.31.1.tar.gz
tar zxf v2.31.1.tar.gz
cd git-2.31.1
make configure
./configure --prefix=/usr/local/git
make && make install

# 添加到 PATH
echo 'export PATH=/usr/local/git/bin:$PATH' >> ~/.bashrc
source ~/.bashrc

# 验证
git --version
su root
make
#make: *** 没有规则可以创建目标“install”。 停止。
yum -y install make
git clone https://github.com/Microsoft/vcpkg.git
cd vcpkg
./bootstrap-vcpkg.sh
./vcpkg integrate install
./vcpkg.exe install lz4
#bash: ./vcpkg.exe: 没有那个文件或目录
./vcpkg install lz4
#Additional packages (*) will be modified to complete this operation.
#Detecting compiler hash for triplet x64-linux...
#/home/ya/vcpkg/scripts/vcpkg-tools.json: error: A suitable version of git was not found (required v2.7.4) and unable to automatically download a portable one. Please install a newer version of git
# 需要git 2.7.4+

#error: while detecting compiler information:
#The log file content at "/home/ya/vcpkg/buildtrees/detect_compiler/stdout-x64-linux.log" is:
#A suitable version of ninja was not found (required v1.13.2).
zlib:
yum install zlib
检查
# 检查libcrypto.so和libssl.so
ldconfig -p | grep -E "libcrypto.so|libssl.so"
yum install openssl openssl-devel
ldconfig -p | grep liblz4.so
ldconfig -p | grep libz.so
ldconfig -p | grep libzstd.so
# 检查
# 启用编译环境
source /opt/rh/devtoolset-9/enable
export LD_LIBRARY_PATH=/opt/rh/devtoolset-9/root/usr/lib64:$LD_LIBRARY_PATH

# 安装编译依赖
yum install -y gcc gcc-c++ make autoconf automake libtool ncurses-devel

# 创建临时目录
mkdir -p /tmp/yashan_deps
cd /tmp/yashan_deps

# 1. 安装 zstd 1.4.4
wget https://ghproxy.com/https://github.com/facebook/zstd/archive/v1.4.4.tar.gz -O zstd-1.4.4.tar.gz
tar zxf zstd-1.4.4.tar.gz
cd zstd-1.4.4
make -C lib && make -C programs
make install PREFIX=/usr/local
cd ..
ldconfig
zstd --version

# 2. 安装 iperf 2.0.13
wget https://ghproxy.com/https://github.com/esnet/iperf/archive/refs/tags/2.0.13.tar.gz -O iperf-2.0.13.tar.gz
tar zxf iperf-2.0.13.tar.gz
cd iperf-2.0.13
./configure --prefix=/usr/local
make && make install
cd ..
iperf --version

# 3. 安装 monit 5.28.0
wget https://ghproxy.com/https://bitbucket.org/tildeslash/monit/downloads/monit-5.28.0.tar.gz -O monit-5.28.0.tar.gz
tar zxf monit-5.28.0.tar.gz
cd monit-5.28.0
./configure --prefix=/usr/local
make && make install
cd ..
monit --version

# 4. 安装 fio 3.34
wget https://ghproxy.com/https://github.com/axboe/fio/archive/refs/tags/fio-3.34.tar.gz -O fio-3.34.tar.gz
tar zxf fio-3.34.tar.gz
cd fio-fio-3.34
./configure --prefix=/usr/local
make && make install
cd ..
fio --version

# 5. 安装 mpathpersist
yum install -y device-mapper-multipath
mpathpersist --version 2>&1 | head -n1 || echo "mpathpersist installed"

# 6. 更新动态链接库
ldconfig
三、用户设置
useradd -d /home/yashan -m yashan
passwd yashan

groupadd YASDBA
usermod -a -G YASDBA yashan

mkdir -p /home/yashan/install
chown -R yashan:yashan /home/yashan/install

## 创建/data/yashan目录、HOME目录和DATA目录
# mkdir -p /data/yashan
# mkdir -p /data/yashan/yasdb_home
# mkdir -p /data/yashan/yasdb_data

## 直接基于父目录进行授权即可
# chown -R yashan:yashan /data/yashan

## 运行日志目录
# mkdir -p /data/yashan/log

## 软件包下载
# cd /home/yashan/install
下载软件包(https://download.yashandb.com/download)
$ tar zxf yashandb-{version_number}-linux-x86_64.tar.gz
$ ll ./bin/yasboot
-rwxrwxr-x 1 yashan yashan 9377280 Sep 26 01:32 yasboot
$ ll ./om/bin/yasom
-rwxrwxr-x 1 yashan yashan 9377280 Sep 26 01:32 yasom
四、调整进程VMA上限
当并发用户数较多或执行复杂的SQL操作时,单个进程可能需要管理数千个VMA区域。Linux系统默认的65536个VMA限制在高负载数据库环境中往往不够用,可能导致"Cannot allocate memory"或"ENOMEM"错误。建议调大VMA上限值,推荐2000000或以上。
## 查看当前配置
# sysctl -a|grep vm.max_map_count

## 修改配置
# sysctl -w vm.max_map_count=2000000
# echo "vm.max_map_count=2000000" >> /etc/sysctl.conf
五、调整资源限制值
vi /etc/security/limits.conf
# YashanDB 资源限制配置
yashan soft nofile 1048576
yashan hard nofile 1048576
yashan soft nproc 1048576
yashan hard nproc 1048576
yashan soft rss unlimited
yashan hard rss unlimited
yashan soft stack 8192
yashan hard stack 8192
su yashan
# 切换到 yashan 用户后检查
ulimit -n   # 应该显示 1048576
ulimit -u   # 应该显示 1048576
ulimit -m   # 应该显示 unlimited
ulimit -s   # 应该显示 8192
调整网络连接参数
## 查看当前配置
# cat /proc/sys/net/core/somaxconn

## 调整参数值
# sudo sysctl -w net.core.somaxconn=32768
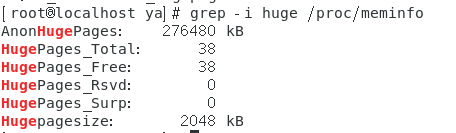
启用大页内存
free -g
#              total        used        free      shared  buff/cache   #available
#Mem:              3           0           0           0           2           2
#Swap:             7           0           7

##配置150 个大页(300MB)

echo "vm.nr_hugepages=150" >> /etc/sysctl.conf
echo "vm.nr_overcommit_hugepages=0" >> /etc/sysctl.conf
sysctl -p
grep -i huge /proc/meminfo

# reboot
关闭透明大页
## 1. 查找透明大页相关的虚拟文件系统路径
find / -name *transparent_hugepage
#find: ‘/run/user/1000/gvfs’: 权限不够
#/sys/kernel/mm/transparent_hugepage


## 2. 根据路径选择查看命令,常见命令如下:
cat /sys/kernel/mm/transparent_hugepage/enabled
## 或
cat /sys/kernel/mm/redhat_transparent_hugepage/enabled
vi /etc/default/grub
#GRUB_CMDLINE_LINUX这一行参数改为
GRUB_CMDLINE_LINUX="crashkernel=auto rd.lvm.lv=centos/root rd.lvm.lv=centos/swap rhgb quiet transparent_hugepage=never"
# [ -d /sys/firmware/efi ] && echo UEFI || echo BIOS
## BIOS引导
# grub2-mkconfig -o /boot/grub2/grub.cfg
reboot
#验证透明大页已关闭
cat /sys/kernel/mm/transparent_hugepage/enabled
cat /sys/kernel/mm/transparent_hugepage/defrag
显示always madvise [never]
端口
## 关闭防火墙
systemctl stop firewalld
## 关闭开机自启
systemctl disable firewalld

DAMO开发者矩阵,由阿里巴巴达摩院和中国互联网协会联合发起,致力于探讨最前沿的技术趋势与应用成果,搭建高质量的交流与分享平台,推动技术创新与产业应用链接,围绕“人工智能与新型计算”构建开放共享的开发者生态。
更多推荐

 8
8 0
0- 0


 已为社区贡献1条内容

所有评论(0)