Android 应用集成 Gemini API:从零开始构建一个简单的聊天机器人
文章目录
前言
大家好!在这篇博客中,我将深入讲解如何使用 Android Studio、Retrofit 库以及 Material Design 组件,从零开始构建一个简单的聊天机器人,并集成 Google 的 Gemini API。我们将逐步完成以下步骤,并详细解释每个步骤的目的和实现方式,让我们开始吧!
1. 项目初始化和依赖添加
目的: 创建一个新的 Android 项目,并引入必要的库,以便进行网络请求和 UI 开发。这里,我的项目名称为geminiapi_demo2
步骤:
-
创建项目: 在 Android Studio 中,选择 “File” -> “New” -> “New Project”,选择 “Empty Activity” 模板,并设置项目名称、包名等。
-
添加依赖: 打开
build.gradle (Module: app)文件,在dependencies块中添加以下依赖:implementation 'com.squareup.retrofit2:retrofit:2.9.0' // Retrofit 库,用于网络请求 implementation 'com.squareup.retrofit2:converter-gson:2.9.0' // Gson 库,用于 JSON 数据解析 implementation 'com.google.android.material:material:1.11.0' // Material Design 组件库,用于构建简单且相对美观的 UIretrofit: Retrofit 是一个类型安全的 HTTP 客户端,用于简化网络请求。converter-gson: Gson 是一个 Java 库,用于将 JSON 数据转换为 Java 对象,反之亦然。material: Material Design 组件库提供了各种预定义的 UI 组件,可以帮助我们快速构建美观的 Android 应用。
-
同步 Gradle: 点击 “Sync Now” 按钮,同步 Gradle 文件,下载并安装依赖库。
2. Retrofit 配置
目的: 创建一个 Retrofit 客户端类,用于发送 HTTP 请求到 Gemini API。
步骤:
-
创建
ApiClient.java文件: 在com.example.geminiapi_demo2包下创建一个名为ApiClient.java的 Java 文件。 -
添加代码: 将以下代码添加到
ApiClient.java文件中:package com.example.geminiapi_demo2; import retrofit2.Retrofit; import retrofit2.converter.gson.GsonConverterFactory; public class ApiClient { private static final String BASE_URL = "https://generativelanguage.googleapis.com/v1/"; // Gemini API 的基础 URL private static Retrofit retrofit; public static Retrofit getClient() { if (retrofit == null) { retrofit = new Retrofit.Builder() .baseUrl(BASE_URL) // 设置基础 URL .addConverterFactory(GsonConverterFactory.create()) // 添加 Gson 转换器 .build(); } return retrofit; } }BASE_URL: 定义 Gemini API 的基础 URL。Retrofit.Builder(): 创建 Retrofit 客户端的构建器。baseUrl(): 设置请求的基础 URL。addConverterFactory(): 添加 Gson 转换器,用于将 JSON 数据转换为 Java 对象。build(): 构建 Retrofit 客户端。
3. Gemini API 接口定义
目的: 定义一个 Java 接口,用于描述与 Gemini API 交互的方法。
步骤:
-
创建
GeminiApiService.java文件: 在com.example.geminiapi_demo2包下创建一个名为GeminiApiService.java的 Java 接口文件。 -
添加代码: 将以下代码添加到
GeminiApiService.java文件中:package com.example.geminiapi_demo2; import com.example.geminiapi_demo2.models.GenerateContentRequest; import com.example.geminiapi_demo2.models.GenerateContentResponse; import retrofit2.Call; import retrofit2.http.Body; import retrofit2.http.Headers; import retrofit2.http.POST; import retrofit2.http.Path; public interface GeminiApiService { @Headers({ "Content-Type: application/json", // 设置请求头,指定内容类型为 JSON "x-goog-api-key: YOUR_API_KEY" // 设置请求头,添加 API 密钥 }) @POST("models/{model}:generateContent") // 定义 POST 请求的 URL Call<GenerateContentResponse> generateContent(@Path("model") String model, @Body GenerateContentRequest request); // 定义请求方法 }@Headers: 用于设置请求头。Content-Type: application/json:指定请求体的内容类型为 JSON。x-goog-api-key: YOUR_API_KEY:添加 API 密钥,用于身份验证。请将YOUR_API_KEY替换为你实际的 API 密钥。
@POST: 指定请求方法为 POST,并定义请求的 URL。@Path: 用于替换 URL 中的占位符{model}。@Body: 用于指定请求体,这里使用GenerateContentRequest对象作为请求体。Call<GenerateContentResponse>: 定义请求方法的返回类型,使用 Retrofit 的Call对象,并指定响应类型为GenerateContentResponse。
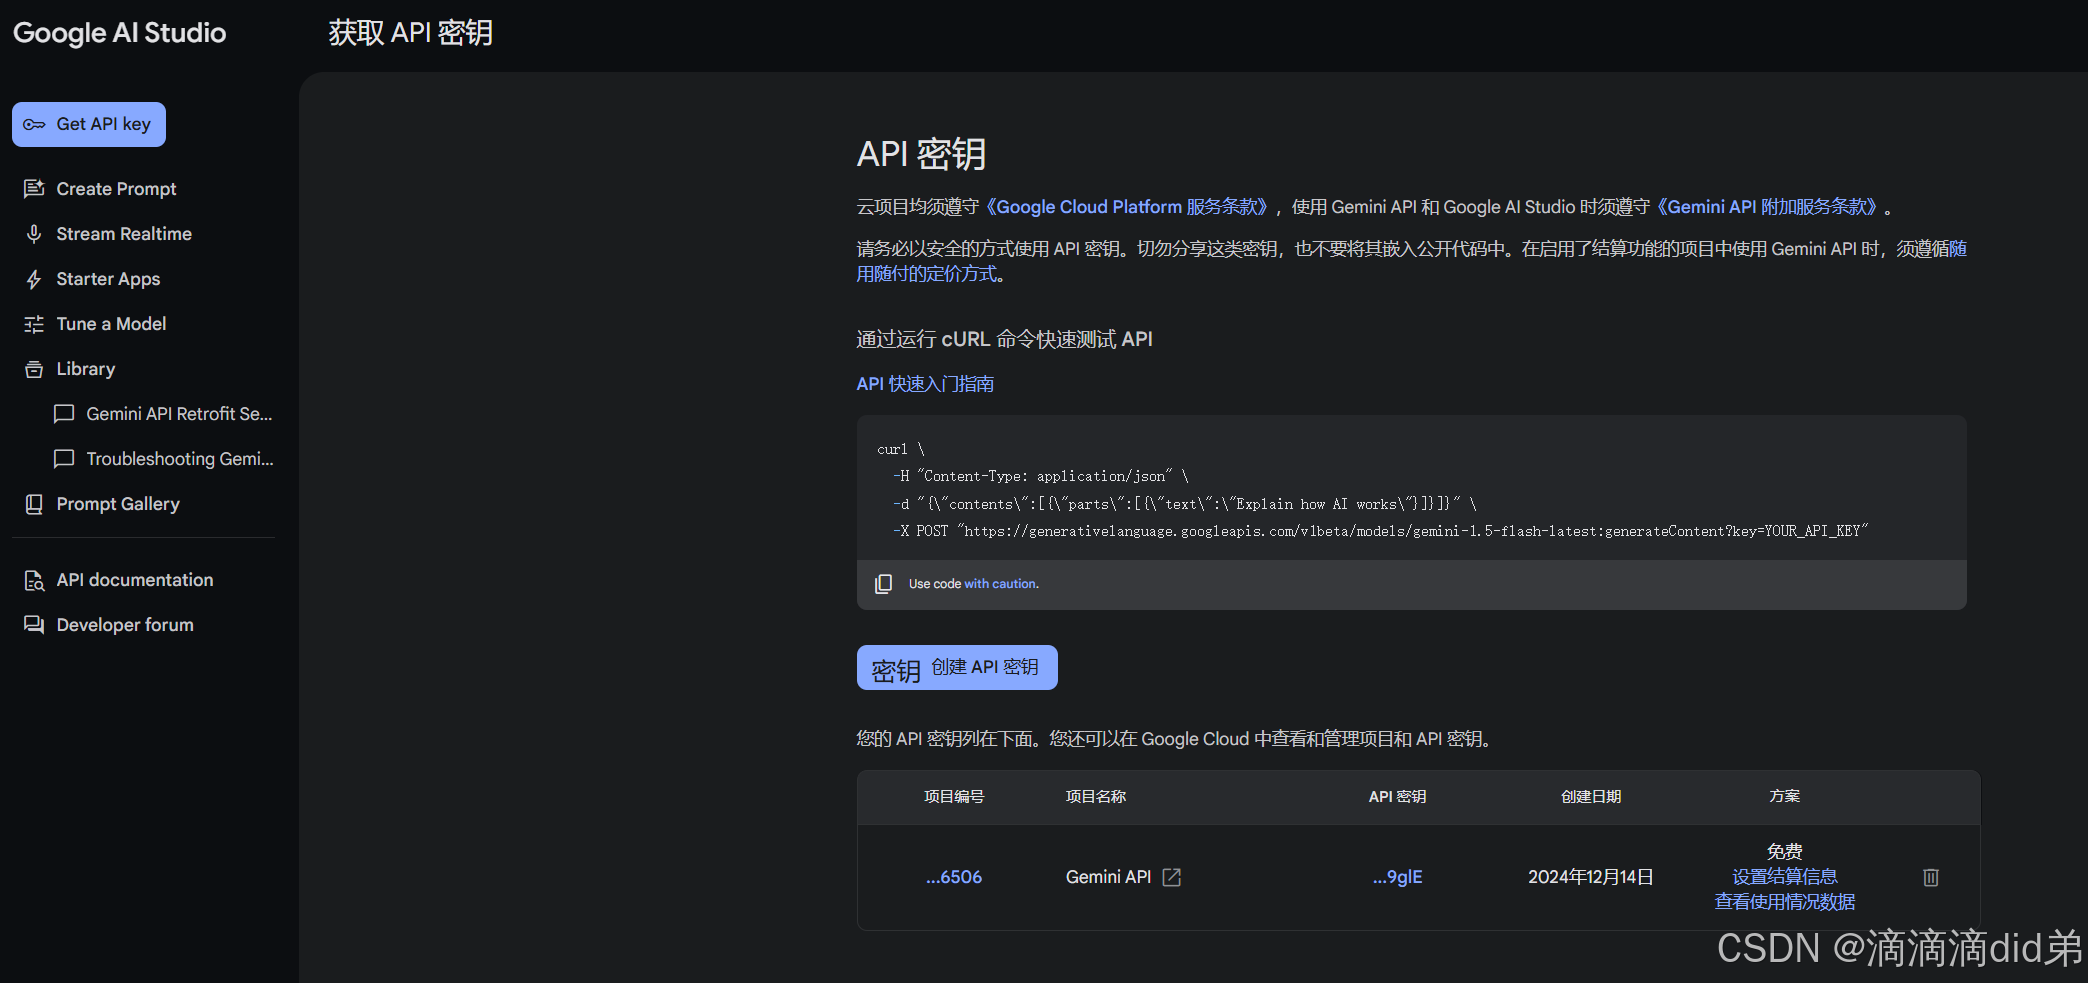
4. Gemini API密钥获取
目的: 获取Gemini API的密钥以连接至Gemini
步骤:
-
准备一个谷歌账号,已经有了请跳过。
-
建议使用美国节点访问。
-
打开Google AI Studio 申请api的网址:https://makersuite.google.com/app/apikey。
-
点击左边菜单里的 Get API key,然后在右边点击创建API密钥,这样就可以得到你的API密钥了
5. 数据模型创建
目的: 创建 Java 类,用于映射 Gemini API 的请求和响应数据。
步骤:
-
创建
models包: 在com.example.geminiapi_demo2包下创建一个名为models的包。 -
创建
GenerateContentRequest.java文件: 在models包下创建一个名为GenerateContentRequest.java的 Java 文件,用于定义请求数据模型。 -
添加代码: 将以下代码添加到
GenerateContentRequest.java文件中:package com.example.geminiapi_demo2.models; import java.util.List; public class GenerateContentRequest { private List<Content> contents; public GenerateContentRequest(List<Content> contents) { this.contents = contents; } public List<Content> getContents() { return contents; } public void setContents(List<Content> contents) { this.contents = contents; } public static class Content { private List<Part> parts; public Content(List<Part> parts) { this.parts = parts; } public List<Part> getParts() { return parts; } public void setParts(List<Part> parts) { this.parts = parts; } } public static class Part{ private String text; public Part(String text) { this.text = text; } public String getText() { return text; } public void setText(String text) { this.text = text; } } }- 这个类定义了 Gemini API 请求的结构,包括
contents列表,其中包含Content对象,而Content对象又包含Part列表,Part对象包含text属性。
- 这个类定义了 Gemini API 请求的结构,包括
-
创建
GenerateContentResponse.java文件: 在models包下创建一个名为GenerateContentResponse.java的 Java 文件,用于定义响应数据模型。 -
添加代码: 将以下代码添加到
GenerateContentResponse.java文件中:package com.example.geminiapi_demo2.models; import java.util.List; public class GenerateContentResponse { private List<Candidate> candidates; public GenerateContentResponse(List<Candidate> candidates) { this.candidates = candidates; } public List<Candidate> getCandidates() { return candidates; } public void setCandidates(List<Candidate> candidates) { this.candidates = candidates; } public static class Candidate{ private Content content; public Candidate(Content content){ this.content=content; } public Content getContent() { return content; } public void setContent(Content content) { this.content = content; } } public static class Content{ private List<Part> parts; public Content(List<Part> parts){ this.parts=parts; } public List<Part> getParts() { return parts; } public void setParts(List<Part> parts) { this.parts = parts; } } public static class Part{ private String text; public Part(String text){ this.text = text; } public String getText() { return text; } public void setText(String text) { this.text = text; } } }- 这个类定义了 Gemini API 响应的结构,包括
candidates列表,其中包含Candidate对象,而Candidate对象又包含Content对象,Content对象包含Part列表,Part对象包含text属性。
- 这个类定义了 Gemini API 响应的结构,包括
6. API 调用和响应处理
目的: 在 MainActivity 中调用 Gemini API,并处理返回的响应数据。
步骤:
-
修改
MainActivity.java文件: 将以下代码添加到MainActivity.java文件中:import androidx.appcompat.app.AppCompatActivity; import android.os.Bundle; import android.util.Log; import android.widget.Button; import android.widget.EditText; import android.widget.TextView; import com.example.geminiapi_demo2.models.GenerateContentRequest; import com.example.geminiapi_demo2.models.GenerateContentResponse; import com.example.geminiapi_demo2.models.GenerateContentRequest.Content; import com.example.geminiapi_demo2.models.GenerateContentRequest.Part; import java.util.ArrayList; import java.util.List; import retrofit2.Call; import retrofit2.Callback; import retrofit2.Response; public class MainActivity extends AppCompatActivity { private EditText inputEditText; private Button sendButton; private TextView responseTextView; @Override protected void onCreate(Bundle savedInstanceState) { super.onCreate(savedInstanceState); setContentView(R.layout.activity_main); inputEditText = findViewById(R.id.inputEditText); sendButton = findViewById(R.id.sendButton); responseTextView = findViewById(R.id.responseTextView); sendButton.setOnClickListener(v -> { String prompt = inputEditText.getText().toString().trim(); if (!prompt.isEmpty()) { updateUI("User", prompt); // 先显示用户输入 generateContent("gemini-pro", prompt); inputEditText.setText(""); // 清空输入框 } }); } private void generateContent(String model, String prompt) { GeminiApiService apiService = ApiClient.getClient().create(GeminiApiService.class); // Prepare the request body List<Part> parts = new ArrayList<>(); parts.add(new Part(prompt)); List<Content> contents = new ArrayList<>(); contents.add(new Content(parts)); GenerateContentRequest request = new GenerateContentRequest(contents); // Make the API call Call<GenerateContentResponse> call = apiService.generateContent(model, request); call.enqueue(new Callback<GenerateContentResponse>() { @Override public void onResponse(Call<GenerateContentResponse> call, Response<GenerateContentResponse> response) { if (response.isSuccessful()) { GenerateContentResponse geminiResponse = response.body(); if(geminiResponse != null && geminiResponse.getCandidates() != null && !geminiResponse.getCandidates().isEmpty()) { String responseText = geminiResponse.getCandidates().get(0).getContent().getParts().get(0).getText(); Log.d("Gemini Response", "Response: " + responseText); updateUI("Gemini", responseText); // 显示 Gemini 响应 } else { Log.e("Gemini Response","No response from Gemini"); updateUI("Gemini", "No response from Gemini"); } } else { int statusCode = response.code(); String errorMessage = response.message(); try { // 如果 response.errorBody() 不为空,尝试获取错误详情 if (response.errorBody() != null) { String errorBodyString = response.errorBody().string(); Log.e("Gemini Response", "Error: Status Code = " + statusCode + ", Message: " + errorMessage + " , Body: " + errorBodyString); updateUI("Gemini", "Error: Status Code = " + statusCode + ", Message: " + errorMessage + " , Body: " + errorBodyString); } else { Log.e("Gemini Response", "Error: Status Code = " + statusCode + ", Message: " + errorMessage); updateUI("Gemini", "Error: Status Code = " + statusCode + ", Message: " + errorMessage); } } catch (Exception e) { Log.e("Gemini Response", "Error while parsing error body: " + e.getMessage()); Log.e("Gemini Response", "Error: Status Code = " + statusCode + ", Message: " + errorMessage); updateUI("Gemini", "Error while parsing error body: " + e.getMessage() + "Error: Status Code = " + statusCode + ", Message: " + errorMessage); } } } @Override public void onFailure(Call<GenerateContentResponse> call, Throwable t) { Log.e("Gemini Response", "Error: " + t.getMessage()); updateUI("Gemini", "Error: " + t.getMessage()); } }); } private void updateUI(String sender, String message) { runOnUiThread(() -> { String currentText = responseTextView.getText().toString(); String newText = currentText + "\n" + sender + ": " + message; responseTextView.setText(newText); }); } }findViewById(): 获取布局文件中 UI 组件的引用。sendButton.setOnClickListener(): 设置按钮点击事件监听器。- 获取用户输入的文本。
- 调用
updateUI()方法显示用户输入。 - 调用
generateContent()方法发送请求。 - 清空输入框。
generateContent():- 创建
GeminiApiService实例。 - 创建
GenerateContentRequest对象,用于构建请求体。 - 使用 Retrofit 的
enqueue()方法发送异步请求。 - 在
onResponse()方法中处理响应。- 如果请求成功,则从
GenerateContentResponse中提取响应文本,并调用updateUI()方法显示 Gemini 响应。 - 如果请求失败,则记录错误信息,并调用
updateUI()方法显示错误信息。
- 如果请求成功,则从
- 在
onFailure()方法中处理请求失败的情况。
- 创建
updateUI():- 使用
runOnUiThread()方法在 UI 线程中更新 UI。 - 将新的消息添加到
TextView中。
- 使用
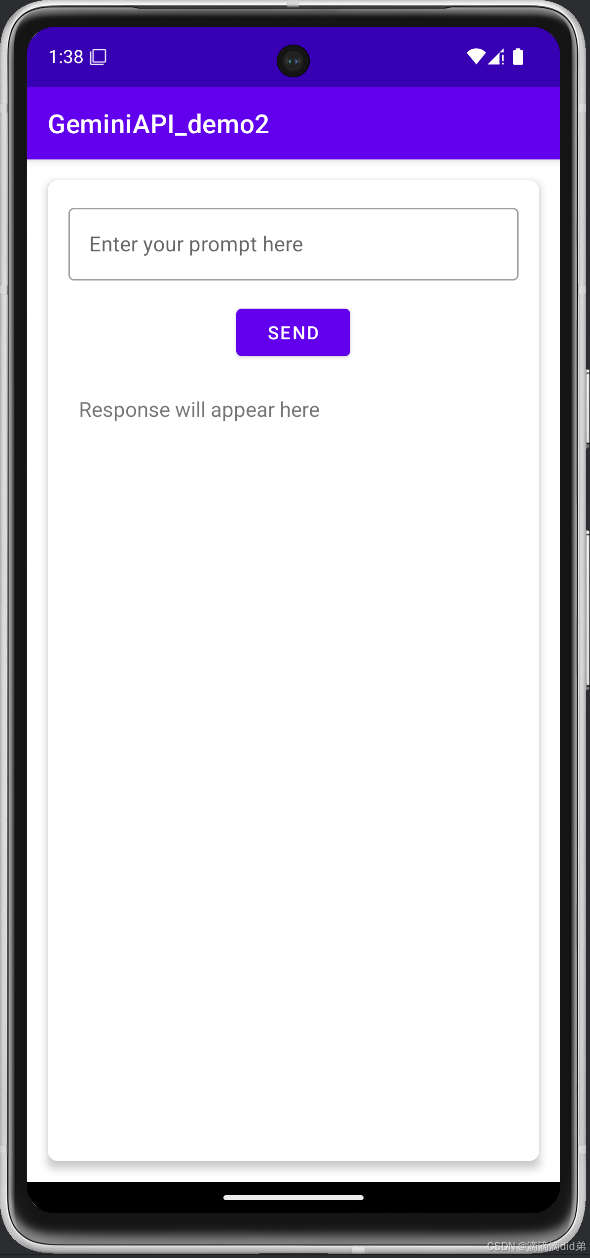
7. 使用 Material Design 组件构建 UI
目的: 使用 Material Design 组件创建简单且相对美观的用户界面。
步骤:
-
创建
activity_main.xml文件: 将以下代码添加到activity_main.xml文件<?xml version="1.0" encoding="utf-8"?> <com.google.android.material.card.MaterialCardView xmlns:android="http://schemas.android.com/apk/res/android" xmlns:app="http://schemas.android.com/apk/res-auto" android:layout_width="match_parent" android:layout_height="match_parent" android:layout_margin="16dp" app:cardCornerRadius="8dp" app:cardElevation="4dp"> <LinearLayout android:layout_width="match_parent" android:layout_height="match_parent" android:orientation="vertical" android:padding="16dp"> <com.google.android.material.textfield.TextInputLayout android:layout_width="match_parent" android:layout_height="wrap_content" android:hint="Enter your prompt here" style="@style/Widget.MaterialComponents.TextInputLayout.OutlinedBox"> <com.google.android.material.textfield.TextInputEditText android:id="@+id/inputEditText" android:layout_width="match_parent" android:layout_height="wrap_content" android:inputType="textMultiLine" /> </com.google.android.material.textfield.TextInputLayout> <com.google.android.material.button.MaterialButton android:id="@+id/sendButton" android:layout_width="wrap_content" android:layout_height="wrap_content" android:layout_gravity="center_horizontal" android:layout_marginTop="16dp" android:text="Send" /> <ScrollView android:layout_width="match_parent" android:layout_height="0dp" android:layout_weight="1" android:layout_marginTop="16dp" android:scrollbars="vertical"> <TextView android:id="@+id/responseTextView" android:layout_width="match_parent" android:layout_height="wrap_content" android:padding="8dp" android:textSize="16sp" android:text="Response will appear here" /> </ScrollView> </LinearLayout> </com.google.android.material.card.MaterialCardView>MaterialCardView: 创建一个带有圆角和阴影的卡片式布局,用于包裹整个 UI。TextInputLayout: 创建一个带有提示文本和轮廓样式的输入框的容器。TextInputEditText: 创建一个多行文本输入框。MaterialButton: 创建一个 Material Design 风格的按钮。ScrollView: 创建一个可滚动的视图,用于显示长文本。TextView: 用于显示 Gemini API 的响应。
8. 效果展示
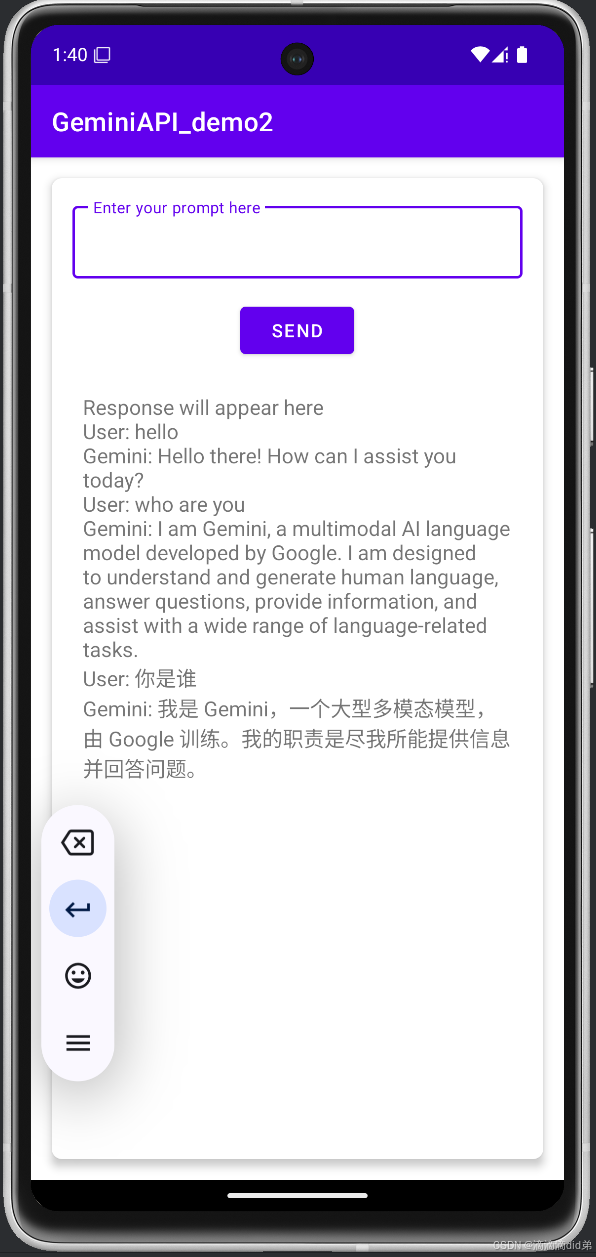
总结
通过以上步骤,我们成功地构建了一个简单的 Android 聊天机器人app,并集成了 Gemini API。这个应用可以接收用户输入,发送到 Gemini API,并显示 Gemini 的响应。我们还添加了多次交互、中文输入支持和滑动显示优化,并使用了 Material Design 组件来提升用户体验。
这个项目只是一个起点,你可以根据自己的需求进行扩展和改进。例如,你可以添加更好的 UI、支持更多的 Gemini API 功能、添加用户身份验证,在自己的Android项目中集成GeminiAPI等等。
希望这篇博客对你有所帮助!如果你有任何问题,请随时留言。

DAMO开发者矩阵,由阿里巴巴达摩院和中国互联网协会联合发起,致力于探讨最前沿的技术趋势与应用成果,搭建高质量的交流与分享平台,推动技术创新与产业应用链接,围绕“人工智能与新型计算”构建开放共享的开发者生态。
更多推荐

 34
34 0
0- 0


 已为社区贡献1条内容

所有评论(0)