MyBatis-Flex多数据源:在SpringBoot3中使用MyBatis-Flex实现多数据源
·
MyBatis-Flex多数据源:在SpringBoot3中使用MyBatis-Flex实现多数据源
一、场景需求与方案选型
1.1 什么是多数据源
本文中的多数据源指:单个SpringBoot服务 同时连接并使用 多个不同的数据库。
1.2 为什么选择 MyBatis-Flex
相较于传统方案需要自行配置 DataSource、TransactionManager 等组件,MyBatis-Flex 通过注解驱动实现了:
- 零配置多数据源:仅需简单配置即可管理多个数据源
- 声明式切换:通过
@Table注解即可指定实体类对应的数据源 - 事务无缝集成:天然支持 Spring 事务管理
相较于 Spring Boot 原生的多数据源配置,MyBatis-Flex 的方案更简洁高效。
二、官方文档
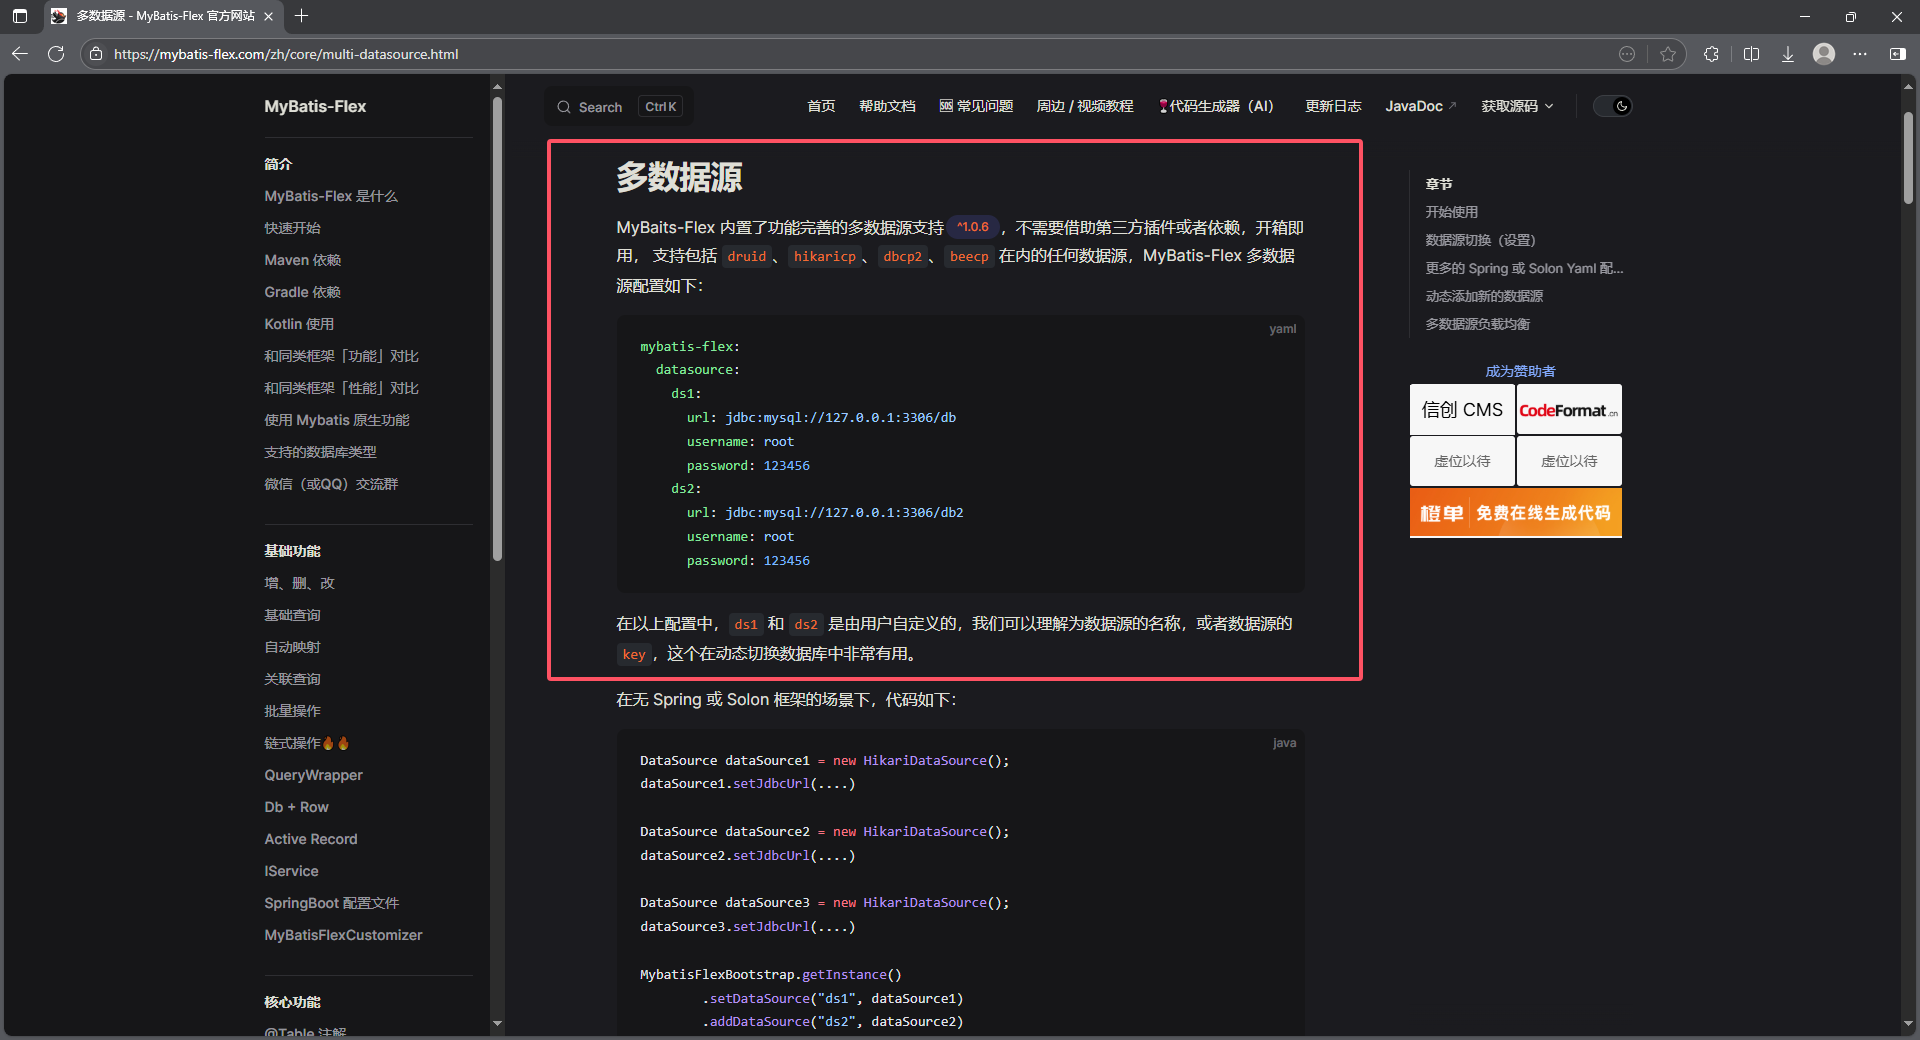
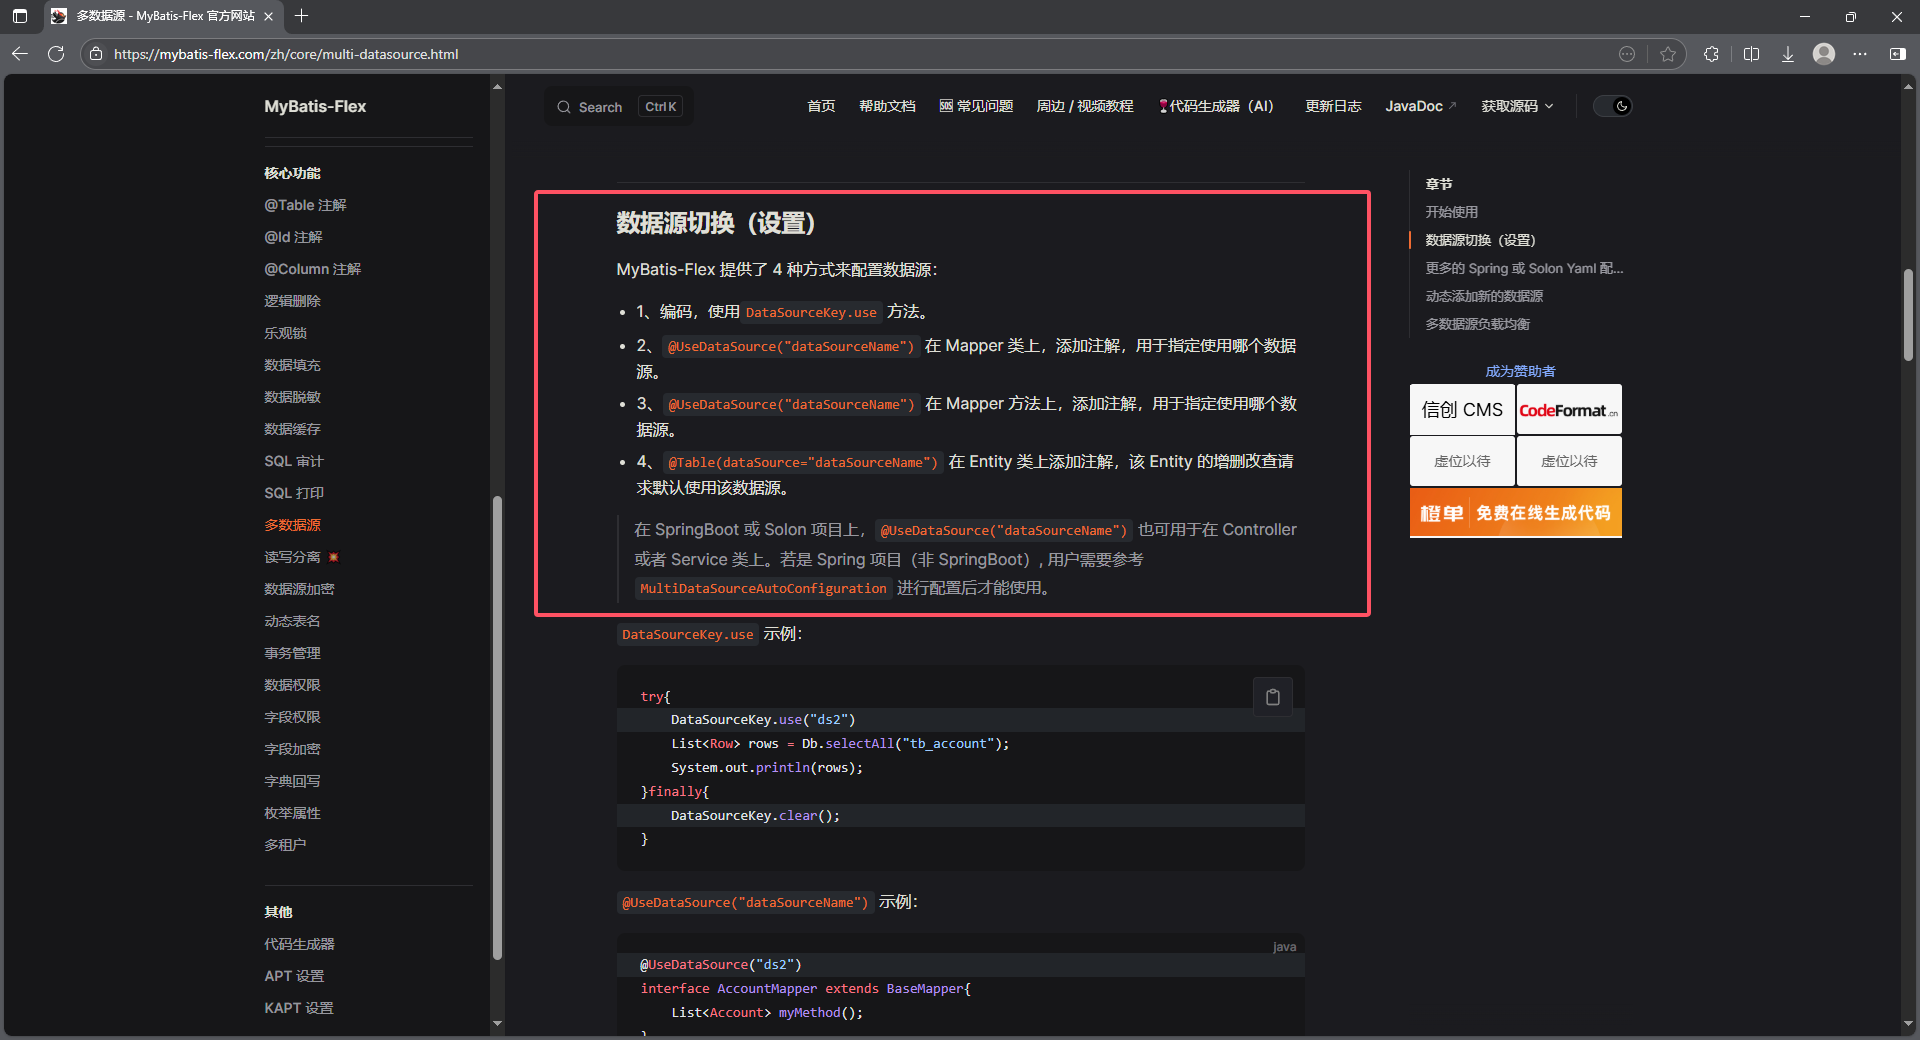
官方文档:MyBatis-Flex 多数据源
2.1 多数据源配置(yml)
2.2 指定数据源(数据源切换配置)
三、环境与项目准备
3.1 技术栈与版本
- SpringBoot: 3.4.5
- MyBatis-Flex: 1.10.9
- 数据库: MySQL 8.0
- 驱动: mysql-connector-j
3.2 项目创建

3.3 POM
<?xml version="1.0" encoding="UTF-8"?>
<project xmlns="http://maven.apache.org/POM/4.0.0" xmlns:xsi="http://www.w3.org/2001/XMLSchema-instance"
         xsi:schemaLocation="http://maven.apache.org/POM/4.0.0 https://maven.apache.org/xsd/maven-4.0.0.xsd">
    <modelVersion>4.0.0</modelVersion>

    <parent>
        <groupId>org.springframework.boot</groupId>
        <artifactId>spring-boot-starter-parent</artifactId>
        <version>3.4.5</version>
        <relativePath/>
    </parent>

    <groupId>com.example</groupId>
    <artifactId>hello-mybatis-flex-multiple-datasource</artifactId>
    <version>0.0.1-SNAPSHOT</version>
    <name>hello-mybatis-flex-multiple-datasource</name>
    <description>MyBatis-Flex 多数据源</description>

    <properties>
        <java.version>21</java.version>
    </properties>

    <dependencies>
        <dependency>
            <groupId>org.springframework.boot</groupId>
            <artifactId>spring-boot-starter</artifactId>
        </dependency>
        <dependency>
            <groupId>org.projectlombok</groupId>
            <artifactId>lombok</artifactId>
            <optional>true</optional>
        </dependency>
        <dependency>
            <groupId>org.springframework.boot</groupId>
            <artifactId>spring-boot-starter-test</artifactId>
            <scope>test</scope>
        </dependency>
        <dependency>
            <groupId>com.mybatis-flex</groupId>
            <artifactId>mybatis-flex-spring-boot3-starter</artifactId>
            <version>1.10.9</version>
        </dependency>
        <dependency>
            <groupId>com.mysql</groupId>
            <artifactId>mysql-connector-j</artifactId>
            <scope>runtime</scope>
        </dependency>
        <dependency>
            <groupId>com.alibaba</groupId>
            <artifactId>druid-spring-boot-starter</artifactId>
            <version>1.2.24</version>
        </dependency>
    </dependencies>

    <build>
        <plugins>
            <plugin>
                <groupId>org.springframework.boot</groupId>
                <artifactId>spring-boot-maven-plugin</artifactId>
                <configuration>
                    <excludes>
                        <exclude>
                            <groupId>org.projectlombok</groupId>
                            <artifactId>lombok</artifactId>
                        </exclude>
                    </excludes>
                </configuration>
            </plugin>
        </plugins>
    </build>

</project>
3.4 数据库准备
创建数据库和表,插入测试数据:
1. 用户数据库(user_db)
CREATE DATABASE `user_db` /*!40100 DEFAULT CHARACTER SET utf8mb4 COLLATE utf8mb4_0900_ai_ci */ /*!80016 DEFAULT ENCRYPTION='N' */
2. 用户表(user_db.user)
-- user_db.`user` definition

CREATE TABLE `user` (
  `user_id` bigint NOT NULL COMMENT '用户ID',
  `username` varchar(50) NOT NULL COMMENT '用户名',
  `password` varchar(100) NOT NULL COMMENT '密码',
  `balance` decimal(10,2) DEFAULT '0.00' COMMENT '账户余额',
  `create_time` datetime DEFAULT CURRENT_TIMESTAMP COMMENT '创建时间',
  PRIMARY KEY (`user_id`),
  UNIQUE KEY `username` (`username`)
) ENGINE=InnoDB DEFAULT CHARSET=utf8mb4 COLLATE=utf8mb4_0900_ai_ci;
3. 订单数据库(order_db)
CREATE DATABASE `order_db` /*!40100 DEFAULT CHARACTER SET utf8mb4 COLLATE utf8mb4_0900_ai_ci */ /*!80016 DEFAULT ENCRYPTION='N' */
4. 订单表( order_db.order)
-- order_db.`order` definition

CREATE TABLE `order` (
  `order_id` bigint NOT NULL COMMENT '订单ID',
  `user_id` bigint NOT NULL COMMENT '下单用户ID',
  `order_amount` decimal(10,2) NOT NULL COMMENT '订单金额',
  `order_status` tinyint DEFAULT '0' COMMENT '0-待支付,1-已支付,2-已取消',
  `create_time` datetime DEFAULT CURRENT_TIMESTAMP COMMENT '下单时间',
  PRIMARY KEY (`order_id`)
) ENGINE=InnoDB DEFAULT CHARSET=utf8mb4 COLLATE=utf8mb4_0900_ai_ci;
5. 插入测试数据
插入 user_db.user 表的测试数据
-- 插入 user_db.user 表的测试数据示例:
-- 用户测试数据(合理覆盖默认值、唯一性约束和数据类型)
INSERT INTO `user` (`user_id`, `username`, `password`, `balance`, `create_time`) VALUES
(1005, '张伟', 'e10adc3949ba59abbe56e057f20f883e', 4500.00, '2024-01-15 09:10:00'),  -- 密码:123456
(1006, '王芳', 'd8578edf8458ce06fbc5bb76a58c5ca4', 0.00, CURRENT_TIMESTAMP),      -- 密码:qwerty(余额默认值)
(1007, '李娜', '5f4dcc3b5aa765d61d8327deb882cf99', 1234.56, '2024-01-17 16:45:00'), -- 密码:password
(1008, '陈勇', '25f9e794323b453885f5181f1b624d0b', 78900.33, '2024-01-18 20:00:00'); -- 密码:123456789
插入 order_db.order 表的测试数据
-- 插入 order_db.order 表的测试数据示例:
-- 订单测试数据(覆盖状态、金额范围、时间类型)
INSERT INTO `order` (`order_id`, `user_id`, `order_amount`, `order_status`, `create_time`) VALUES
(2001, 1001, 150.00, 1, '2024-01-20 10:00:00'),          -- 用户 1001 的已支付订单
(2002, 1005, 99.99,  0, CURRENT_TIMESTAMP),             -- 用户 1005 的待支付订单(使用默认时间)
(2003, 1003, 450.50, 2, '2024-01-19 15:30:00'),        -- 用户 1003 的已取消订单
(2004, 1008, 2000.00, 1, '2024-01-18 14:00:00'),       -- 用户 1008 的大额已支付订单
(2005, 1002, 300.00,  0, CURRENT_TIMESTAMP);            -- 用户 1002 的待支付订单
四、MyBatis-Flex 多数据源配置与使用
步骤 1: 配置多数据源 (application.yml)
spring:
  application:
    name: hello-mybatis-flex-multiple-datasource

mybatis-flex:
  datasource:
    user_db:
      url: jdbc:mysql://127.0.0.1:3306/user_db
      username: flex_test_user
      password: 12345678
    order_db:
      url: jdbc:mysql://127.0.0.1:3306/order_db
      username: flex_test_user
      password: 12345678
关键点说明:
- 在
mybatis-flex.datasource下直接配置多个数据源 - 每个数据源定义一个唯一名称 (如
user_db,order_db) - 配置项与传统
spring.datasource相同 (url,username,password)
步骤 2: 实体类绑定数据源
通过 @Table(dataSource = "数据源名称") 注解指定实体类对应的数据源。
用户实体(绑定到 user_db)
package com.example.hello.mybatisflex.multiple.datasource.db.user.entity;

import com.mybatisflex.annotation.Id;
import com.mybatisflex.annotation.KeyType;
import com.mybatisflex.annotation.Table;
import lombok.Data;

import java.math.BigDecimal;
import java.time.LocalDateTime;

/**
 * 用户表实体类
 */
@Data
@Table(value = "user", dataSource = "user_db")
public class User {
    /**
     * 用户ID(主键)
     */
    @Id(keyType = KeyType.Auto)
    private Long userId;

    /**
     * 用户名(唯一约束)
     */
    private String username;

    /**
     * 密码(加密存储)
     */
    private String password;

    /**
     * 账户余额(单位:元,精度保留两位小数)
     */
    private BigDecimal balance;

    /**
     * 创建时间(默认当前时间)
     */
    private LocalDateTime createTime;
}
订单实体(绑定到 order_db)
package com.example.hello.mybatisflex.multiple.datasource.db.order.entity;

import com.mybatisflex.annotation.Id;
import com.mybatisflex.annotation.KeyType;
import com.mybatisflex.annotation.Table;
import lombok.Data;

import java.math.BigDecimal;
import java.time.LocalDateTime;

/**
 * 订单表实体类
 */
@Data
@Table(value = "order", dataSource = "order_db")
public class Order {
    /**
     * 订单ID(主键)
     */
    @Id(keyType = KeyType.Auto)
    private Long orderId;

    /**
     * 用户ID(关联 user.user_id)
     */
    private Long userId;

    /**
     * 订单金额(单位:元,非空,精度保留两位小数)
     */
    private BigDecimal orderAmount;

    /**
     * 订单状态(0-待支付,1-已支付,2-已取消)
     */
    private Integer orderStatus;

    /**
     * 下单时间(默认当前时间)
     */
    private LocalDateTime createTime;
}
步骤 3: 创建 Mapper 接口
Mapper 接口无需特殊处理,继承 BaseMapper 即可。
UserMapper.java:
package com.example.hello.mybatisflex.multiple.datasource.db.user.mapper;

import com.example.hello.mybatisflex.multiple.datasource.db.user.entity.User;
import com.mybatisflex.core.BaseMapper;
import org.apache.ibatis.annotations.Mapper;

@Mapper
public interface UserMapper extends BaseMapper<User> {
}
OrderMapper.java:
package com.example.hello.mybatisflex.multiple.datasource.db.order.mapper;

import com.example.hello.mybatisflex.multiple.datasource.db.order.entity.Order;
import com.mybatisflex.core.BaseMapper;
import org.apache.ibatis.annotations.Mapper;

@Mapper
public interface OrderMapper extends BaseMapper<Order> {
}
五、功能测试与验证
5.1 单元测试类
package com.example.hello.mybatisflex.multiple.datasource;

import com.example.hello.mybatisflex.multiple.datasource.db.order.entity.Order;
import com.example.hello.mybatisflex.multiple.datasource.db.order.mapper.OrderMapper;
import com.example.hello.mybatisflex.multiple.datasource.db.user.entity.User;
import com.example.hello.mybatisflex.multiple.datasource.db.user.mapper.UserMapper;
import lombok.extern.slf4j.Slf4j;
import org.junit.jupiter.api.Test;
import org.springframework.beans.factory.annotation.Autowired;
import org.springframework.boot.test.context.SpringBootTest;

import java.util.List;

@Slf4j
@SpringBootTest
class MultipleDatasourceTest {

    @Autowired
    private UserMapper userMapper;

    @Autowired
    private OrderMapper orderMapper;

    @Test
    void testUserMapper() {
        List<User> users = userMapper.selectAll();
        log.info("users: {}", users);
    }

    @Test
    void testOrderMapper() {
        List<Order> orders = orderMapper.selectAll();
        log.info("orders: {}", orders);
    }

    @Test
    void testMultipleDatasource() {
        List<User> users = userMapper.selectAll();
        log.info("用户列表:{}", users);

        List<Order> orders = orderMapper.selectAll();
        log.info("订单列表:{}", orders);

        User user = userMapper.selectOneById(1005L);
        log.info("测试重新切换到用户数据库,单个用户:{}", user);
    }

}
5.2 测试结果及分析
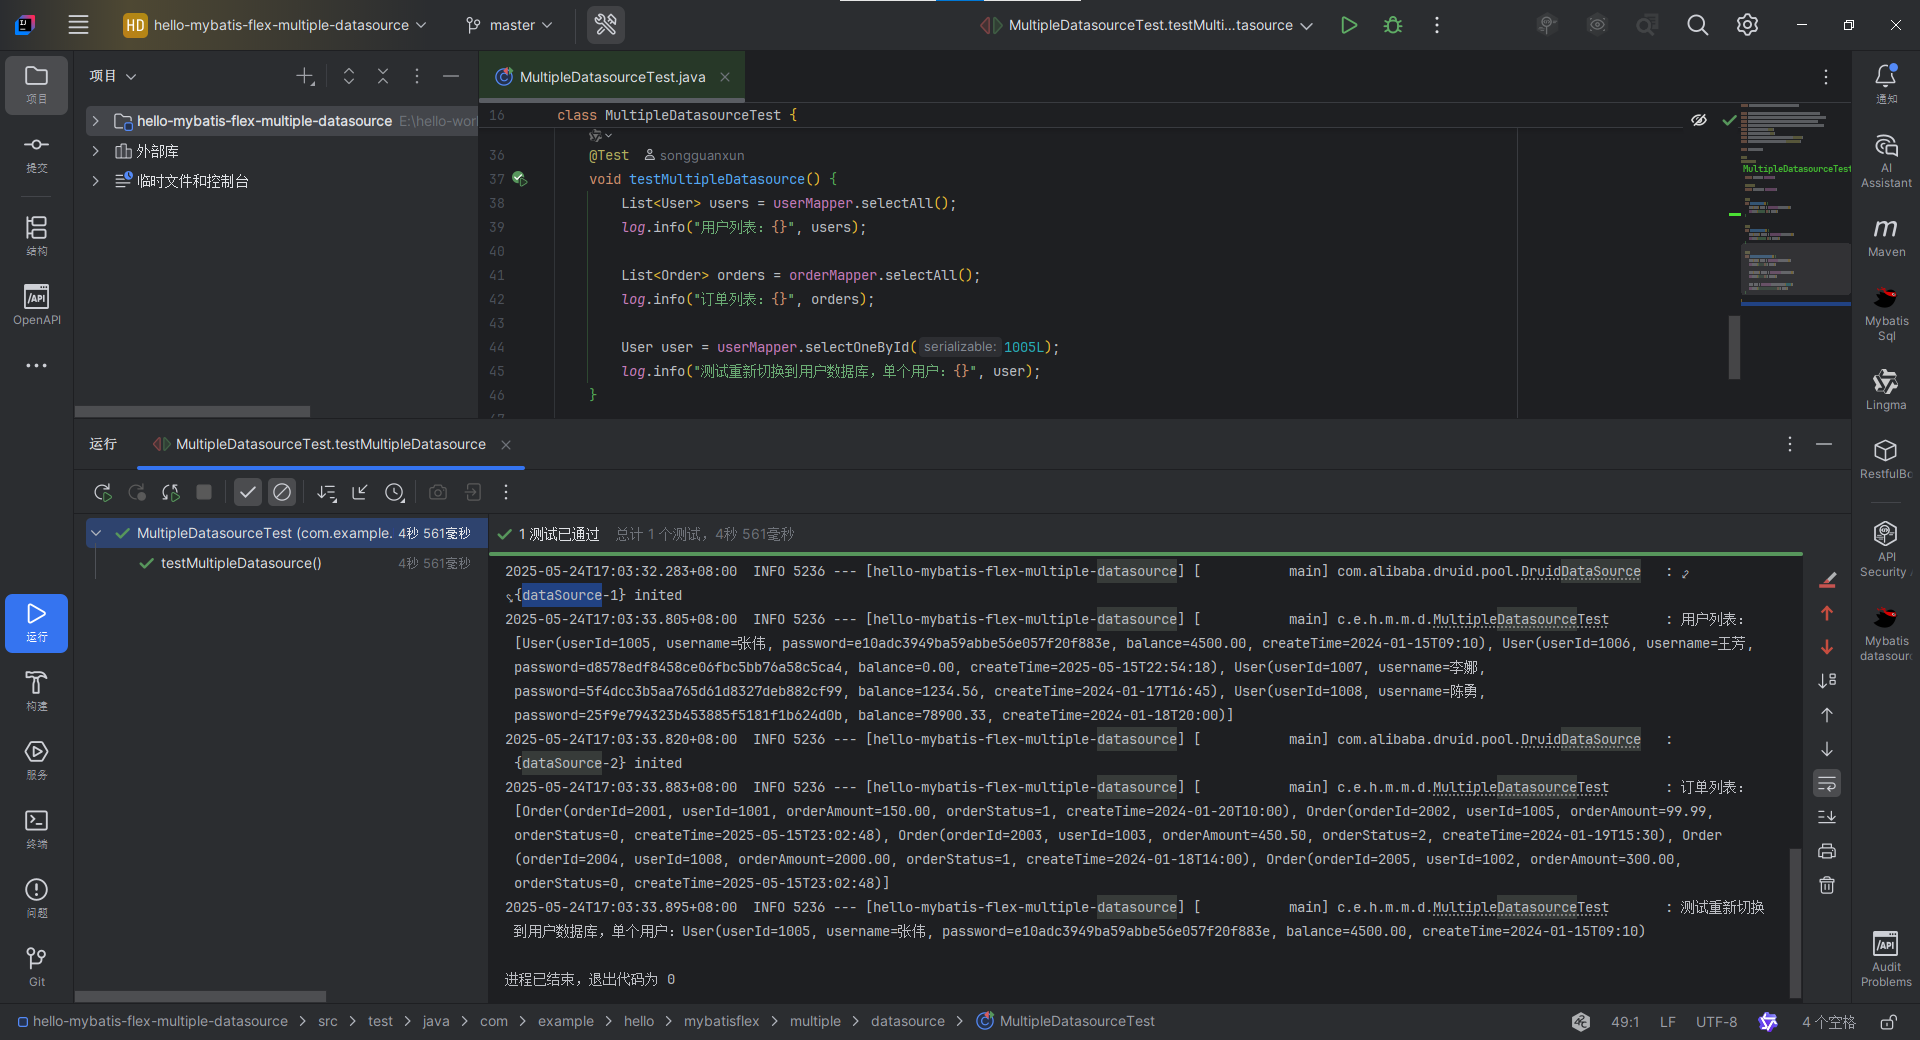
执行 testMultipleDatasource() 的日志输出
17:03:24.141 [main] INFO org.springframework.test.context.support.AnnotationConfigContextLoaderUtils -- Could not detect default configuration classes for test class [com.example.hello.mybatisflex.multiple.datasource.MultipleDatasourceTest]: MultipleDatasourceTest does not declare any static, non-private, non-final, nested classes annotated with @Configuration.
17:03:24.509 [main] INFO org.springframework.boot.test.context.SpringBootTestContextBootstrapper -- Found @SpringBootConfiguration com.example.hello.mybatisflex.multiple.datasource.HelloMybatisFlexMultipleDatasourceApplication for test class com.example.hello.mybatisflex.multiple.datasource.MultipleDatasourceTest

  .   ____          _            __ _ _
 /\\ / ___'_ __ _ _(_)_ __  __ _ \ \ \ \
( ( )\___ | '_ | '_| | '_ \/ _` | \ \ \ \
 \\/  ___)| |_)| | | | | || (_| |  ) ) ) )
  '  |____| .__|_| |_|_| |_\__, | / / / /
 =========|_|==============|___/=/_/_/_/

 :: Spring Boot ::                (v3.4.5)

2025-05-24T17:03:25.990+08:00  INFO 5236 --- [hello-mybatis-flex-multiple-datasource] [           main] c.e.h.m.m.d.MultipleDatasourceTest       : Starting MultipleDatasourceTest using Java 21.0.1 with PID 5236 (started by SongGuanxun in E:\hello-world\hello-mybatis-flex-multiple-datasource)
2025-05-24T17:03:25.995+08:00  INFO 5236 --- [hello-mybatis-flex-multiple-datasource] [           main] c.e.h.m.m.d.MultipleDatasourceTest       : No active profile set, falling back to 1 default profile: "default"
  __  __       _           _   _       _____ _
 |  \/  |_   _| |__   __ _| |_(_)___  |  ___| | _____  __
 | |\/| | | | | '_ \ / _` | __| / __| | |_  | |/ _ \ \/ /
 | |  | | |_| | |_) | (_| | |_| \__ \ |  _| | |  __/>  <
 |_|  |_|\__, |_.__/ \__,_|\__|_|___/ |_|   |_|\___/_/\_\
         |___/ v1.10.9 https://mybatis-flex.com
2025-05-24T17:03:29.336+08:00  INFO 5236 --- [hello-mybatis-flex-multiple-datasource] [           main] c.e.h.m.m.d.MultipleDatasourceTest       : Started MultipleDatasourceTest in 4.35 seconds (process running for 7.449)
Mockito is currently self-attaching to enable the inline-mock-maker. This will no longer work in future releases of the JDK. Please add Mockito as an agent to your build what is described in Mockito's documentation: https://javadoc.io/doc/org.mockito/mockito-core/latest/org/mockito/Mockito.html#0.3
WARNING: A Java agent has been loaded dynamically (D:\maven\repository\net\bytebuddy\byte-buddy-agent\1.15.11\byte-buddy-agent-1.15.11.jar)
WARNING: If a serviceability tool is in use, please run with -XX:+EnableDynamicAgentLoading to hide this warning
WARNING: If a serviceability tool is not in use, please run with -Djdk.instrument.traceUsage for more information
WARNING: Dynamic loading of agents will be disallowed by default in a future release
Java HotSpot(TM) 64-Bit Server VM warning: Sharing is only supported for boot loader classes because bootstrap classpath has been appended
2025-05-24T17:03:32.283+08:00  INFO 5236 --- [hello-mybatis-flex-multiple-datasource] [           main] com.alibaba.druid.pool.DruidDataSource   : {dataSource-1} inited
2025-05-24T17:03:33.805+08:00  INFO 5236 --- [hello-mybatis-flex-multiple-datasource] [           main] c.e.h.m.m.d.MultipleDatasourceTest       : 用户列表:[User(userId=1005, username=张伟, password=e10adc3949ba59abbe56e057f20f883e, balance=4500.00, createTime=2024-01-15T09:10), User(userId=1006, username=王芳, password=d8578edf8458ce06fbc5bb76a58c5ca4, balance=0.00, createTime=2025-05-15T22:54:18), User(userId=1007, username=李娜, password=5f4dcc3b5aa765d61d8327deb882cf99, balance=1234.56, createTime=2024-01-17T16:45), User(userId=1008, username=陈勇, password=25f9e794323b453885f5181f1b624d0b, balance=78900.33, createTime=2024-01-18T20:00)]
2025-05-24T17:03:33.820+08:00  INFO 5236 --- [hello-mybatis-flex-multiple-datasource] [           main] com.alibaba.druid.pool.DruidDataSource   : {dataSource-2} inited
2025-05-24T17:03:33.883+08:00  INFO 5236 --- [hello-mybatis-flex-multiple-datasource] [           main] c.e.h.m.m.d.MultipleDatasourceTest       : 订单列表:[Order(orderId=2001, userId=1001, orderAmount=150.00, orderStatus=1, createTime=2024-01-20T10:00), Order(orderId=2002, userId=1005, orderAmount=99.99, orderStatus=0, createTime=2025-05-15T23:02:48), Order(orderId=2003, userId=1003, orderAmount=450.50, orderStatus=2, createTime=2024-01-19T15:30), Order(orderId=2004, userId=1008, orderAmount=2000.00, orderStatus=1, createTime=2024-01-18T14:00), Order(orderId=2005, userId=1002, orderAmount=300.00, orderStatus=0, createTime=2025-05-15T23:02:48)]
2025-05-24T17:03:33.895+08:00  INFO 5236 --- [hello-mybatis-flex-multiple-datasource] [           main] c.e.h.m.m.d.MultipleDatasourceTest       : 测试重新切换到用户数据库,单个用户:User(userId=1005, username=张伟, password=e10adc3949ba59abbe56e057f20f883e, balance=4500.00, createTime=2024-01-15T09:10)

进程已结束,退出代码为 0
测试结论成功验证
- 成功同时连接并操作
user_db和order_db两个数据库 - 在同一个方法内,根据
@Table注解自动切换数据源 - 数据源切换操作对开发者透明,无需手动干预
- 跨数据源事务需额外处理(本示例未涉及)
六、重要注意事项
1. 数据源命名
- 在
yml中配置的数据源名称 (user_db,order_db) 必须与实体类@Table注解中dataSource属性的值严格一致。 - 名称建议使用有意义的英文,避免特殊字符。
2. 事务管理
- 本文示例演示的是 跨数据源查询
- 如果需要事务,请参考 MyBatis-Flex 官网的事务章节:《事务管理 - 多数据源注意事项》
七、Spring Boot 原生数据源配置失效
在 SpringBoot 项目中使用 MyBatis-Flex 配置多数据源时,原生 spring.datasource 配置失效,且未显式指定数据源的 SQL 操作会默认使用 MyBatis-Flex 配置的第一个数据源。
深度解析:
详细了解此行为背后的机制,请参考:《MyBatis-Flex 多数据源配置行为解析:为什么 SpringBoot 默认数据源会失效?(原生 spring.datasource 配置失效)》
八、总结
通过 MyBatis-Flex 实现 Spring Boot 多数据源开发非常简洁高效:
- 配置简单:在
yml中直接定义多个数据源 - 使用直观:通过
@Table(dataSource="...")注解绑定实体与数据源 - 自动切换:框架根据实体注解自动路由到正确数据源
- 无侵入性:Mapper 接口和 Service 层代码无需关注数据源切换细节
这种方案显著降低了多数据源使用的复杂度,是 Spring Boot 项目中处理多数据库需求的推荐方式。

DAMO开发者矩阵,由阿里巴巴达摩院和中国互联网协会联合发起,致力于探讨最前沿的技术趋势与应用成果,搭建高质量的交流与分享平台,推动技术创新与产业应用链接,围绕“人工智能与新型计算”构建开放共享的开发者生态。
更多推荐


 22
22 0
0- 0


 已为社区贡献8条内容

所有评论(0)