VLA模型RDT部署——用自己的数据集/OXE数据集进行微调全流程(包括GPU显存不足的解决办法)
本文详细记录用自己的数据集/OXE数据集对RDT进行微调的全流程,包括环境的搭建、CUDA与Pytorch的安装、项目数据流、官方README.md注意事项解读、源代码修改、CPU offloading/预计算语言嵌入解决GPU显存不足问题等详细内容,希望能够帮助到有相关项目需求的小伙伴。
本文将同步发表于wx公众号:基德DDD()
目录
环境的搭建
根据官方文档完成环境搭建。
git clone git@github.com:thu-ml/RoboticsDiffusionTransformer.git
cd RoboticsDiffusionTransformer

conda create -n rdt python=3.10.0
conda activate rdt

pip install torch==2.1.0 torchvision==0.16.0  --index-url https://download.pytorch.org/whl/cu121

pip install packaging==24.0

pip install flash-attn --no-build-isolation

pip install -r requirements.txt

# 见下方note解释
pip install protobuf==3.19.0
其中,官方使用的是python 3.10.0,cuda 12.1,pytorch 2.1.0。
note:按照requirement.txt安装的依赖中,diffusers和transformers会自动安装所需依赖protobuf,但是两者自动安装的protobuf相互覆盖后的版本会无法满足对方的要求,因此需要手动选一个兼容的protobuf版本,最后我找到的兼容版本是protobuf 3.19.0。
CUDA与Pytorch
1、可以通过下面的指令查看自己的GPU支持的最高CUDA版本,显示结果的右上角即自己的GPU支持的最高CUDA版本(CUDA相当于使得能够编写程序调用GPU的接口):
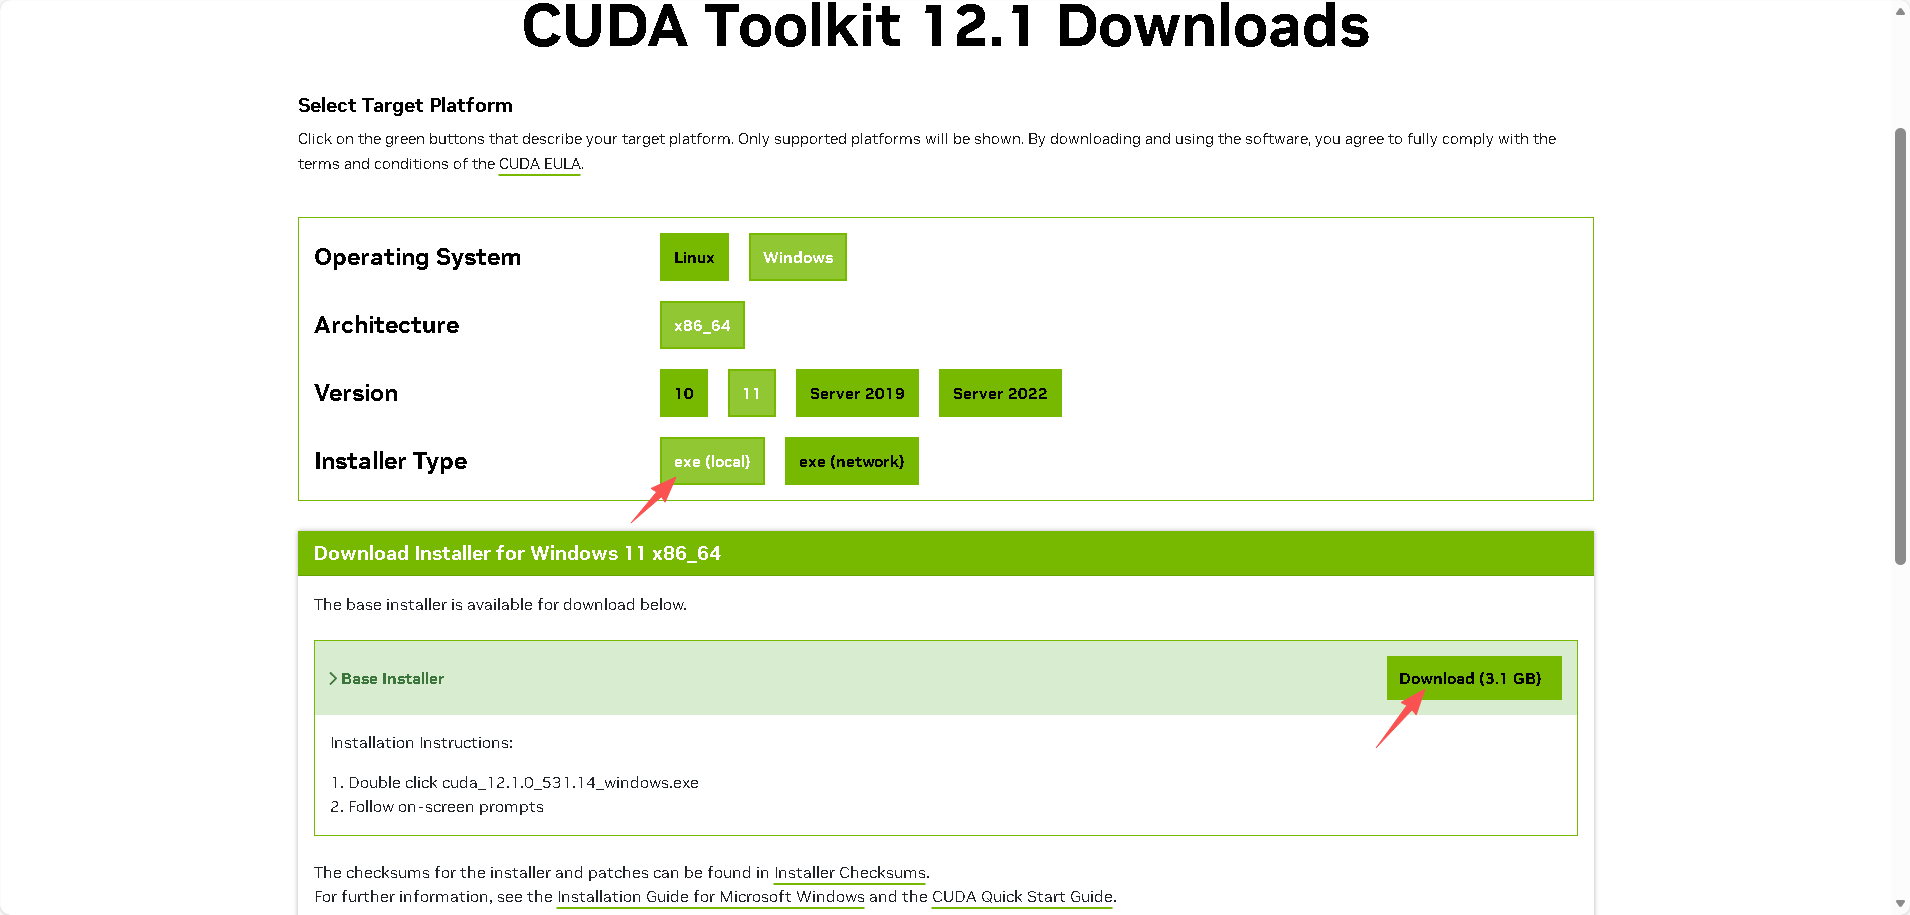
nvidia-smi2、然后通过CUDA Toolkit Archive | NVIDIA Developer,选择自己想要且自己GPU支持的CUDA版本。推荐使用本地下载,快一点。
win11:
ubuntu 20.04:
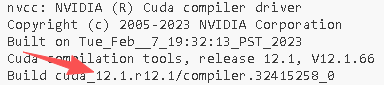
3、现在可以通过下面的指令确认CUDA成功安装(未安装的话会报错):
nvcc--version
4、通过GitHub - pytorch/vision:计算机视觉专用的数据集、变换和模型 --- GitHub - pytorch/vision: Datasets, Transforms and Models specific to Computer Vision(查看Pytorch和python的兼容关系)和Previous PyTorch Versions(查看Pytorch和CUDA的兼容关系),可以根据自己安装的CUDA版本与python版本,下载满足要求的Pytorch版本。
下载慢的话可以指定--index-url为国内源。

模型的下载与链接
需要用到rdt-1b、google/t5-v1_1-xxl、google/siglip-so400m-patch14-384等模型,模型下载等问题可见我的文章VLA模型RDT部署——前置工作——超全的各种下载huggingface模型/数据集的方法总结-CSDN博客。
其中t5-v1_1-xxl和siglip-so400m-patch14-384需要通过下面的指令链接到项目仓库下:
# 可以在项目仓库根目录下
mkdir -p google

ln -s /path/to/t5-v1_1-xxl google/t5-v1_1-xxl
ln -s /path/to/siglip-so400m-patch14-384 google/siglip-so400m-patch14-384
项目数据流
VLA模型需要视觉、语言、运动等数据,并且是按照一定格式要求来读取数据,而RDT要求使用hdf5文件来传递数据,这是一种主要以observation、action为键的数据格式;另外语言指令可以通过hdf5文件(以其中的instruction键传入)、txt文件传入、json文件传入、预计算语言嵌入多种方式传入。
frobotics-diffusion-transformer/rdt-ft-data · Datasets at Hugging Face
这是官方微调数据集,包含以hdf5格式包装的相关数据,以及以json文件对应的语言指令。展示其中的hdf5文件的结构和内容为:
h5ls -r hdf5文件路径 # 查看hdf5文件结构也可以通过扩展HDF5 Preview查看:
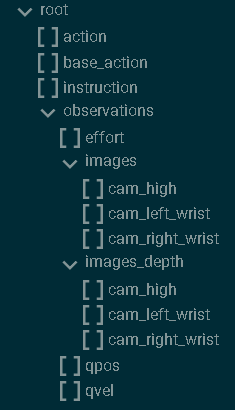
其中,
- observation:
- qpos:两只机械臂的关节位置,(TRAJ_LEN,14);第七和第十四节是夹持关节角
- images:
- cam_high:外部摄像头在每个时间步(TRAJ_LEN、480、640、3)获取 RGB 图像
- cam_left_wrist:左腕摄像头在每个时间步(TRAJ_LEN、480、640、3)获取 RGB 图像
- cam_right_wrist:右腕摄像头在每个时间步(TRAJ_LEN、480、640、3)拍摄的 RGB 图像。
- action:下一时间步两只机器人手臂的期望关节位置,(TRAJ_LEN,14);注意,这与下一时间步的实际接合位置略有不同
因此,当制作我们自己的数据集时,重点要关注并收集的动作、视觉数据是:
而语言指令一般以txt文件、json文件、预计算语言嵌入方式传入。
其中,关于图像的处理流程,RDT的处理是在data/hdf5_vla_dataset.py会给cam_high_mask根据历史帧情况设置True和False,并copy到cam_left_wrist和cam_right_wrist;
            ...
            cam_high = parse_img('cam_high')
            # For step_id = first_idx - 1, the valid_len should be one
            valid_len = min(step_id - (first_idx - 1) + 1, self.IMG_HISORY_SIZE)
            cam_high_mask = np.array(
                [False] * (self.IMG_HISORY_SIZE - valid_len) + [True] * valid_len
            )
            cam_left_wrist = parse_img('cam_left_wrist')
            cam_left_wrist_mask = cam_high_mask.copy()
            cam_right_wrist = parse_img('cam_right_wrist')
            cam_right_wrist_mask = cam_high_mask.copy()
            ...
而在train/dataset.py中,当mask=False,也就是 valid 为假,以及image.shape为0时,会把对应相机图像用背景图替代,并标志为相机不存在从而不参与微调。
...
for i in range(self.img_history_size):
for j in range(self.num_cameras):
images, image_mask = image_metas[j]
image, valid = images[i], image_mask[i]
if valid and (math.prod(image.shape) > 0) and \
(random.random() > mask_probs[j]):
rearranged_images.append((image, True))
else:
rearranged_images.append((background_image.copy(), False))
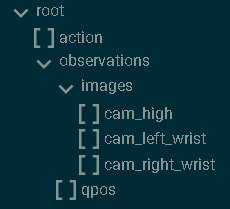
...因此,对于单臂时只有场景相机和一个手腕相机的情况,转换hdf5文件时需要把缺失的图像设置为空字节,并且将“mask......copy到cam_left_wrist”的逻辑修改为如果是空字节,mask需要设置为False(具体代码见源代码修改部分)。
README.md解读
统一动作向量
“During implementation, you may need to fill your robot action into the unified action vector (L180-194). Please refer to this file for an explanation of each element in the unified vector. We have reserved enough slots for each physical quantity. For example, we have reserved ten slots for joint angles. If your robot arm has six degrees of freedom, you only need to fill in the first six.”
官方提出128维统一动作向量来满足各种机器人的动作维度要求,后面对HDF5VLADataset类的修改便是基于这128维统一动作向量的结构修改的。通过阅读config/state_vec.py可以知道,128维总体分为50个右臂维度、50个左臂维度、3个底盘维度、25个保留扩展维度。其中右臂维度包括10个机械臂关节位置(0-9)、5个夹爪关节位置(10-14,其中表示开闭用10号)、10个机械臂关节速度(15-24)、5个夹爪关节速度(25-29)、3个EEF(末端执行器)位置(30-32)、6个EEF6D姿态(33-38)、3个EEF线速度(39-41)、3个EEF角速度(42-44)、5个保留扩展(45-49),左臂同理(50-99);还有3个底盘速度(100-102)、25个保留扩展(103-127)。
6D表示
“We use 6D representation for EEF rotation. If your action space contains EEF rotation (angle or quaternion), please refer to this file for conversion. We note that this mapping is not reversible. Different Euler angles may be equivalent and correspond to the same 6D representation.“
位姿包括位置和姿态,其中位置就是xyz表示,而姿态的表示有很多。表示姿态一般可以通过旋转矩阵、欧拉角、四元数等方法,然而,旋转矩阵无歧义但在神经网络中难以回归,欧拉角直观但不连续,四元数无奇异但存在双覆盖问题。 6D 表示是通过使用旋转矩阵前两列向量,提供了一种连续、无约束、对神经网络友好的旋转参数化方式,尽管该映射不可逆,但在机器人末端执行器姿态控制中是最稳定且推荐的表示。因此RDT中使用6D表示来表示EEF的旋转。
如果数据集采用的是欧拉角或者四元数来表示EEF的旋转,需要先通过docs/test_6drot.py转换为6D表示,制作成满足RDT要求的数据集再继续。
源代码修改
数据集部分
1、直接把数据集放到官方保留的data/agilex中,可以不用去修改对应的json文件的占位符。
2、根据自己数据集的情况修改data/hdf5_val_dataset.py中HDF5VLADataset类(包含前文说的关于单臂时的相机处理),细节见代码的中文注释:
import os
import fnmatch
import json

import h5py
import yaml
import cv2
import numpy as np

from configs.state_vec import STATE_VEC_IDX_MAPPING


class HDF5VLADataset:
    """
    This class is used to sample episodes from the embododiment dataset
    stored in HDF5.
    """
    def __init__(self) -> None:
        # [Modify] The path to the HDF5 dataset directory
        # Each HDF5 file contains one episode
        # 在data/agilex下放微调所需要用的数据集
        HDF5_DIR = "data/agilex/rdt_data/dataset/"
        self.DATASET_NAME = "agilex"

        self.file_paths = []
        for root, _, files in os.walk(HDF5_DIR):
            for filename in fnmatch.filter(files, '*.hdf5'):
                file_path = os.path.join(root, filename)
                self.file_paths.append(file_path)

        # Load the config
        with open('configs/base.yaml', 'r') as file:
            config = yaml.safe_load(file)
        self.CHUNK_SIZE = config['common']['action_chunk_size']
        self.IMG_HISORY_SIZE = config['common']['img_history_size']
        self.STATE_DIM = config['common']['state_dim']

        # Get each episode's len
        episode_lens = []
        for file_path in self.file_paths:
            valid, res = self.parse_hdf5_file_state_only(file_path)
            _len = res['state'].shape[0] if valid else 0
            episode_lens.append(_len)
        self.episode_sample_weights = np.array(episode_lens) / np.sum(episode_lens)

    def __len__(self):
        return len(self.file_paths)

    def get_dataset_name(self):
        return self.DATASET_NAME

    def get_item(self, index: int=None, state_only=False):
        """Get a training sample at a random timestep.

        Args:
            index (int, optional): the index of the episode.
                If not provided, a random episode will be selected.
            state_only (bool, optional): Whether to return only the state.
                In this way, the sample will contain a complete trajectory rather
                than a single timestep. Defaults to False.

        Returns:
           sample (dict): a dictionary containing the training sample.
        """
        while True:
            if index is None:
                file_path = np.random.choice(self.file_paths, p=self.episode_sample_weights)
            else:
                file_path = self.file_paths[index]
            valid, sample = self.parse_hdf5_file(file_path) \
                if not state_only else self.parse_hdf5_file_state_only(file_path)
            if valid:
                return sample
            else:
                index = np.random.randint(0, len(self.file_paths))

    def parse_hdf5_file(self, file_path):
        """[Modify] Parse a hdf5 file to generate a training sample at
            a random timestep.

        Args:
            file_path (str): the path to the hdf5 file

        Returns:
            valid (bool): whether the episode is valid, which is useful for filtering.
                If False, this episode will be dropped.
            dict: a dictionary containing the training sample,
                {
                    "meta": {
                        "dataset_name": str,    # the name of your dataset.
                        "#steps": int,          # the number of steps in the episode,
                                                # also the total timesteps.
                        "instruction": str      # the language instruction for this episode.
                    },
                    "step_id": int,             # the index of the sampled step,
                                                # also the timestep t.
                    "state": ndarray,           # state[t], (1, STATE_DIM).
                    "state_std": ndarray,       # std(state[:]), (STATE_DIM,).
                    "state_mean": ndarray,      # mean(state[:]), (STATE_DIM,).
                    "state_norm": ndarray,      # norm(state[:]), (STATE_DIM,).
                    "actions": ndarray,         # action[t:t+CHUNK_SIZE], (CHUNK_SIZE, STATE_DIM).
                    "state_indicator", ndarray, # indicates the validness of each dim, (STATE_DIM,).
                    "cam_high": ndarray,        # external camera image, (IMG_HISORY_SIZE, H, W, 3)
                                                # or (IMG_HISORY_SIZE, 0, 0, 0) if unavailable.
                    "cam_high_mask": ndarray,   # indicates the validness of each timestep, (IMG_HISORY_SIZE,) boolean array.
                                                # For the first IMAGE_HISTORY_SIZE-1 timesteps, the mask should be False.
                    "cam_left_wrist": ndarray,  # left wrist camera image, (IMG_HISORY_SIZE, H, W, 3).
                                                # or (IMG_HISORY_SIZE, 0, 0, 0) if unavailable.
                    "cam_left_wrist_mask": ndarray,
                    "cam_right_wrist": ndarray, # right wrist camera image, (IMG_HISORY_SIZE, H, W, 3).
                                                # or (IMG_HISORY_SIZE, 0, 0, 0) if unavailable.
                                                # If only one wrist, make it right wrist, plz.
                    "cam_right_wrist_mask": ndarray
                } or None if the episode is invalid.
        """
        with h5py.File(file_path, 'r') as f:
            qpos = f['observations']['qpos'][:]
            num_steps = qpos.shape[0]
            # [Optional] We drop too-short episode
            # 过滤短样本,可以根据数据集情况修改或者注释掉
            # if num_steps < 128:
            #     return False, None

            # [Optional] We skip the first few still steps
            EPS = 1e-2
            # Get the idx of the first qpos whose delta exceeds the threshold
            qpos_delta = np.abs(qpos - qpos[0:1])
            indices = np.where(np.any(qpos_delta > EPS, axis=1))[0]
            if len(indices) > 0:
                first_idx = indices[0]
            else:
                raise ValueError("Found no qpos that exceeds the threshold.")

            # We randomly sample a timestep
            step_id = np.random.randint(first_idx-1, num_steps)

            # Load the instruction
            dir_path = os.path.dirname(file_path)
            # 提供不同读取instruction的方式,json方式为源代码的方式

            ### hdf5方式
            # 直接写入hdf5文件里,叫instruction:
            # instruction = f['instruction']

            ### txt方式
            # 在数据集路径下方放写了instruction的txt文件,如:instruction.txt:
            # with open(os.path.join(dir_path,'instruction.txt'), 'r') as file:
            #     instruction = file.read().strip()  # strip 去掉首尾空格和换行
            # 如果文件为空,设置默认 instruction 避免报错
            # if not instruction:
            #     instruction = "No instruction provided."

            ### json方式
            with open(os.path.join(dir_path, 'expanded_instruction_gpt-4-turbo.json'), 'r') as f_instr:
                instruction_dict = json.load(f_instr)
            ## We have 1/3 prob to use original instruction,
            ## 1/3 to use simplified instruction,
            ## and 1/3 to use expanded instruction.
            instruction_type = np.random.choice([
                'instruction', 'simplified_instruction', 'expanded_instruction'])
            instruction = instruction_dict[instruction_type]
            if isinstance(instruction, list):
                instruction = np.random.choice(instruction)

            ### 预计算语言嵌入
            # You can also use precomputed language embeddings (recommended)
            # instruction = "path/to/lang_embed.pt"

            # Assemble the meta
            meta = {
                "dataset_name": self.DATASET_NAME,
                "#steps": num_steps,
                "step_id": step_id,
                "instruction": instruction
            }

            # 源代码是双臂,根据自己数据集情况修改
            # 夹爪位不为1的是用来归一化开合度表示的夹爪,如果是用开闭表示的,改为1不进行归一化
            # Rescale gripper to [0, 1]
            qpos = qpos / np.array(
               [[1, 1, 1, 1, 1, 1, 4.7908, 1, 1, 1, 1, 1, 1, 4.7888]]
            )
            target_qpos = f['action'][step_id:step_id+self.CHUNK_SIZE] / np.array(
               [[1, 1, 1, 1, 1, 1, 11.8997, 1, 1, 1, 1, 1, 1, 13.9231]]

            )

            # Parse the state and action
            state = qpos[step_id:step_id+1]
            state_std = np.std(qpos, axis=0)
            state_mean = np.mean(qpos, axis=0)
            state_norm = np.sqrt(np.mean(qpos**2, axis=0))
            actions = target_qpos
            if actions.shape[0] < self.CHUNK_SIZE:
                # Pad the actions using the last action
                actions = np.concatenate([
                    actions,
                    np.tile(actions[-1:], (self.CHUNK_SIZE-actions.shape[0], 1))
                ], axis=0)

            # Fill the state/action into the unified vector
            def fill_in_state(values):
                # Target indices corresponding to your state space
                # In this example: 6 joints + 1 gripper for each arm
                # 源代码为双臂,单臂只保留右臂部分,并根据机械臂自由度修改range范围
                UNI_STATE_INDICES = [
                    STATE_VEC_IDX_MAPPING[f"left_arm_joint_{i}_pos"] for i in range(6)
                ] + [
                    STATE_VEC_IDX_MAPPING["left_gripper_open"]
                ] + [
                    STATE_VEC_IDX_MAPPING[f"right_arm_joint_{i}_pos"] for i in range(6)
                ] + [
                    STATE_VEC_IDX_MAPPING["right_gripper_open"]
                ]
                uni_vec = np.zeros(values.shape[:-1] + (self.STATE_DIM,))
                uni_vec[..., UNI_STATE_INDICES] = values
                return uni_vec
            state = fill_in_state(state)
            state_indicator = fill_in_state(np.ones_like(state_std))
            state_std = fill_in_state(state_std)
            state_mean = fill_in_state(state_mean)
            state_norm = fill_in_state(state_norm)
            # If action's format is different from state's,
            # you may implement fill_in_action()
            actions = fill_in_state(actions)

            # Parse the images
            def parse_img(key):
                imgs = []
                for i in range(max(step_id-self.IMG_HISORY_SIZE+1, 0), step_id+1):
                    img = f['observations']['images'][key][i]
                    if np.asarray(img).size == 0:
                        return np.zeros((self.IMG_HISORY_SIZE, 0, 0, 0), dtype=np.uint8), False
                    decoded = cv2.imdecode(np.frombuffer(img, np.uint8), cv2.IMREAD_COLOR)
                    if decoded is None or decoded.size == 0:
                        return np.zeros((self.IMG_HISORY_SIZE, 0, 0, 0), dtype=np.uint8), False
                    imgs.append(decoded)
                imgs = np.stack(imgs)
                if imgs.shape[0] < self.IMG_HISORY_SIZE:
                    # Pad the images using the first image
                    imgs = np.concatenate([
                        np.tile(imgs[:1], (self.IMG_HISORY_SIZE-imgs.shape[0], 1, 1, 1)),
                        imgs
                    ], axis=0)
                return imgs, True
            # `cam_high` is the external camera image
            cam_high, cam_high_available = parse_img('cam_high')
            # For step_id = first_idx - 1, the valid_len should be one
            valid_len = min(step_id - (first_idx - 1) + 1, self.IMG_HISORY_SIZE)
            if cam_high_available:
                cam_high_mask = np.array(
                    [False] * (self.IMG_HISORY_SIZE - valid_len) + [True] * valid_len
                )
            else:
                cam_high_mask = np.zeros((self.IMG_HISORY_SIZE,), dtype=bool)
            cam_left_wrist, cam_left_wrist_available = parse_img('cam_left_wrist')
            cam_left_wrist_mask = cam_high_mask.copy() \
                if cam_left_wrist_available else np.zeros((self.IMG_HISORY_SIZE,), dtype=bool)
            cam_right_wrist, cam_right_wrist_available = parse_img('cam_right_wrist')
            cam_right_wrist_mask = cam_high_mask.copy() \
                if cam_right_wrist_available else np.zeros((self.IMG_HISORY_SIZE,), dtype=bool)

            # Return the resulting sample
            # For unavailable images, return zero-shape arrays, i.e., (IMG_HISORY_SIZE, 0, 0, 0)
            # E.g., return np.zeros((self.IMG_HISORY_SIZE, 0, 0, 0)) for the key "cam_left_wrist",
            # if the left-wrist camera is unavailable on your robot
            return True, {
                "meta": meta,
                "state": state,
                "state_std": state_std,
                "state_mean": state_mean,
                "state_norm": state_norm,
                "actions": actions,
                "state_indicator": state_indicator,
                "cam_high": cam_high,
                "cam_high_mask": cam_high_mask,
                "cam_left_wrist": cam_left_wrist,
                "cam_left_wrist_mask": cam_left_wrist_mask,
                "cam_right_wrist": cam_right_wrist,
                "cam_right_wrist_mask": cam_right_wrist_mask
            }

    def parse_hdf5_file_state_only(self, file_path):
        """[Modify] Parse a hdf5 file to generate a state trajectory.

        Args:
            file_path (str): the path to the hdf5 file

        Returns:
            valid (bool): whether the episode is valid, which is useful for filtering.
                If False, this episode will be dropped.
            dict: a dictionary containing the training sample,
                {
                    "state": ndarray,           # state[:], (T, STATE_DIM).
                    "action": ndarray,          # action[:], (T, STATE_DIM).
                } or None if the episode is invalid.
        """
        with h5py.File(file_path, 'r') as f:
            qpos = f['observations']['qpos'][:]
            # qpos = f['qpos'][:]
            num_steps = qpos.shape[0]
            # [Optional] We drop too-short episode
            # 过滤短样本,可以根据数据集情况修改或者注释掉
            # if num_steps < 128:
            #     return False, None

            # [Optional] We skip the first few still steps
            EPS = 1e-2
            # Get the idx of the first qpos whose delta exceeds the threshold
            qpos_delta = np.abs(qpos - qpos[0:1])
            indices = np.where(np.any(qpos_delta > EPS, axis=1))[0]
            if len(indices) > 0:
                first_idx = indices[0]
            else:
                raise ValueError("Found no qpos that exceeds the threshold.")

            # Rescale gripper to [0, 1]
            # 源代码是双臂,根据自己数据集情况修改
            # 夹爪位不为1的是用来归一化开合度表示的夹爪,如果是用开闭表示的,改为1不进行归一化
            qpos = qpos / np.array(
               [[1, 1, 1, 1, 1, 1, 4.7908, 1, 1, 1, 1, 1, 1, 4.7888]]
            )
            target_qpos = f['action'][:] / np.array(
               [[1, 1, 1, 1, 1, 1, 11.8997, 1, 1, 1, 1, 1, 1, 13.9231]]
            )

            # Parse the state and action
            state = qpos[first_idx-1:]
            action = target_qpos[first_idx-1:]

            # Fill the state/action into the unified vector
            def fill_in_state(values):
                # Target indices corresponding to your state space
                # In this example: 6 joints + 1 gripper for each arm
                # 源代码为双臂,单臂只保留右臂部分,并根据机械臂自由度修改range范围
                UNI_STATE_INDICES = [
                    STATE_VEC_IDX_MAPPING[f"left_arm_joint_{i}_pos"] for i in range(6)
                ] + [
                    STATE_VEC_IDX_MAPPING["left_gripper_open"]
                ] + [
                    STATE_VEC_IDX_MAPPING[f"right_arm_joint_{i}_pos"] for i in range(6)
                ] + [
                    STATE_VEC_IDX_MAPPING["right_gripper_open"]
                ]
                uni_vec = np.zeros(values.shape[:-1] + (self.STATE_DIM,))
                uni_vec[..., UNI_STATE_INDICES] = values
                return uni_vec
            state = fill_in_state(state)
            action = fill_in_state(action)

            # Return the resulting sample
            return True, {
                "state": state,
                "action": action
            }

if __name__ == "__main__":
    ds = HDF5VLADataset()
    for i in range(len(ds)):
        print(f"Processing episode {i}/{len(ds)}...")
        ds.get_item(i)
3、根据自己机械臂的运动频率修改config/dataset_control_freq.json中的:
    ...
    "agilex": 25,
    ...
4、运行data/compute_dataset_stat_hdf5.py来计算数据集的统计信息。
python -m data.compute_dataset_stat_hdf5微调部分
根据自己的实际情况填写finetune.sh。
1、可以根据自己的情况选择增加NVIDIA CUTLASS。
git clone https://github.com/NVIDIA/cutlass.git2、选择使用模型的方式,填写--pretrained_model_name_or_path。
”the model id of a pre-trained model hosted inside a model repo on HuggingFace. Please fill with "robotics-diffusion-transformer/rdt-1b", which is the officially-released RDT-1B model🤗 at HuggingFace. (recommended)”
方法一:托管在 HuggingFace 模型仓库中的预训练模型的模型 ID
--pretrained_model_name_or_path="robotics-diffusion-transformer/rdt-1b" \
“the path to a directory containing the manually downloaded model weights from HuggingFace, e.g., "/path/to/rdt-1b". You should first manually download the rdt-1b directory from this link🤗.“
方法二:手动下载rdt-1b模型目录,见”模型的下载与链接“部分
--pretrained_model_name_or_path="/path/to/rdt-1b" \
3、根据单机微调还是多机微调选择:
单机:accelerate launch main.py \
多机:deepspeed --hostfile=hostfile.txt main.py \
# export NCCL_IB_HCA=mlx5_0:1,mlx5_1:1,mlx5_2:1,mlx5_3:1,mlx5_4:1,mlx5_7:1,mlx5_8:1,mlx5_9:1 # NCCL使用哪些网卡 多机
export NCCL_IB_DISABLE=1 # 0:启用InfiniBand(多机);1:禁用 IB(单机,走 TCP)
# export NCCL_SOCKET_IFNAME=bond0 # 多机
export NCCL_DEBUG=INFO
export NCCL_NVLS_ENABLE=0

export TEXT_ENCODER_NAME="google/t5-v1_1-xxl"
export VISION_ENCODER_NAME="google/siglip-so400m-patch14-384"
export OUTPUT_DIR="./checkpoints/rdt-finetune-1b" # 输出路径
export CFLAGS="-I/usr/include"
export LDFLAGS="-L/usr/lib/x86_64-linux-gnu"
export CUTLASS_PATH="/path/to/cutlass" # 指向NVIDIA CUTLASS

export WANDB_PROJECT="robotics_diffusion_transformer"

export CUDA_VISIBLE_DEVICES=0 # 设置CUDA使用GPU位置

if [ ! -d "$OUTPUT_DIR" ]; then
    mkdir -p "$OUTPUT_DIR"
    echo "Folder '$OUTPUT_DIR' created"
else
    echo "Folder '$OUTPUT_DIR' already exists"
fi

# 多机
# deepspeed --hostfile=hostfile.txt main.py \
    # --deepspeed="./configs/zero2.json" \
    # --pretrained_model_name_or_path="robotics-diffusion-transformer/rdt-1b" \ # 方法一:从huggingface中加载

# 单机
accelerate launch main.py \
    --deepspeed="./configs/zero2.json" \
    --pretrained_model_name_or_path="/path/to/rdt-1b" \
    --pretrained_text_encoder_name_or_path=$TEXT_ENCODER_NAME \
    --pretrained_vision_encoder_name_or_path=$VISION_ENCODER_NAME \
    --output_dir=$OUTPUT_DIR \
    --train_batch_size=32 \
    --sample_batch_size=64 \
    --max_train_steps=200000 \
    --checkpointing_period=1000 \
    --sample_period=500 \
    --checkpoints_total_limit=40 \
    --lr_scheduler="constant" \
    --learning_rate=1e-4 \
    --mixed_precision="bf16" \
    --dataloader_num_workers=8 \
    --image_aug \
    --dataset_type="finetune" \
    --state_noise_snr=40 \
    --load_from_hdf5 \
    --report_to=wandb

    # Use this to resume training from some previous checkpoint
    # --resume_from_checkpoint="checkpoint-36000" \

    # Use this to load from saved lanuage instruction embeddings,
    # instead of calculating it during training
    # --precomp_lang_embed \
4、填写完毕,且GPU显存能够支持完整加载包括t5-v1_1-xxl等模型,便可以进行微调。
chmod +x ./finetune.sh
./finetune.sh
若发现GPU显存无法支持完整加载包括t5-v1_1-xxl等模型,可通过下面讲的CPU offloading/预计算语言嵌入来分散GPU显存压力。
在RDT中,语言的处理流程是,如果通过hdf5文件(以其中的instruction键传入)、txt文件传入、json文件方式传入时,会经过t5_encode.py利用t5-v1_1-xxl模型将文字转换成RDT模型可用的语义特征,然后继续后续的微调或推理;通过预计算语言嵌入的方式传入时,则是在微调或训练先通过官方给出的encode_lang.py、encode_lang_batch.py利用t5-v1_1-xxl模型将文字进行预计算语言嵌入,后面就不再需要t5-v1_1-xxl模型参与微调或者推理。
无论是第一类始终需要t5-v1_1-xxl模型参与,还是第二类利用t5-v1_1-xxl模型进行预计算语言嵌入,都可以通过CPU offloading来减小t5-v1_1-xxl模型对GPU的开销。当然也可以自己用其他方式实现预计算语言嵌入,完全不用t5-v1_1-xxl模型。
CPU offloading
1、在models/multimodal_encoder/t5_encoder.py中填写use_offload_folder或OFFLOAD_DIR,并创建对应文件夹即可。
2、为了防止使用CPU offloading后,整个模型仍然采取整个移动的方式,需要将train/train.py中下面这部分代码进行注释掉:
    ...
    if text_encoder is not None:
        text_encoder.to(accelerator.device, dtype=weight_dtype)
    ...
3、另外,模型的数据格式为bf16(bfloat16),与RDT输入的fp32(float32)可能会冲突,需要在train/sample.py中修改源代码。
源代码为:
            ...
            pred_actions = rdt.predict_action(
                lang_tokens=text_embeds,
                lang_attn_mask=lang_attn_mask,
                img_tokens=image_embeds,
                state_tokens=states,
                action_mask=state_elem_mask.unsqueeze(1),
                ctrl_freqs=ctrl_freqs
           ...
修改为:
        ...
        if step == 0 and accelerator.is_main_process:
            logger.info(
                f"[Sample] lang={text_embeds.dtype}, img={image_embeds.dtype}, "
                f"state={states.dtype}, model={next(rdt.parameters()).dtype}"
            )
        with autocast(dtype=weight_dtype):
            pred_actions = rdt.predict_action(
                lang_tokens=text_embeds,
                lang_attn_mask=lang_attn_mask,
                img_tokens=image_embeds,
                state_tokens=states,
                action_mask=state_elem_mask.unsqueeze(1),
                ctrl_freqs=ctrl_freqs
            )
        ...
4、现在便可以顺利进行微调。
chmod +x ./finetune.sh
./finetune.sh
预计算语言嵌入
1、在scripts/encode_lang.py、scripts/encode_lang_batch.py中填写use_offload_folder或OFFLOAD_DIR,并创建对应文件夹即可。
2、使用data/hdf5_val_dataset.py中HDF5VLADataset类中的预计算语言方式。
          ...
          ### 预计算语言嵌入
            # You can also use precomputed language embeddings (recommended)
            # instruction = "path/to/lang_embed.pt"
            instructions_path = os.path.join(dir_path, "instructions")
            instructions_names = []

            for filename in os.listdir(instructions_path):
                # 检查文件名是否以.pt结尾
                if filename.endswith(".pt"):
                    instructions_names.append(os.path.join(instructions_path, filename))
            instruction = np.random.choice(instructions_names)
          ...
3、在finetune.sh中增加--precomp_lang_embed。
4、现在便可以顺利进行微调。
chmod +x ./finetune.sh
./finetune.sh
关于sample
在微调过程中会在sample_period周期按照sample_batch_size进行采样推理,帮助我们判断微调过程的效果。但是并不会参与到反向传播中,其实并不会对微调结果直接产生印象,因此当发生dataset_num_workers过大而内存报错时,可以考虑关闭sample。
1、在finetune.sh中设置--sample_period=-1关闭sample。
2、修改train/train.py,使得当sample_period=-1时,sample_num_workers=0,而不是dataset_num_workers,不会浪费内存。
    ...
    sample_num_workers = 0 if args.sample_period <= 0 else args.dataloader_num_workers
    sample_dataloader = torch.utils.data.DataLoader(
        sample_dataset,
        batch_size=args.sample_batch_size,
        shuffle=True,
        collate_fn=data_collator,
        num_workers=sample_num_workers,
        pin_memory=True,
        # persistent_workers=True
        persistent_workers=(sample_num_workers > 0)
    )
    ...
欢迎各位小伙伴一起交流学习!

DAMO开发者矩阵,由阿里巴巴达摩院和中国互联网协会联合发起,致力于探讨最前沿的技术趋势与应用成果,搭建高质量的交流与分享平台,推动技术创新与产业应用链接,围绕“人工智能与新型计算”构建开放共享的开发者生态。
更多推荐


 31
31 0
0- 0


 已为社区贡献2条内容

所有评论(0)