我是如何从零开始搭建一个双模式可视化编程平台:从Python到ROS2的技术实践
本文介绍了一个双模式可视化编程平台,支持Python通用编程和ROS2机器人编程的无缝切换。平台基于现代化Web技术栈(Next.js 13.4+、TypeScript、React DnD等),采用Zustand进行高效状态管理,实现了拖拽式编程体验。核心创新包括:1)统一界面支持两种编程模式;2)优化的拖拽系统与智能磁吸连接算法;3)渐进式学习路径设计,从基础编程过渡到机器人开发。该平台解决了现
0. 引言
可视化编程已经成为编程教育领域的重要方向。从MIT Media Lab开发的Scratch到Google推出的Blockly,这些基于图形化积木的编程环境极大地降低了编程学习的门槛。根据Scratch官方数据,该平台已经被翻译成70多种语言,全球有数千万学生通过它开始编程学习之旅。可视化编程通过将抽象的代码逻辑转化为直观的图形积木,让学习者能够专注于计算思维和问题解决,而不是被语法细节所困扰。这种教学方式特别适合8到16岁的初学者,他们可以通过拖拽和组合积木来创建交互式故事、游戏和动画。
然而,现有的可视化编程平台大多局限于单一领域。Scratch专注于创意表达和基础编程概念,Blockly则更多作为一个库被集成到其他应用中。当学习者需要从通用编程过渡到专业领域(如机器人编程)时,往往面临工具切换和学习曲线的断层。ROS2(Robot Operating System 2)作为现代机器人开发的事实标准,其复杂的节点通信机制、话题订阅发布模型以及分布式架构对初学者来说具有相当的挑战性。传统的ROS2学习路径要求学习者首先掌握Python或C++,然后理解ROS2的核心概念,最后才能编写实际的机器人程序。这个过程通常需要数周甚至数月的时间。
本项目旨在打破这种局限,构建一个支持Python通用编程和ROS2机器人编程的双模式可视化平台。该平台基于Next.js 13.4+和TypeScript构建,采用现代化的Web技术栈,提供流畅的拖拽编程体验。用户可以在同一个界面中无缝切换Python和ROS2两种模式,从基础的条件判断、循环控制学起,逐步过渡到Publisher/Subscriber通信、传感器数据处理和机器人运动控制等专业领域。这种渐进式的学习路径不仅保持了可视化编程的易用性,还为学习者提供了通往专业机器人开发的桥梁。目前这个工作基本搭建完成,但是还有一些细节需要完善,如果想要交流的朋友可以加作者一起做开发
在闲暇之余,我完成了我以前的梦想,并构建了一个双模式可视化编程平台,支持:
- Python模式:从基础编程概念开始
- ROS2模式:无缝过渡到机器人编程
- 统一界面:同一套拖拽交互,降低学习成本
1. 技术架构概览
我们选择了经过大规模验证的现代化技术栈:
// 技术栈配置
const techStack = {
  frontend: "Next.js 13.4+ (App Router)",
  language: "TypeScript 5.x",
  ui: "React 19.1.0",
  styling: "Tailwind CSS 4.x",
  dragDrop: "React DnD 16.0.1",
  stateManagement: "Zustand 5.0.8",
  testing: "Jest + React Testing Library"
};
2. 核心技术实现:从拖拽到代码生成
2.1 状态管理:为什么选择Zustand?
在状态管理方案的选择上,我们对比了Redux、MobX和Zustand三个主流方案:
| 方案 | 优点 | 缺点 | 适用场景 |
|---|---|---|---|
| Redux | 可预测、可调试 | 样板代码多、学习曲线陡峭 | 大型复杂应用 |
| MobX | 响应式、直观 | 黑盒化、调试困难 | 中小型应用 |
| Zustand | 简洁、轻量、易学 | 生态相对较小 | 中小型到大型应用 |
我们选择Zustand的核心原因:
- API简洁:相比Redux的action/reducer模式,Zustand直接修改状态
- TypeScript友好:完整的类型推导,开发体验优秀
- 性能优秀:基于React Hooks,避免不必要的重渲染
- 学习成本低:团队成员快速上手
// 我们的状态管理实现
interface EditorState {
  // 当前编辑模式
  currentMode: 'python' | 'ros2';

  // 工作区数据
  blocks: WorkspaceBlock[];
  connections: Connection[];

  // 操作函数
  setMode: (mode: 'python' | 'ros2') => void;
  addBlock: (block: WorkspaceBlock) => void;
  removeBlock: (blockId: string) => void;
  updateBlock: (blockId: string, updates: Partial<WorkspaceBlock>) => void;
}

// 创建store - 简洁的API设计
const useEditorStore = create<EditorState>((set, get) => ({
  // 初始状态
  currentMode: 'python',
  blocks: [],
  connections: [],

  // 模式切换 - 带确认提示
  setMode: (mode) => {
    const currentBlocks = get().blocks;
    if (currentBlocks.length > 0) {
      const confirmed = confirm('切换模式将清空当前工作区,是否继续?');
      if (!confirmed) return;
    }
    set({ currentMode: mode, blocks: [], connections: [] });
  },

  // 积木操作 - 原子性更新
  addBlock: (block) => set((state) => ({
    blocks: [...state.blocks, { ...block, id: generateId() }]
  })),

  removeBlock: (blockId) => set((state) => ({
    blocks: state.blocks.filter(b => b.id !== blockId),
    connections: state.connections.filter(c =>
      c.source !== blockId && c.target !== blockId
    )
  })),

  updateBlock: (blockId, updates) => set((state) => ({
    blocks: state.blocks.map(block =>
      block.id === blockId ? { ...block, ...updates } : block
    )
  }))
}));
2.2 拖拽系统:React DnD的深度应用
拖拽是可视化编程的核心交互,我们选择了React DnD作为拖拽引擎。为什么?
技术对比分析:
// 其他拖拽库的问题
const problems = {
  'react-beautiful-dnd': '只支持列表拖拽,不支持自由拖拽',
  'dnd-kit': 'API复杂,学习成本高',
  'react-dnd': '功能强大,但配置复杂'
};

// React DnD的优势
const advantages = {
  typeSystem: '基于类型的拖拽限制,避免误操作',
  flexibility: '支持复杂的嵌套拖拽场景',
  performance: '优化的渲染机制,支持大量元素',
  ecosystem: '丰富的中间件和工具'
};
核心实现:积木拖拽系统
// 积木拖拽源组件
const DraggableBlock = ({ block }: { block: WorkspaceBlock }) => {
  const [{ isDragging }, dragRef] = useDrag({
    type: 'BLOCK',
    item: () => ({
      id: block.id,
      type: block.type,
      position: block.position,
      // 包含完整的积木数据,确保拖拽完整性
      data: block
    }),
    collect: (monitor) => ({
      isDragging: monitor.isDragging(),
    }),
  });

  return (
    <div
      ref={dragRef}
      className={`block ${isDragging ? 'dragging' : ''}`}
      style={{
        opacity: isDragging ? 0.5 : 1,
        transform: isDragging ? 'rotate(5deg)' : 'none'
      }}
    >
      {/* 积木内容 */}
    </div>
  );
};

// 工作区放置目标
const WorkspaceDropZone = () => {
  const [{ isOver, canDrop }, dropRef] = useDrop({
    accept: 'BLOCK',
    drop: (item: DragItem, monitor) => {
      const offset = monitor.getClientOffset();
      if (offset) {
        handleBlockDrop(item, offset);
      }
    },
    collect: (monitor) => ({
      isOver: monitor.isOver(),
      canDrop: monitor.canDrop(),
    }),
  });

  return (
    <div
      ref={dropRef}
      className={`workspace ${isOver ? 'drop-active' : ''}`}
    >
      {/* 工作区内容 */}
    </div>
  );
};
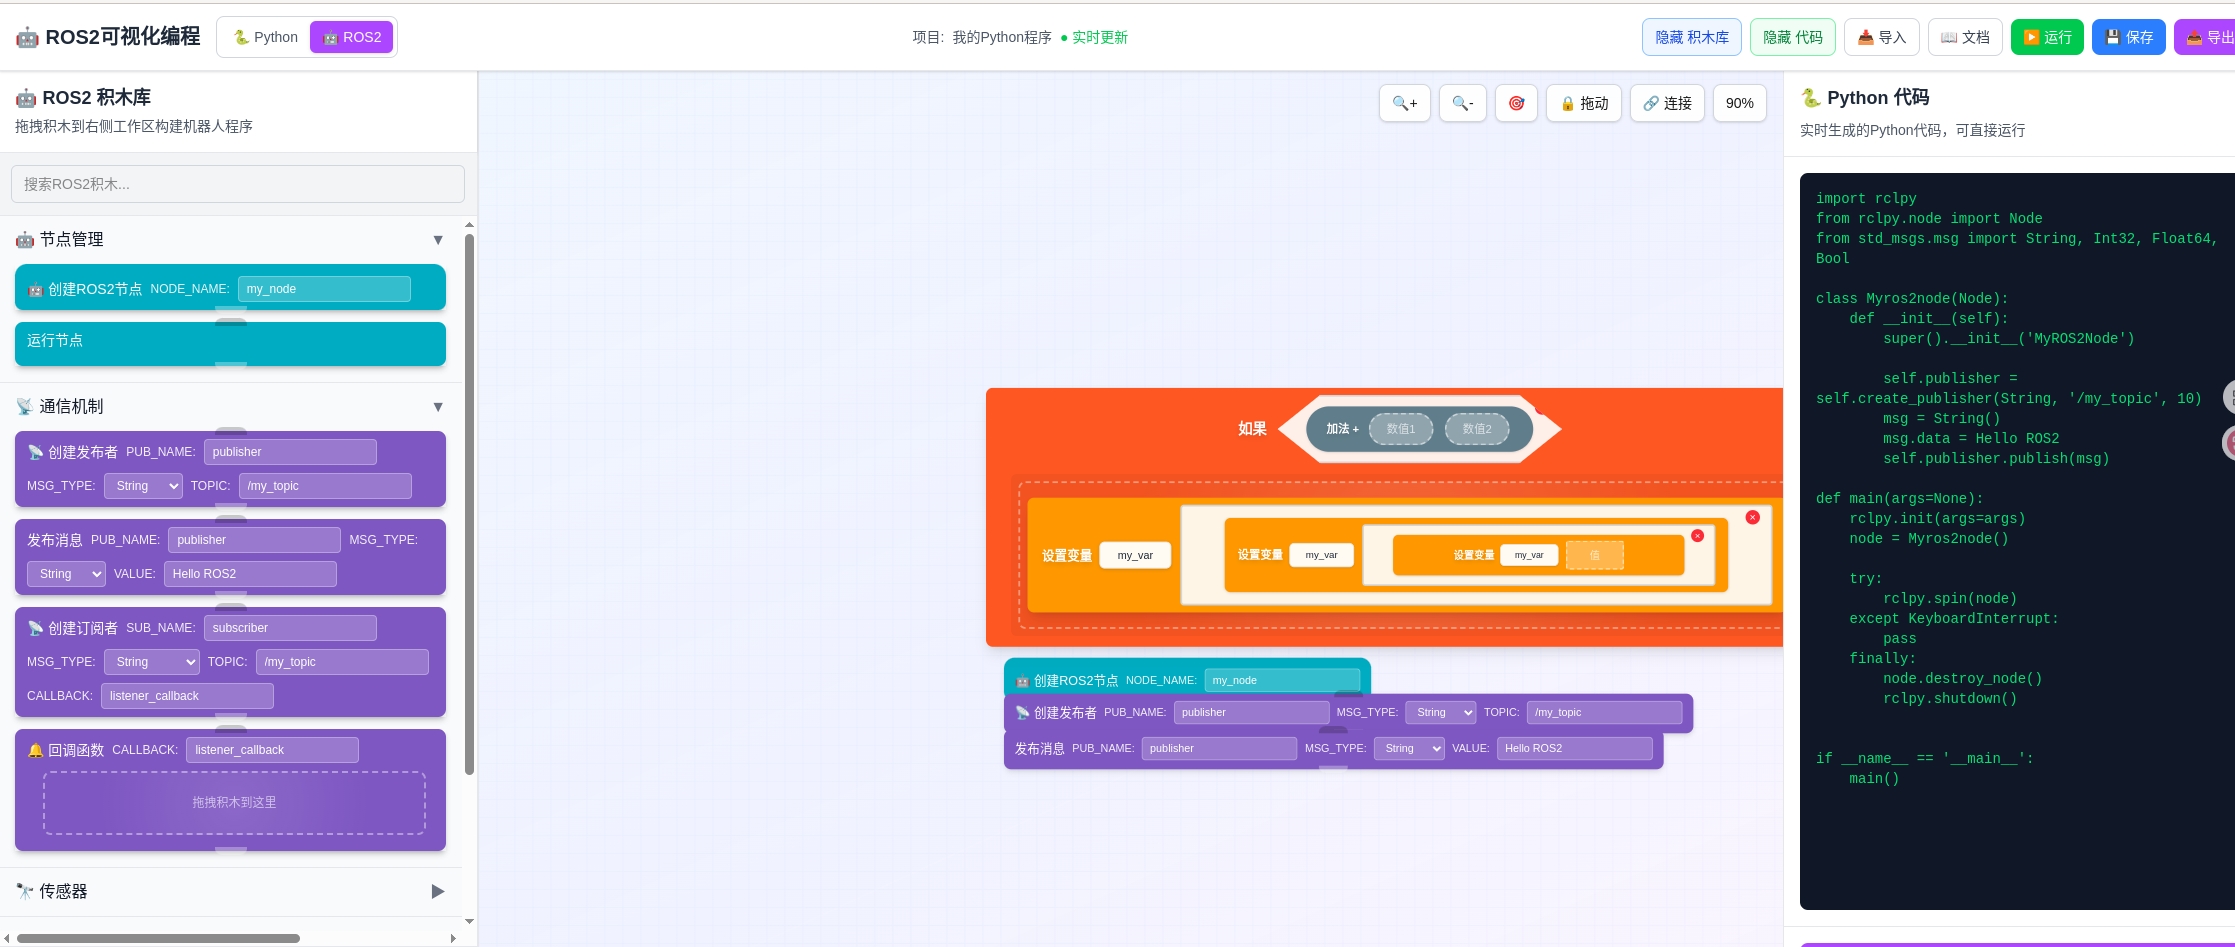
2.3 智能磁吸连接:让积木"自动对齐"
积木之间的连接是可视化编程中最频繁的操作。我们实现了一套智能磁吸连接系统,让积木能够自动对齐和吸附。
连接检测算法:
// 连接区域检测器
export class ConnectionZoneDetector {
  private readonly DETECTION_RADIUS = 80;      // 检测半径
  private readonly HIGHLIGHT_RADIUS = 40;      // 高亮半径
  private readonly SNAP_THRESHOLD = 15;       // 吸附阈值

  detectConnectionZone(
    draggedBlock: BlockPosition,
    targetBlock: BlockPosition
  ): ConnectionZone | null {
    // 计算被拖拽积木底部凸起点坐标
    const draggedBottom = {
      x: draggedBlock.x + draggedBlock.width / 2,
      y: draggedBlock.y + draggedBlock.height
    };

    // 计算目标积木顶部凹槽点坐标
    const targetTop = {
      x: targetBlock.x + targetBlock.width / 2,
      y: targetBlock.y
    };

    // 计算距离
    const distance = Math.sqrt(
      Math.pow(draggedBottom.x - targetTop.x, 2) +
      Math.pow(draggedBottom.y - targetTop.y, 2)
    );

    // 根据距离返回不同的连接状态
    if (distance < this.SNAP_THRESHOLD) {
      return { type: 'snap', distance, targetId: targetBlock.id };
    } else if (distance < this.HIGHLIGHT_RADIUS) {
      return { type: 'highlight', distance, targetId: targetBlock.id };
    } else if (distance < this.DETECTION_RADIUS) {
      return { type: 'detect', distance, targetId: targetBlock.id };
    }

    return null;
  }
}
连接体验优化:
- 精确连接点:每个积木有40x8像素的精确连接点,避免误连接
- 视觉反馈:距离不同时显示不同的视觉提示
- 自动吸附:距离小于15像素时自动对齐
- 连接验证:确保积木类型匹配才能连接
2.4 积木系统:数据模型设计
积木是整个平台的基础,我们设计了完整的数据模型:
// 积木数据模型
export interface PythonBlock {
  id: string;                      // 唯一标识
  category: PythonBlockCategory;   // 分类:变量、控制、运算等
  shape: PythonBlockShape;         // 形状:hat/statement/reporter等
  label: string;                   // 显示文本
  color: string;                   // 主题色
  pythonCode: string;              // 代码模板
  inputs?: BlockInput[];           // 输入参数定义
  hasTopConnector?: boolean;       // 是否有顶部连接点
  hasBottomConnector?: boolean;    // 是否有底部连接点
  isContainer?: boolean;           // 是否可包含子积木
  description?: string;            // 功能说明
}

// 积木形状类型
export type PythonBlockShape =
  | 'hat'        // 帽子形状:程序开始
  | 'statement'  // 语句形状:标准命令块
  | 'reporter'   // 报告形状:返回值表达式
  | 'boolean'    // 布尔形状:条件判断
  | 'c-block'    // C形状:容器块
  | 'cap';       // 末端形状:程序结束

// 输入参数定义
export interface BlockInput {
  id: string;                      // 参数ID
  name: string;                    // 参数名(用于代码模板替换)
  type: 'text' | 'number' | 'boolean' | 'dropdown' | 'block';
  defaultValue?: any;              // 默认值
  options?: string[];              // 下拉选项
  placeholder?: string;            // 占位符文本
  acceptedTypes?: string[];        // 可接受的积木类型
}
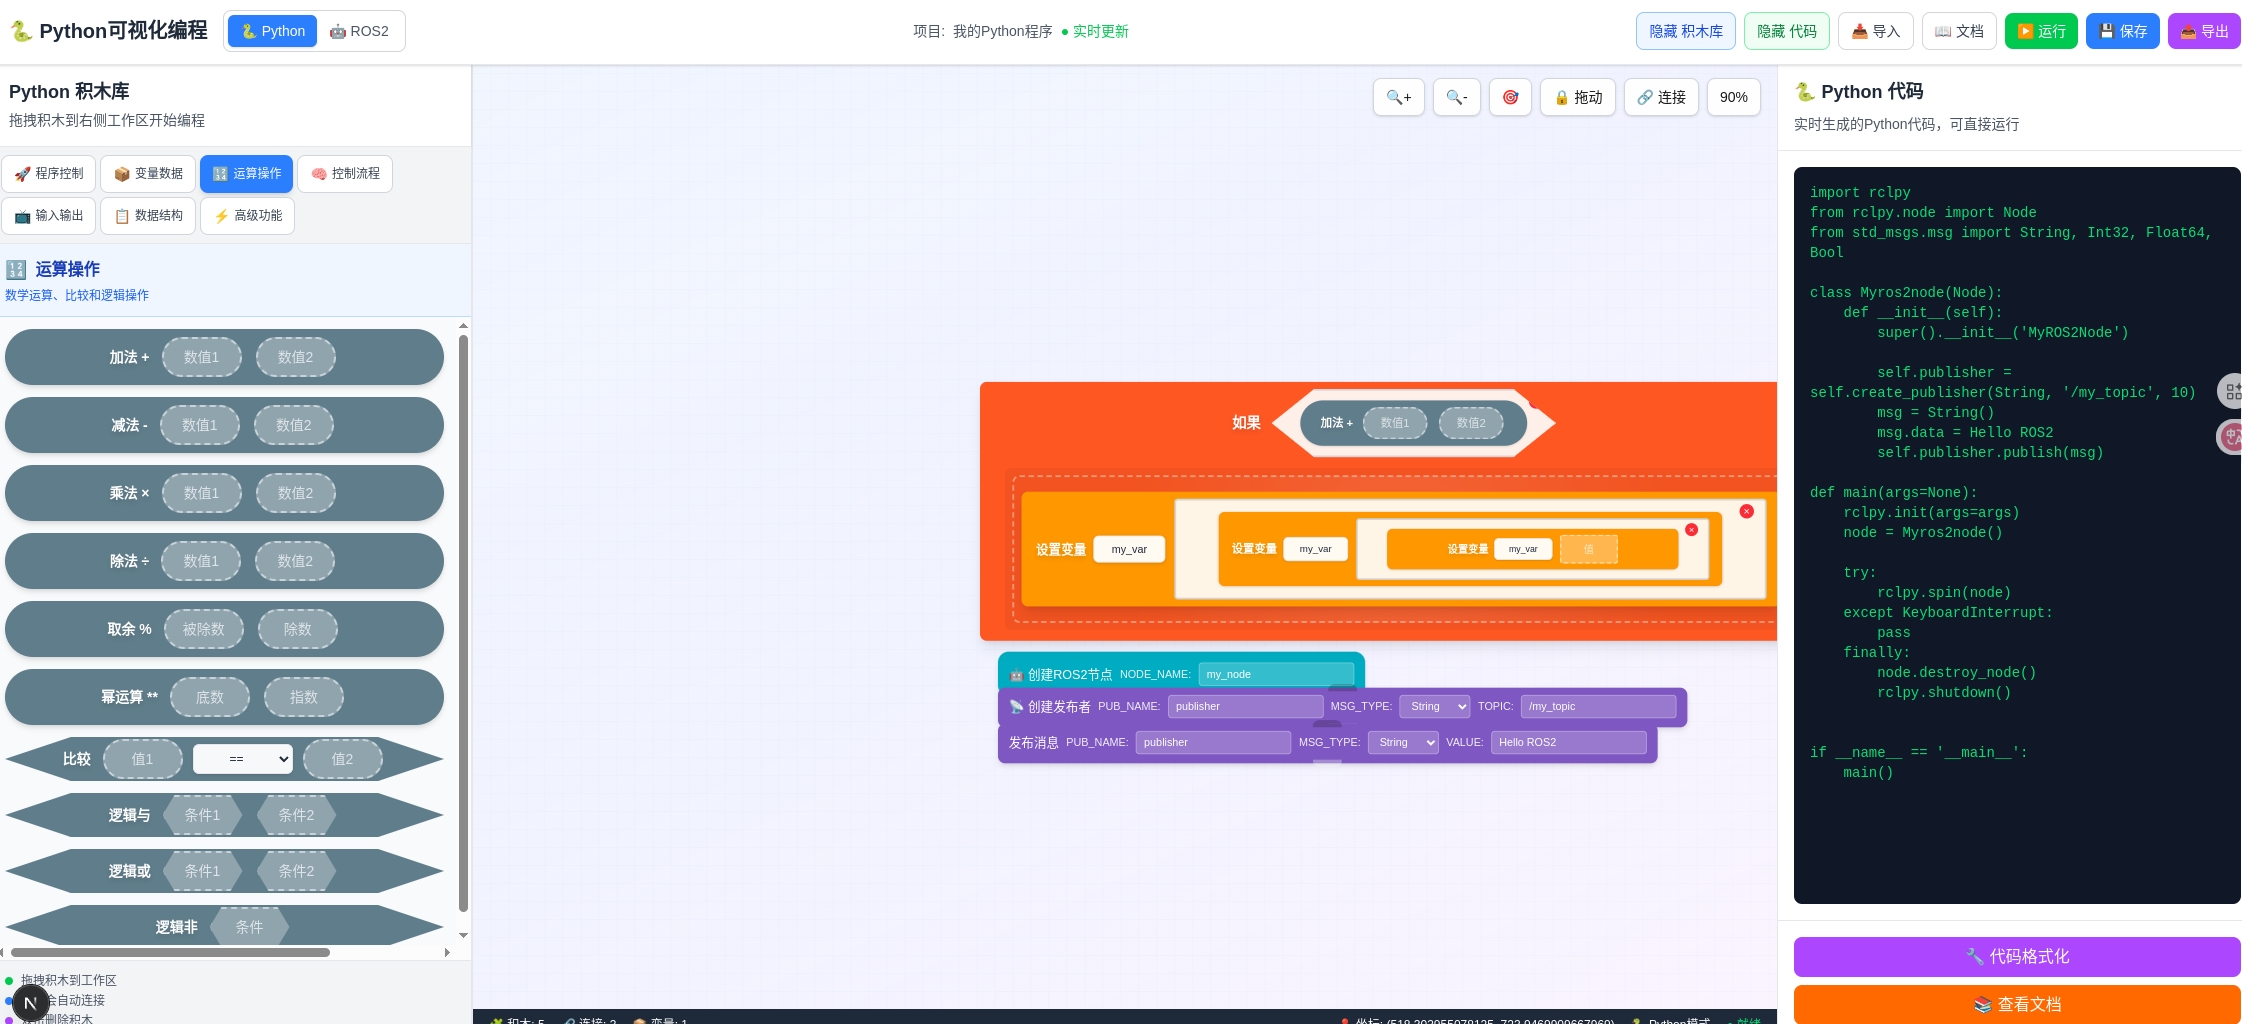
积木分类系统:
我们定义了七大类积木,覆盖Python编程的核心场景:
- 程序控制:程序开始、导入模块
- 变量数据:变量赋值、获取、数字、字符串
- 运算操作:加减乘除、比较运算、逻辑运算
- 控制流程:if条件、for循环、while循环、函数定义
- 输入输出:print输出、input输入、文件读写
- 数据结构:列表操作、字典操作、字符串处理
- 高级功能:异常处理、类定义
3. 代码生成:从积木到可执行代码
3.1 拓扑排序算法:确保代码执行顺序
代码生成是可视化编程平台最核心的功能。我们使用拓扑排序算法来确定积木的执行顺序,确保生成的代码逻辑正确。
算法原理:
拓扑排序是一种针对有向无环图(DAG)的排序算法,能够将图中的节点排列成线性序列,使得对于任意一条边(u, v),节点u都排在节点v之前。
// 拓扑排序算法实现
private topologicalSort(): BaseNode[] {
  const visited = new Set<string>();    // 已访问节点
  const visiting = new Set<string>();   // 正在访问节点
  const result: BaseNode[] = [];        // 排序结果

  const visit = (nodeId: string): void => {
    // 循环依赖检测
    if (visiting.has(nodeId)) {
      throw new Error(`检测到循环依赖: ${nodeId}`);
    }

    // 避免重复访问
    if (visited.has(nodeId)) {
      return;
    }

    // 标记为正在访问
    visiting.add(nodeId);

    // 递归访问所有前驱节点
    const incomingEdges = this.context.edges.filter(
      edge => edge.target === nodeId
    );
    for (const edge of incomingEdges) {
      visit(edge.source);
    }

    // 完成访问
    visiting.delete(nodeId);
    visited.add(nodeId);

    // 添加到结果序列
    const node = this.context.nodes.find(n => n.id === nodeId);
    if (node) {
      result.push(node);
    }
  };

  // 访问所有节点
  for (const node of this.context.nodes) {
    if (!visited.has(node.id)) {
      visit(node.id);
    }
  }

  return result;
}
循环依赖检测:
算法使用visiting集合来检测循环依赖。如果在递归过程中遇到了一个正在访问的节点,说明存在环,算法会抛出错误。这能及时发现不合理的积木连接,避免生成无限递归的代码。
3.2 代码生成器架构
我们采用了模块化的代码生成器架构:
// 基础代码生成器
abstract class BaseCodeGenerator {
  abstract generate(blocks: WorkspaceBlock[]): GeneratedCode;
  abstract validate(blocks: WorkspaceBlock[]): ValidationResult;
}

// Python代码生成器
class PythonCodeGenerator extends BaseCodeGenerator {
  generate(blocks: WorkspaceBlock[]): GeneratedCode {
    // 1. 拓扑排序
    const sortedBlocks = this.topologicalSort(blocks);

    // 2. 生成代码
    const codeLines = sortedBlocks.map(block =>
      this.generateBlockCode(block)
    );

    // 3. 处理缩进
    const indentedCode = this.applyIndentation(codeLines);

    // 4. 添加依赖
    const imports = this.collectImports(blocks);

    return {
      code: [...imports, ...indentedCode].join('\n'),
      dependencies: this.extractDependencies(blocks)
    };
  }
}

// 专门的积木生成器
class DataBlockGenerator extends BaseCodeGenerator {
  generateBlockCode(block: DataBlock): string {
    // 处理变量赋值、数字、字符串等
  }
}

class ControlBlockGenerator extends BaseCodeGenerator {
  generateBlockCode(block: ControlBlock): string {
    // 处理if、for、while等控制流
  }
}
…详情请参照古月居

DAMO开发者矩阵,由阿里巴巴达摩院和中国互联网协会联合发起,致力于探讨最前沿的技术趋势与应用成果,搭建高质量的交流与分享平台,推动技术创新与产业应用链接,围绕“人工智能与新型计算”构建开放共享的开发者生态。
更多推荐

 19
19 0
0- 0


 已为社区贡献67条内容

所有评论(0)