ESP32 + MicroPython 驱动 DS1302 实时时钟芯片
·
概述
在嵌入式系统中,实时时钟(RTC)是记录时间、定时任务、日志记录等功能的核心组件。本文将介绍如何使用 ESP32 在 MicroPython 环境下驱动经典的 DS1302 时钟芯片,实现时间的读取与设置,并提供完整的原理图设计和代码解析。
一、DS1302 芯片简介
DS1302 是一款低功耗实时时钟芯片,支持秒、分、时、日、月、年、星期等时间信息的记录,并可通过外部 32.768kHz 晶振保持时间精度。它采用三线制串行通信接口(类似于 SPI),包括:
- SCLK(CLK):时钟信号线
- I/O(DAT):双向数据线
- RST(CE):片选/复位信号线
此外,DS1302 支持一个备用电池输入(VCC2),可在主电源断开时由纽扣电池供电,持续走时。
二、硬件连接与原理图设计
1. ESP32 与 DS1302 引脚连接
| DS1302 引脚 | 功能说明 | ESP32 GPIO 引脚 |
|---|---|---|
| VCC2 | 主电源(+3.3V~5V) | 3.3V |
| GND | 接地 | GND |
| SCLK | 时钟线 | GPIO18 |
| I/O | 数据线 | GPIO23 |
| RST | 片选/使能 | GPIO5 |
| VCC1 | 备用电池(如CR2032) | +3V(电池正极) |
⚠️ 注意:
- ESP32 工作电压为 3.3V,而 DS1302 支持 3.3V~5V,可直接连接。
- 建议在 VCC1 引脚接一个 3V 纽扣电池(如 CR2032),确保断电后仍能维持时间。
- 无需上拉电阻,DS1302 内部已有弱上拉。
2. 完整电路图
以下为 DS1302 外围完整电路连接图:
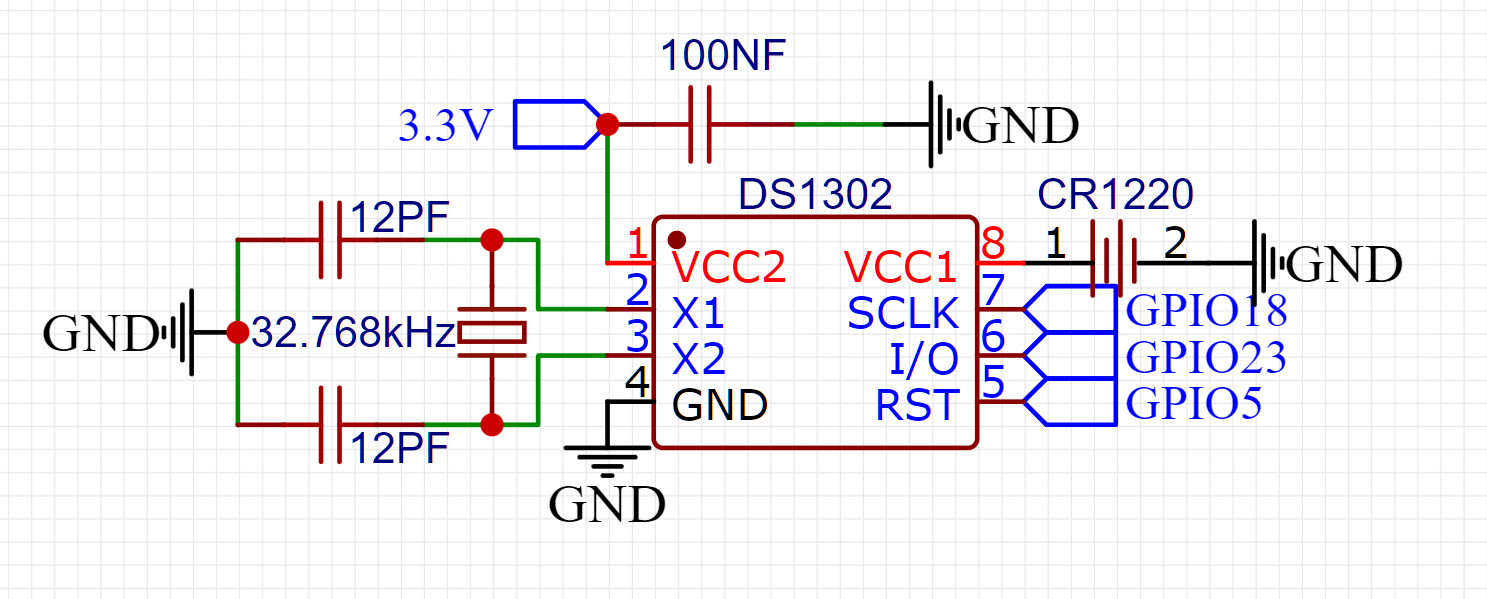
电路图详解:
- 晶振部分:DS1302 使用外部 32.768kHz 晶振作为时钟源,通过 X1 和 X2 引脚接入。晶振两端各接一个 12pF 的电容到地,以稳定振荡频率。
- 电源部分:VCC2 连接到 ESP32 的 3.3V 输出,GND 共地。VCC1 可接一个 CR1220 纽扣电池,保证断电后时间不丢失。
- 去耦电容:在 VCC2 和 GND 之间接一个 100nF 的电容,用于滤波和稳定电源。
- 通信引脚:SCLK(GPIO18)、I/O(GPIO23)、RST(GPIO5)分别连接到 DS1302 与ESP32 对应引脚。
三、MicroPython 代码实现
DS1302 使用简单的三线同步串行协议,无需硬件 SPI,我们可以通过 machine.Pin 模拟时序完成通信。
完整代码如下:
from machine import Pin

class DS1302:
    def __init__(self, clk, dio, cs):
        self.clk = Pin(clk)
        self.dio = Pin(dio)
        self.cs = Pin(cs)
        self.clk.init(Pin.OUT)
        self.cs.init(Pin.OUT)

    def _dec2hex(self, dat):
        """将十进制数转换为BCD码(Hex格式)"""
        return (dat // 10) * 16 + (dat % 10)

    def _hex2dec(self, dat):
        """将BCD码转换为十进制数"""
        return (dat // 16) * 10 + (dat % 16)

    def _write_byte(self, dat):
        """向DS1302写入一个字节(低位先行)"""
        self.dio.init(Pin.OUT)
        for i in range(8):
            self.dio.value((dat >> i) & 1)
            self.clk.value(1)
            self.clk.value(0)  # 下降沿读取

    def _read_byte(self):
        """从DS1302读取一个字节"""
        d = 0
        self.dio.init(Pin.IN)
        for i in range(8):
            d |= (self.dio.value() << i)
            self.clk.value(1)
            self.clk.value(0)
        return d

    def _get_reg(self, reg):
        """读取指定寄存器的值"""
        self.cs.value(1)
        self._write_byte(reg)
        t = self._read_byte()
        self.cs.value(0)
        return t

    def _set_reg(self, reg, dat):
        """设置指定寄存器的值"""
        self.cs.value(1)
        self._write_byte(reg)
        self._write_byte(dat)
        self.cs.value(0)

    def _wr(self, reg, dat):
        """安全写入:先关闭写保护,写入数据,再开启写保护"""
        self._set_reg(0x8E, 0x00)      # 关闭写保护
        self._set_reg(reg, dat)
        self._set_reg(0x8E, 0x80)      # 开启写保护(最高位为1)

    def getDateTime(self):
        """
        获取完整日期时间,返回列表
        格式:[年, 月, 日, 星期几, 时, 分, 秒]
        年份自动加上2000(假设为2000-2099年)
        """
        return [
            self._hex2dec(self._get_reg(0x8D)) + 2000,  # 年 (0x8C + 1)
            self._hex2dec(self._get_reg(0x89)),         # 月 (0x88 + 1)
            self._hex2dec(self._get_reg(0x87)),         # 日 (0x86 + 1)
            self._hex2dec(self._get_reg(0x8B)),         # 星期 (0x8A + 1)
            self._hex2dec(self._get_reg(0x85)),         # 时 (0x84 + 1)
            self._hex2dec(self._get_reg(0x83)),         # 分 (0x82 + 1)
            self._hex2dec(self._get_reg(0x81)) % 60     # 秒 (0x80 + 1),防止60秒异常
        ]

    def getTime(self):
        """
        仅获取时间部分
        返回:[时, 分, 秒]
        """
        return [
            self._hex2dec(self._get_reg(0x85)),
            self._hex2dec(self._get_reg(0x83)),
            self._hex2dec(self._get_reg(0x81)) % 60
        ]

    def setDateTime(self, year, month, day, dayOfWeek, hour, minutes, seconds):
        """
        设置日期和时间
        参数范围:
            year: 2000-2099(自动取模)
            month: 1-12
            day: 1-31
            dayOfWeek: 1-7(1=星期日)
            hour: 0-23
            minutes: 0-59
            seconds: 0-59
        """
        self._wr(0x8C, self._dec2hex(year % 100))   # 年
        self._wr(0x88, self._dec2hex(month % 13))   # 月
        self._wr(0x86, self._dec2hex(day % 32))     # 日
        self._wr(0x8A, self._dec2hex(dayOfWeek % 8)) # 星期
        self._wr(0x84, self._dec2hex(hour % 24))    # 时
        self._wr(0x82, self._dec2hex(minutes % 60)) # 分
        self._wr(0x80, self._dec2hex(seconds % 60))  # 秒

    def setDateTime_list(self, time_list):
        """
        通过列表设置时间
        time_list = [year, month, day, dayOfWeek, hour, minutes, seconds]
        """
        self.setDateTime(*time_list)
四、使用示例
# 初始化 DS1302
rtc = DS1302(clk=18, dio=23, cs=5)

# 设置当前时间:2025年8月9日,星期六,1时30分0秒
rtc.setDateTime(2025, 8, 9, 6, 1, 30, 0)

# 或使用列表设置
# rtc.setDateTime_list([2025, 8, 9, 6, 1, 30, 0])

# 读取当前时间
time_now = rtc.getDateTime()
print("当前时间:{}年{}月{}日 {}:{}:{}".format(*time_now))

# 仅获取时间
hms = rtc.getTime()
print("当前时间:{:02d}:{:02d}:{:02d}".format(*hms))
输出示例:
当前时间:2025年8月9日 1:30:0
当前时间:01:30:00
六、常见问题与注意事项
-
时间不准?
- 检查晶振是否正常(32.768kHz)
- 确保电池有电
- 初次使用需手动设置时间
-
读取数据为0?
- 检查接线是否正确,尤其是
RST是否接好 - 确认
dio引脚方向切换正确(代码中已处理)
- 检查接线是否正确,尤其是
七、总结
本文详细介绍了如何在 ESP32 的 MicroPython 环境下驱动 DS1302 实时时钟芯片,从硬件连接到软件实现,提供了可复用的类库代码。DS1302 虽然功能简单,但在低功耗、低成本项目中依然具有很高的实用价值。
通过本方案,你可以轻松实现时间记录、闹钟、定时开关等功能,适用于智能家居、数据采集、日志系统等场景

DAMO开发者矩阵,由阿里巴巴达摩院和中国互联网协会联合发起,致力于探讨最前沿的技术趋势与应用成果,搭建高质量的交流与分享平台,推动技术创新与产业应用链接,围绕“人工智能与新型计算”构建开放共享的开发者生态。
更多推荐
 14
14 0
0- 0


 已为社区贡献1条内容

所有评论(0)