WPF学习笔记(6)数据绑定Binding
前言
数据绑定是在UI界面与数据之间建立的绑定关系。在数据更改其值时,绑定到该数据的控件会自动反映更改;界面改变时,则对应的数据也可以自动更改。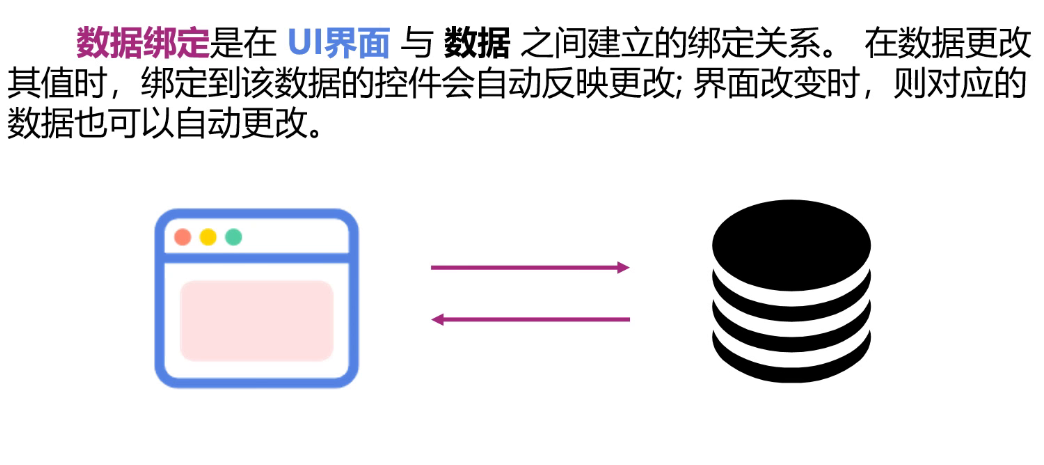 官方文档:
官方文档:
https://learn.microsoft.com/zh-cn/dotnet/desktop/wpf/data/data-binding-overview?view=netframeworkdesktop-4.8
一、数据绑定概述
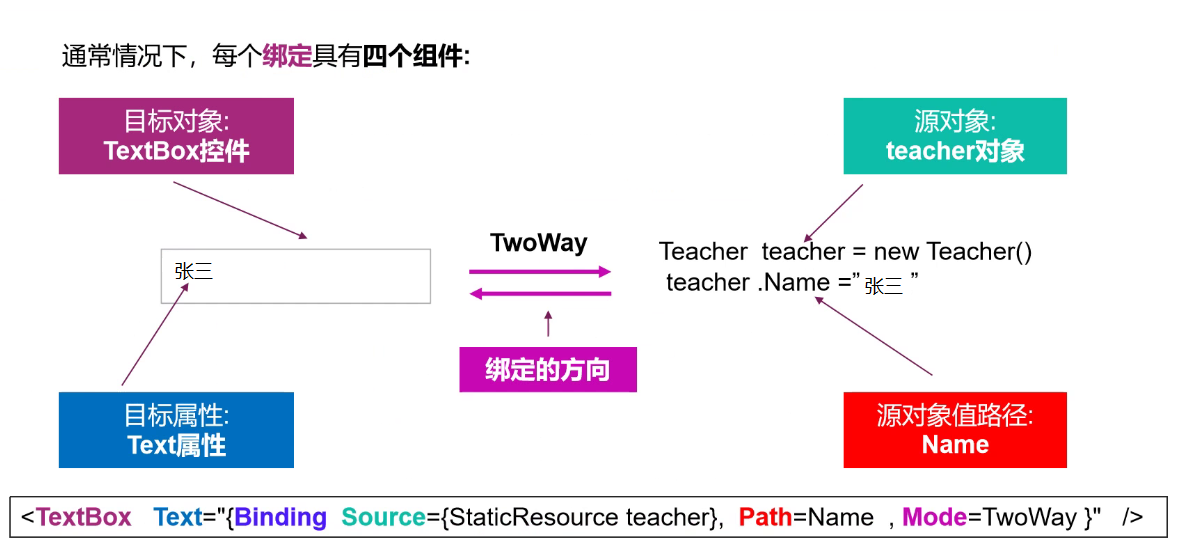
数据绑定本质上是绑定目标与绑定源之间的桥梁。通常,每个绑定都有四个组件:
- 绑定目标对象
- 目标属性
- 绑定源
- 要使用的绑定源中值的路径
例如,如果您将TextBox的内容绑定到Teacher.Name属性,则可以按照下表设置绑定:
| 设置 | 价值 |
|---|---|
| 目标 | TextBox |
| 目标属性 | Text |
| 源对象 | Teacher |
| 源对象值路径 | Name |
Binding 类提供对绑定定义的高级访问,该绑定连接绑定目标对象(通常为 WPF 元素)的属性和任何数据源(例如数据库、XML文件,或包含数据的任何对象)。
| 属性 | 设置 |
|---|---|
| Source | 获取或设置要用作绑定源的对象。 |
| Path | 获取或设置绑定源属性的路径。 |
| XPath | 获取或设置一个 XPath 查询,该查询返回要使用的 XML 绑定源上的值。 |
| Mode | 获取或设置一个值,该值指示绑定的数据流方向。 |
| ElementName | 获取或设置要用作绑定源的对象。但这个对象是XAML树中的控件元素。 |
| RelativeSource | 通过指定绑定源相对于绑定目标位置的位置,获取或设置此绑定源。 |
| UpdateSourceTrigger | 获取或设置一个值,该值指示更新绑定源的时间。 |
二、实例学习
1. Path
使用C#创建两个类,联系方式Contact 和 教师 Teacher,代码如下:
//联系方式
   public class Contact
   {
       public string Phone { get; set; }
       public string City { get; set; }
   }
   //教师三属性
   public class Teacher
   {
       private string name;
       private Contact contact;
       private ArrayList arrayList;

       public string Name
       {
           get
           {
               return name;
           }
           set
           {
               name = value;
           }
       }
       public Contact Contact { get; set; }
       public ArrayList Skill { get; set; }
   }
在MainWindow.xaml文件界面为实例化的teacher 对象资源、字符串资源进行绑定。
ArrayList属于System.Collections类,String属于System类,可根据VS提示添加
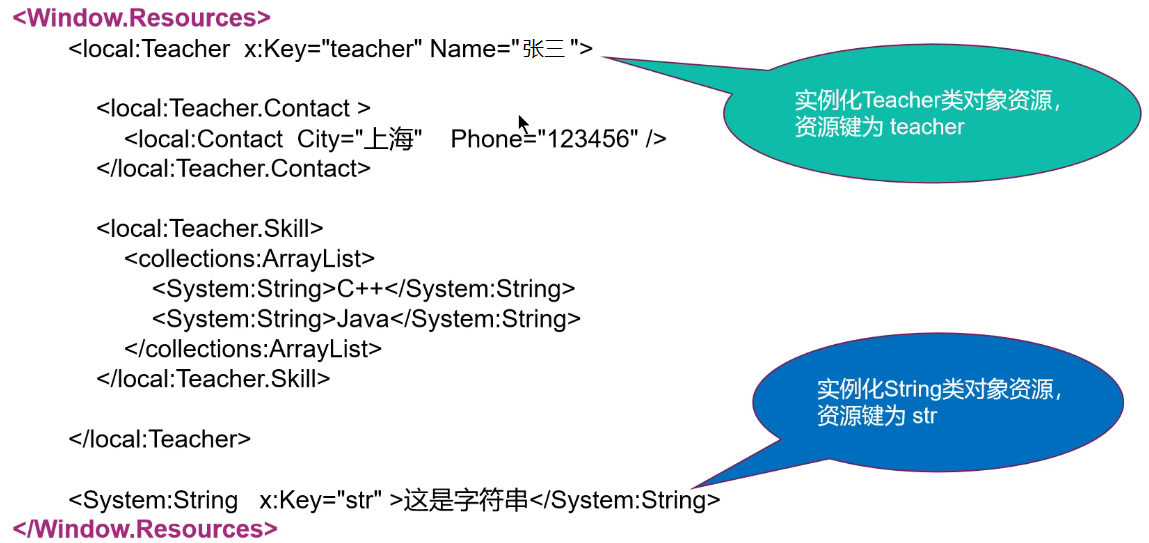
代码如下:
   <local:Teacher x:Key="teacher" Name="张三">
       <local:Teacher.Contact>
           <local:Contact City="北京" Phone="010-12345567"/>
       </local:Teacher.Contact>

       <local:Teacher.Skill>
           <collections:ArrayList>
               <system:String>C++</system:String>
               <system:String>Java</system:String>
           </collections:ArrayList>
       </local:Teacher.Skill>
   </local:Teacher>

   <system:String x:Key="str">这是一个字符串</system:String>
ArrayList中包含多个内容时,使用[0]/[1]/…表示形式
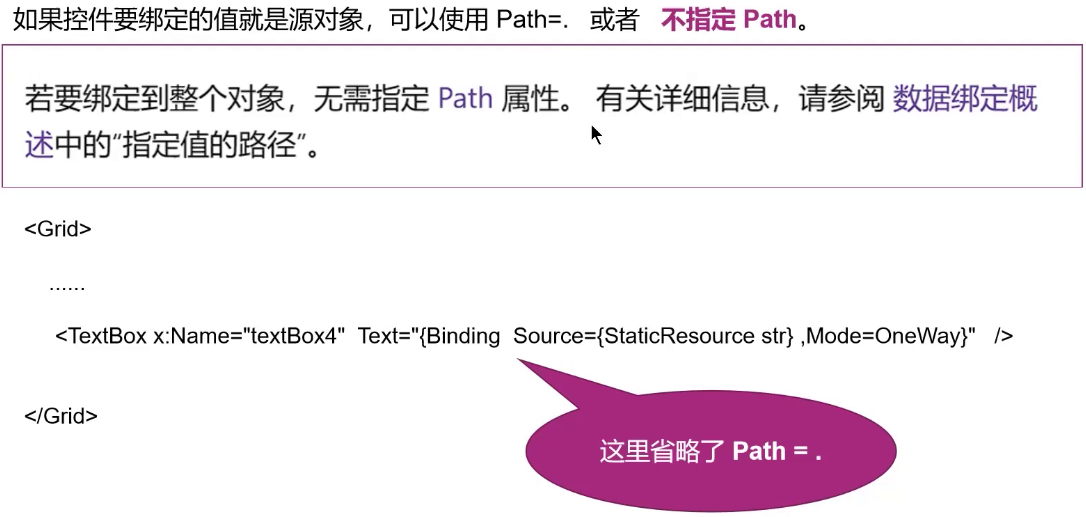
Path访问本身时,可使用点“.” 代替。当参数Mode为双向绑定时必须写Path,其他Mode时可不写Path,此处示例为单向绑定,Mode = OneWay

代码如下:
<TextBox x:Name="TextBox"  Text="{Binding Source={StaticResource teacher},Path = Name}" Margin="275,62,298,0" TextWrapping="Wrap"  VerticalAlignment="Top" Width="227" Height="52"/>
<TextBox x:Name="TextBox1" Text="{Binding Source={StaticResource teacher}, Path=Contact.City}" Margin="275,142,298,0" TextWrapping="Wrap"  VerticalAlignment="Top" Width="227" Height="52"/>
<TextBox x:Name="TextBox2" Text="{Binding Source={StaticResource teacher}, Path=Skill[1]}" Margin="275,226,298,0" TextWrapping="Wrap"  VerticalAlignment="Top" Width="227" Height="52"/>
<TextBox x:Name="TextBox3" Text="{Binding Source={StaticResource str}, Path=.}" Margin="275,313,298,0" TextWrapping="Wrap"  VerticalAlignment="Top" Width="227" Height="52"/>
<TextBox x:Name="TextBox4" Text="{Binding Source={StaticResource str},Mode=OneWay}" Margin="276,360,299,0" TextWrapping="Wrap"  VerticalAlignment="Top" Height="52" FontSize="24"/>
按照Binding的构造函数,还存在第二种写法,省略“Path = ”写法,直接写于“Binding”后
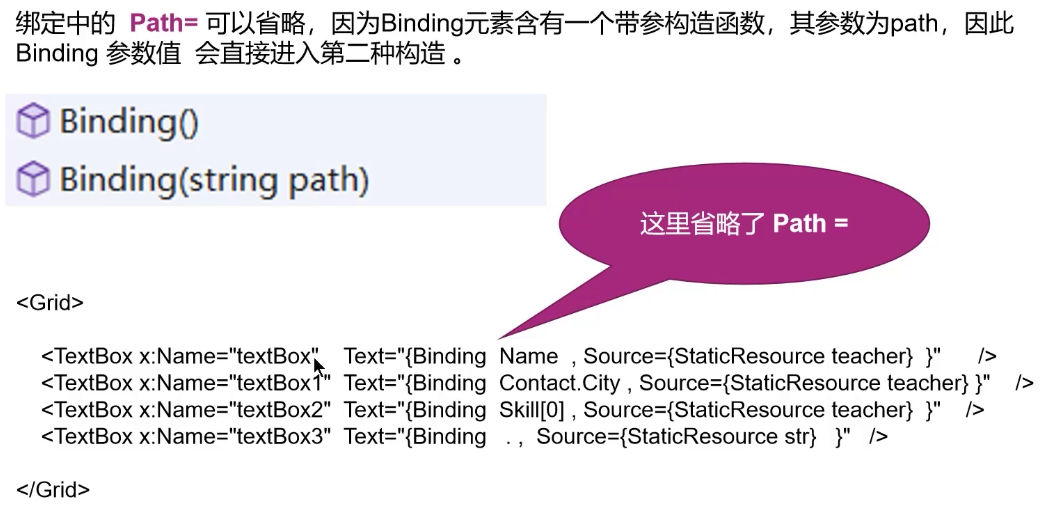
代码如下所示:
<TextBox x:Name="TextBox"  Text="{Binding Name, Source={StaticResource teacher}}" Margin="275,62,298,0" TextWrapping="Wrap"  VerticalAlignment="Top" Width="227" Height="52"/>
<TextBox x:Name="TextBox1" Text="{Binding Contact.City, Source={StaticResource teacher}}" Margin="275,142,298,0" TextWrapping="Wrap"  VerticalAlignment="Top" Width="227" Height="52"/>
<TextBox x:Name="TextBox2" Text="{Binding Skill[1], Source={StaticResource teacher}}" Margin="275,226,298,0" TextWrapping="Wrap"  VerticalAlignment="Top" Width="227" Height="52"/>
<TextBox x:Name="TextBox3" Text="{Binding ., Source={StaticResource str}}" Margin="275,313,298,0" TextWrapping="Wrap"  VerticalAlignment="Top" Width="227" Height="52"/>
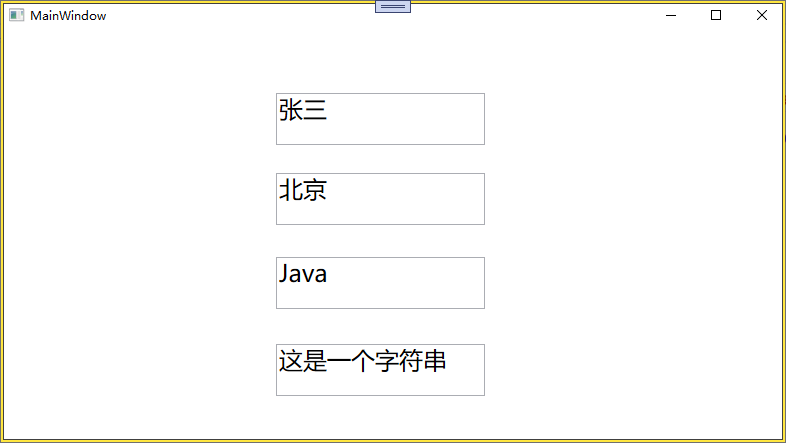
运行结果展示:
2. XPath
在XAML中实例Books对象资源、字符串资源,进行数据绑定
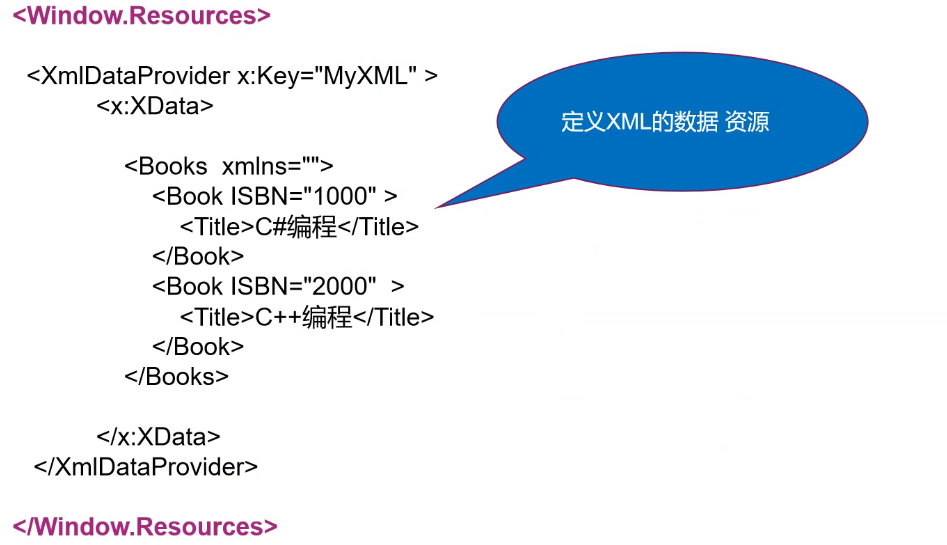
   <Window.Resources>
       <XmlDataProvider x:Key="MyXML" >
               <x:XData>
                   <Books xmins="">
                       <Book ISBN="1000">
                           <Title>C#编程</Title>
                       </Book>
                       <Book ISBN="2000">
                           <Title>C++编程</Title>
                       </Book>
                   </Books>
               </x:XData>
           </XmlDataProvider>
       </Window.Resources>
WPF 中的 XPath 属性由 XmlNode.SelectNodes 方法处理。 可以修改 XPath 查询以获取不同的结果。 下面是关于上一示例中绑定XPath的查询的一些ListBox示例:
- XPath=“Book[1]” 将返回第一个图书元素(“XML in Action”)。 请注意, XPath 索引基于 1 而不是 0。
- XPath=“Book[@*]” 将返回具有任何属性的所有图书元素。
- XPath=“Book[last()-1]” 将返回第二个到最后一个 book 元素(“Microsoft .NET 简介”)。
- XPath=“*[position()>3]” 将返回除了前三个之外的所有书籍元素。
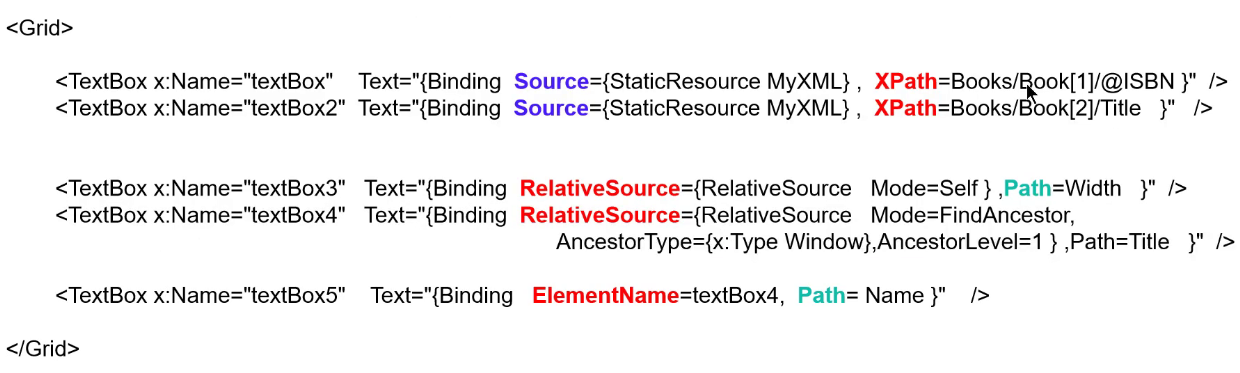
代码如下:
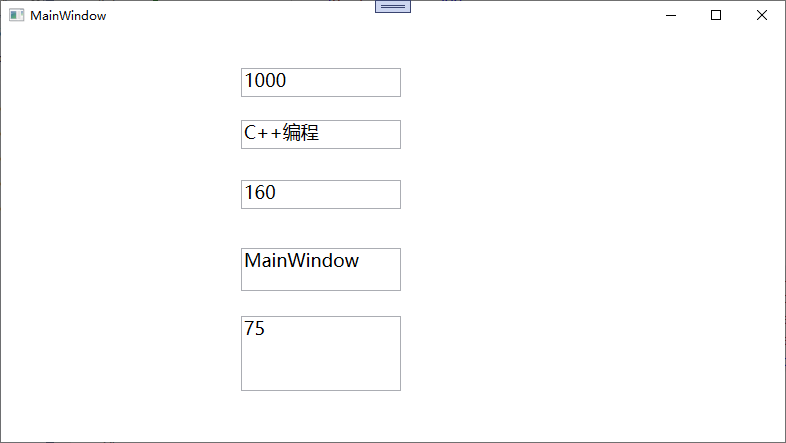
<TextBox x:Name="TextBox" Text="{Binding Source={StaticResource MyXML}, XPath=Books/Book[1]/@ISBN}"  HorizontalAlignment="Left" Margin="240,37,0,0" TextWrapping="Wrap"  VerticalAlignment="Top" Width="160" Height="29" />
<TextBox x:Name="TextBox1" Text="{Binding Source={StaticResource MyXML}, XPath=Books/Book[2]/Title}" HorizontalAlignment="Left" Margin="240,89,0,0" TextWrapping="Wrap" VerticalAlignment="Top" Width="160" Height="29" />
<TextBox x:Name="TextBox2" Text="{Binding RelativeSource={RelativeSource Mode=Self}, Path=Width}" HorizontalAlignment="Left" Margin="240,149,0,0" TextWrapping="Wrap" VerticalAlignment="Top" Width="160" Height="29" />
<TextBox x:Name="TextBox3" Text="{Binding RelativeSource={RelativeSource Mode=FindAncestor, AncestorType={x:Type Window}, AncestorLevel=1}, Path=Title}" HorizontalAlignment="Left" Margin="240,217,0,0" TextWrapping="Wrap" VerticalAlignment="Top" Width="160" Height="43" />
<TextBox x:Name="TextBox4" Text="{Binding ElementName=TextBox4, Path=Height}" HorizontalAlignment="Left" Margin="240,285,0,0" TextWrapping="Wrap" VerticalAlignment="Top" Width="160" Height="75" FontSize="18"/>
运行结果如下:
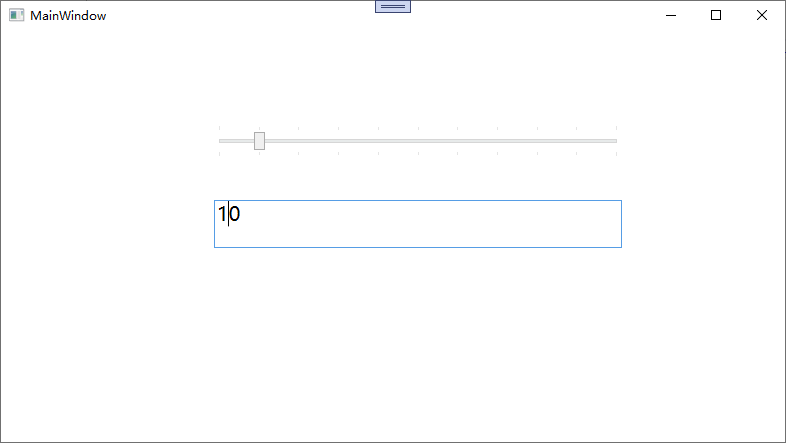
3. ElementName
ElementName属性绑定目标控件,Path绑定目标控件属性,代码运行结果展示如下:

总结
- Binding有两种构造方法
- 通过ElementName实现两个控件之间的数据绑定

DAMO开发者矩阵,由阿里巴巴达摩院和中国互联网协会联合发起,致力于探讨最前沿的技术趋势与应用成果,搭建高质量的交流与分享平台,推动技术创新与产业应用链接,围绕“人工智能与新型计算”构建开放共享的开发者生态。
更多推荐
 23
23 0
0- 0


 已为社区贡献5条内容

所有评论(0)