

aws lambda使用
Building machine learning models on a laptop is straightforward.
在笔记本电脑上构建机器学习模型非常简单。
Deploying models so they’re available in production is not.
部署模型以使其在生产中不可用。
Productionizing ML is hard. Not only does it combine SDE, ML and DevOps. But there’s no one-size fits all approach.
生产ML很难。 它不仅结合了SDE,ML和DevOps。 但是,没有一种千篇一律的方法。
A company’s setup depends on a combination of business requirements, financial constraints and technical skills.
公司的设置取决于业务需求,财务限制和技术技能的组合。
Today we’ll learn to deploy serverless ML on Lambda.
While most ML is not a good fit for serverless, it can make sense on occasion. I’ll explain when it makes sense in a moment.
尽管大多数ML都不适合无服务器,但有时还是有道理的。 一会儿我会解释一下。
目录: (Table of contents:)
- Background information 背景资料
- Train a model locally 在本地训练模型
- Push the model to S3 将模型推到S3
- Build a SAM application 生成SAM应用程序
- Test the application locally 在本地测试应用程序
- Deploy the application to AWS 将应用程序部署到AWS
- Test the API 测试API
- Conclusion 结论
背景 (Background)
ML什么时候适合无服务器? (When is a ML a good fit for serverless?)
Your ML is a good fit for Lambda if…
如果……,您的ML非常适合Lambda。
-
Your model is small. Lambda reloads your model on each request so a large model is is going to result in slow response times.
您的模型很小。 Lambda会在每个请求上重新加载模型,因此大型模型将导致响应时间变慢。
-
Data vectors are small. Lambda comes with a 3GB memory ceiling. So if your input data is massive, it’s just going to crash.
数据向量很小。 Lambda带有3GB内存上限。 因此,如果您的输入数据非常庞大,它将崩溃。
-
You model will be sporadically accessed. Lambda scales out (not up) to infinite and charges you per request. So it’s well suited to intermittent “on-the-fly” demand.
您的模型将被偶尔访问。 Lambda可以扩展(而不是扩展)到无限,并根据请求向您收费。 因此,它非常适合间歇性的“即时”需求。
-
Low-cost is important. Lambda charges $0.20 per million requests.
低成本很重要。 Lambda每百万个请求收取$ 0.20。
Otherwise… consider deploying on EC2, or Sagemaker (if money is not a concern).
否则……考虑在EC2或Sagemaker上进行部署(如果不考虑金钱的话)。
什么是SAM? (What is SAM?)
SAM stands for “Serverless Application Model”. It’s an open-source framework for provisioning AWS services via code.
SAM代表“无服务器应用程序模型”。 这是一个开放源代码框架,用于通过代码配置AWS服务。
As a rule, always choose infrastructure-as-code over setting up infrastructure in the AWS console. The former is more maintainable, reproducible, and allows storing versions in Github.
通常,请始终选择“基础架构即代码”,而不是在AWS控制台中设置基础架构。 前者更具可维护性,可复制性,并允许将版本存储在Github中。
教程先决条件 (Tutorial prerequisites)
You’ll need a few things setup on your machine.
您需要在计算机上进行一些设置。
-
AWS Shell (downloaded and configured)
AWS Shell(下载并配置 )
- AWS SAM Client AWS SAM客户端
- Docker 码头工人
在本地训练模型 (Train a model locally)
The focus of this tutorial is on deployment. So we won’t concern ourselves with training an accurate model. But you can easily replace this with your own more complex model.
本教程的重点是部署。 因此,我们不会担心训练一个准确的模型。 但是您可以轻松地用自己的更复杂的模型替换它。
In Jupyter notebook, start by importing required libraries.
在Jupyter Notebook中,首先导入所需的库。
from sklearn.datasets import load_wine
import pandas as pd
import numpy as np
import pickle
Import data and generate a dataframe.
导入数据并生成一个数据框。
data = load_wine() # import dataset
df = pd.DataFrame(data['data'], columns=data['feature_names']) # build dataframe
df['target'] = data['target'] # add dependent variable
df = df.sample(frac=1) # randomize the data
df.head(3)
Split data into test and train sets.
将数据分为测试集和训练集。
print("row count:",len(df))
train_df = df[:150]
test_df = df[150:]
#=> row count: 178
Prepare data to train a model.
准备数据以训练模型。
def X_and_y_from_df(df, y_column, X_columns = []):
    '''Extract data from the dataframe'''
    X = {}
    for feature in X_columns:
        X[feature] = df[feature].tolist()
    y = df[y_column].tolist()
    return X, yX_train, y_train = X_and_y_from_df(train_df, 'target', ['alcohol'])
X_test, y_test = X_and_y_from_df(test_df, 'target', ['alcohol'])X_train = np.array(X_train['alcohol']).reshape(-1,1)
X_test = np.array(X_test['alcohol']).reshape(-1,1)
Fit the model.
拟合模型。
from sklearn.linear_model import LogisticRegression
model = LogisticRegression()
model.fit(X_train, y_train)
Pickle the model.
腌制模型。
import pickle
pickle.dump( model, open( "pickled_model.p", "wb" ) )
Great! Now it’s in a format that can be easily stored in S3.
大! 现在,它的格式可以轻松存储在S3中。
将模型推到S3 (Push the model to S3)
Open your command line in the same directory as your notebook above.
在与上面的笔记本相同的目录中打开命令行。
Create an S3 bucket.
创建一个S3存储桶。
$ aws s3 mb s3://sam-sklearn-lambda-123Note: You’ll need your own globally unique bucket name.
注意:您将需要自己的全局唯一存储桶名称。
Push your pickled model to S3.
将您腌制的模型推到S3。
$ aws s3 cp pickled_model.p s3://lambda-app-bucket-123Your model is now accessible to AWS services and can be updated or changed without redeploying any other code.
AWS服务现在可以访问您的模型,并且可以在不重新部署任何其他代码的情况下对其进行更新或更改。
生成SAM应用程序 (Build a SAM Application)
On the command line, initialize a SAM application.
在命令行上,初始化SAM应用程序。
$ sam initThis will ask you 4 questions which will be used to build a starting template for our SAM application.
这将问您4个问题,这些问题将用于为我们的SAM应用程序构建启动模板。
Answer the questions as below.
回答以下问题。
提示: (Prompts:)
-
Which template source would you like to use? 1 — AWS Quick Start Templates
您想使用哪个模板源? 1-AWS快速入门模板
-
Which runtime would you like to use? 2 — python3.8
您要使用哪个运行时? 2 — python3.8
-
Project name [sam-app]: [press “enter” to keep the default name]
项目名称[sam-app]: [按“输入”以保留默认名称]
-
AWS quick start application templates: 1 — Hello World Example
AWS快速入门应用程序模板: 1 — Hello World示例
Now cd into the directory that was just created, and open it with your favorite text editor. I’m using Atom.
现在cd进入刚刚创建的目录,并使用您喜欢的文本编辑器将其打开。 我正在使用Atom。
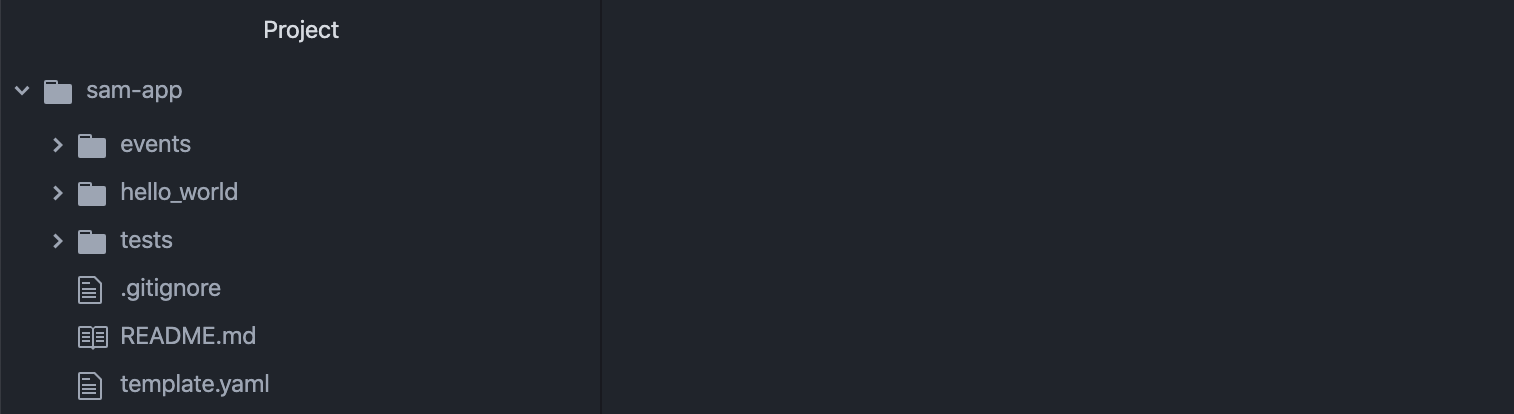
The directory structure should look like below.
目录结构应如下所示。
Next, let’s change the name of our the subdirectory where our lambda code lives from /hello_world to code/. You can do this with the following command.
接下来,让我们将lambda代码所在的子目录的名称从/hello_world更改为code/ 。 您可以使用以下命令执行此操作。
$ mv hello_world/ code/ Now it’s time to update files.
现在该更新文件了。
template.yaml (template.yaml)
This is the file which tells CloudFormation which services should be provisioned.
该文件告诉CloudFormation应该提供哪些服务。
Update it so it looks like below.
更新它,使其如下所示。
Note: You’ll need to create an IAM role in AWS which permits Lambda to read files in S3. Mine is called “arn:aws:iam::421242169512:role/LambdaCanReadS3” but you’ll need to replace this with your role’s name.
注意:您需要在AWS中创建一个IAM角色,以允许Lambda读取S3中的文件。 我的名字叫“ arn:aws:iam :: 421242169512:role / LambdaCanReadS3”,但是您需要用角色名称替换它。
The above provisions both an API Gateway endpoint and a Lambda.
上面提供了API网关端点和Lambda。
It also specifies the language running on the Lambda as Python3.8, sets a few variables that can be accessed in our lambda code, and configures the API Gateway endpoint.
它还将在Lambda上运行的语言指定为Python3.8,设置一些可以在我们的lambda代码中访问的变量,并配置API Gateway端点。
代码/app.py (code/app.py)
This is where our Lambda code lives.
这就是我们的Lambda代码所在的地方。
import json
import sklearn
import boto3
import os
import json
import pickles3 = boto3.client('s3')
s3_bucket = os.environ['s3_bucket']
model_name = os.environ['model_name']
temp_file_path = '/tmp/' + model_namefrom sklearn.linear_model import LogisticRegressiondef lambda_handler(event, context):
    # Parse input
    body = event['body']
    input = json.loads(body)['data']
    input = float(input )    # Download pickled model from S3 and unpickle
    s3.download_file(s3_bucket, model_name, temp_file_path)
    with open(temp_file_path, 'rb') as f:
        model = pickle.load(f)    # Predict class
    prediction = model.predict([[input]])[0]    return {
        "statusCode": 200,
        "body": json.dumps({
            "prediction": str(prediction),
        }),
    }
In a nutshell, this imports libraries, pulls your model from S3, parses the input request, classifies it, and returns a response.
简而言之,这将导入库,从S3中提取模型,解析输入请求,对其进行分类,然后返回响应。
代码/requirements.txt (code/requirements.txt)
This is where we specify what libraries should be installed on our Lambda. Below is all we need.
我们在此处指定应在Lambda上安装哪些库。 以下是我们所需要的。
requests
boto3
sklearn
Now run the following on your command line.
现在,在命令行上运行以下命令。
$ sam buildThis creates a .aws-sam/build directory, which contains code that will be deployed to AWS.
这将创建一个.aws-sam/build目录,其中包含将部署到AWS的代码。
在本地测试应用程序 (Test the application locally)
Before deploying, let’s make sure the application works locally. Do not continue until you get a successful response here.
在部署之前,让我们确保该应用程序在本地运行。 在这里获得成功的响应之前,请不要继续。
Run below to provision the app locally.
运行以下内容以在本地配置应用程序。
$ sam local start-apiNow hit the endpoint with a curl.
现在卷曲一下端点。
$ curl -XPOST http://127.0.0.1:3000/classify -H 'Content-Type: application/json' -d '{"data":".10"}'The response should look like below.
响应应如下所示。
{"prediction": "1"}If you’re response looks like above, continue!
如果您的回复如上所示,请继续!
将应用程序部署到AWS (Deploy the application to AWS)
cd into the .aws-sam/build/ directory.
cd进入.aws-sam/build/目录。
$ cd .aws-sam
$ cd build
Now run below. This creates a zip file with dependencies that will be deployed (in a moment). This will take a minute.
现在运行下面。 这将创建一个具有将要部署的依赖项的zip文件。 这需要一分钟。
Note: I’m using the name of my S3 bucket but you should use the name of yours.
注意:我使用的是我的S3存储桶的名称,但您应该使用自己的名称。
$ sam package --template-file template.yaml --s3-bucket lambda-app-bucket-123 --output-template-file packaged.yamlThen run below to deploy your application.
然后在下面运行以部署您的应用程序。
$ sam deploy --template-file packaged.yaml --stack-name SklearnLambdaStack --capabilities CAPABILITY_IAMYou should get a confirmation that your application has been deployed.
您应该确认您的应用程序已部署。
测试API (Test the API)
In the previous response from deployment, you’ll be provided with a URL.
在先前的部署响应中,将为您提供一个URL。
If everything worked, sending a request to this URL should return the same response as making a request to your app running locally.
如果一切正常,向该URL发送请求应返回与向本地运行的应用程序发出请求相同的响应。
$ curl -XPOST https://6lsk6c6vw2.execute-api.us-east-1.amazonaws.com/Prod/classify/ -H 'Content-Type: application/json' -d '{"data":".10"}'So the above should return.
因此,以上应返回。
{"prediction": "1"}Congratulations! You’ve deployed your first serverless ML application!
恭喜你! 您已经部署了第一个无服务器ML应用程序!
结论 (Conclusion)
As you can see, deploying ML on serverless architecture is anything but straightforward.
如您所见,在无服务器架构上部署ML绝非易事。
The example we walked through is about as simple as it gets; we even skipped API authentication because I didn’t want to detract from the core lesson.
我们遍历的示例非常简单。 我们甚至跳过了API身份验证,因为我不想偏离核心课程。
There aren’t many great examples on productionizing serverless ML, so I hope this helps speed up your learning process.
生产无服务器ML的例子很多,所以我希望这有助于加快学习过程。
I fully expect we’ll see more and better tool for productionizing ML in future. But until then, infrastructure is going to be tightly coupled with model deployment.
我完全希望我们将来会看到更多更好的工具来生产ML。 但是在那之前,基础架构将与模型部署紧密结合在一起。
I hope you found this useful. As always, let me know if you get stuck and I’ll try to help!
希望您觉得这有用。 与往常一样,让我知道您是否遇到困难,我们会尽力帮助您!
aws lambda使用


 已为社区贡献2条内容

所有评论(0)