C++与QML进行数据交互的常见方法
QML类型注册(QML Type Registration):可以将C++ 对象注册为自定义的QML类型,使得QML可以直接创建和使用这些对象。到此这篇关于C++与QML进行数据交互的常见方法总结的文章就介绍到这了,更多相关C++ QML数据交互内容请搜索脚本之家以前的文章或继续浏览下面的相关文章希望大家以后多多支持脚本之家!这是最简单的方式,可以在QML中直接绑定C++ 对象的属性。通过在C++
一、属性绑定
这是最简单的方式,可以在QML中直接绑定C++ 对象的属性。通过在C++ 对象中使用Q_PROPERTY宏定义属性,然后在QML中使用绑定语法将属性与QML元素关联起来。
1.person.h
|
1 2 3 4 5 6 7 8 9 10 11 12 13 14 15 16 17 18 19 20 21 22 23 24 25 |
|
2.main.cpp
|
1 2 3 4 5 6 7 8 9 10 11 12 13 14 15 16 17 18 19 20 21 22 23 24 25 26 27 |
|
3.main.qml
|
1 2 3 4 5 6 7 8 9 10 11 12 13 14 15 16 17 18 19 20 21 22 23 24 25 26 27 28 29 |
|
二、信号与槽
C++ 对象可以发出信号,而QML中的元素可以连接到这些信号上。这样,当C++ 对象的状态发生变化时,可以通过信号与槽机制将这些变化传递给QML界面。
1.myobject.h
|
1 2 3 4 5 6 7 8 9 10 11 12 |
|
2.main.cpp
|
1 2 3 4 5 6 7 8 9 10 11 12 13 14 15 16 17 18 19 20 21 22 23 24 25 |
|
3.main.qml
|
1 2 3 4 5 6 7 8 9 10 11 12 13 14 15 16 17 18 19 20 21 22 23 24 25 26 27 28 |
|
三、模型视图
模型视图(Model-View):可以使用C++ 中的数据模型(QStandardItemModel)来提供数据给QML界面。QML中的视图元素(如ListView或GridView)可以使用这些模型来显示数据。

1.mymodel.h
|
1 2 3 4 5 6 7 8 9 10 11 12 13 14 15 16 17 18 19 20 21 22 23 24 25 26 27 |
|
2.mymodel.cpp
|
1 2 3 4 5 6 7 8 9 10 11 12 13 14 15 16 17 18 19 20 21 22 23 24 25 26 27 28 29 30 31 32 33 34 35 36 37 |
|
3.main.cpp
|
1 2 3 4 5 6 7 8 9 10 11 12 13 14 15 16 17 18 19 20 21 22 23 24 25 |
|
4.main.qml
|
1 2 3 4 5 6 7 8 9 10 11 12 13 14 15 16 17 18 19 20 21 22 |
|
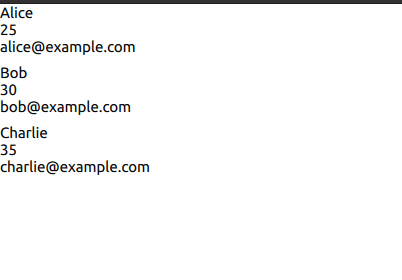
运行效果
四、QML类型注册
QML类型注册(QML Type Registration):可以将C++ 对象注册为自定义的QML类型,使得QML可以直接创建和使用这些对象。通过在C++ 中使用 Q_PROPERTY 宏和 Q_INVOKABLE 函数,可以将C++ 类注册为QML类型。我需要这样一个案例
1.myobject.h
|
1 2 3 4 5 6 7 8 9 10 11 12 13 14 15 16 17 18 19 20 21 22 23 |
|
2.main.cpp
|
1 2 3 4 5 6 7 8 9 10 11 12 13 14 15 16 17 18 19 20 21 22 23 24 25 26 27 28 29 30 |
|
3.main.qml
|
1 2 3 4 5 6 7 8 9 10 11 12 13 14 15 16 17 18 19 20 21 22 23 24 25 26 27 28 29 30 31 32 |
|
到此这篇关于C++与QML进行数据交互的常见方法总结的文章就介绍到这了,更多相关C++ QML数据交互内容请搜索脚本之家以前的文章或继续浏览下面的相关文章希望大家以后多多支持脚本之家!
您可能感兴趣的文章:

DAMO开发者矩阵,由阿里巴巴达摩院和中国互联网协会联合发起,致力于探讨最前沿的技术趋势与应用成果,搭建高质量的交流与分享平台,推动技术创新与产业应用链接,围绕“人工智能与新型计算”构建开放共享的开发者生态。
更多推荐

 19
19 0
0- 0


 已为社区贡献1条内容

所有评论(0)