开源地图引擎openlayers_教你用vue+JavaScript+openlayers+iview制作天气预报图
啥都不说先看效果还有事件统计功能,以及本地天气预报功能。这算是前端技术中的webgis相关的知识,这些实现都是用的纯前端加上中国天气网api和高德地图的地理编码的api请求数据。因为这个小demo涉及的数据传递较多,所以我选择使用vue框架,另外为了地图的展示,openlayers作为开源的webgis库,是很值得被选择,本项目涉及较多的就是openlayers添加地图,以及在地图上添加overl
·
啥都不说先看效果

还有事件统计功能,以及本地天气预报功能。
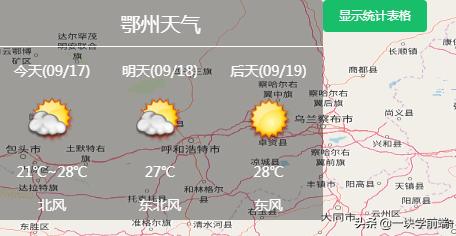
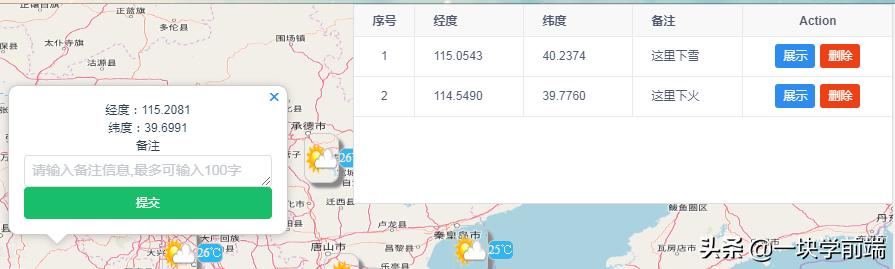
这算是前端技术中的webgis相关的知识,这些实现都是用的纯前端加上中国天气网api和高德地图的地理编码的api请求数据。因为这个小demo涉及的数据传递较多,所以我选择使用vue框架,另外为了地图的展示,openlayers作为开源的webgis库,是很值得被选择,本项目涉及较多的就是openlayers添加地图,以及在地图上添加overlayers
以下代码为map以及overlayers的添加
setMap:function () { this.map = new Map({ layers: [ new TileLayer({ source: new OSM() })], target: 'map', view: new View({ center: this.center, zoom: this.zoom, projection: 'EPSG:4326', // projection:'EPSG:3785', rotation: this.rotation, minZoom: 5, maxZoom: 15 })})}, setOverlayer:function(){ this.overlay = new Overlay({ element: document.getElementById('popup'), autoPan: true, autoPanAnimation: { duration: 250 } }) this.map.addOverlay(this.overlay);},另外一个难点就是,异步请求api数据,由于本人的js水平有限,就采用了es6中比较简单的async与await结合的方法写的,还有其他解决方案,比如generator函数,还有promise等,迭代书写异步的方式,
async getWeatherData(){ let self = this for(let i=0;i<10;i++){ await axios( { method:'get', url:'https://www.tianqiapi.com/api/', params: { appid:'', appsecret:'', version:'v6', city:citys[i] } } ).then(function (response) { // console.log(response); // self.cityweatherData[i] = [] // self.cityweatherData[i].push(citys[i] ) self.cityweatherData[i].push(response['data']['tem']) self.cityweatherData[i].push(response['data']['wea']) self.cityweatherData[i].push(response['data']['wea_img']) // self.cityweatherData[i].push(response['data']['HeWeather6']['0']['now']['tmp']) }) .catch(function (error) { console.log(error); }) await axios( { method:'get', url:'https://restapi.amap.com/v3/geocode/geo?parameters', params: { key:'', address: citys[i], city: citys[i], // dataType:'JSONP', output:'json' } } ).then(function (response) { // console.log(response) // console.log(response['data']['geocodes']['0']['location']) self.cityweatherData[i].push(citys[i]) self.cityweatherData[i].push(response['data']['geocodes']['0']['location']) }) .catch(function (error) { console.log(error); })本项目大量涉及到向dom中添加新的div,和img等,这就涉及到html元素在浏览器加载的过程细节以及一些动态添加新的dom元素以及新的样式等,看上去简单,实则不然,比如下面的代码
addPics(){ for(let i = 0;i<10;i++){ let all = document.getElementById('all'); let sElement = document.createElement("div"); let img = document.createElement('div') let text = document.createElement('div') sElement.id = "overlay" + i; sElement.classList.add("picout") text.classList.add("temtext") text.innerHTML = this.cityweatherData[i][0] + '℃' all.appendChild(sElement) switch(this.cityweatherData[i][2]){ case"yun": img.classList.add("yun");break; case"qing": img.classList.add("qing");break; case"yin": img.classList.add("yin");break; case"yu": img.classList.add("yu");break; case"shachen": img.classList.add("shachen");break; case"xue": img.classList.add("xue");break; case"lei": img.classList.add("lei");break; case"wu": img.classList.add("wu");break; case"bingbao": img.classList.add("bingbao");break; } let box = document.getElementById(sElement.id) box.appendChild(img) box.appendChild(text) let oly = new Overlay({ element: box, // autoPan: true, // positioning: 'center-center' }) console.log(this.cityweatherData[i][4]) let lon = Number((this.cityweatherData[i][4].split(','))[0]) let lat = Number((this.cityweatherData[i][4].split(','))[1]) console.log(lon,lat) this.map.addOverlay(oly) oly.setPosition([lon,lat]) }}, changeZoom(){ let _this = this let picouts = document.getElementsByClassName('picout') let temtexts = document.getElementsByClassName('temtext') this.map.on("moveend
DAMO开发者矩阵,由阿里巴巴达摩院和中国互联网协会联合发起,致力于探讨最前沿的技术趋势与应用成果,搭建高质量的交流与分享平台,推动技术创新与产业应用链接,围绕“人工智能与新型计算”构建开放共享的开发者生态。
更多推荐


 0
0 0
0- 0


 已为社区贡献3条内容

所有评论(0)