人工智能-刷脸登录实现
4 刷脸登录实现4.1 需求分析为了用户登录的便捷,我们在系统中增加刷脸登录的功能,大致流程如下图:4.1.2 触发流程用户在登录页面触发刷脸登录功能在该页面中弹出一个二维码,此二维码是后台即时生成,包含特殊标志(但本质上是一个URL链接),后续登录流程将会使用此标志。用户对该二维码进行扫描,并在扫描端(手机或PC,注:此处不建议使用微信扫描)浏览器打开落地页。打开落地页时,授权使...
4 刷脸登录实现
4.1 需求分析
为了用户登录的便捷,我们在系统中增加刷脸登录的功能,大致流程如下图: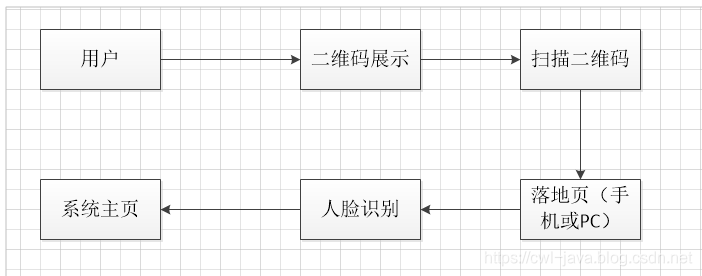
4.1.2 触发流程
- 用户在登录页面触发刷脸登录功能
- 在该页面中弹出一个二维码,此二维码是后台即时生成,包含特殊标志(但本质上是一个URL链接),后续登录流程将会使用此标志。用户对该二维码进行扫描,并在扫描端(手机或PC,注:此处不建议使用微信扫描)浏览器打开落地页。
- 打开落地页时,授权使用摄像头,并进行人脸识别,识别成功后,关闭落地页。识别成功后,登录页面自动检测到成功标识,并获取相关信息,进入系统主页。
4.1.2 技术点
- 二维码生成
- 百度云AI
- Redis
- 前端摄像头调用
4.2 搭建环境
(1) 引入坐标
<!-- 百度云AI API-->
<dependency>
    <groupId>com.baidu.aip</groupId>
    <artifactId>java-sdk</artifactId>
    <version>4.8.0</version>
</dependency>
<!-- 二维码 -->
<dependency>
    <groupId>com.google.zxing</groupId>
    <artifactId>core</artifactId>
    <version>3.2.1</version>
</dependency>
<dependency>
    <groupId>com.google.zxing</groupId>
    <artifactId>javase</artifactId>
    <version>3.2.1</version>
</dependency>
(2)添加配置
ai:
 appId: 15191935
 apiKey: cyWSHgas93Vtdmt42OwbW8pu
 secretKey: yf1GusMvvLBdOnyubfLubNyod9iEDEZW
 imageType: BASE64
 groupId: itcast
qr:
 url: https://localhost:8080/#/facelogin
(3)创建二维码工具类
配置二维码创建的工具类
@Component
public class QRCodeUtil {
    /**
     * 生成Base64 二维码
     */
    public String crateQRCode(String content) throws IOException {
        ByteArrayOutputStream os = new ByteArrayOutputStream();
        try {
            QRCodeWriter writer = new QRCodeWriter();
            BitMatrix bitMatrix = writer.encode(content, BarcodeFormat.QR_CODE, 200,
200);
            BufferedImage bufferedImage =
MatrixToImageWriter.toBufferedImage(bitMatrix);
            ImageIO.write(bufferedImage, "png", os);
            //添加图片标识
            return new String("data:image/png;base64," +
Base64.encode(os.toByteArray()));
       } catch (Exception e) {
            e.printStackTrace();
       } finally {
            os.close();
       }
        return null;
   }
}
在QRCodeUtil类头添加 @Component 注解,使用时可通过 @Autowired 来自动装配。
(4) 创建基本的工程结构
在系统微服务中构建基本的Controller代码
@RestController
@RequestMapping("/sys/faceLogin")
public class FaceLoginController {
    /**
     * 获取刷脸登录二维码
     *     返回值:QRCode对象(code,image)
     *
     */
    @RequestMapping(value = "/qrcode", method = RequestMethod.GET)
    public Result qrcode() throws Exception {
       return null;
   }
    /**
     * 检查二维码:登录页面轮询调用此方法,根据唯一标识code判断用户登录情况
     *     查询二维码扫描状态
     *         返回值:FaceLoginResult
     *             state :-1,0,1 (userId和token)
     */
    @RequestMapping(value = "/qrcode/{code}", method = RequestMethod.GET)
    public Result qrcodeCeck(@PathVariable(name = "code") String code) throws Exception
{
 return null;
   }
    /**
     * 人脸登录:根据落地页随机拍摄的面部头像进行登录
     *         根据拍摄的图片调用百度云AI进行检索查找
     */
    @RequestMapping(value = "/{code}", method = RequestMethod.POST)
    public Result loginByFace(@PathVariable(name = "code") String code,
@RequestParam(name = "file") MultipartFile attachment) throws Exception {
 return null;
   }
    /**
     * 图像检测,判断图片中是否存在面部头像
     */
    @RequestMapping(value = "/checkFace", method = RequestMethod.POST)
    public Result checkFace(@RequestParam(name = "file") MultipartFile attachment)
throws Exception {
 return null;
   }
}
在系统微服务中构建基本的Service代码
@Service
public class FaceLoginService {
    @Value("${qr.url}")
    private String url;
 //创建二维码
    public QRCode getQRCode() throws Exception {
 return null;
   }
 //根据唯一标识,查询用户是否登录成功
    public FaceLoginResult checkQRCode(String code) {
 return null;
   }
 //扫描二维码之后,使用拍摄照片进行登录
    public String loginByFace(String code, MultipartFile attachment) throws Exception {
 return null;
   }
 //构造缓存key
    private String getCacheKey(String code) {
        return "qrcode_" + code;
   }
}
4.3 二维码生成
@Component
public class QRCodeUtil {
    /**
     * 生成Base64 二维码
     */
    public String crateQRCode(String content) throws IOException {
        System.out.println(content);
        ByteArrayOutputStream os = new ByteArrayOutputStream();
        try {
            QRCodeWriter writer = new QRCodeWriter();
            BitMatrix bitMatrix = writer.encode(content, BarcodeFormat.QR_CODE, 200,
200);
            BufferedImage bufferedImage =
MatrixToImageWriter.toBufferedImage(bitMatrix);
            ImageIO.write(bufferedImage, "png", os);
            //添加图片标识
            return new String("data:image/png;base64," +
Base64.encode(os.toByteArray()));
       } catch (Exception e) {
            e.printStackTrace();
       } finally {
            os.close();
             }
        return null;
   }
}
在QRCodeUtil类头添加 @Component 注解,使用时可通过 @Autowired 来自动装配。
4.4 封装API
对于百度云AI SDK我们进行一些简单的封装,便于使用时,减少代码冗余。
@Component
public class BaiduAiUtil {
    @Value("${ai.appId}")
    private String APP_ID;
    @Value("${ai.apiKey}")
    private String API_KEY;
    @Value("${ai.secretKey}")
    private String SECRET_KEY;
    @Value("${ai.imageType}")
    private String IMAGE_TYPE;
    @Value("${ai.groupId}")
    private String groupId;
    private AipFace client;
    private HashMap<String, String> options = new HashMap<String, String>();
    public BaiduAiUtil() {
        options.put("quality_control", "NORMAL");
        options.put("liveness_control", "LOW");
   }
    @PostConstruct
    public void init() {
        client = new AipFace(APP_ID, API_KEY, SECRET_KEY);
   }
    /**
     * 人脸注册 :将用户照片存入人脸库中
     */
    public Boolean faceRegister(String userId, String image) {
        // 人脸注册
        JSONObject res = client.addUser(image, IMAGE_TYPE, groupId, userId, options);
        Integer errorCode = res.getInt("error_code");
        return errorCode == 0 ? true : false;
   }
    /**
     * 人脸更新 :更新人脸库中的用户照片
     */
    public Boolean faceUpdate(String userId, String image) {
        // 人脸更新
        JSONObject res = client.updateUser(image, IMAGE_TYPE, groupId, userId,
options);
        Integer errorCode = res.getInt("error_code");
        return errorCode == 0 ? true : false;
   }
    /**
     * 人脸检测:判断上传图片中是否具有面部头像
     */
    public Boolean faceCheck(String image) {
        JSONObject res = client.detect(image, IMAGE_TYPE, options);
        if (res.has("error_code") && res.getInt("error_code") == 0) {
            JSONObject resultObject = res.getJSONObject("result");
            Integer faceNum = resultObject.getInt("face_num");
            return faceNum == 1?true:false;
       }else{
            return false;
       }
   }
    /**
     * 人脸查找:查找人脸库中最相似的人脸并返回数据
     *         处理:用户的匹配得分(score)大于80分,即可认为是同一个用户
     */
    public String faceSearch(String image) {
        JSONObject res = client.search(image, IMAGE_TYPE, groupId, options);
        if (res.has("error_code") && res.getInt("error_code") == 0) {
            JSONObject result = res.getJSONObject("result");
            JSONArray userList = result.getJSONArray("user_list");
            if (userList.length() > 0) {
                JSONObject user = userList.getJSONObject(0);
                double score = user.getDouble("score");
                if(score > 80) {
                    return user.getString("user_id");
               }
           }
       }
        return null;
   }
}
- 在构造方法中,实例化client。通过client,可以调用SDK中包含的各种API。
- APP_ID, API_KEY, SECRET_KEY在文中第一段中所述位置获取,如没有正确配置,会直接导致API调用失败。
- 根据官方文档所示,我们大致创建了
faceRegister()、faceUpdate()、faceCheck()、faceSearch()四个方法。
- 人脸注册
faceRegister(groupId, userId, image) - groupId:用于人脸库区分人群标识,自定义即可,人脸库会根据提交的groupId,将用户分组
- userId:人脸库中的用户标识,同组不可重复,自定义即可(通常为系统中用户的唯一标识)
image:Base64用户图片- 人脸更新
faceUpdate(groupId, userId, image) - 参数解释同人脸注册
- 该方法用于发生变化时,更新人脸信息
- 人脸检测
faceCheck(image) image:Base64用户图片- 该方法用于人脸注册、人脸更新和人脸登录前使用
- 目前采用的方案是检测出人脸数大于0即可,如需深化需求,可按需扩展
- 人脸登录
faceSearch(image) image:Base64用户图片- 该方法使用的是百度云AI 人脸搜索方法,目前采用的方式是匹配度最高的结果,即要登录的用户同样的,在BaiduAiUtil类头添加 @Component 注解,使用时可通过 @Autowired 来自动装配。在API调用后返回值处理上,进行了简单的解析,如需深化解析,可按需扩展。
4.5 功能实现
完成刷脸登录一共需要我们解决如下5个问题:
-
人脸注册/人脸更新
在刷脸登录之前,我们首先需要对系统中的用户进行人脸注册,将相关信息提交至人脸库,才可通过人脸识别的相关接口进行刷脸登录操作。当用户相貌变更较大时,可通过人脸更新进行人脸信息更换。 -
二维码生成
获取验证码。通过工具生成相关信息后,如特殊标志,将特殊标志写入Redis缓存,并将标记值设为”-1“,我们认定值为”-1“,即为当前标记尚未使用。调用QRCodeUtil.crateQRCode()生成二维码。 -
二维码检测
前端获取二维码后,对二维码进行展现,并且前台启动定时器,定时检测特殊标记状态值。当状态值为“1”时,表明登录成功。 -
人脸检测
当用户扫码进入落地页,通过落地页打开摄像头,并且定时成像。将成像图片,通过接口提交给后端进行人脸检测。 -
人脸登录
检测成功后,即进行人脸登录,人脸登录后,改变特殊标记状态值,成功为“1”,失败为“0”。当登录成功时,进行自动登录操作,将token和userId存入到redis中。
4.5.1 后端实现
(1)人脸注册/人脸更新:在刷脸登录之前,我们首先需要对系统中的用户进行人脸注册,将相关信息提交至人脸库,才可通过人脸识别的相关接口进行刷脸登录操作。当用户相貌变更较大时,可通过人脸更新进行人脸信息更换。
//人脸注册
 @RequestMapping(value = "/register/face", method = RequestMethod.POST)
    public Boolean registerFace(@RequestParam(name = "fid") String fid) throws
Exception {
        SysFile sysFile = fileService.findById(fid);
        String path = uploadPath + "/" + sysFile.getPath() + "/" +
sysFile.getUuidName();
        byte[] bytes = Files.readAllBytes(Paths.get(path));
        Boolean isSuc;
        String image = Base64Utils.encodeToString(bytes);
        isSuc = userService.checkFace(image);
        if (isSuc) {
            isSuc = baiduAiUtil.faceRegister("1", userId, image);
       }
        return isSuc;
   }
 //人脸更新
    @RequestMapping(value = "/update/face", method = RequestMethod.POST)
    public boolean updateFace(@RequestParam(name = "fid") String fid) throws Exception
{
        SysFile sysFile = fileService.findById(fid);
        String path = uploadPath + "/" + sysFile.getPath() + "/" +
sysFile.getUuidName();
        byte[] bytes = Files.readAllBytes(Paths.get(path));
        Boolean isSuc;
        String image = Base64Utils.encodeToString(bytes);
        isSuc = userService.checkFace(image);
        if (isSuc) {
            isSuc = baiduAiUtil.faceUpdate("1", userId, image);
       }
        return isSuc;
   }
(2)二维码生成:获取验证码。通过工具生成相关信息后,如特殊标志,将特殊标志写入Redis缓存,并将标记值设为”-1“,我们认定值为”-1“,即为当前标记尚未使用。调用QRCodeUtil.crateQRCode()生成二维码。
Controller:
 /**
     * 获取刷脸登录二维码
     */
    @RequestMapping(value = "/qrcode", method = RequestMethod.GET)
    public Result qrcode() throws Exception {
        return new Result(ResultCode.SUCCESS, faceLoginService.getQRCode());
   }
   public QRCode getQRCode() throws Exception {
        String code = idWorker.nextId() + "";
        FaceLoginResult result = new FaceLoginResult("-1");
        redisTemplate.boundValueOps(getCacheKey(code)).set(result, 30,
TimeUnit.MINUTES);
        String strFile = qrCodeUtil.crateQRCode(url + "?code=" + code);
        return new QRCode(code, strFile);
   }
Service:
   public FaceLoginResult checkQRCode(String code) {
        String cacheKey = getCacheKey(code);
        FaceLoginResult result = (FaceLoginResult) redisTemplate.opsForValue().get(cacheKey);
        return result;
   }
(4)人脸检测/人脸登录:当用户扫码进入落地页,通过落地页打开摄像头,并且定时成像。将成像图片,通过接口提交给后端进行人脸检测。
/**
     * 图像检测,判断图片中是否存在面部头像
     */
    @RequestMapping(value = "/checkFace", method = RequestMethod.POST)
    public Result checkFace(@RequestParam(name = "file") MultipartFile attachment)
throws Exception {
        if (attachment == null || attachment.isEmpty()) {
            throw new CommonException();
       }
        Boolean aBoolean =
baiduAiUtil.faceCheck(Base64Utils.encodeToString(attachment.getBytes()));
        if(aBoolean) {
            return new Result(ResultCode.SUCCESS);
       }else{
             return new Result(ResultCode.FAIL);
       }
   }
(5)检测成功后,即进行人脸登录,人脸登录后,改变特殊标记状态值,成功为“1”,失败为“0”。当登录成功时,进行自动登录操作,将token和userId存入到redis中。
Controller:
@RequestMapping(value = "/{code}", method = RequestMethod.POST)
    public Result loginByFace(@PathVariable(name = "code") String code,
@RequestParam(name = "file") MultipartFile attachment) throws Exception {
        String userId = faceLoginService.loginByFace(code, attachment);
        if(userId == null) {
            return new Result(ResultCode.FAIL);
       }else{
            //构造返回数据
            return new Result(ResultCode.SUCCESS);
       }
   }
Service:
 public String loginByFace(String code, MultipartFile attachment) throws Exception {
        String userId =
baiduAiUtil.faceSearch(Base64Utils.encodeToString(attachment.getBytes()));
        FaceLoginResult result = new FaceLoginResult("1");
        if(userId != null) {
            User user = userDao.findById(userId).get();
            if(user != null) {
                Subject subject = SecurityUtils.getSubject();
                subject.login(new UsernamePasswordToken(user.getMobile(),
user.getPassword()));
                String token = subject.getSession().getId() + "";
                result = new FaceLoginResult("0",token,userId);
           }
       }
        redisTemplate.boundValueOps(getCacheKey(code)).set(result, 30,
TimeUnit.MINUTES);
        return userId;
   }
4.5.2 前端实现
前端主要实现的功能是,获取二维码并展示,然后后台轮询检测刷脸登录状态,并且实现落地页相关功能(摄像头调用、定时成像、发送人脸检测和发送人脸登录请求)
(1)二维码展现
	// 二维码
    handlecode() {
      qrcode().then(res => {
      this.param.qrcode = res.data.file
        this.centerDialogVisible = true
        this.codeCheckInfo = res.data.code
        setInterval(() => {
          if (this.states === '-1') {
          codeCheck({ code: res.data.code }).then(res => {
            this.states = res.data.state
            this.token = res.data.token
            if (this.states === '0') {
            // 登录
            this.$store
             .dispatch('LoginByCode', res.data.token)
             .then(() => {
                this.$router.push({ path: '/' })
             })
             .catch(() => {
             })
           }
            if (this.states === '1') {
              // 关闭
              this.centerDialogVisible = false
           }
         })
       }
       }, 1000 * 10)
     })
   }
(2)落地页调用摄像头
handleClick() {
      let _this = this
      if (!this.vdstate) {
        return false
     }
      if (!_this.states) {
        // 注册拍照按钮的单击事件
      let video = this.$refs['vd']
      let canvas = this.$refs['cav']
      // let form = this.$refs["myForm"];
      let context = canvas.getContext('2d')
      // 绘制画面
      context.drawImage(video, 0, 0, 200, 200)
      let base64Data = canvas.toDataURL('image/jpg')
      // 封装blob对象
      let blob = this.dataURItoBlob(base64Data, 'camera.jpg') // base64 转图片file
      let formData = new FormData()
      formData.append('file', blob)
      this.imgUrl = base64Data
      checkFace(formData).then(res => {
        if (res.data.isSuc) {
          axios({
            method: 'post',
            url: '/api/frame/facelogin/' + this.$route.query.code,
            data: formData
         })
           .then(function(response) {
              console.log(response)
              _this.states = true
              _this.canvasShow = false
              _this.tipShow = true
              // _this.$message.success('验证通过' + '!')
           })
           .catch(function(error) {
              console.log(error)
           })
       } else {
          return false
       }
     })
     }
   },
    dataURItoBlob(base64Data) {
      var byteString
      if (base64Data.split(',')[0].indexOf('base64') >= 0)
        byteString = atob(base64Data.split(',')[1])
      else byteString = unescape(base64Data.split(',')[1])
      var mimeString = base64Data
       .split(',')[0]
       .split(':')[1]
       .split(';')[0]
      var ia = new Uint8Array(byteString.length)
      for (var i = 0; i < byteString.length; i++) {
        ia[i] = byteString.charCodeAt(i)
     }
      return new Blob([ia], { type: mimeString })
   }
 }
4.6 总结
通过上述的步骤,可以实现一个刷脸登录的功能,其核心在于百度云AI的使用。通过合理的使用百度云AI SDK提供的相关API,我们可以很轻松的实现刷脸登录功能。刷脸登录的业务流程有很多种,我们只是实现了一种借助二维码的方式,作为抛砖引玉。更多的流程和实现方式,在此不进行赘述。

DAMO开发者矩阵,由阿里巴巴达摩院和中国互联网协会联合发起,致力于探讨最前沿的技术趋势与应用成果,搭建高质量的交流与分享平台,推动技术创新与产业应用链接,围绕“人工智能与新型计算”构建开放共享的开发者生态。
更多推荐


 3
3 0
0- 0


 已为社区贡献3条内容

所有评论(0)